Fdevans - New Reefer XL 300

fdevans

Community Member
View Badges
Joined
Sep 10, 2021
Messages
72
Reaction score
53
Location
Paso Robles
Rating - 0%
0   0   0
Official start of my build thread! Went to the LFS yesterday and place the deposit and order for the list below plus the usual extras. Tank will be mix of fish and corals.

Build:
- Red Sea Reefer XL300
- Reef Octopus Varios 6 DC Water Pump
- Red Sea - ReefWave 25 Gyre Flow Pump (2)*
- CaribSea Arag-Alive Bimini Pink Aquarium Substrate 60-80 lb
- Live Rock BTP (X) Lbs Over ~80 LBS
- Red Sea ReefLed 90 Light R35120 (20)
- Red Sea Reefer Skimmer 300
- 300w Aquatop Submersible Titanium Heater
- Red Sea DIY Aquarium Net Cover.

*These may be switched out before final purchase to something that integrates better with the Apex.

- Neptune APEXel
- Neptune Systems LDK Leak Detection Kit
- One additional water level sensor to notify on low ATO.

Next steps plan for preparations:
- Order RODI filters and Brute cans to build out a mixing station.
- See if there is a good spot for a QT tank as I'd like to quarantine the fish as they start arriving.
- Look for designs/plans for an electronics cabinet that will sit beside the tank rather than keeping them in the main cabinet.

Here's a photo from my pre-build thread (https://www.reef2reef.com/threads/nit-picky-tank-placement.858339/) discussion about placement. I've decided to go flat against the wall based on the reality check from @Isopod80 that dropping things and reaching behind it will be troublesome [unfortunately I don't have any children to drop in @workhz :)]

placement.jpg


I'll be sure to take more photos and post along the way.

Stocking plan


Definitely Want
- Yellow Watchman Goby + Pistol Shrimp buddy
- Paired Clown fish.
- Purple or Helfrichi Firefish
- Orchid Dottyback
CUC
- Serpent Star fish (I really like these)
- Cleaner Shrimp (will this go OK with Pistol Shrimp?)
- Emerald Crab
- Hermit Crabs and the other usual suspects.
(Anything I should stay away from???)

Still researching/considering
- Info on Wrasse that might be on the more passive side, but still nice to look at.
- Forktail Blenny. I read somewhere they are venomous?
- Cardinal fish.

Since it's only a 65 gallon tank I'm focusing on smaller passive fish and likely making the stars of the show the Clown pair and choosing a more exotic coloring pattern for them. (By choosing, I mean the girlfriend chooses) Corals, I like Zoas and Hammers for the color spectrum. Otherwise the world is my ocean... :p


QUESTIONS ROUND UP:
- Any issues with combining cleaner shrimp with pistol shrimp?
- How serious is the concern around Forktail Blenny being venomous?
- Any cleanup crew I should avoid with this tank/stock?
- Will the Red Sea net cover be sufficient to keep any aspiring dolphins in the tank?
- Are most cords long enough to reach into a neighboring electronics cabinet? It will be right next to the tank.
- Links to good Quarantine Tank building/running/storage threads?
- Wrasse suggestions that is an easy going tank mate?
 

blaxsun

10K Club member
View Badges
Joined
Dec 15, 2020
Messages
26,709
Reaction score
31,146
Location
The Abyss
Rating - 0%
0   0   0
Adaptive Reef makes a control panel that you may find works great for mounting your electronics in the right side of the cstand. You’re not running too much equipment, so it will be mostly housing things like power bricks and outlets. And yes, most equipment cords will be long enough to extend to a cabinet outside the stand if you choose to that route (for the odd component, you can get cheap 1-3ft extension cables on Amazon).

The Red Sea lid should be sufficient, but you may find that you need a finer mesh at some point if you end up with a lot of tiny jumpers.

The only wrasse that I’ve found that isn’t overly dramatic is a cleaner wrasse.
 

Ranjib

7500 Club Member
View Badges
Joined
Apr 16, 2016
Messages
9,843
Reaction score
17,058
Location
Pleasant Hill, Concord
Rating - 0%
0   0   0
Red Sea net should be sufficient. Both shrimps together is fine, since the pistol shrimp will burrow and have its own place. I am assuming you will have sand. That’s something to consider (bare bottom).
naoko wrasse or most wrasse within 3” should be fine,
 
OP
OP
fdevans

fdevans

Community Member
View Badges
Joined
Sep 10, 2021
Messages
72
Reaction score
53
Location
Paso Robles
Rating - 0%
0   0   0
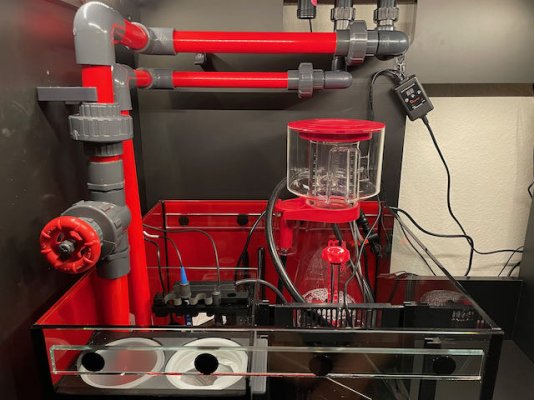
I am WAY behind in updating my build progress. I'll start approximately from where I left off. The tank and initial round of purchases arrived much sooner than anticipated. On September 17th "most" of the order was ready at my LFS. Picked up what I could and dove into building the cabinet and planning for all the next steps.

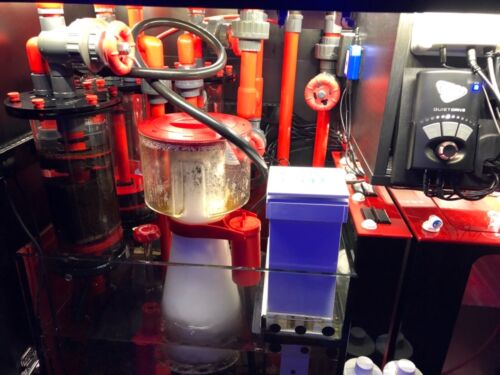
I'll take this moment to say I was more than inspired and used many ideas originating from @Butuz and their build. (They get all the credit for the coolness factor). The cabinet was outfitted with the suggested LED lights, and I painted the sump similarly for hiding wires and general aesthetics. (I'm a big black and red combo fan)

IMG_5277 2.jpeg

IMG_5284 2.jpeg

IMG_5287 2.jpeg


Since not quite everything came in at the same time, once the cabinet was finished and the tank placed on top I shifted my focus to the mixing station. But placement was looking good!
 
OP
OP
fdevans

fdevans

Community Member
View Badges
Joined
Sep 10, 2021
Messages
72
Reaction score
53
Location
Paso Robles
Rating - 0%
0   0   0
The item that wasn't anywhere on my original budget but likely should have been was the Quarantine tank. I had to laugh when I told my partner "Yeah, buying a big tank means you have to have at least one more small one..." (she just rolled her eyes)

Since it wasn't on my original plan and I didn't even know where I was going to put a second tank I went with an All-In-One 20 Gallon Tall setup from Aqueon that would be easy to place wherever in the house would accommodate it. Upgraded the heater to an Aquatop and added an Ink Bird monitor to help prevent disasters. I painted the bottom and back and grabbed a few pieces of artfully designed white PVC pieces and was ready to roll. At this point I was still waiting for quite a bit more for the main tank, but I was keen on getting QT started for my first swimming friend. (More on the first fish and fish plan in a post below)

Things I learned from this part of the build:
  • Plan for a QT tank in your budget. Overall, having the QA and making sure I wasn't putting the main tank at risk definitely out weighed the extra cost.
  • Plan for a QT tank spot as well. It needs all the same general ideas of the main. Electricity, not near bright sunny windows, be somewhere you'll be able to keep an eye on the fish, etc.
IMG_5420.jpeg


IMG_5411.jpeg

IMG_5421.jpeg
IMG_5481.jpeg
 
OP
OP
fdevans

fdevans

Community Member
View Badges
Joined
Sep 10, 2021
Messages
72
Reaction score
53
Location
Paso Robles
Rating - 0%
0   0   0
Since the QT tank was up and running and I settled on a QT plan of 3 weeks I got the first fish on Oct 2nd. Blue Sapphire Damselfish was chosen as a starter because they were available, inexpensive (in case I made a mistake), and rumored to be tame versus other Damsels. After an Instagram poll it was named Azul.

IMG_5496.jpeg


The remaining fish plan is: (roughly in this order)

Yellow Watchman Goby with Tiger Pistol Shrimp*
(2) Frostbite Clowns
Orchid Dottyback
Bangai Cardinal
Helfrichi Firefish

That's a total of 7 in my 65 gallon display. From my research that is likely the upper limit, but opinions vary. I'd be open to one more, but not sure. Comments welcome, passive, reef safe fish only.

*Actually got the YWG and shrimp last weekend so the fish is in QT now. The shrimp I'm wondering if I'll even see it again after putting it in the main tank (No QT due to copper treatment). Hopefully the YWG will seek him out and encourage him to be social. Another post on that later.
 
OP
OP
fdevans

fdevans

Community Member
View Badges
Joined
Sep 10, 2021
Messages
72
Reaction score
53
Location
Paso Robles
Rating - 0%
0   0   0
We left the tank at cabinet assembled, and tank placed on top. (I didn't even take the plastic off the tank for quite a while) There was still quite a bit of work left:

I wanted to paint the sump as I was very inspired by @Butuz as mentioned above. That went well with the exception of the first can of paint exploding and leaking all over my hands.
IMG_5476.jpeg

IMG_5752.jpeg


9A968783-17A6-414F-8D42-6192A9AA0F7B 2.jpeg

IMG_5502.jpeg

IMG_5505.jpeg


I wanted to replace the included plumbing for both aesthetics and functional reasons. Red Sea's plumbing comes metric, therefore adding anything later would likely require more complicated efforts down the road. This step I made a major mishap and hastily ordered the parts I thought I needed while at a kids football game. I got the sizes all wrong and didn't know it until they arrived. After dealing with returns/re-orders, etc. we were a few weeks down the road before I even got a chance to start cutting and gluing. Multiple trips to the local plumbing store that has nice, high-quality schedule 80 fittings, and the underneath was looking great!

IMG_5527.jpeg

IMG_5548 2.jpeg

Things I learned from this part of the build:
  • Painting with Red PlastiDip takes a LOT of coats. I was adding coats over the course of 2 days and likely had to get up to 10-12 to get a solid enough red color. I'm honestly not sure if I'd paint it again... The PlastiDip ends up with a rough surface so managing magnetic holders (Tunze 3155 mounts, Apex sensor magnets, etc are hard to move around on the rough surface)
  • Don't order size specific things without being VERY sure it's the right size. ReOrdering takes time and restocking/shipping back costs extra wasted funds. (Suggestion for the larger online retailers... why not have packages for "Convert your Reefer to SAE" as ready to buy sets?)
  • The gate valve upgrade over the included Reefer valve has been nice. The level of fine tuning required to enable "silent mode" is seems much easier with the upgraded valve.

Once that was all done we were ready to plan the logistics of the "Very Big Day".
 

Attachments

  • IMG_5527.jpeg
    IMG_5527.jpeg
    98.8 KB · Views: 56
OP
OP
fdevans

fdevans

Community Member
View Badges
Joined
Sep 10, 2021
Messages
72
Reaction score
53
Location
Paso Robles
Rating - 0%
0   0   0
"Very Big Day"

As part of the main LFS purchase I opted to go with Live Rock over dry rock. Shortening the cycle time was a big bonus and they have a lot of rock on hand to choose through. Before I could think about the aquascaping I had to make sure I had enough water to fill-'er-up when I got home. I had already been making water and had a few buckets, but total volume is 80 gallons and 1 Brute (full to the brim) is 32 gallons. I bit the bullet and bought one of the 44 gallon cans I mentioned before. Along with a few other 10 gallon bins I planed to use for maintenance task I started crunching salt a few days ahead of time. After getting each batch to 1.024sg I let each batch process for 12-16 hours before I moved it to the next holding spot and started over again. To keep the water moving I placed some cheap power heads and small utility pumps in the other containers while they waited for the "Very Big Day".

Since the rock needs to stay wet, and I didn't want to lug a bunch of rock back and forth (I don't live close remember) the LFS was open to letting me do the aquascaping at the shop. I made a cardboard template and scoured the aquascaping forum for ideas/inspirations before I went.

I was at the store for probably 4-5 hours trying different things, getting "unfiltered opinions", and trying to incorporate all the things I'd learned in my research about designing an aesthetically pleasing and fish pleasing landscape. When I was finally at a stopping point I had 3 distinct structures and I marked them with colored zip ties and took lots of pictures in the hope of re-crafting it all over again at home. I threw in quite a few other small and medium rocks that weren't in the store built structure just for good measure. There were also a few late additions of dry rock they had that were flat, base pieces that would help the structure be much more stable.

On suggestion from the LFS I had purchased some silicon hot pads on Amazon, but stopped on the way home to get more as the rock foot print was much more than I expected.

Once home it seemed like the process started all over again in the garage so I could try to secure the rock stacks a bit before placing in the tank. While I had the right rocks in generally the right spots thanks to the colored zip ties, they just didn't seem to fit together the same anymore. "It's OK" I thought. I have this single stick of epoxy that should help everything... NOPE. I had little to no luck getting the rocks to securely hold together with the epoxy and I was running out very quickly. By this time it was getting close to 7pm so all the stores were closed to get advice or more epoxy. I decided I'd just go with gravity and come back to securing the rocks later in the week. Risky, but they had been out of water for quite some time now and I didn't want to lose all the bio benefits I had paid for and gone the extra effort to achieve.


With a bit of help from the girlfriend I got started placing everything in the tank and it went better than the garage attempt. This was definitely the most stressful part. I don't know that I've read about that here anywhere, but the biggest learning (as I mention below) was that placing rock into the tank was (so far) the most stressful part of this hobby. Worrying that I could make one small move and crack something I'd been working towards for so many months took, while rocks are still choosing their own, all new plan for how they want to fit together was tough. But it all came together and I was able to carefully drop in the sand and start filling it with the hoards of salt water I'd spent all week making. This was the most satisfying part of the day for sure. Watching that water slowly fill the tank, spill over into the sump and finally be able to turn on everything was double cheers worthy. (cause I was definitely drinking a beer by then)

IMG_5565.jpeg


IMG_5578.jpeg

IMG_5579.jpeg


IMG_5583.jpeg

IMG_5586.jpeg

IMG_5588.jpeg

IMG_5593.jpeg

IMG_BF7E4BDA354F-1.jpeg

Things I learned on this "Very Big Day"

  • IT CAN BE A MAJOR TEST IN PATIENCE. There were a few times when I was putting it in the actual tank that things weren't going smoothly and I had to really reel it in to make sure I didn't make a terrible mistake inside the glass.
  • Having an extra Brute dedicated and on wheels (I got some of the brute wheels that are made for those cans) has been very helpful.
  • Don't have too strict of a picture in your head before staring the aquascape. You never know how the rocks will be shaped, or how they will fit together.
  • Even when you think you have it built, if you have to take it apart, it won't go back together the same way so see the previous note and continue to be flexible on the design.
  • Epoxy stick alone will not keep your rocks together. Use epoxy to make the gap fill in well then use super glue to adhere it solidly.
  • If you're doing live rock plan for a "Very Big Day".
  • Using silicon hot pads under the base rock pieces (Walmart had them) made me feel much better about putting them in the tank.
  • The only stable rock is the one on the bottom, and even that's not for sure.

*Still more posts to come in next few days.
 

Butuz

Valuable Member
View Badges
Joined
Jul 4, 2018
Messages
1,117
Reaction score
1,711
Location
The Woodlands, TX
Rating - 0%
0   0   0
We left the tank at cabinet assembled, and tank placed on top. (I didn't even take the plastic off the tank for quite a while) There was still quite a bit of work left:

I wanted to paint the sump as I was very inspired by @Butuz as mentioned above. That went well with the exception of the first can of paint exploding and leaking all over my hands.
IMG_5476.jpeg

IMG_5752.jpeg


9A968783-17A6-414F-8D42-6192A9AA0F7B 2.jpeg

IMG_5502.jpeg

IMG_5505.jpeg


I wanted to replace the included plumbing for both aesthetics and functional reasons. Red Sea's plumbing comes metric, therefore adding anything later would likely require more complicated efforts down the road. This step I made a major mishap and hastily ordered the parts I thought I needed while at a kids football game. I got the sizes all wrong and didn't know it until they arrived. After dealing with returns/re-orders, etc. we were a few weeks down the road before I even got a chance to start cutting and gluing. Multiple trips to the local plumbing store that has nice, high-quality schedule 80 fittings, and the underneath was looking great!

IMG_5527.jpeg

IMG_5548 2.jpeg

Things I learned from this part of the build:
  • Painting with Red PlastiDip takes a LOT of coats. I was adding coats over the course of 2 days and likely had to get up to 10-12 to get a solid enough red color. I'm honestly not sure if I'd paint it again... The PlastiDip ends up with a rough surface so managing magnetic holders (Tunze 3155 mounts, Apex sensor magnets, etc are hard to move around on the rough surface)
  • Don't order size specific things without being VERY sure it's the right size. ReOrdering takes time and restocking/shipping back costs extra wasted funds. (Suggestion for the larger online retailers... why not have packages for "Convert your Reefer to SAE" as ready to buy sets?)
  • The gate valve upgrade over the included Reefer valve has been nice. The level of fine tuning required to enable "silent mode" is seems much easier with the upgraded valve.

Once that was all done we were ready to plan the logistics of the "Very Big Day".
Just saw this. Awesome job, love it!
 

Butuz

Valuable Member
View Badges
Joined
Jul 4, 2018
Messages
1,117
Reaction score
1,711
Location
The Woodlands, TX
Rating - 0%
0   0   0
I am WAY behind in updating my build progress. I'll start approximately from where I left off. The tank and initial round of purchases arrived much sooner than anticipated. On September 17th "most" of the order was ready at my LFS. Picked up what I could and dove into building the cabinet and planning for all the next steps.

I'll take this moment to say I was more than inspired and used many ideas originating from @Butuz and their build. (They get all the credit for the coolness factor). The cabinet was outfitted with the suggested LED lights, and I painted the sump similarly for hiding wires and general aesthetics. (I'm a big black and red combo fan)

IMG_5277 2.jpeg

IMG_5284 2.jpeg

IMG_5287 2.jpeg


Since not quite everything came in at the same time, once the cabinet was finished and the tank placed on top I shifted my focus to the mixing station. But placement was looking good!

thanks for the shout out! your build looks awesome.
 

Butuz

Valuable Member
View Badges
Joined
Jul 4, 2018
Messages
1,117
Reaction score
1,711
Location
The Woodlands, TX
Rating - 0%
0   0   0
Btw, if your RSR skimmer is making sucking type of noise, let me know. i have designed and 3d print replacement air chambers for their skimmer, reduces the db a ton. The details are under the listing below.


Algae invading algae: Have you had unwanted algae in your good macroalgae?

  • I regularly have unwanted algae in my macroalgae.

    Votes: 21 35.0%
  • I occasionally have unwanted algae in my macroalgae.

    Votes: 14 23.3%
  • I rarely have unwanted algae in my macroalgae.

    Votes: 5 8.3%
  • I never have unwanted algae in my macroalgae.

    Votes: 5 8.3%
  • I don’t have macroalgae.

    Votes: 14 23.3%
  • Other.

    Votes: 1 1.7%
Back
Top