- Joined
- Mar 1, 2019
- Messages
- 205
- Reaction score
- 333
After hours and hours of playing with different 3D designers, I am calling it quits. Google Sketchup was perfect for me, except it continues to crash... I will have to do the best that I can to explain my build through pictures and details. I honestly can't wait any longer and I am ready to get my ideas out there so I can begin addressing current problems, and finding new ideas from others!
I guess by starting off I can send pictures of what I am already working with. Please, do not be alarmed. No aquatic life has been housed in this aquarium, and nor do I intend to house anything in it currently. It's basically a sleeping giant as of the moment. I move to a new apartment in July, and I am hoping to have a plan together and all of my equipment sourced out to be ready to go on the day I make my move. That way I can get everything up and cycling on the first day when I move in. I plan to begin cleaning and packing things up over spring break, which is next week. So, things are moving pretty quickly and I want to be as proactive as I can. Anyway, here are the pictures of my current situation.


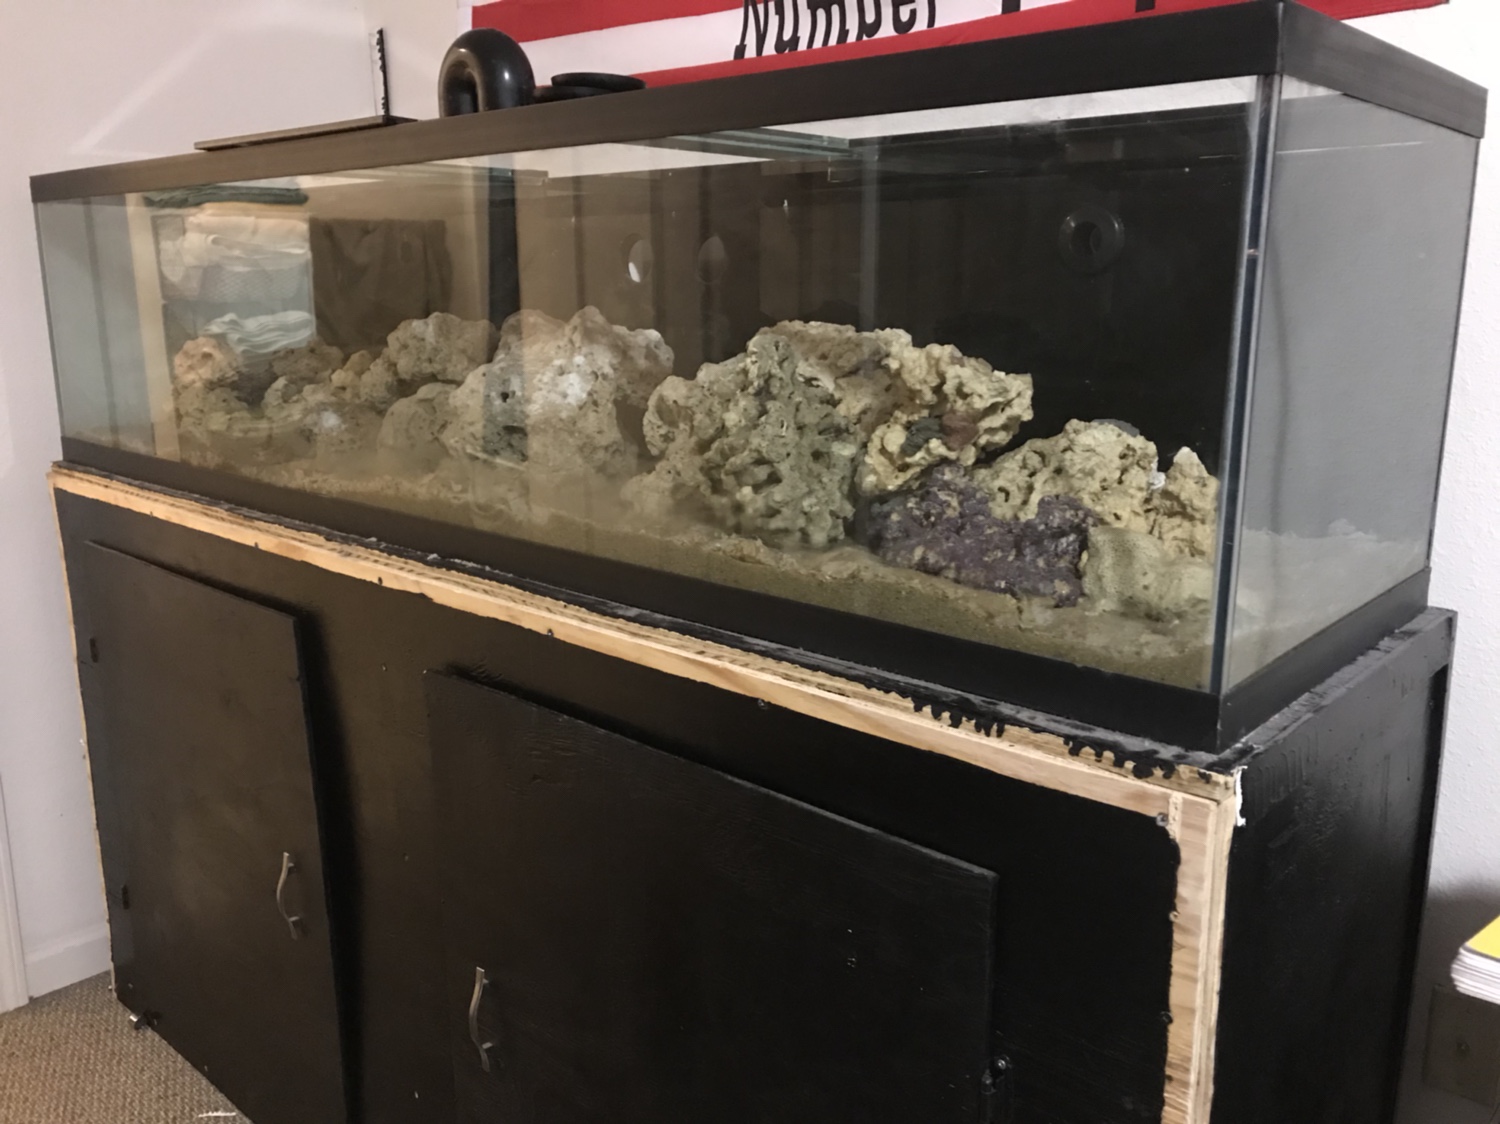
As you can see, it is quite a mess. This big boy is measured out to be:
72"L x 18"W x 17"H
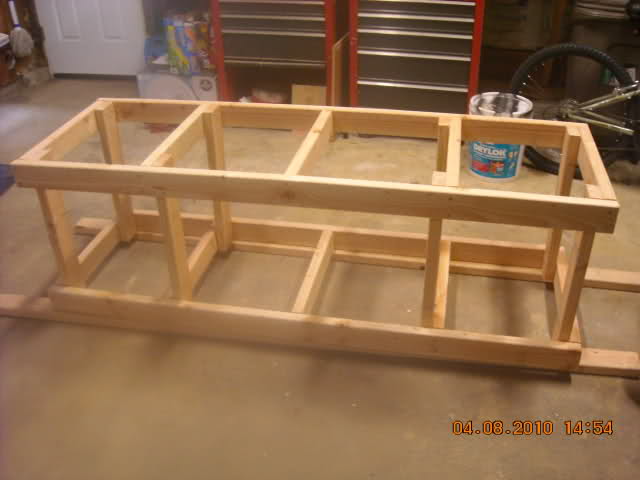
The first problem that I would like to address is the stand. It was a DIY project by my Stepfather and I, and just see so many problems. One problem being possible over-engineering, or just lack of coordination when putting it together. Also, it is a very tight fit and hard to work around in. Not to mention that we did not even use sanded plywood.... oh, and do not let me forget that money was wasted on buying all the wood treated. It went about expected for someone's first DIY stand build. I can say this though, she has held!
I want to create a new stand, and I am willing to salvage anything from the old one if need be. The old stand is comprised of entirely 2x4. Everything being screwed in. I have researched and researched, and I think I have finally found a design that I am willing to go with, I will post a picture of it below.

This design or a variation of it seems to be floating all across the internet. I like it because it is simple. Here's how I envision it going for my build.
Red railing on top: 2x6" lumber (72" in length)
Blue cross boards on top: 2x6" (15" in length)
Purple uprights in the middle: 2x4" (25" in length)
Green uprights within the base: 2x4" (8" in length)
I will wrap everything in 3/4" plywood, or less if over-engineered.
*All boards of like color are the same*
I would like to have the plywood fitted, to where there are no gaps. I also have no experience with glue or pilot hole drilling. From my understanding this build may require that. I would also like to have doors, that aren't as sketchy as these ones currently on it. If possible I would like to implicate a separate section for storage/hide equipment/or to house an outlet source away from direct water splashing to connect all of my electronics. This stand must also be able to house a 55G sump (48" x 13" x 21") and I would like to not be cramp while working in it. I plan to cut a section out of the back plywood panel that is at least 13", that way the plumbing can come to and from the sump with ease, and I can get ventilation. I would also like to have a canopy that has openings with handles that I can open and close. I plan to house at least a 5 gallon bucket of RO/DI water to connect to an ATS that I already have. I will paint the stand and canopy matte black, or something of the sort.
I know I am not offering much in the way of ease here, but I am not much of a carpenter. However, if I can get pointed in the right direction I will be able to get it done. I have basic knowledge of tools and how to use them.
As far as particulars go, you can see that I have a Synergy overflow box which wide opens gets around 2500 GPH, roughly 17x my tank's total volume. I need to cut some old pumping out because I am going to redo it and make it cleaner when I move. I use the bean overflow system in my overflow, for those who do not know I will post a link to a video explaining what exactly that is.
Finally got my return pump out and it is a Eheim Compact+ 5000 Pump. Honestly do not remember why I went with this pump, I think it is mainly due to at the time I believed in Eheim products religiously. My heater is also a 200W Eheim Jager.
As far as water flow in the tank, I went with a Comline Wavebox 6208. I liked the idea of one even flow of water, however I would be lying if I said I wasn't worried if somehow this contraption could end up breaking my tank....
I'm also going to go with 3 coral moonbox LED+. My tank's depth is actually lower than a lot of Nano tank's depth. If I keep them more centered, I believe we will do just fine, with areas pof low light being to the outside. Might be fine all the way around honestly. I want to invest in a PAR meter anyhow.
My salt of choice is E.S.V. B-ionic seawater. Link posted below for anyone interested.
I test my salinity via MA887 DIGITAL SEAWATER REFRACTOMETER - MILWAUKEE
https://www.marinedepot.com/E.S.V._...ef_Salt_Mix-E.S.V.-EV4113-FISM-EV4113-vi.html
I have quite a bit to do, and I still need to research some of this stuff. I haven't even decided on a skimmer. I want efficiency, over brand name when possible. Unless brand name offers the go to deal or product. So, any suggestions are welcome! I can't thank everyone enough who has helped me. I hope you'll be more than willing to continue to do so. Also, I managed to find some original pictures, I will post them below as well. I'm not sure if I have left anything out, although I just remembered to ask if anyone knows if there is a specific test kit used for E.S.V. or can I go with the API kit? Anyway, I hope I haven't discombobulated anyone, because figuring out how to tackle all of this has discombobulated me, haha.


I guess by starting off I can send pictures of what I am already working with. Please, do not be alarmed. No aquatic life has been housed in this aquarium, and nor do I intend to house anything in it currently. It's basically a sleeping giant as of the moment. I move to a new apartment in July, and I am hoping to have a plan together and all of my equipment sourced out to be ready to go on the day I make my move. That way I can get everything up and cycling on the first day when I move in. I plan to begin cleaning and packing things up over spring break, which is next week. So, things are moving pretty quickly and I want to be as proactive as I can. Anyway, here are the pictures of my current situation.
As you can see, it is quite a mess. This big boy is measured out to be:
72"L x 18"W x 17"H
The first problem that I would like to address is the stand. It was a DIY project by my Stepfather and I, and just see so many problems. One problem being possible over-engineering, or just lack of coordination when putting it together. Also, it is a very tight fit and hard to work around in. Not to mention that we did not even use sanded plywood.... oh, and do not let me forget that money was wasted on buying all the wood treated. It went about expected for someone's first DIY stand build. I can say this though, she has held!
I want to create a new stand, and I am willing to salvage anything from the old one if need be. The old stand is comprised of entirely 2x4. Everything being screwed in. I have researched and researched, and I think I have finally found a design that I am willing to go with, I will post a picture of it below.
This design or a variation of it seems to be floating all across the internet. I like it because it is simple. Here's how I envision it going for my build.
Red railing on top: 2x6" lumber (72" in length)
Blue cross boards on top: 2x6" (15" in length)
Purple uprights in the middle: 2x4" (25" in length)
Green uprights within the base: 2x4" (8" in length)
I will wrap everything in 3/4" plywood, or less if over-engineered.
*All boards of like color are the same*
I would like to have the plywood fitted, to where there are no gaps. I also have no experience with glue or pilot hole drilling. From my understanding this build may require that. I would also like to have doors, that aren't as sketchy as these ones currently on it. If possible I would like to implicate a separate section for storage/hide equipment/or to house an outlet source away from direct water splashing to connect all of my electronics. This stand must also be able to house a 55G sump (48" x 13" x 21") and I would like to not be cramp while working in it. I plan to cut a section out of the back plywood panel that is at least 13", that way the plumbing can come to and from the sump with ease, and I can get ventilation. I would also like to have a canopy that has openings with handles that I can open and close. I plan to house at least a 5 gallon bucket of RO/DI water to connect to an ATS that I already have. I will paint the stand and canopy matte black, or something of the sort.
I know I am not offering much in the way of ease here, but I am not much of a carpenter. However, if I can get pointed in the right direction I will be able to get it done. I have basic knowledge of tools and how to use them.
As far as particulars go, you can see that I have a Synergy overflow box which wide opens gets around 2500 GPH, roughly 17x my tank's total volume. I need to cut some old pumping out because I am going to redo it and make it cleaner when I move. I use the bean overflow system in my overflow, for those who do not know I will post a link to a video explaining what exactly that is.
Finally got my return pump out and it is a Eheim Compact+ 5000 Pump. Honestly do not remember why I went with this pump, I think it is mainly due to at the time I believed in Eheim products religiously. My heater is also a 200W Eheim Jager.
As far as water flow in the tank, I went with a Comline Wavebox 6208. I liked the idea of one even flow of water, however I would be lying if I said I wasn't worried if somehow this contraption could end up breaking my tank....
I'm also going to go with 3 coral moonbox LED+. My tank's depth is actually lower than a lot of Nano tank's depth. If I keep them more centered, I believe we will do just fine, with areas pof low light being to the outside. Might be fine all the way around honestly. I want to invest in a PAR meter anyhow.
My salt of choice is E.S.V. B-ionic seawater. Link posted below for anyone interested.
I test my salinity via MA887 DIGITAL SEAWATER REFRACTOMETER - MILWAUKEE
https://www.marinedepot.com/E.S.V._...ef_Salt_Mix-E.S.V.-EV4113-FISM-EV4113-vi.html
I have quite a bit to do, and I still need to research some of this stuff. I haven't even decided on a skimmer. I want efficiency, over brand name when possible. Unless brand name offers the go to deal or product. So, any suggestions are welcome! I can't thank everyone enough who has helped me. I hope you'll be more than willing to continue to do so. Also, I managed to find some original pictures, I will post them below as well. I'm not sure if I have left anything out, although I just remembered to ask if anyone knows if there is a specific test kit used for E.S.V. or can I go with the API kit? Anyway, I hope I haven't discombobulated anyone, because figuring out how to tackle all of this has discombobulated me, haha.