Finally, my build thread...

OP
OP
K-Philly

K-Philly

Active Member
View Badges
Joined
Mar 1, 2019
Messages
205
Reaction score
333
Rating - 0%
0   0   0
This stand is in serious need of beefing up... Right now you have a lot of the weight being supported by screws. I would put some 2x4s in the corners vertically between the top horizontal 2x4 and the bottom horizontal 2x4. A lot of a tank's weight is concentrated around the edges of the tank, and while your vertical 2x4s do go from the ground up to the full height of the stand, you have no "tank to ground" support unless your tank is a true flat bottom tank (which it doesn't look like it is...)
Thanks for the advice! I have not built the stand you quoted. It was just a thought of mine, to possibly use as a reference.
 

Pntbll687

Valuable Member
View Badges
Joined
Oct 4, 2017
Messages
2,100
Reaction score
2,617
Rating - 0%
0   0   0
Looks like some progress going on, which is always good.

If you keep the sand, you're going to need to thoroughly rinse it. Would probably be easier to start with new sand or go bare bottom.
 
OP
OP
K-Philly

K-Philly

Active Member
View Badges
Joined
Mar 1, 2019
Messages
205
Reaction score
333
Rating - 0%
0   0   0
Looks like some progress going on, which is always good.

If you keep the sand, you're going to need to thoroughly rinse it. Would probably be easier to start with new sand or go bare bottom.
I think it would be much easier to get new sand, like you recommended. I believe that was pool filter sand from home-depot. I am going to look and compare prices.
 
OP
OP
K-Philly

K-Philly

Active Member
View Badges
Joined
Mar 1, 2019
Messages
205
Reaction score
333
Rating - 0%
0   0   0
Thank you for sharing the in-depth (no pun intended) build thread. I'm loving every minute and update brought to your thread.

Please continue the updates/progress description and pictures.
You got it! Somebody can surely learn something from this build! I wish I was more confident in my carpenter skills as I am my reefing ones. I think I have decided on lights. Going with the Reefbreeders Coral Moonbox LED +, and going to get a 5% discount since I plan on buying 3. With my tank dimensions, those lights should be able to handle most anything I decide to grow. I got to thinking while cleaning though, I am worried that if I don't properly aquascape then there will be no room for tangs or fish of the sort.
 
OP
OP
K-Philly

K-Philly

Active Member
View Badges
Joined
Mar 1, 2019
Messages
205
Reaction score
333
Rating - 0%
0   0   0
http://reefcentral.com/forums/showthread.php?t=1169964

Finally found the original thread, and I think I’m overthinking it. But I have a plan that I want to execute when I can. I’m going to scrap my old stand, and take what I can use for my new stand.

2b6f38f78da9276e3a70e2c25340d542.jpg


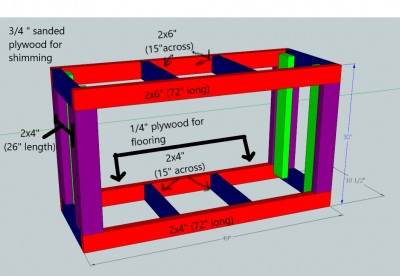
My top will be made out of 2x6. The legs will be 2x4 and the bottom frame will be 2x4. I will put 3/4” plywood on the top of the tank. I will also wrap the tank in 3/4” unless 1/4” will do. Plywood in the bottom as well.

Can some kindly explain to me exactly how the wood gluing would work? From my understanding it works with your screwing. What exactly is pilot screwing as well and where would this be done on the stand? I’m almost there as far as understanding the concepts of this.
 
OP
OP
K-Philly

K-Philly

Active Member
View Badges
Joined
Mar 1, 2019
Messages
205
Reaction score
333
Rating - 0%
0   0   0
Alright, time for another research posting thread and I will have several videos along with a possible link to go with this thread. I believe that it will help a lot of people new to the world of carpentry or woodworking as it were, to better understand some things. I also wanted to pull everything that I have found into one spot so that I can use this post as a quick reference when planning things out. I am also hoping that someone might be able to clear up a question or two that I might still have.

A little terminology to begin with:

Hardwood: Considered heavier and more dense than softwoods. Used in applications such as walls, ceilings, and floors. Species include but are not limited to: Oak, Maple, Mahogany, Cherry, Walnut and Teak.

Softwood: Lighter and less dense than hardwoods. Used in applications such as doors, furniture, and window frames. Species include but are not limited to: Pine, Hickory, Ash, Birch, and Cedar.

*Review lumber defects along with pictures to better understand grades*

Hardwood Grades:
  1. First and Second (FAS): Highest grade, high-quality furnishings. Solid wood mouldings and interior joinery. 83% usable material on one face (minimum 6x8" board size).
  2. Select (Sel): Similar to FAS grade. 83% usable material on one face (minimum 4x6" board size).
  3. #1 Common (#1 Comm): 66% usable material on one face (minimum 3x4" board size).
  4. #2 Common (#2 Comm): 50% usable material on one face (minimum 3x4" board size).
Softwood Grades:
  1. C select: Almost completely free of all defects; commonly used for cabinets and interior trim.
  2. D select: Comparable to C select, but many contain small knots (no bigger than the size of a dime).
  3. #1 Common: Contains small, tight knots that won't fall out; offers a high-quality knotty appearance.
  4. #2 Common: Very similar to #1 common, but with slightly larger knots.
  5. #3 Common: Larger knots that are found in #2 common, typically used for crates, boxes, and fences.

Grain and board terminology:
  1. Vertical grain: Most stable grain.
    images
  2. Rift sawn: 45 degrees on growth ring. (Moderately stable)
    upload_2019-3-8_0-53-6.jpeg
  3. Slab grain: Coarse, 90 degrees to short side of board (weak)
    upload_2019-3-8_0-56-2.jpeg
  4. End grain: Part of cut where the pathways of the adsorbent part of wood is exposed. Absorbs more material such as glue. Makes a bonding surface weaker if not "plugged" first.
    upload_2019-3-8_0-59-15.jpeg
  5. Face grain: The wide side of a board, and a better bonding or adhesive surface.
    upload_2019-3-8_1-1-57.jpeg

  6. Heart: Area of the board that makes it weaker structurally, especially when cut.
    images
Distortions of lumber:

upload_2019-3-8_1-9-32.jpeg


Crook can also be identified as crown, and need to be placed upward if applying.


Understanding Load in Lumber
  1. Depth of Structural members. For example, 2x10" joists spread 24" provide a stronger and stiffer assembly than 2x8" of same grade and species that is spaced 16".
  2. E = Value of elasticity. Which is the ratio of amount of load that causes material to deform. The higher the E-value, the stiffer the material.
  3. Fb = Value of extreme fiber stress in bending. The Higher the Fb-value, the stronger the wood.
  4. Lumber Grade = Measure of E-value and Fb-value which are both concurrent with each other.
  5. Duration of load. Does not effect E-values.
Basic Aquarium stand build:

Common joint used in stand building:

In-depth look how creating butt joints:

Information on Screws:

Wood screws and pilot holes:


Woodworking Glue:

Pocket hole joinery:

Selecting a finish:

Why aquarium trim is important:

*I do not own nor claim to own any videos or the information provided. I just found them and collected them to one place in order to make a centralized area to gather information. All credit goes to the creators of the videos.*

There it is, I may include other things such as canopy top building, or adding cabinets to a stand but I feel this is a good start. Regarding my concerns, once I get my tank cleaned up I am going to try and post some pictures of my silicon work. To me my tank looks just fine and stable, but I did buy it off a person who got it from Glass Cages. They did not like the euro-bracing, and after watching the trimming video it has raised some concerns for me. But for now, I won't worry. Also, I would like to salvage some of my 2x4" boards from the old stand. I was wondering if screws that were already drilled into the board might cause a problem, even after I remove them. I am going to review some of this information, and draw up some plans to post here. I might actually go ahead and just get the tank completely cleaned and then removed from the stand. Break the old stand down, and then go ahead and build my new stand over break. I feel like that would be a great milestone for me.

Almost forgot the link below! Credit goes to rocketengineer!

https://www.fpl.fs.fed.us/documnts/fplgtr/fplgtr113/ch04.pdf

upload_2019-3-8_1-5-28.jpeg
 
Last edited:
OP
OP
K-Philly

K-Philly

Active Member
View Badges
Joined
Mar 1, 2019
Messages
205
Reaction score
333
Rating - 0%
0   0   0
Plans for stand.png
So, finally figured out a way to more accurately represent what I was thinking. From my understanding, as long as I go with 2x6" on top and run all 8 of the 2x4" uprights (purple) then I wont need any vertical supports. If I were to do a vertical support, it would be on the backside in the middle. Supposedly, if I use a combination of pilot holes and wood glue then I won't need the inner green braces. They are suppose to help make the stand square. Please disregard the thinner lines below and to the right of the stand. That's from a previous design that is not mine.
 
OP
OP
K-Philly

K-Philly

Active Member
View Badges
Joined
Mar 1, 2019
Messages
205
Reaction score
333
Rating - 0%
0   0   0
https://www.bulkreefsupply.com/x-120-axium-space-saving-g4-protein-skimmer-eshopps.html

Looking at going with this skimmer seeing as it will be a long time before I need something bigger. Don't want to mess up the foam and it will work along with other forms of filtration. Cost efficient too with good reviews. My first chamber's water level is at 10" though, probably 10 1/4" including water going over the baffle. I'll need to find something to set this skimmer on top of.
 

GTPoker

New Member
View Badges
Joined
Feb 15, 2019
Messages
18
Reaction score
32
Rating - 0%
0   0   0
How much did your wood cost you? Also how much are those lights you're talking about? When's the move?
 
OP
OP
K-Philly

K-Philly

Active Member
View Badges
Joined
Mar 1, 2019
Messages
205
Reaction score
333
Rating - 0%
0   0   0
IMG_2103.jpg

So, it has been a little while since I have updated my thread. With the newly announced Tunze giveaway, I figured that now would be a good time!

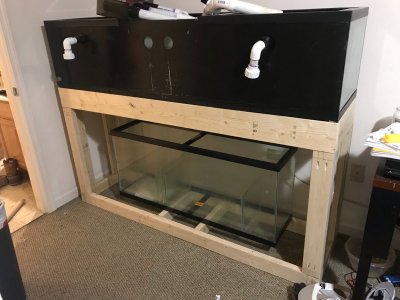
Obviously, I got the stand frame all put together. It isn't perfect, but I can honestly say it is much better than the last one we built! I am actually pretty proud of the job I have done. Took about two days to get together and I did not end up having to cut a single board! The hardware store handled that for me. Still looking into paint and sealant. I want to be sure I know what I am doing before I start that. Also, in case you were wondering why the tank is sitting on the stand backwards, it is because I plan to clean it up. I would like to repaint that as well. Considering a different route though, and I would love some opinions! My original plan was to do the stand and canopy in a glass-like black, that would basically enclose around the tank, that also had a black background. In turn, making all the colors pop! However, I have read some cases of others possibly using a shade a blue on the back of the tank instead. How do we feel about this?

I may have changed my mind on Eshopps skimmer to this certain Reef Octopus Skimmer. The link below will take you to it. They are both the same price so I figured why not get the Reef Octopus instead, since I am more familiar with it.

https://www.bulkreefsupply.com/reef-octopus-classic-150int-6-internal-protein-skimmer.html

I also am making a switch to another return pump. I will use my current Eheim as a backup. My goal is to have around 3x the turnover rate in my sump, with 5x being my max threshold. I am trying to fit my return pump's GPH as close to my skimmer's GPH as possible, while also having the ability to upgrade. In my humble opinion, I feel that when you get into the 10x range it can be overkill. The skimmer may not be able to get the friction it needs from organic waste in order to efficiently clean the water. Due to the fact that the pump on the skimmer can not keep up with the pull of water that is created by the pump of the return. That is probably why most people get the "bubbling out" or random overflows from their skimmers. That's just my two cents, and something that I have picked up on from articles and videos I have seen.

What I like about this Reef Octopus return pump, is that it gives me what I need and the ability to ramp up with a skimmer upgrade. Both of which I think come at a fair price. I will probably run it a notch up from what would be considered "equal" to my skimmer's GPH, just to be sure I make up for the head loss due to plumbing angles. Do any of you find it efficient to run two return pumps, each on their own return line? Personally, I feel that may be a bit overkill unless you knew that the tank would be stationary for a long period of time say like 3 years or more. I plan to do full maintenance on most of my equipment via vinegar soak every 6 months or so. I would like to believe that would cut the percentage down of possible equipment failure, which I know is not always predictable. Anyway, here is the link to the pump!

https://www.bulkreefsupply.com/varios-2-controllable-dc-pump-792-gph-reef-octopus.html

Plan to do a small tuneup on my Comline wavebox! Apparently, they have upgraded the controller since I have purchased my box. It now has an optional night mode that will ramp down to lowest settings. From my understanding, this works by a sensor that you attach near your lights. When the sensor detects "darkness" it will ramp down the box. When your lights come on again, the sensor detects it and will then return the box back to the original settings made by the user. I like mimicking the actual ocean as much as possible, so this caught my attention fairly quickly. I feel the more natural that I can make it, the better off the tank will be. However, I have had a lot of trouble finding any reviews on this new controller and the night mode feature. I asked BRS if the box could is apex controllable, and basically they told me that the manufacturer said yes, however it is a pain in the butt to set up this way. Maybe some of you have some insight! Here's the link:

https://www.bulkreefsupply.com/wavecontroller-7090-tunze.html

As far as some current building goes, I am planning to either sell or trade my current sump. Some of you may have seen it posted on other forums such as ones that are local to my area. I feel that it is way to oversized, and a 40G would have a much wider footprint. For me, the smart and efficient choice would be to go back to the drawing board and design a new sump out of a 40G. One that includes a refugium of course.

I want to make a switch on lights as well. The AI Prime HD is literally only a couple of bucks more, and I want to try 3. I realize 4 would be the more popular opinion, however I would like to state a few things concerning my tank first. But like always, I am open minded to what anyone has to say! My tank is a 100G long, and the very top of the tank measures at 17". Even at 6ft, these lights would not need to penetrate as far down. They could reach more further out and at stronger intensities. I would try to run them 6" off of the water level. I plan to paint the inside of the canopy white, and I might as reflective white as possible. Just to give those wavelengths a little more push. I want to run about a 2" sand band, which would lift any corals on the very bottom, even further up. I still have options with these lights as well. I could place any SPS higher up on the rock, or later down the road if I wanted to I could just invest in another fixture. But with proper placement and ensuring water clarity, I really do have confidence that these lights will grow most anything I need it to. Thoughts on that are welcome as well!

I am currently trying to negotiate a deal on an Apex classic controller. Comes with all the standard items except for the display module. Which if I get it, purchasing the display module will still be more cost efficient than a brand new apex system. So, my fingers are currently crossed! I know controllers are definitely not necessary, and I know most people like them so that they can check them from their phone. Honestly, I like them because it actually logs data. I can then see tank trends and match them to whatever variable that I might have changed. There are some controllers out there that I have found that do not actually log the data, but just give current readings. One other controller I was interested in was the Seneye controller that has the built in PAR meter. But it seems like after you replace the data cards repeatedly, you would just be better off buying a brand new controller.

As far as PAR meters, somewhere down the road I hope to purchase this one.

https://www.bulkreefsupply.com/usb-smart-quantum-par-sensor-apogee.html

Finally, and this topic is really important to me. I want to know what everyone's personal opinion is on QT(s) and UV sterilizers. Here are my thoughts. If I can find a reliable LFS that I know for certain quarantines all new arrivals, and run a UV sterilizer on my system, I would surely be okay. However, if I don't do that then I should probably run a QT which does help ensure my tank's safety, but will cost additional money and space. What are y'alls thoughts on efficiently protecting your reef? I still have not decided on a fool-proof plan yet and need more input.

After doing some more research on salt mixes, I think I am going to move away from ESV B-Ionic and over to the Read Sea Coral Pro. I think that this salt will be much more easier for me to handle and will prolong me needing anything such as a magnesium reactor if one day my reef was large enough to need one. Until then I feel the elements contained in this salt will suit me just fine and I can battle any loses by doing routine water changes, and it is more cost efficient.

Once again, I apologize for the long post! Hopefully these will get shorter and more precise as I begin sourcing out equipment. I always appreciate the feedback and help from the community! Please, if you have a different way of doing things then be my guest and post it! It will only encourage my brainstorming! On top of that, I am willing to do any waiting that I must when it comes to my setup. I rather wait a little longer and try to set it up right the first time, than to battle it once it is up and running!
 

count krunk

Valuable Member
View Badges
Joined
Jul 17, 2017
Messages
2,316
Reaction score
4,243
Location
ATL, GA
Rating - 0%
0   0   0
i was going to suggest pocket screws and wood glue! glad to see you went that route. I built the frame for my 40 breeder out of 2x2"s with 1/2" ply top and bottom and 1/4" ply for the sides and front. it is super strong and MUCH lighter due to 1/4" and 2x2"s.

As for QT, some do. some don't. I don't. To not, you need to feed good healthy food. live food whenever you can and IMO run UV or ozone. It also helps to start with mature rock. You can click on my link and see some build threads where the user QT or does not QT and their method.
 
OP
OP
K-Philly

K-Philly

Active Member
View Badges
Joined
Mar 1, 2019
Messages
205
Reaction score
333
Rating - 0%
0   0   0
i was going to suggest pocket screws and wood glue! glad to see you went that route. I built the frame for my 40 breeder out of 2x2"s with 1/2" ply top and bottom and 1/4" ply for the sides and front. it is super strong and MUCH lighter due to 1/4" and 2x2"s.

As for QT, some do. some don't. I don't. To not, you need to feed good healthy food. live food whenever you can and IMO run UV or ozone. It also helps to start with mature rock. You can click on my link and see some build threads where the user QT or does not QT and their method.
When you say live food, are you referring to Copepods? I will have a refugium to support them, and hopefully get somewhat of a colony established in the tank.

I agree with the weight, it is so much more lighter than my old stand. It is put together much better as well. Gotta love the feeling of when you impress even yourself!

I hope you don't mind if I post an update below for everyone to see, even if I am replying to you. I don't see the need to make two posts, haha.

As far as updates go, I secured the Apex classic! Should be here by next Thursday and I plan to get it reset, and test it to be sure it operates as it was sold! The person I did business with was extremely helpful and generous, so I am certain that it works just fine. The deal was done over Ebay, and the seller could not get me videos. We discussed the possibility of the lab grade PH probe being defected, and they lowered the price of the overall unit in case that were true. I was mainly after the base and outlet unit anyhow. They had great reviews, and normally I do not like doing certain business without being present. However, there was a chance I could have missed a great opportunity. It'll work out, and if it doesn't then I'm sure the world isn't going to end!

My studies have gotten pretty heavy, because I had to put off some school due to pneumonia. If I can get some of that out of the way, I may possibly go pick up a 40G breeder this weekend from Petco, since they recently were doing the dollar per gallon sell. Hopefully, I can design and build a new sump out of this. Still need to get rid of my 55G sump though.
 
OP
OP
K-Philly

K-Philly

Active Member
View Badges
Joined
Mar 1, 2019
Messages
205
Reaction score
333
Rating - 0%
0   0   0
I have some more brainstorming and researching to do, so I figured tonight I would switch it up. I have a good feeling that this post will get quite a few replies, which is what I am hoping for! For tonight's topic, I would like to ask everyone's opinion on livestock! I am certain that a lot of my aquatic critters will depend heavily on how strategic I am when designing my aquascape! I am open to most anything, other than overly aggressive and non-reef safe of course! Just to kick it off, I would like to give everyone my thoughts on what I was contemplating on keeping!

I like different, but all the while I feel like some things are best left the same.

I know for certain that I would like a Spotted Green Mandarin and a Red Dragonet. I would be sure to design the rockwork to where these guys would have plenty of sand space to booger about and not be on top of each other. I would also be sure that the tank has reached a stable point before even thinking about purchasing them, and that I have also obtained a healthy amount of pods to sustain a colony.

What's a reef without clownfish? Love those guys! I am undecided between several different species which are: the Lightning Maroon, Yellowstripe Maroon, Red Saddle, Domino, and the Black/White Ocellaris!

Love the tangs too! As far as the go I am pretty certain I want a blue or a yellow. The only way I will try a powder blue, is if I do in fact build a QT tank and am capable of getting him on a very balanced diet. The tank would most definitely have to display some very stable parameters. I want this guy to be set up for success to not just survive in my tank, but to live happy and healthy! Less stressed he is, the less stressed I am. I plan to look into some other species as well.

I will most definitely be after a red serpent starfish!

Of course, we want the goby and pistol shrimp pair. Has anyone had any luck with this relationship with other species of gobies other than the Yellow Watchman?

There are way to many Wrasses to name! So definitely still looking into that!

I can't say these are all %100 because I am still deciding. Let me know what y'all think and feel free to offer suggestions! I would really like to hear what some of y'all think as far as inverts go.
 

Freshwater filter only or is it? Have you ever used an HOB filter on a saltwater tank?

  • I currently use a HOB filter on my reef tank.

    Votes: 28 29.8%
  • I don’t currently use a HOB filter on my reef tank, but I have in the past.

    Votes: 15 16.0%
  • I have used a HOB on fish only or quarantine tanks, but not on the display tank.

    Votes: 25 26.6%
  • I have never used a HOB on a saltwater tank.

    Votes: 24 25.5%
  • Other.

    Votes: 2 2.1%
Back
Top