Bravo1xray

Community Member
View Badges
Joined
Feb 21, 2022
Messages
29
Reaction score
14
Location
Denver CO
Rating - 0%
0   0   0
Hello all!! I followed a few threads on this tank (sorry I don’t recall the OP) but I really liked it. So I decided to give it a try. This will be my first full build including the stand, sump and drilling the tank. Always looking for feed back and ideas so please share!

I currently have a 26 AIO that has thought me so much thus far. It’s been a whirl wind of tests and experience. Here’s a pic of it up and running. Still adding and learning more of the hobby.
DBA769C0-A799-49E1-9E60-3CCDA56AAE0B.jpeg
 
OP
OP
B

Bravo1xray

Community Member
View Badges
Joined
Feb 21, 2022
Messages
29
Reaction score
14
Location
Denver CO
Rating - 0%
0   0   0
Ok as I was starting this project I wasn’t thinking about doing a full write up on it. There will be some missing pieces here and there but if you have any questions I’ll be happy to answer them.

I decided to build my own stand. There were a few builds on here that I really liked but were way over my abilities and were down right beautiful. I wanted a open design so the sump would be a part of the visual experience. I found one on Pinterest that looked plenty sturdy and easy enough to make. So I went with it. Mostly 2x4 stud and 1/2 plywood. I added a few different things to make it a little more furniture like.
61CE228D-F30F-4791-B2C5-B2D3BC77F18D.jpeg
C1255396-E0B7-429B-AEB2-B921466E5EA2.jpeg

225C6B76-AD74-4DD0-AE31-E92681CAA6F2.jpeg
A7B95DFA-C28A-43BF-8C07-0EF2D7F66361.jpeg
 
OP
OP
B

Bravo1xray

Community Member
View Badges
Joined
Feb 21, 2022
Messages
29
Reaction score
14
Location
Denver CO
Rating - 0%
0   0   0
My original plan was to use a 20L for the sump. I wasn’t sure if it had the volume to hold the tank water if there was a power outage or equipment failure. Plus it just looked so small in that huge opening.
070E8881-D632-4DB4-9A87-2644972BF881.jpeg
 
OP
OP
B

Bravo1xray

Community Member
View Badges
Joined
Feb 21, 2022
Messages
29
Reaction score
14
Location
Denver CO
Rating - 0%
0   0   0
As I completed the work on the stand I was looking for options for the sump. I finished the exterior with some molding and trim pieces. Then the interior I installed some faux brick backing to add some texture to the interior.
D556632F-681B-474F-9AFC-3D7229DDB9D4.jpeg
180873F7-8526-44F6-90B9-120DB959BA08.jpeg
A70D0C93-A025-4757-8B97-AC2CA671AC23.jpeg
 
OP
OP
B

Bravo1xray

Community Member
View Badges
Joined
Feb 21, 2022
Messages
29
Reaction score
14
Location
Denver CO
Rating - 0%
0   0   0
After several coats of Paint in Command Center gray paint the stand is complete!
3F3EB115-9508-4B0C-B172-DBA52A4F84FB.jpeg

852F1255-0EB0-49D6-AD38-4A236732562D.jpeg

321C45CE-3532-4EF4-AD45-A5FE1304A197.jpeg


The 20L just didn’t look right.
 
OP
OP
B

Bravo1xray

Community Member
View Badges
Joined
Feb 21, 2022
Messages
29
Reaction score
14
Location
Denver CO
Rating - 0%
0   0   0
So after doing some research I did find a 30 breeder would be perfect. But they have been discontinued and I could not locate one anyway. I looked on the Petco website and at the time the 40b was on their 50% off sale and was $59 if I recall. So I went down and picked one up!
063E560D-F92E-478C-AC01-7BE6B20C6A2F.jpeg


Its a little tall but I think we can make it work!
 
OP
OP
B

Bravo1xray

Community Member
View Badges
Joined
Feb 21, 2022
Messages
29
Reaction score
14
Location
Denver CO
Rating - 0%
0   0   0
While at ReefStock in Denver I spoke to many of the vendors and came up with a plan for the return pump and plumbing. I went with a Siccie SDC 7.0 for the return (way over kill in hindsight). After fiddling with the plumbing for a few days I finally got it to a place that for now
I’m happy with. After several trips to Home D and Ace we got it together!! I’ll kinda go over the parts that I used as we go along. Stay with me!
 
OP
OP
B

Bravo1xray

Community Member
View Badges
Joined
Feb 21, 2022
Messages
29
Reaction score
14
Location
Denver CO
Rating - 0%
0   0   0
I picked up the Eshopps Prodigy M for the drain. 1” down to the sump and 1” overflow. I decided the dual 1/2” returns would work just fine. Here we go! Time to drill holes in my glass tank!
6AF98906-D422-4B5D-93A2-271066B588A6.jpeg

BBEE218F-A134-4DFF-926D-1DFD4803C7D4.jpeg
D042C2FF-F164-4477-B06B-BA16C11E774F.jpeg
427CD10C-3969-4713-BE6F-532749FCF8B8.jpeg
 

Attachments

  • 622A6645-6748-4A28-B61E-0BDC90591CC8.jpeg
    622A6645-6748-4A28-B61E-0BDC90591CC8.jpeg
    165.3 KB · Views: 99
OP
OP
B

Bravo1xray

Community Member
View Badges
Joined
Feb 21, 2022
Messages
29
Reaction score
14
Location
Denver CO
Rating - 0%
0   0   0
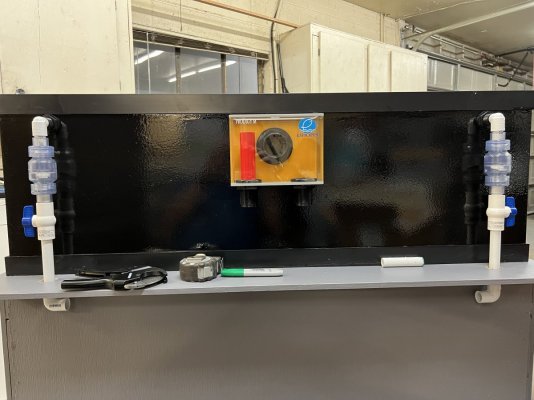
From BRS I picked up the 1/2” bulkheads and back flow valves. HD and Ace had just about everything else. I used flexible tubing for the drains and hard lines to the returns. The return is 1” till it gets to the “T” as it exits out the back of the stand.
D6A17AA3-700C-4773-B0DC-A64E5E70EBA1.jpeg
F6C4B117-07AD-4E25-B7E8-EC93271202AD.jpeg
0069A0B7-7003-4A4B-A624-633A9F08E44D.jpeg
 
OP
OP
B

Bravo1xray

Community Member
View Badges
Joined
Feb 21, 2022
Messages
29
Reaction score
14
Location
Denver CO
Rating - 0%
0   0   0
Ok time to fill and test for leaks! Here goes nothing!
A84F99AC-2341-45C3-9CC9-E988B0906C53.jpeg

Everything worked and no leaks! I let it run for about two days and it all checked out. I did find out that the Eshopps Prodigy has some design flaws and makes it very difficult to “tune” the system. The red tube supplied is not long enough and the overflow box doesn’t have enough height to really stop the Gurgling from the wier box. I did put a taller piece of 1” pvc in but now we are danger close to the top of the overflow box.
 
Last edited:
OP
OP
B

Bravo1xray

Community Member
View Badges
Joined
Feb 21, 2022
Messages
29
Reaction score
14
Location
Denver CO
Rating - 0%
0   0   0
Funny I didn’t get one pic of me building the aqua scape! Grrrr!
I bought 55lbs of Marco rock and 4 medium bases from BRS. After watching their videos and taking their advice of 1.5-2lbs per gallon it was way too much at 55lbs! Like 20-25lb too much! Lol but now we have some extra for the next tank I guess. I used the super glue and 2 part epoxy method. It took me about 3 days to complete and most of that was curing time. Here are the pics that I do have of the scape.

2002D427-6A3C-4DCF-9BA6-87CCB6AD8703.jpeg
ADA60A4C-E773-49E3-93A0-E311C807DAEC.jpeg


As you can see it went through a few changes and placement ideas. Here is the pretty much final look.

7B7CF374-6828-44E4-AEDB-FB39CAB0118B.jpeg
4B2525E4-31D0-453F-9138-D58E07127FD5.jpeg
 
OP
OP
B

Bravo1xray

Community Member
View Badges
Joined
Feb 21, 2022
Messages
29
Reaction score
14
Location
Denver CO
Rating - 0%
0   0   0
The sump was the next to get work done. As I said Previously I went with the 40 breeder. And after watching some more YouTube University I came up with doing a baffle-less sump. I bought a piece of glass and cut it to fit to make my ATO Reservoir. Came out pretty clean and holds just about 6 gallons.

9355918C-1016-494E-9E13-C116442B3148.jpeg


the heater and return pump fit nicely next to the glass partition.

6FCD1F92-9AD5-4E9A-970B-7012B5DC5F12.jpeg


The black stuff is Aquamesh from BRS and it’s the xtra corse to make my partitions and chambers for the future refugium, filter fleece roller and skimmer.

A06B37FF-4C0C-41F4-B5FF-9608E7CB3C84.jpeg
B4D5D8C0-079A-4EEF-9A76-04873B0F3E1B.jpeg


A nice thing about the Aquamesh is that I can move it around to make size changes as the tanks needs change.
 
OP
OP
B

Bravo1xray

Community Member
View Badges
Joined
Feb 21, 2022
Messages
29
Reaction score
14
Location
Denver CO
Rating - 0%
0   0   0
After calling a few buddies and ordering some pizza we wrestled the tank into its final resting place.

228ECD6E-730B-4718-8F09-480491735384.jpeg


It sat like this for a day or two so I can be sure that this is how I want it to look and I needed to go to work! Lol

Im happy with it and the scape so next is wiring it all up!
 
OP
OP
B

Bravo1xray

Community Member
View Badges
Joined
Feb 21, 2022
Messages
29
Reaction score
14
Location
Denver CO
Rating - 0%
0   0   0
There is so much wiring that gets done and the sucky part is that I don’t have all the parts. So I got done what I could. I have enough to get it cycled so let’s roll with it. I add stuff as I pick it up.

649032A6-A6D8-40F3-933A-A09F38CB6935.jpeg
908EF6F9-6E1D-44D8-BAC8-8BE34DC130D0.jpeg


the white round things are Amazon Wi-Fi switches and timers. They work pretty awesome if you’re looking for some.
 
OP
OP
B

Bravo1xray

Community Member
View Badges
Joined
Feb 21, 2022
Messages
29
Reaction score
14
Location
Denver CO
Rating - 0%
0   0   0
And here we are pretty much today. It’s been filled and running about four days now. I ran it a full 24hrs with a filter sock to catch most of the stuff in the sand and rocks after filling it and heat up the water. Tossed in a bottle of Dr. Tim’s one and only and dosed some Ammonia. Just waiting for it to cycle now!!

C705D148-32D0-4AAB-A59F-526387F4C73D.jpeg

For now I’m running a pair of AI prime 16hd. I know it’s a bit under lit but for now they will work fine as there are no corals or fish yet. So we will add something more down the road.
 
OP
OP
B

Bravo1xray

Community Member
View Badges
Joined
Feb 21, 2022
Messages
29
Reaction score
14
Location
Denver CO
Rating - 0%
0   0   0
Oh and a shout out to TwzteD’s thread. It was his that I couldn’t recall in the beginning. If you haven’t looked at his build thread please go check it out. Amazing work!!
 

Tentacled trailblazer in your tank: Have you ever kept a large starfish?

  • I currently have a starfish in my tank.

    Votes: 7 36.8%
  • Not currently, but I have kept a starfish in the past.

    Votes: 3 15.8%
  • I have never kept a starfish, but I hope to in the future.

    Votes: 6 31.6%
  • I have no plans to keep a starfish.

    Votes: 3 15.8%
  • Other.

    Votes: 0 0.0%
Back
Top