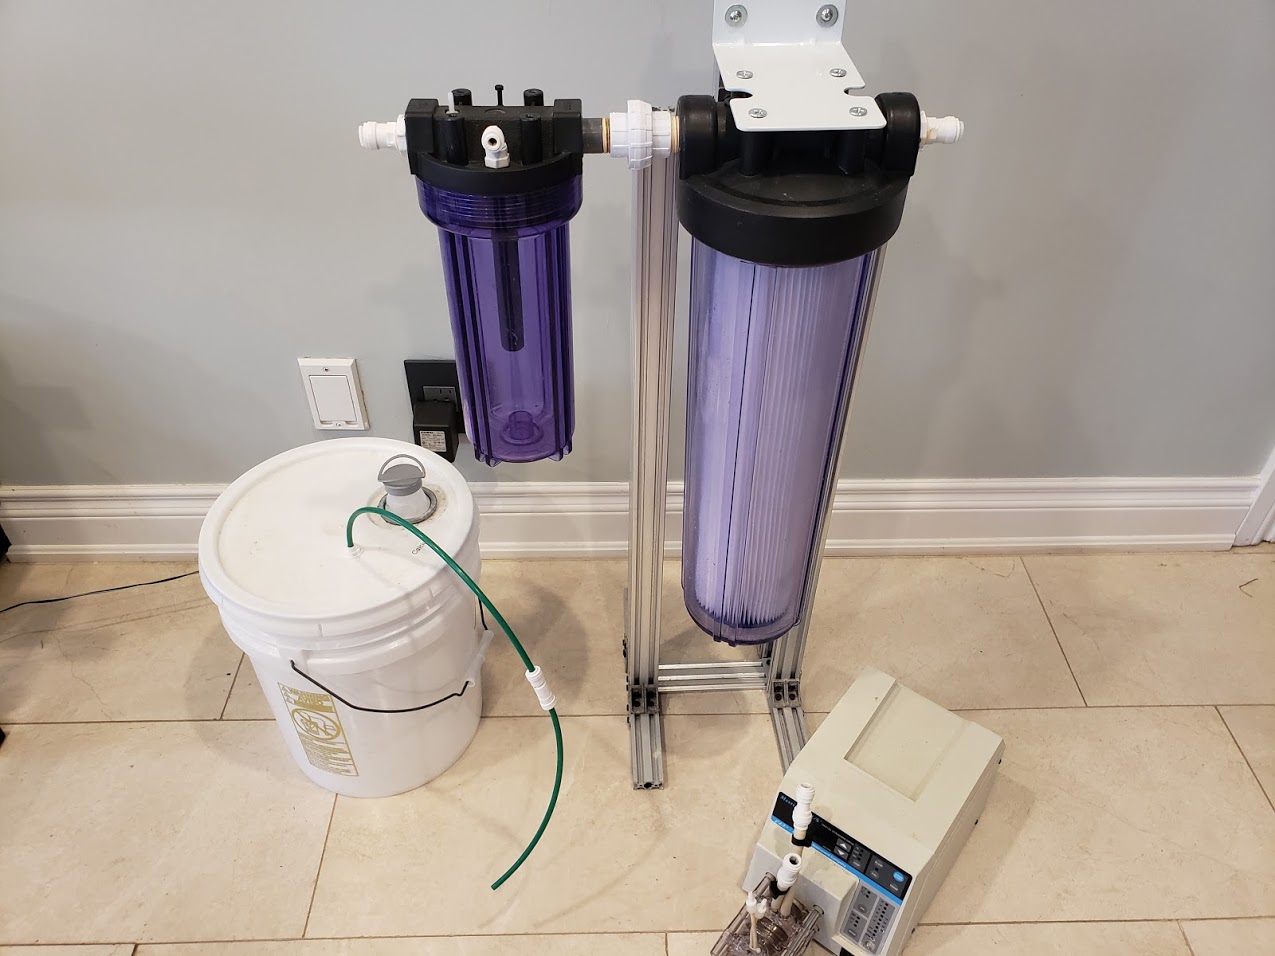
I decided to push ahead and rework the filter to the final version, or close to it. I started looking to see what extrusion parts I could build a stand from, then I realized I had a perfectly good stand integrated into my original glass bead based filter. So I disassembled the glass bead version as it will not be needed. The cartridge version with peristaltic pump(s) works for longer periods of time anyway. Though switching to a peristaltic pump to feed the glass bead version may have extended it's running time, but oh well.
I estimate the 5 gallon reagent bucket will last 30 - 40 days between refills. I am filtering 10% of the system water through the filter per day and dosing approximately 0.25ml of ATM Agent Green per day.
The only enhancement I am considering, is adding a magnetic spinner to the bottom of the reaction chamber to make sure the water where the reagent is dripping is well mixed. The nub on the bottom for the canister housing is giving me reason for pause. Perhaps a glass plate to sit on the nub and provide a slippery surface for a stir bar. The will be a larger gap than I would normally prefer, but I can probably make it work.
The magnetic stirrer might be overkill. I will wait and see if I notice any impact on alkalinity.
Looking good. Have you noticed any precipitate starting to build up on the pleated filter ?
If you get a moment, can you snap a photo of the barb/fitting you are using to connect to the LS13 tubing ? We just used the smallest barb we could find, but would prefer to do a more proper/secure long term setup.
Not really on the precipitate front. I was pulling the PO4 down slowly as my corals get really annoyed as they have been acclimated to the high PO4, and my nitrate is always super low (0.5 - 1.0 ppm). My target is for nitrate to be 1.0 - 5.0 ppm and PO4 0.08 - 0.10 ppm once I get the bound PO4 depleted. After having the filter off for the past 2 weeks, my reading today was 0.38 ppm. When I had the test filter last running, it was 0.19 ppm, so it pretty much doubled without the constant consumption of the filter. I swapped pleated filters and started with a new one and am soaking the used one in water with vinegar to release any LaPO4 in any case.
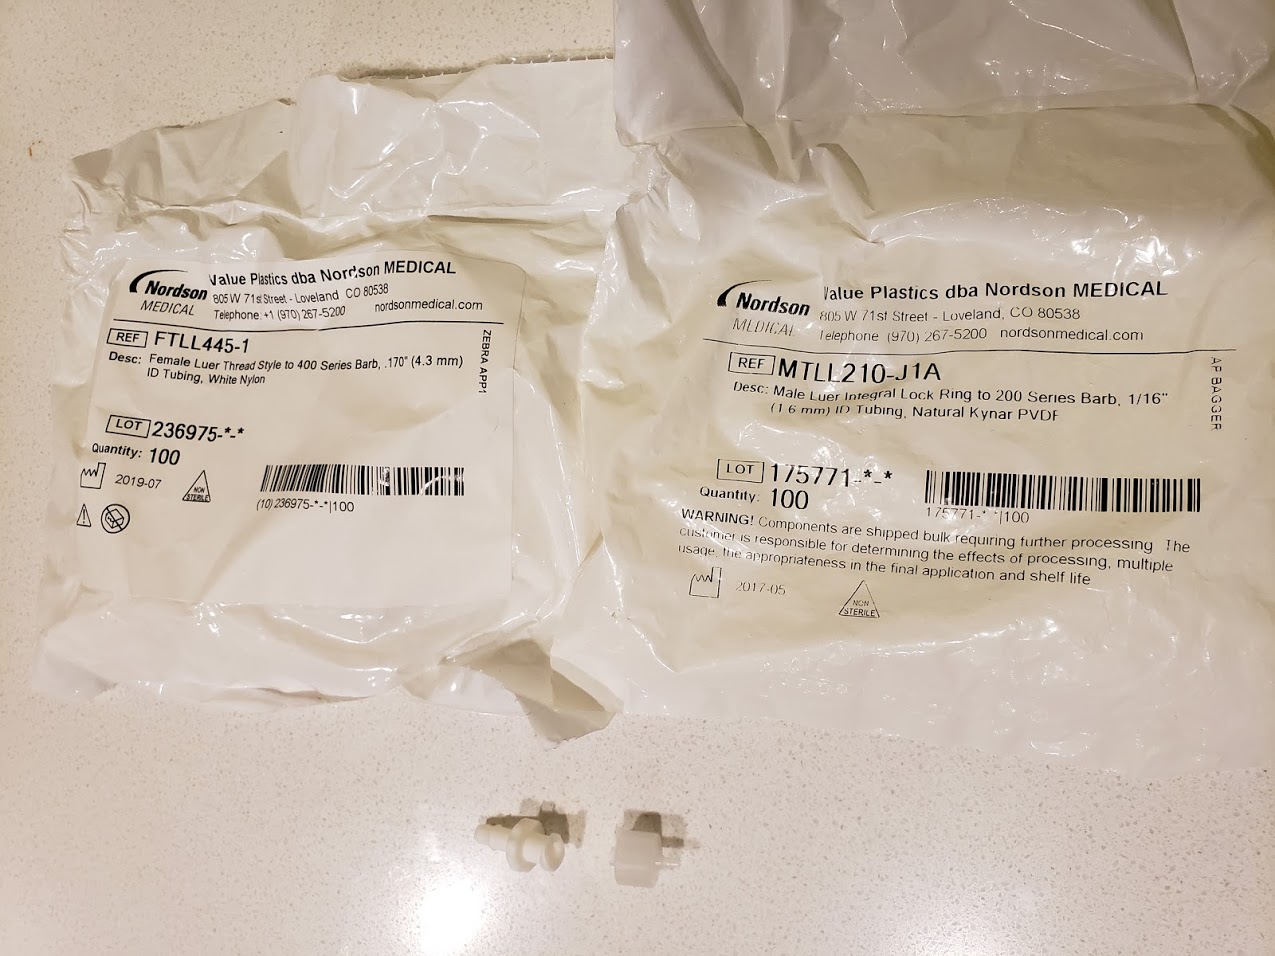
On the connector front, I got tired of purchasing connectors from US Plastics as they are expensive and have a limited selection. So I went and found a medical supplier that has a broad range of sizes and can be reasonable if you purchase the connectors 100 at a time.
The bag and connector on the left fits the typical 1/4" plastic tubing that we use. These tubes normally have a .170 internal diameter. The barbs push into the tubes with not too much effort and go to a female luer fitting.
The bag and connector on the right is 1/16" barb to a male luer connector. I have some smaller barb fittings than these, but the Masterflex site lists 1/16" as the hose barb size for the LS13 tubing, so I went with those.
I was worried about finding a hose clamp small enough to fit the LS13 tubing, but the friction fit on a 1/16" barb appears to be sufficient to keep a good seal.
Quick update. I still have the filter running. I noticed the pleated filter must be clogging and causing back pressure. I had the Masterflex set to 100 ml/min and the effluent started to slow down. I don't see any particles on the pleated filter though. I know there are Lanthanum Phosphate flocs being formed though. I see them caught in the surface tension of the mixing canister and settled to the bottom as well.
Just to confirm the efficacy of the filter, I measured the tank water and the effluent from the filter. Tank water was 0.349 ppm and the effluent was 0.073 ppm. So that is a pretty decent drop. I am starting to think the Reborn I have in my CalRx might be contributing to the phosphate load.
I have increased the flow to 120 ml/min through the filter and will monitor.
Good to hear. We have turned up our flow rates to help make a larger dent in our po4 levels. We are now flowing about 137 gallons per day through the reactor. Have to refill the 5 gallon jug every 2 days. Levels are .36 in and .01 out. I think another 4-6 months and we should hopefully get them lowered to where they need to be.
We had to replace the LS13 tubing yesterday after noticing the LaCl solution wasn't going down. The inside of the tube was clogged, which is understandable given how small the orifice is. 3 months isn't bad, considering we had ordered a 50 foot roll on Ebay for about $10.
This morning's reading is 0.304 ppm for the tank. So the increase of 20% in flow to 120ml/min did drop it. I am out of the ATM product (finally), so I will be switching to the TLF version (Phosphate-L) on the next refill. The TLF one asks to be diluted 1:2, but I will just use it undiluted for this purpose. It should provide a +15% boost in the LaCl strength as a result. I am looking forward to seeing a drop in the tank level as a result.
I am busy exploring another change to my LaCl setup. The need to clean the pleated filters prompted me to experiment with multiple settlement stages with the hope that the filter could be eliminated. It did not work out, but I did confirm that the Hanna is sensitive to precipitate suspended in the water column, so not a complete waste of time.
I was about to order the parts to build a 6" PVC filter washing apparatus, to make cleaning the filters easier, but while disassembling my failed settlement stages test, I noticed how much pressure can build up when the filter in the final stage is plugged. I always suspected this was the case when using a peristaltic pump, I can now confirm that pressure does increase markedly.
This got me to thinking about my previous glass bead filter. It was super easy to clean as it only required a backwash, but the time between cleaning was too short. Partly because the glass bead filter was only in a 10" x 2.5" filter cartridge, and that I was using a high flow pump to feed it and prematurely clogging the glass beads as a result.
So I am going to build a new glass bead filter based on a 20" x 4.5" Big Blue sized filter housing that I am using with the pleated filter. This will dramatically increase the filter surface area and should increase the time between cleanings. I am going to be using 3-way ball valves to make the plumbing and routing super compact compared to my previous serpentine design. I will also be adding an IFM Effector pressure sensor to track the back pressure as the filter media clogs. I have been thinking these pressure sensors would be perfect for this type of task, but was concerned with possible contamination with water (regardless of how high I mount it to keep an air gap
), so I have ordered some Plast-O-Matic PVC gauge guards that use a diaphragm to protect against contamination.
The re-fill-able filter cartridge will take about a month to get here, so results will take awhile. I expect to eventually have 2 of the Big Blue canisters integrated into the design, with 1 online and the other in standby waiting to be swapped in, to allow the in-use one to be back flushed, and then become the standby unit waiting for the next swap.
I think the combination of the slower flow of the peristaltic pump and the feedback on the current back pressure will allow the glass bead filter to achieve good results. Lets see.
The canister cartridge showed up today. The first thing I did was unpack it to check what screening it used on it's ends. I was hoping for a molded in grating with close spaced slits, to retain the glass beads, but instead I found that each end had a woven filter cloth as part of its end cap and bottom cap. Crap, that would clog in a heartbeat when exposed to LaCl precipitate.
I did notice that on the inside, there appeared to be a very fine mesh screen. I grabbed an X-acto knife and checked to see if I could cut out the woven filter and just leave the screen. While doing that I found the way to disassemble the bottom cap and was able to remove the woven filter while leaving the mesh screen in place. But, upon doing this I discovered the fine filter screen is made of metal, most likely stainless. It might be OK for freshwater, but will most likely not be saltwater safe. That will have to be replaced.
So I have ordered a couple meters of 150 micron nylon filter mesh from China. Now I have another month or so of waiting for that to arrive.
I finally got around to re-building the LaCl reactor today back into a glass bead version. It is a national holiday here (Canada Day), so I was not able to to grab any parts, but I had everything I need on hand, except for a longer 3/8 braided water line. I will get that tomorrow and then start it up.
Just to recap, this is what the first version looked like. It worked but used complex plumbing and lots of valves.
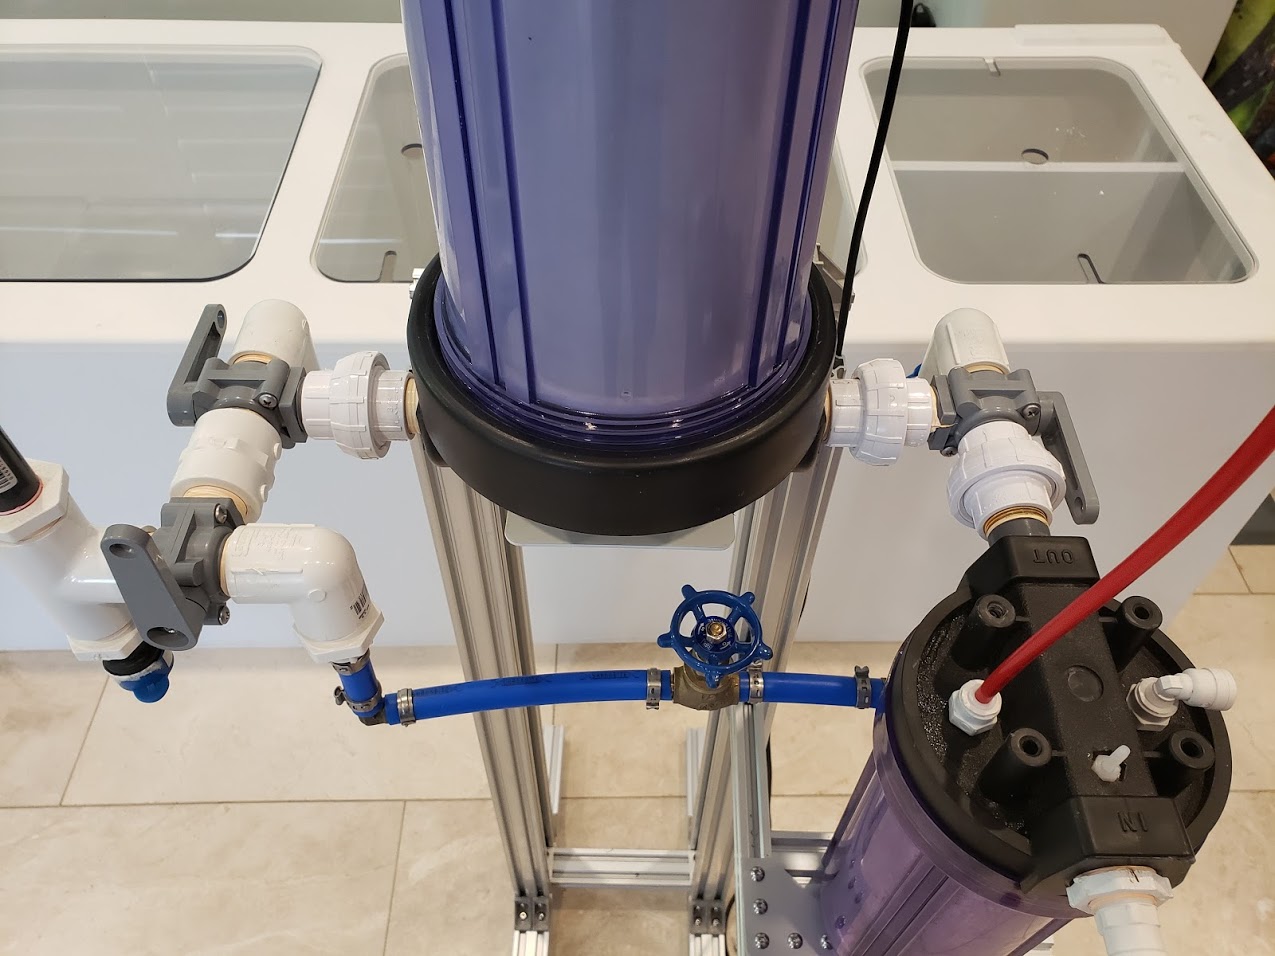
Here is the re-built version. Much, much simpler.
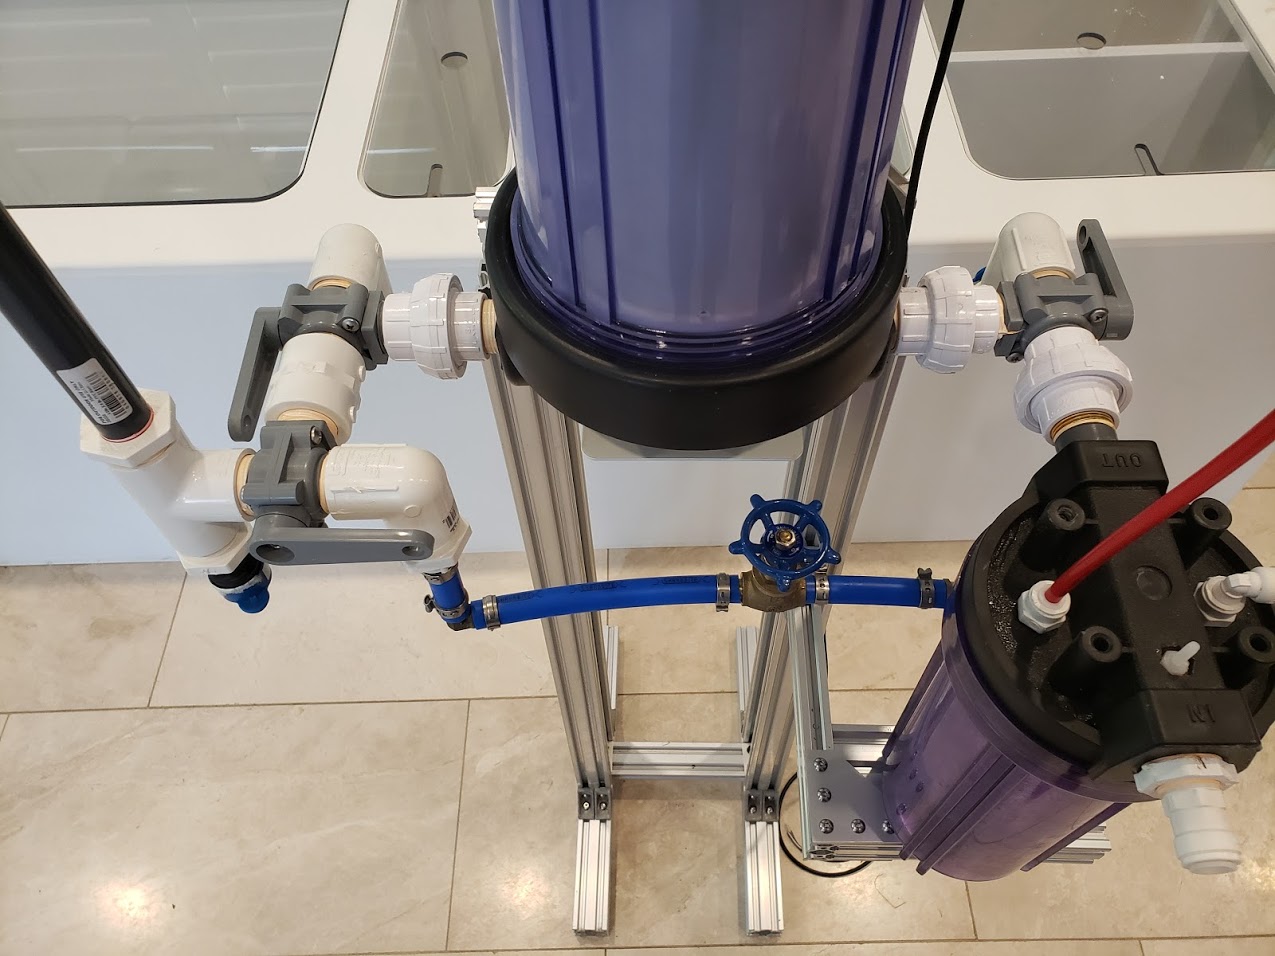
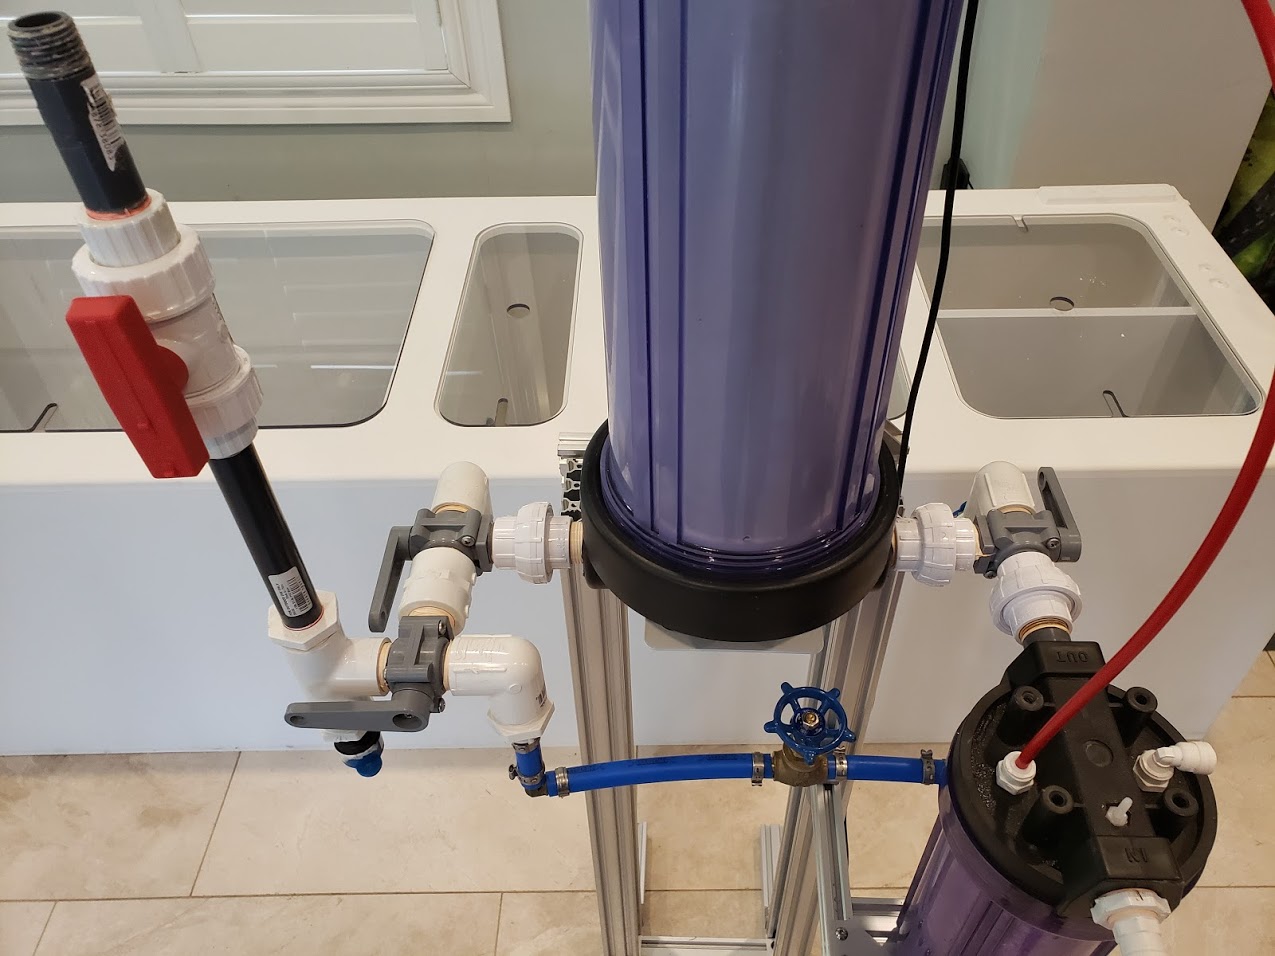
The v2 version uses a 20x4.5, Big Blue canister rather than the previous 10x2.5 ones. I used (3), 3-way valves to eliminate about 90% of the previous plumbing complexity. The v2 supports all the features of the v1, with the exception of draining the glass bead filter back to the tank (for emptying the saltwater before a backwash). This version losses a bit of saltwater for a backwash cycle.
This is the valve configuration for normal operation. The glass bead filter bed, filters the water coming from the 10x2.5 reaction canister, removing the reacted LaPO4.
This is the valve configuration for back washing the glass bead filter bed. The brass gate valve is for adjusting the tap water flow rate that will be used for the backwash. No saltwater will reach this valve.
This is the valve configuration for draining the tap water from within the glass bead filter after a backwash has completed.
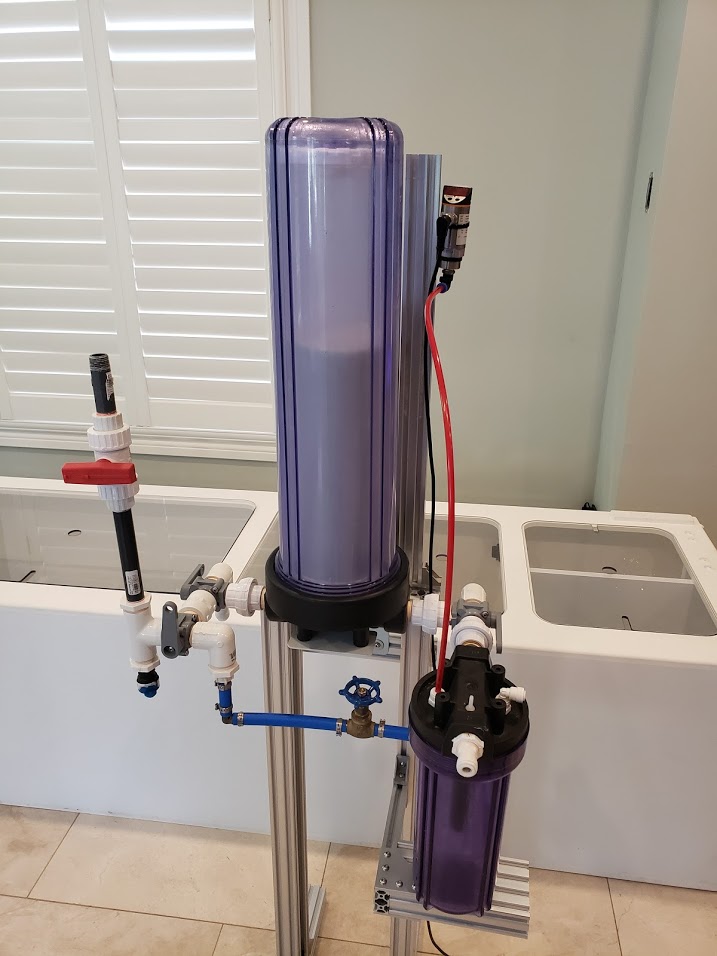
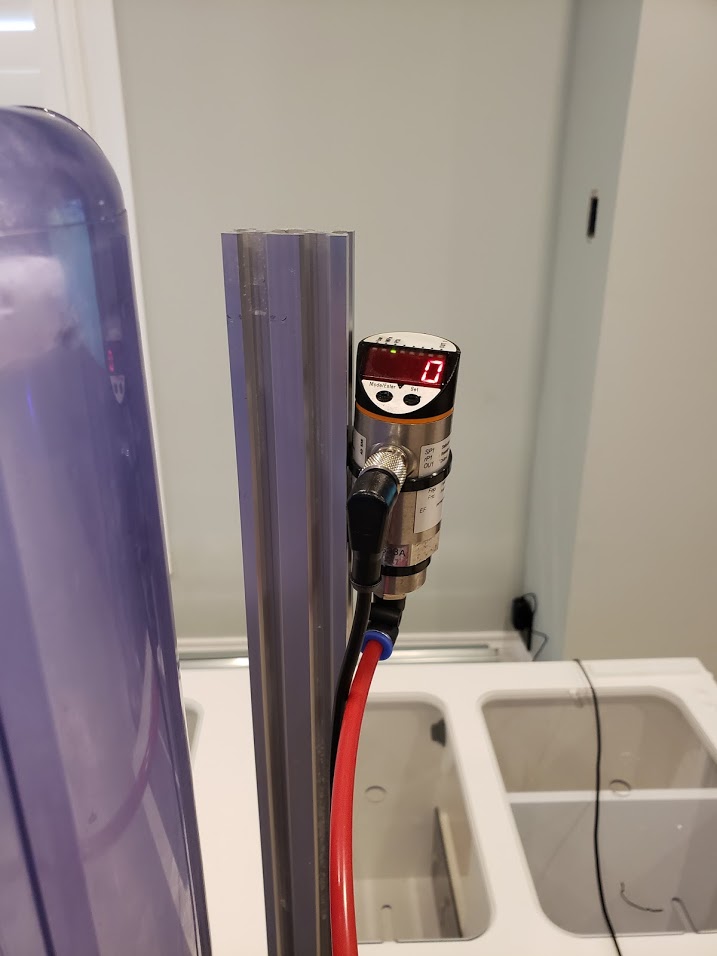
Here is a new feature that I am hoping will really help to gauge when back washes are needed. It is an IFM pressure sensor for monitoring the back pressure created by the peristaltic pump, and a clogged bead filter bed. Using the pleated filter version, I noticed that noticeable back pressure built up, while the filter was still flowing pretty freely.
While building this version, I rebuilt the stand it is using. Still mostly comprised of off-cuts, but now far stronger to deal with the much heavier canister. I also replaced lots of the screws with stainless ones in the stand. I found a lot of the black oxide screws corroded. A couple were so bad, I could not unscrew them as the hex socket in the head was too corroded.
Tomorrow I plan to hook it up to the peristaltic pump, tap water source, drains, do a leak test, and then bring it online.
I have the reactor up and running now. I ran into a bunch of issues while starting it up yesterday.
I decided to add a Plast-o-matic gauge guard before the IFM sensor just to make sure no corrosion occurred. Filling the sensor side of the guard with mineral oil was a bit of a messy chore, but eventually went fine.
I worked through the various stages of the filter, looking for leaks and confirming proper operation. Everything was going fine, no leaks, until I got to the point of confirming proper flow through the internal canister. The water is supposed to flow up the outside and overflow down through the middle, getting filtered by the glass beads. For some reason, the water level never rose inside the housing and just flowed straight out the drain back to the tank.
After tightening and re-tightening the filter housing, I finally concluded that the refillable filter canister I purchased, was not able to seat properly. It uses a twist on cap, and the housing head has some angled guides that are intended to position the cartridge to the dead center of the head. The guides were too tight as they got lower and the cartridge was not able to reach the seat for it's o-ring to seal properly due to the size of the twist on cap. After considering cutting off the guides, I decided to instead make an o-ring out of craft foam, a type of neoprene, to fill the gap between the seat and the cartridge. The foam is only 1/16" thick, but it did the trick. The water level then rose, but the next issue with the cartridge became apparent. The twist on cap is not water tight!
After contemplating what to do about the cap, I decided to do nothing. I knew that the water that seeped through the joint would have to pass through glass beads on the way out of the canister, so I decided to start the filter up with the LaCl dosing and wait for the leak to self seal and force the water level to rise and flow down through the cartridge as expected. After starting it, the water level slowly started to rise. It has been 18 hours so far and the level will be overflowing the cartridge within the hour or so. I have a feeling that every backwash will require this step of re-plugging the shortest path for the water to exit.
The pressure sensor has remained at 0 PSI during operation so far. I tested it during the startup test by closing the valve and waiting until the back pressure registered 2 PSI, so I know it will sense the back pressure when we get to that point.
Really disappointed in the refillable cartridge design. I have emailed BRS to see if they can get their hard shell canisters in 20"x4.5", Big Blue sizing. My v1 of this filter used one of their 10"x2.5" canisters, and it worked awesome. So getting one of those in the larger size, would be my preferred solution.
I completed 1 run of the new v2 filter today. All things being said, it went pretty well. I had a few hiccups that needed to be addressed. I forgot to seal the fittings for the pressure transducer and feed for the LaCl solution. When the water level in the reaction chamber kept rising, it told me I had a leak. Well that and the water leaking on to the top of the reaction chamber. I tried adding an o-ring onto each fitting, and then switched to PTFE thread tape as one was still leaking. The tape fixed the issue completely.
I also found that I had placed the vent feed on the wrong side of the media canister. I had it on the output, but in the v1 version it was on input, so I moved it to input. I noticed that the draining was stalling, while draining the backwash residual water, and that is when I noticed the different placement. Fixed now.
Last night the pressure sensor slowly crept up to 1 psi, and then 2 psi, before falling back to 0 psi. When I investigated, I found the LaCl solution had run out on schedule, and the LaCl dosing head was pumping air.
So after 1 week of operation, the phosphorous level went from 154 ppb to 79 ppb (0.47 ppm to 0.24). My target to get down to is 33 ppb (0.1 ppm). I expect the decline to slow from this point forward as I have substantial phosphate bound into some rocks being kept alive, but stored in a barrel.
Oh, and BRS does not carry the hard shell refillable canisters in 20"x4.5" unfortunately.
The v2 version of the filter has been working great. I am thinking about a v3 design though. The original plan, when the v2 was being contemplated, was for a wall mountable design that used multiple 10" canisters and the BRS hard shell cartridges. I instead used the single big blue canister for the much simpler design, and it is very simple, but I am back to thinking about a wall mountable version. I still have my lingering doubts about the sealing on the big blue cartridge, though it appears to be holding it's seal fine, and going to a design using multiple 10" canisters would allow the BRS cartridges to be used, and they seal perfectly.
The 3 way valves in the v2 proved to be the perfect means of controlling and altering the water flow to allow for simple compact design and operation. It is the 3 ways that have me thinking that my original plan for a bank of 10" canisters might be the best solution after all.
For the v3, the design points that I would want to hit are:
Easy to assemble and build
Expandable
Wall mountable
To make it easy to assemble, v3 would primarily use 3/8" hard tubing and push fit connectors. These are the 3/8" size of the 1/4" RODI style connectors. This would make it super easy to assemble, just cutting hose and connecting segments together. BRS sells the 1/4" version of 3 way valves with push fit connectors built in, and the same valves are available in 3/8" from industrial and plumbing suppliers. Anyone could then build one of these with very little needed skills.
The design would be for 2 parallel runners that connect the bank of canisters together. Three 3 way valves would be need for the 2 runners. One side would have 1 which toggles between mixing chamber and drain to waste, and the other would have 2 valves that would toggle between drain to tank and flush, and the flush side would have a 3 way that toggles between drain to waste and the back flush feed. Identical to how the v2 used three 3 way valves. Each canister would need two 3 way valves each to connect the canister to each runner and be able to reverse the direction of flow through the canister (for back flushing).
To expand the design, you would simply extend the length of each runner with another segment pushed on, add a canister with two 3 way valves, and 2 threaded to push connectors for the canister. The surface area of the big blue canister in v2 would need around 3 of the 10" canisters to approach the same amount of area. Note, this is not volume, but of the area of glass beads exposed to the flow. So my initial design would include 3 or 4 canisters and that should approach or slightly exceed the v2 specs.
The design would be completely wall mountable and would use the brackets that the canisters ship with. I do however expect that they will be rotated 90 degrees, so a support extending from the wall to allow the rotated brackets to mount to will be required. A simple 2x4 would work, but I will probably use extrusions.
Operation would be identical to v2, except a bank of canisters would be doing the filtering instead of 1. As the individual canisters clogged with reacted particulate, more water would flow through the other canisters in the system, balancing the filtering automatically.
When all the canisters are clogged with captured particulate, then the system would be put into a flushing cycle. This would work identical to the v2, just multiplied by the number of canisters in the filter bank.
That is it for now. I am not sure when I might get around to building a v3, but I expect I will at some point.
The v2 model is working pretty well. I had 0.45 ppm of phosphate to lower, and I now have it down to a steady 40 ppb (0.12 ppm) with 60 ml/min going through the reactor. I was running it at 90 ml/min while I was working on pulling it down, but lowered it to 60 to slow the decline and to test if I could control the level using the flow rate. So far, it seems to be sitting stable at 40 ppb, so it seems to be an effective strategy.
I am still testing the level everyday just incase it starts to deplete.
I have the reactor offline and expect it to remain so for the foreseeable future. Once I had the phosphate below 0.12 ppm, it has continued to drop and is now between 0.03 and 0.07 ppm. Once I had it down, in my preferred range, of around 0.1 ppm, I started dosing a tiny 0.25 ppm of daily calcium nitrate, and that seems to have helped the phosphate to continue to decrease.
So I have the reactor offline, and I may have to start thinking about supplemental phosphate dosing in the future. Lol, alway's a new challenge.
Well my phosphate reactor is back online. I accidentally drove my PO4 back into the stratosphere with some automated dosing and a lack of attention. Oops. While running it again I noticed that my levels had plateaued and stopped dropping. It turned out to be a poorly placed (re-installed) intake hose for the peristaltic pump had sucked up a bunch of cheato, but in the mean time, while trying to diagnose the issue, I made some observations.
The current v2 reactor is just too big an unwieldy with the big 20" x 4.5" canister. Taking it apart for maintenance is a job unto itself. The poor sealing of the cartridge holding the glass beads continues to annoy me.
I also noticed that while the algae was obstructing the intake, the flow through the reactor allowed a big pile of flocs to settle on the bottom of the mixing chamber like a big pile of guano. This again makes me wonder if a simple settlement filter is not possible. I tried this in the past and failed, but I may try something again with a much longer and slower path for the reacted flocs to settle out of suspension in.
I have purchased 4 of the BRS hard shell filter cartridges and plan to rebuild the unit into a 4 canister version that provides the same surface area as the 20"x 4.5", but uses (4) 10" x 2.5" canisters. It will also allow individual canisters to be taken offline and back washed (I think). The biggest cost for the v3 version will be the required extra ball valves to allow each canister to be independently operated (online / back washing / offline). I also plan to revisit the mixing method and see if it can be improved both for result and ease of maintenance. I expect to wait until I have my PO4 back under control before I start the rebuild.
I have been following this thread for quite a while now and would love to pick your brain about some of the finer details. I have made up a very similar unit over the past two months and actually got it online finally today. 10" x 2.4" reaction chamber with honeycomb-drilled pvc as a flow modifier with a 20" x 4.5" 5 micron pleated filter after. Have a Neptune 1/4" flow meter to keep an eye on my input/output flow rate with a Kamoer Pro 2 Doser pump controlling the Lanthanum dose every half hour. Waiting on a very similar pressure gauge as the standard oil filled pressure gauge from RODI setup doesn't give me any sort of readings even when the output was entirely clogged. What sort of pressure readings were you getting with the pleated filter setup?
Another question is: Did you ever play around with mixing up the reaction chamber in any more of an effective manner? My work got in a bunch of replacement lower plastics for RODI canisters that have been dropped over the years, and Im wondering if its worth trying to machine out that bottom nub to be able to use some sort of magnetic stirring action within the reaction vessel itself.
Second question is: Is it worthwhile to try adding a secondary filter chamber to REALLY make sure that all LACl percipitate is out of the water coming out of the rx? Thinking a final 10" x 2.5" 1 micron pleated filter would really polish it out as I build up stock of nicer fish after a bad crash last summer. Just worried about some of the tangs/ angels etc... with more complicated gills that I have interest in keeping once again.
Sorry if the picture is a bit confusing as its in front of my calc reactor setup as I temporarily use one of my dosing containers as a stand while i work something up for such a THICCCK filter. Glad to be rid of the socks though!
I don't think I used the IFM pressure sensor on the pleated version. When I had it running on the glass bead version, I found that it would get up to about 1.5 psi, and that was the signal that it needed to be back flushed. So that is probably why you are not seeing a reading on a gauge as the pressure is still pretty low, and the gauge will not be as sensitive.
Yes, I have been wanting to do a more vigorous mixing chamber for awhile, and considered the same solution, removing the nub on the bottom of the canister and adding a magnetic spinner. I just am not sure how I can remove the nub. It is pretty deep in there and would require a long tool. I am still thinking about other styles of mixing chambers and may replace the RODI canister with something else in the v3 version. Stay tuned.
Adding a final 1 micron filter is a great idea. You can never be too careful with removing LaCl.
What I found with the pleated filters was, is that they clog fairly quickly, both from the LaCl flocs, and from other sediment in my water column. After a few times cleaning the 20" x 4.5", I decided I needed a faster, lazy man way of cleaning the filter, and that is when I went to the glass bead version. It's more complicated upfront, but I can back wash it in 10 minutes and never have to disassemble anything.
One of the reasons for moving to the smaller glass bead canisters is that the single large canister has so much LaCl settled on the inside surface, that I can barely see through and need to use a flashlight to back light the media for monitoring back flushes. Once I have 4 of the smaller canisters, I expect that I will be more willing to disassemble and give them an acid bath periodically to keep them more transparent.
That being said, the pleated filter style worked great while I used it.