Leak turns into new build

OP
OP
MichaelClark55

MichaelClark55

Active Member
View Badges
Joined
Feb 23, 2018
Messages
277
Reaction score
228
Rating - 0%
0   0   0
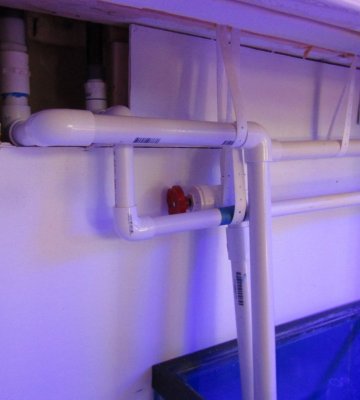
Getting the bulkheads tightened are a *****. I got them hand tightened while pulling down on the pipe to make sure as many threads were used as possible. I can't get the wrench into the tight spot where they are located inside the wall pocket. Any suggestions?
 
OP
OP
MichaelClark55

MichaelClark55

Active Member
View Badges
Joined
Feb 23, 2018
Messages
277
Reaction score
228
Rating - 0%
0   0   0
Spent all day trying to plumb 55 gal sump and 33 gal ATO into the stand. (stacked) Got it all plumbed and then decided it was just too cramped. Did not glue any of it. Just a mock-up. I found a 15 gal, 15" dia. food grade container on Amazon tonight for ATO. I will start over tomorrow with that in mind.
 
OP
OP
MichaelClark55

MichaelClark55

Active Member
View Badges
Joined
Feb 23, 2018
Messages
277
Reaction score
228
Rating - 0%
0   0   0
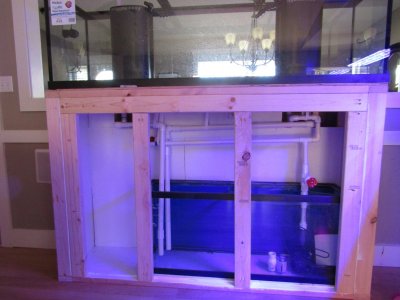
Got most all the plumbing done. Now I will do some tweaking (aka fixing the screwups). I still have another valve to install on one of the drain lines and I somehow have put the T in the return line in the wrong place. I see why because that was the only place left for it. However, the purpose of that valve was to slow the flow to the closet bulkhead. Any ideas?

The vertical supports on the front are there just to remind me to design the door layout. They are pocket screwed in so moving them is not a biggie. Ordered a 15 gal food grade container for the ATO and the space left over is perfect for that. I'll add pocket panels is the sides for electronics. All things go well should have water ready this weekend.
IMG_0114.jpg
IMG_0115.jpg
IMG_0116.jpg
71IccxQDv9L._SL1500_.jpg
ATO reservoir
 
OP
OP
MichaelClark55

MichaelClark55

Active Member
View Badges
Joined
Feb 23, 2018
Messages
277
Reaction score
228
Rating - 0%
0   0   0
Looking good! Looks like you'll have enough clearance to remove and clean the skimmer and cup.

Well, it still will be tight that 55g sump is going to be almost to the top. The baffle tops are set at 16". The skimmer runs in 8" of water so the platform will be 8" high or so (building it today) still should have clearance. Got to be cautious in the design of the top trim of the front of the cabinet. I may make that piece removable with magnets. BTW I will need more coral. What you got for me?
 
OP
OP
MichaelClark55

MichaelClark55

Active Member
View Badges
Joined
Feb 23, 2018
Messages
277
Reaction score
228
Rating - 0%
0   0   0
Best part of the build so far. Got 2 - 20amp dedicated GFI lines installed yesterday. Lights will be plugged directly into outlets.

IMG_0122.jpg
 
Last edited:

AllSignsPointToFish

"No Longer The Guy Without FaceBook"
View Badges
Joined
Oct 1, 2015
Messages
5,851
Reaction score
9,670
Location
Gulf Breeze, Florida
Rating - 0%
0   0   0
Well, it still will be tight that 55g sump is going to be almost to the top. The baffle tops are set at 16". The skimmer runs in 8" of water so the platform will be 8" high or so (building it today) still should have clearance. Got to be cautious in the design of the top trim of the front of the cabinet. I may make that piece removable with magnets. BTW I will need more coral. What you got for me?
If you figure out how to make the panels removeable with magnetic attachments, please let me know. I designed my stand the same way, and I've tried magnets, door catches, and all sorts of other ideas with little success.

As far as coral goes, I have three more of the green birdsnest frags, but you already have two of those! LOL I have one little Birds of Paradise frag that is growing nicely. I could also frag you a piece of grape montipora or another purple-ish branching coral I have (kind of looks like a Montipora digitata). I still have two green acro frags :) No more mushrooms...yet.
 
OP
OP
MichaelClark55

MichaelClark55

Active Member
View Badges
Joined
Feb 23, 2018
Messages
277
Reaction score
228
Rating - 0%
0   0   0
If you figure out how to make the panels removeable with magnetic attachments, please let me know. I designed my stand the same way, and I've tried magnets, door catches, and all sorts of other ideas with little success.

As far as coral goes, I have three more of the green birdsnest frags, but you already have two of those! LOL I have one little Birds of Paradise frag that is growing nicely. I could also frag you a piece of grape montipora or another purple-ish branching coral I have (not quite sure what it is....may still be a seriatopora). I still have two green acro frags :) No more mushrooms...yet.


Will do on the magnet attachments. I designed a house on Orange Beach for a client that has a reef tank and he did it successfully. I will get details as they develop in the next couple days. Plan on the trim job starting tomorrow. Today building small pockets for electronics and duplex outlets covers. Also adding sand later this afternoon. Waiting on the 24 hr clock on the silicone baffles. I'm going to fabricate an upper brace out of place to strengthen the baffles since they are so tall. Would love some monti whenever you get a chance. I have some seriatopora. Acro frags may be cool too. Whatever you feel like doing.
 

AllSignsPointToFish

"No Longer The Guy Without FaceBook"
View Badges
Joined
Oct 1, 2015
Messages
5,851
Reaction score
9,670
Location
Gulf Breeze, Florida
Rating - 0%
0   0   0
Will do on the magnet attachments. I designed a house on Orange Beach for a client that has a reef tank and he did it successfully. I will get details as they develop in the next couple days. Plan on the trim job starting tomorrow. Today building small pockets for electronics and duplex outlets covers. Also adding sand later this afternoon. Waiting on the 24 hr clock on the silicone baffles. I'm going to fabricate an upper brace out of place to strengthen the baffles since they are so tall. Would love some monti whenever you get a chance. I have some seriatopora. Acro frags may be cool too. Whatever you feel like doing.
I'll send pictures of the corals tonight when I get home.

What kind of sump layout/design were you planning to use? I, too, made my sump out of a 55 gallon tank (my DT is also an Aqueon 125 gallon tank with dual Megaflow overflows), and in hindsight I wish I had used a 40 gallon breeder for easier access/maintenance.
 
OP
OP
MichaelClark55

MichaelClark55

Active Member
View Badges
Joined
Feb 23, 2018
Messages
277
Reaction score
228
Rating - 0%
0   0   0
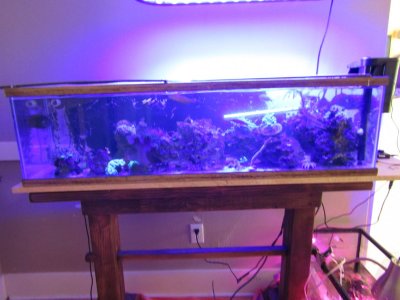
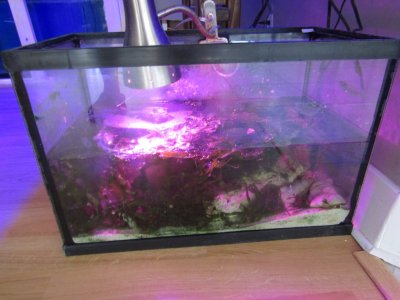
I thought about using the 40L. I actually bought one and its lying in the garage! The desire for more water volume for the fuge won out in my decision. I have 32" sectioned off for the fuge. I had 28" before but only 10" deep and that fuge sucked nutrients like crazy. I was able to keep the fuge running while I built this new system since it was a separate tank. 33L has been used as holding tank. Very crowed but so far not lost anything. Pretty cool size tank definitely will be sitting it up for something after transfer. IMG_0124.jpg IMG_0123.jpg
 
OP
OP
MichaelClark55

MichaelClark55

Active Member
View Badges
Joined
Feb 23, 2018
Messages
277
Reaction score
228
Rating - 0%
0   0   0
Question about Caribe live sand. I have 100lbs of new live sand and about 50lbs of sand from the previous tank that has been rinsed thoroughly. Should I pout the new sand in first and old on top or vice versa or does it matter?
 

AllSignsPointToFish

"No Longer The Guy Without FaceBook"
View Badges
Joined
Oct 1, 2015
Messages
5,851
Reaction score
9,670
Location
Gulf Breeze, Florida
Rating - 0%
0   0   0
Question about Caribe live sand. I have 100lbs of new live sand and about 50lbs of sand from the previous tank that has been rinsed thoroughly. Should I pout the new sand in first and old on top or vice versa or does it matter?
As long as the old sand is rinsed thoroughly, I don't think it matters.
 
OP
OP
MichaelClark55

MichaelClark55

Active Member
View Badges
Joined
Feb 23, 2018
Messages
277
Reaction score
228
Rating - 0%
0   0   0
Skimmer fits in there just as planned. I calculated the flow height based on where it was on the previous thank which is about 6.25" below water level. Still have plenty of room at the top to remove and or clean.
IMG_0125 (1).jpg
 

AllSignsPointToFish

"No Longer The Guy Without FaceBook"
View Badges
Joined
Oct 1, 2015
Messages
5,851
Reaction score
9,670
Location
Gulf Breeze, Florida
Rating - 0%
0   0   0
Skimmer fits in there just as planned. I calculated the flow height based on where it was on the previous thank which is about 6.25" below water level. Still have plenty of room at the top to remove and or clean.
IMG_0125 (1).jpg
Your skimmer is quite a bit smaller than mine ;Shamefullyembarrased
 
OP
OP
MichaelClark55

MichaelClark55

Active Member
View Badges
Joined
Feb 23, 2018
Messages
277
Reaction score
228
Rating - 0%
0   0   0
yeah, it's only rated to 130 gallons, but as you know re-equipping ain't cheap. Priorities. Just bought 2 16" lights to go on each side of my 32". If this will hold me over maybe I can score a good used one from someone.
 

AllSignsPointToFish

"No Longer The Guy Without FaceBook"
View Badges
Joined
Oct 1, 2015
Messages
5,851
Reaction score
9,670
Location
Gulf Breeze, Florida
Rating - 0%
0   0   0
yeah, it's only rated to 130 gallons, but as you know re-equipping ain't cheap. Priorities. Just bought 2 16" lights to go on each side of my 32". If this will hold me over maybe I can score a good used one from someone.
I'd look at a DC skimmer when you get to the that point .
 
OP
OP
MichaelClark55

MichaelClark55

Active Member
View Badges
Joined
Feb 23, 2018
Messages
277
Reaction score
228
Rating - 0%
0   0   0
Got the stand trim completed today except for the doors. Probaly will wait and build them after I get the livestock placed in the new tank. Priorties.

Adjusted a few more things with the plumbing. Love those PVC cutters.

Starting on the electrical side. Installed a 20amp GFI on the left side of the of the stand for the 15g ATO and 2 left side powerheads.
Right side has 2 - 20 amp GFI outlets that will power 600w display LEDs, 100w fuge LED, 2-300w Ti heaters hooked into controller, DC return pump, skimmer and 2 right side powerheads. All electrical boxes are mounted outward and will be recessed into shadow box trim. The back of the boxes have custom covers I built so that they are not exposed to the salt envirnoment. I also wrapped all wiring inside the stand with plastic wire loom and mounted them to the back plywood of the stand.

Added 100lbs of new live sand to the DT. Then added added about 10g of 1.025 to let the sand settle in and let that sit overnight. Today added 80g of new water and about half of the existing LR. I will add the 30g of temp tank water when I move the remaining LR, then top off with more new water. Bought a 55g food grade barrel and along with the 3 - 32 gallons brutes I had, making up 200g of water wasn't to much of a biggie.

Added about 35lbs of sand that came from the previous tank to the fuge in the sump. Throughly rinsed for almost an entire day.Filled the sump up with new water and as I knew it would, the newly siliconed 16" high baffles held perfectly, no leaks. Filling the fuge showed me that I have exactly 32 gallons of water volume with total sump volume of 52g with the water level set at 16". That's about 100% larger than I had in the fuge of the 75g tank. I'm really excited by this since I have been able to keep all the C. Prolifera alive and well. Now that I have a 100w LED for it I'm going to grow some serious reef weeds.

Sorry for the long post, I'm exhausted after a long day working on this project but excited the new tank startup is getting near.
 

Creating a strong bulwark: Did you consider floor support for your reef tank?

  • I put a major focus on floor support.

    Votes: 60 38.5%
  • I put minimal focus on floor support.

    Votes: 35 22.4%
  • I put no focus on floor support.

    Votes: 55 35.3%
  • Other.

    Votes: 6 3.8%
Back
Top