Lots of great things happening! I look forward to watch this build come together and then seeing the tank mature!
Navigation
Install the app
How to install the app on iOS
Follow along with the video below to see how to install our site as a web app on your home screen.
Note: This feature may not be available in some browsers.
More options
You are using an out of date browser. It may not display this or other websites correctly.
You should upgrade or use an alternative browser.
You should upgrade or use an alternative browser.
Mode Aquariums, Infinity Series 75G Build/Review Thread
- Build Thread
- Thread starter S.Pepper
- Start date
- Tagged users None
- Joined
- Sep 21, 2019
- Messages
- 2,231
- Reaction score
- 9,509
Time to move the tank into its final resting place and finish out the controller cabinet with wire management and hooking all of the equipment up.
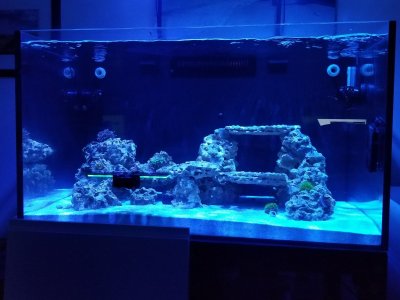
Here's a few pics of the rock work. I took the rock from my existing tank and worked it into the new scape. I did all of the work inside the tank. It would have been too difficult to do it outside the tank. I used Marcorock cement.


Had 2 Brute trash cans (42 & 32) filled with ro/di and heated and mixed with Tropic Marin salt. I also had 2 5 gallon buckets of ro/di waiting. I figured i would need about 80 gallons of water btwn the DT and sump. I ended up needing 85 gallons to finish it up. Here's a few shots from fill day.
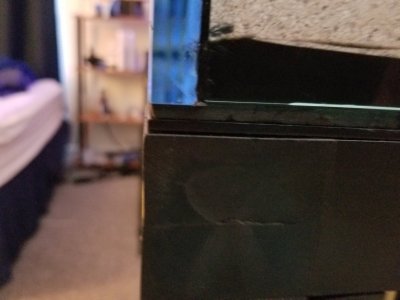
But wait! It's never that easy. I noticed i had an issue when i almost had the DT entirely filled. Even though i had glued down the leveling pad, apparently it moved a little while placing it on the stand. Here's a pick of what it looked like. Remember the glass is 1/2 inch, so it's not as much as it appears in the highly zoomed photo.

What to do? i was there by myself. I decided to drain the tank (about 3/4's) and see if i could some how move it. Dang it! I decided to use the weight of the tank and push it from the back to move the leveling pad back into place. It worked... but now i had to pick the tank up from that side and move it back without moving the leveling pad. I was able to get my finger tips under the edge of the glass enough to pick that side of the tank up, ever so little and move it back about 1/4 inch.

Finally, got back to filling the DT and finishing that.

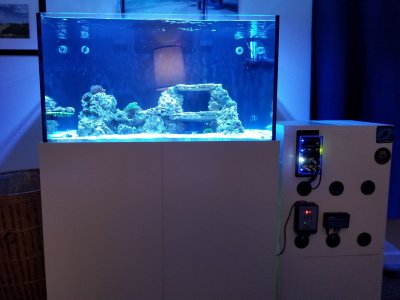
And the finished product (at least at this point) with controller cabinet.

Picture of the new tank with old tank. I took that down and cleaned it the next day.


You'll notice in this picture, the right side panel is off. My Finnex temperature probe is only about 2.5 feet long. It wasn't long enough to out the back of the controller cab and into the sump... so i had to run it out from the front thru the side of the cabinet. I have since bought a Inkbird controller that has 2 probes that are about 6.5 feet long. This will also allow me to run 2 heater elements: 500w as the primary and 300w as the back up.

Next, I'll go over the equipment i'm using and how i am controlling it with the Hydros WaveEngine.
P.S. Here's a shot of my wire management. Everything is organized and easy to identify. If this was going to be my permanent controller cabinet, I would go with the cable raceway.

Here's a few pics of the rock work. I took the rock from my existing tank and worked it into the new scape. I did all of the work inside the tank. It would have been too difficult to do it outside the tank. I used Marcorock cement.
Had 2 Brute trash cans (42 & 32) filled with ro/di and heated and mixed with Tropic Marin salt. I also had 2 5 gallon buckets of ro/di waiting. I figured i would need about 80 gallons of water btwn the DT and sump. I ended up needing 85 gallons to finish it up. Here's a few shots from fill day.
But wait! It's never that easy. I noticed i had an issue when i almost had the DT entirely filled. Even though i had glued down the leveling pad, apparently it moved a little while placing it on the stand. Here's a pick of what it looked like. Remember the glass is 1/2 inch, so it's not as much as it appears in the highly zoomed photo.
What to do? i was there by myself. I decided to drain the tank (about 3/4's) and see if i could some how move it. Dang it! I decided to use the weight of the tank and push it from the back to move the leveling pad back into place. It worked... but now i had to pick the tank up from that side and move it back without moving the leveling pad. I was able to get my finger tips under the edge of the glass enough to pick that side of the tank up, ever so little and move it back about 1/4 inch.
Finally, got back to filling the DT and finishing that.
And the finished product (at least at this point) with controller cabinet.
Picture of the new tank with old tank. I took that down and cleaned it the next day.
You'll notice in this picture, the right side panel is off. My Finnex temperature probe is only about 2.5 feet long. It wasn't long enough to out the back of the controller cab and into the sump... so i had to run it out from the front thru the side of the cabinet. I have since bought a Inkbird controller that has 2 probes that are about 6.5 feet long. This will also allow me to run 2 heater elements: 500w as the primary and 300w as the back up.
Next, I'll go over the equipment i'm using and how i am controlling it with the Hydros WaveEngine.
P.S. Here's a shot of my wire management. Everything is organized and easy to identify. If this was going to be my permanent controller cabinet, I would go with the cable raceway.

Last edited:
Nice build! Great equipment choices too! What kind of coral and fish are you thinking of putting in there?
I am so impressed with that scape. Excited to see what you fill it with.
- Joined
- Sep 21, 2019
- Messages
- 2,231
- Reaction score
- 9,509
Nice build! Great equipment choices too! What kind of coral and fish are you thinking of putting in there?
Hemmdog, I decided to upgrade from a Waterbox 60.2 (which is really a 34G DT) after 4 months solely because i wanted wrasses. I'm hoping to have a Dusky, Melanarus, and some type of leopard wrasse. I'd like to round my fish choice off with a Tomini tang, and some type of goby/blenny. As far as corals go, I have 2 branch hammers, 1 torch, 3 Florida Ricordea, and a few paly/zoas. I'm looking to pick up some more hammers... luv their movement and look. I'm looking for a couple cypheastrea from Jason Fox--hopefully, he'll have a live sale soon.
- Joined
- Sep 21, 2019
- Messages
- 2,231
- Reaction score
- 9,509
I am so impressed with that scape. Excited to see what you fill it with.
thanks.
Your setup is looking great!
I just love your Mode tank. I have never seen one of these before. This is a great build thread and I like that you describe how you came to choose this brand (pros and cons).
The stand looks rock solid, which of I ever upgrade again will be a big factor in the tank I choose. I also like the easy access to all areas of the sump.
- Joined
- Sep 21, 2019
- Messages
- 2,231
- Reaction score
- 9,509
Your setup is looking great!
I just love your Mode tank. I have never seen one of these before. This is a great build thread and I like that you describe how you came to choose this brand (pros and cons).
The stand looks rock solid, which of I ever upgrade again will be a big factor in the tank I choose. I also like the easy access to all areas of the sump.
As I mentioned, it was one of my biggest factors with the upgrade. Thanks for stopping by and for your comments.
- Joined
- Sep 21, 2019
- Messages
- 2,231
- Reaction score
- 9,509
the fox live sale is today !!
thanks, fishdude. I've already got my food, drink, and pee bottle (so i don't miss a thing
- Joined
- Sep 21, 2019
- Messages
- 2,231
- Reaction score
- 9,509
I luv Jason Fox corals! But the live sale today/tonight was a total scam... save for a few sales. It doesn't change how i feel about JF, but "live sales are a joke." Yeah, if u have been around u know what i am talking about. It is what it is, but why must it be? (rhetorical question). 
- Joined
- Sep 21, 2019
- Messages
- 2,231
- Reaction score
- 9,509
I forgot to add that i have ordered my lid from Safe Top Lids. I ordered the Fusion vented frame. It has a killer look and it should at a price of $358. Fernando was a pleasure to deal with. I should get it some time around the first of July. I think i am in the wrong business. lol
- Joined
- Sep 21, 2019
- Messages
- 2,231
- Reaction score
- 9,509
A look at the plumbing. Overall Mode did a nice job with the included plumbing that was cut to size and with valves. You can see from the return plumbing one side has a shorter distance to go than the other. I knew without putting a valve on the shorter side, it would have a stronger flow; but not that big of a deal and i really didn't want to involve myself cutting the pvc with my limited experience.

The overflow has a main drain and emergency drain. The include pvc for the overflow has a durso style drain.


I was hoping, as i had seen from several people profiling this tank, that the durso style fitting wouldn't be glued on. Unfortunately, for whatever reason, this was the only piece, in the included plumbing, that was glued. I wasn't going to glue my main & emergency drain inside the overflow to the bulkheads. So, I tried it out to see if i would like it. Nope, it was impossible to get this set-up and flowing right. I just cut it off and made it into a Herbie style drain.
My next issue was keeping the water level consistent inside the overflow. I would get it dialed in, but within a few days it would rise (typically) and then set off my ATO. Regardless, I have been struggling with this for the last month. Until, found a thread here discussing it.
The suggestion was to set the water level at or just trickling into the emergency drain. This was if the water rises it would go into the emergency drain and continue in the system and NOT set off my ATO. If the water level drops, no biggie, my return pump area in my sump has a little extra water. Of course, if the water level dropped so much in the overflow, it would flood my return area and set off the alarm Anyways, so far, so good. Although, it is a little scary seeing my water that close to the top of the tank. I'll update later.


The overflow has a main drain and emergency drain. The include pvc for the overflow has a durso style drain.
I was hoping, as i had seen from several people profiling this tank, that the durso style fitting wouldn't be glued on. Unfortunately, for whatever reason, this was the only piece, in the included plumbing, that was glued. I wasn't going to glue my main & emergency drain inside the overflow to the bulkheads. So, I tried it out to see if i would like it. Nope, it was impossible to get this set-up and flowing right. I just cut it off and made it into a Herbie style drain.
My next issue was keeping the water level consistent inside the overflow. I would get it dialed in, but within a few days it would rise (typically) and then set off my ATO. Regardless, I have been struggling with this for the last month. Until, found a thread here discussing it.
The suggestion was to set the water level at or just trickling into the emergency drain. This was if the water rises it would go into the emergency drain and continue in the system and NOT set off my ATO. If the water level drops, no biggie, my return pump area in my sump has a little extra water. Of course, if the water level dropped so much in the overflow, it would flood my return area and set off the alarm Anyways, so far, so good. Although, it is a little scary seeing my water that close to the top of the tank. I'll update later.
- Joined
- Sep 21, 2019
- Messages
- 2,231
- Reaction score
- 9,509
Also, I have my aiptasia eating file fish and peppermint shrimp being delivered tomorrow. I only see a 3 aiptasia, but wanted to attack this issue quickly. It seems there's no agreement on how to deal with this problem, so i'll start here and go from there.
It may be the pic angle, but that water level looks high in the tank. That scares the heck out of me. Plus if you plan on making a screen top, it will be wet...
Are you able to cut a 1/2 inch or 1 inch off the backup drain or is it glued in?
Are you able to cut a 1/2 inch or 1 inch off the backup drain or is it glued in?
- Joined
- Sep 21, 2019
- Messages
- 2,231
- Reaction score
- 9,509
It may be the pic angle, but that water level looks high in the tank. That scares the heck out of me. Plus if you plan on making a screen top, it will be wet...
Are you able to cut a 1/2 inch or 1 inch off the backup drain or is it glued in?
As i mentioned, I didn't glue the pvc pipe inside the overflow to the bulkheads. I read somewhere before i got the system not to do that and I'm glad i didn't. That was my thought, also... the water line is about 1/2 from the top of the tank. I think i am going to take a 1/2" off and see how i feel about it. thx
p.s. yes, i have a custom top coming from Safe Top Lid.
- Joined
- Sep 21, 2019
- Messages
- 2,231
- Reaction score
- 9,509
Great thread very interesting and detailed! Keep up the good work
thx, Nino.
- Joined
- Sep 21, 2019
- Messages
- 2,231
- Reaction score
- 9,509
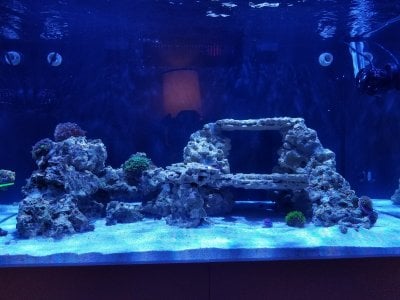
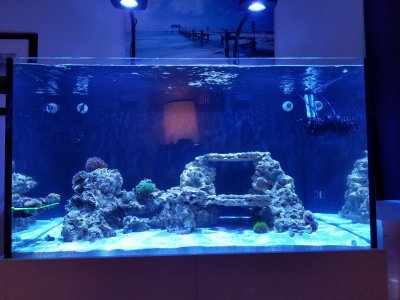
Scraped the interior glass and cleaned the exterior. 10% water change. Cleaned the protein skimmer cup (always beautiful). Cleaned both wave pumps--noticed i finally have coraline algae growing on the wave pump cage. Looking good, but waiting on the fish: dusky wrasse, melanarus wrasse, & leopard wrasse.


Similar threads
New Posts
-
-
What is wrong with my tank? I'm open to any suggestion.
- Latest: MontyNowAReefer
-
-


