Just as a side note. If anyone is looking at doing Euro-bracing on top of a plywood tank, 1x2/4 etc. is much more rigid then any plywood with the center cut out even though it's one complete piece. It's not even close. Always keep the wood grain on edge never flat. Just FYI.

Navigation
Install the app
How to install the app on iOS
Follow along with the video below to see how to install our site as a web app on your home screen.
Note: This feature may not be available in some browsers.
More options
You are using an out of date browser. It may not display this or other websites correctly.
You should upgrade or use an alternative browser.
You should upgrade or use an alternative browser.
Plywood tank build
- Monster Build
- Thread starter Pioneer
- Start date
- Tagged users None


interested to see the cost of this build VS purchasing a custom tank. looks great so far
I will keep a running cost tally periodically. $1500 so far with tank and stand and misc stuff.interested to see the cost of this build VS purchasing a custom tank. looks great so far

revhtree
Owner Administrator
View Badges
Staff member
Super Moderator
Reef Squad
Partner Member 2024
Excellence Award
RGB
Photo of the Month
Article Contributor
R2R TV Featured
Hospitality Award
Article Administrator
Black Friday Sponsor
Partner Sponsor 2023
Industry Professional
My Aquarium Showcase
- Joined
- May 8, 2006
- Messages
- 47,774
- Reaction score
- 87,306
Thanks for sharing!
Just did my flow test on a 2" BRS bulkhead with a low profile strainer to see what I could get for flow out of it with no bubbly noises running dead silent. Post a full test tonight.
That looks sweet I wish I was as handy as you!I thought I was going to start my build last year but better late then never. Started the stand this AM and just finished. Added a touch more center bracing and put 3/4" plywood on top after the picture. Nice and level, actually the most level thing I have ever done in my life, it's perfect. Epoxy in a couple of days on the stand and I start the tank tomorrow. One mistake I made already was not getting farther along with the basement remodel but I am plowing forward. Green treat 2x8 for contact with the floor because I had some nice straight ones in the garage, 2x4 studs 12" on center with a 2x6 rim for vertical load. Round 2 tomorrow.


I am not that handy. I followed EVERYONE'S advice. Make sure everything is square and take your time. Glue the seems and put in plenty of screws. I made sure I startedThat looks sweet I wish I was as handy as you!
with something good, then screw up the fiber glassing later! LOL
Last edited:
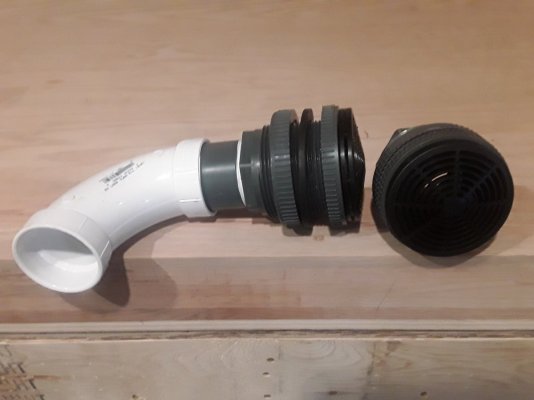
OK, so I wanted to use BRS 2" bulkheads with low profile strainers for my overflows but I couldn't find any flow data so I better know what I am in for on how to set water level and gal per hour so I did a test. As you can see in the Pics I have the strainer on the bulkhead with a 2" x 4" nipple which I cut the threads off to fit a 2" long sweep 90degree fitting and put that in a Home Depot tote. Did a "rough" test with how long it took to fill a 5 gal bucket of water and put that flow through the tote/fitting combo. Long story short is that about 300-325 gallons per hour will go through the combo and be DEAD silent. Any more then that and it starts to gurgle a little. Not loud but noticeable. It rises from a cut off point with drain down to about 1 1/4" up from there at that gal per hour rate. It still leaves about 2/5's of the strainer untouched, plenty of safety margin. A 100w Red Dragon 3100 gph pump is what I am going to buy. Take away the UV gallons per hour and the head pressure calculations/pipe friction with 7 bulkhead combos I am going to put in I should be at that 2000 gal per hour mark. Next I am going to figure out my collection pipe diameter. I am thinking 4" PVC. More later........
Attachments

- Joined
- Dec 29, 2017
- Messages
- 979
- Reaction score
- 1,024
Looking great so far. Following along.

ca1ore
10K Club member
View Badges
Excellence Award
Reef Tank 365
CTARS Member
Article Contributor
R2R TV Featured
How do you know? My knee-jerk reaction would be to disagree. I have found plywood to be much stronger in the lateral axis than dimensional lumber. That's why I built my stand thus.Just as a side note. If anyone is looking at doing Euro-bracing on top of a plywood tank, 1x2/4 etc. is much more rigid then any plywood with the center cut out even though it's one complete piece. It's not even close. Always keep the wood grain on edge never flat. Just FYI.
ca1ore
10K Club member
View Badges
Excellence Award
Reef Tank 365
CTARS Member
Article Contributor
R2R TV Featured
Nice - math says 600 gallons and change. Good dimensions. I'd not go taller than 38".Thanks. 90"wide-48"deep-38" tall
Oustanding! Keep up the good work sir!

I cut out a top and put my weight on it and it flexed more. I made both style of tops. My top is oak, pine I would not do and you can see what direction the grain is going. Plywood grain goes 90 degrees every other ply and it moved more. Many different ways to do it. As long as it's good, it's good. Truthfully I think it ALL rests on a top notch fiberglassing job. IMO.How do you know? My knee-jerk reaction would be to disagree. I have found plywood to be much stronger in the lateral axis than dimensional lumber. That's why I built my stand thus.

Last edited:
- Joined
- Mar 9, 2016
- Messages
- 160
- Reaction score
- 206
Hi what kind of paint are you going to use? 15 years ago I did a 800G plywood tank using Sweetwaters. Now it seems it was replaced by Pentair. I went to rebuild my tank last summer and had a ton of issues with the new paint. It no longer gets really hard like the old stuff. It is also easy to peal off. I worked for months getting my plywood rebuilt only to have it end in mass frustration and once again looking at an empty tank in my garage.
Surface prep is everything. palm sand everything with 60 grit. Even if you have to belt sand it down alittle and add a layer of fiberglass to the inside for strength do it.. Turn to an Epoxy. Pond Armour/shield works well for that, US Composites as well. If they rebuild boat transoms with Epoxy you should be able to bring your beautiful tank back to life but get the surface CLEAN. It's everything. You can save the tank. Good luck.

Made a mistake when doing the Oak coving. Oak coving has a 3/32" lip, the coving doesn't go all the way to the edge and I found out why. I trimmed that 3/32" off and glue and finished nailed it in thinking the glue would hold it flush and it would be perfect. Wrong. It curled. I will be cutting back a 1/16" with an utility knife and sanding it with 60 grit with the palm sander. It totally smooth's it out and makes it perfect but if you ever cut it down on the table saw leave a strong 1/32" edge so it's square and just touch it later. I have a lot of work to do.
What are your plans for live stock fowlr or mixed reef? Excited to watch this build.
mixed reef, but I am keeping my options open. I have a challenge of an older well and associated issues with water quality.
Last edited:

All coving sanded and it turned out nice and smooth with a great transition. Measure and order fiberglass today.
Any update....always love to see more plywood tanks!
Similar threads
- Replies
- 4
- Views
- 206


