Bottyfish

Active Member
View Badges
Joined
Jul 1, 2017
Messages
187
Reaction score
61
Location
Toronto
Rating - 0%
0   0   0
Hi All,

Very excited to find a home to post my build thread. I hope you drop by to get updates or follow along with the journey.

I'm open to feedback and am thinking to make this hopefully detailed pic heavy.

Background

From Toronto, Canada... I started getting interested in the hobby when I was doing research with my dad when we wanted to startup a FOWLR tank. Spent a few years researching through internet, books (yes the paper kind) and a few hobbyists I met.

It didn't take long for that 75G FOWLR we setup in 2002 to turn into a Mixed reef community fish tank.... ;Hilarious

Like most of you, I feel in love with the hobby. I slowly sharpened my carpentry, electrical, plumbing, chemistry and, engineering biology and photoshop skills through more research and experience through our reef tank (I knew high school was useful for something ;Joyful)

Enough boring background of myself...

Fast forward through another two Nano tanks I started on my own and we get to the present day where I am about to dive into a 60 gallon custom reef tank.

========================================================================

Main Tank Specs.

I am still waiting on my order but it will be...

Miracle's Aquariums custom rimless tank
32" x 24" x 18"
1/2 thick polished glass
Starphire (low carbon) glass
Corner black acrylic overflow
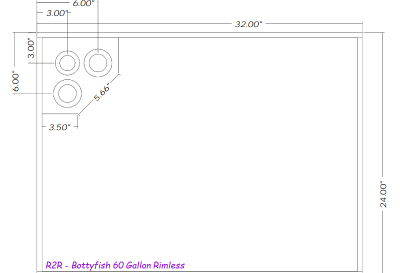
blueprint.png


Sump Tank Specs.

Miracle's Aquariums custom tank
24" x 24" x 15"
3/8 thick polished glass

Auto Top off Tank
16" x 8" x 20"

Stand

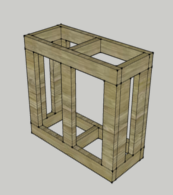
It will be DIY. still in the thought process stage...

Stand_thought.png


Haven't fully decide on dimensions or layout but thinking 34" x 26" x 40" as my current stand is 30" tall and I'd like to avoid bending over to look at my tank. It may require a step stool to get to some areas but that's cool... I had thought about 80/20 T aluminum but decided to go with wood.

The tank will go in the corner of my living room area so I need to focus on quiet equipment.
You'll notice my kids paint easel is presently situated there... Of course its that easel is the temporary location and I have received full authorized from the wife to move it... ;Playful
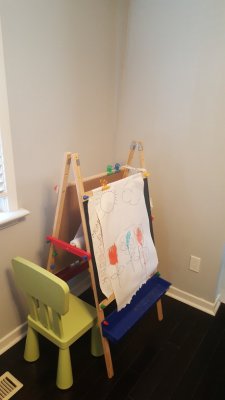
Corner.jpg


That's all for now... hope you tag along and stay tuned as my equipment list gets populated...




Maddlesrain

Valuable Member
View Badges
Joined
Jun 17, 2016
Messages
1,630
Reaction score
1,659
Location
Seattle
Rating - 0%
0   0   0
Congrats on the new build! I also ordered from Miracles and was very happy!
 
OP
OP
Bottyfish

Bottyfish

Active Member
View Badges
Joined
Jul 1, 2017
Messages
187
Reaction score
61
Location
Toronto
Rating - 0%
0   0   0
Hi All,

I've started to compile my equipment list. Here is what I have for now... (some I just have lying around from my previous setups and Ill be using them to get me started ;Woot)

As I continue with my build, I will share my thoughts of why I chose them, my experiences with them and in some cases mini reviews of the products. ;Watching


Bottyfish 60 Gallon Rimless Reef Checklist

Equipment

Lighting

Aqua Illumination Hydra Twenty Six HD (Black x 2 Display tank)
MARS LED 80W Grow lights (Refugium)

USB Powered Controllable LED Strip IP65 Waterproof (Cabinet Sump area)

Filtration

Bubble Magus Curve A5 DC
BRS Mini Reactor - (will run ROX 0.8 carbon)
20 LBS Macro Dry Rock
20 LBS Fiji Totoka Live Rock
200 micron filter socks (x2)


Water movement

Ecotech Vortech MP40
Tunze 6055
Sicce Syncra 3.0 Pump


Other
Eliminator Lighting E107 8 Switch
Marine Magic Triple Dosing Pump MM03
120mm CPU style controllable variable speed fan (Black x 2 for cabinet)
Titanium 300w controllable heater

Digital Thermometer
Grounding Probe

 
OP
OP
Bottyfish

Bottyfish

Active Member
View Badges
Joined
Jul 1, 2017
Messages
187
Reaction score
61
Location
Toronto
Rating - 0%
0   0   0
Ok,

So, I’ve received my BRS Mini Reactor and pretty excited to check it out.

It’s been a while since I’ve ventured into the reactor market and there are a bunch of new players and so many new choices. I did note that most of the vendors that produce skimmers are producing them and the prices to get in on it has gone up and I don’t think it’s just inflation. ;Greedy

I’ve always been a fan of forcing water through my carbon using an active method as opposed to using the mesh bag method which is a more passive. If you watched that BRS video of them comparing the different types of Carbon and using a reactor vs mesh bag, you’ll see what I’m saying.

On my other setup’s I’ve used a Two Little Fishes PhosBan 150 reactor but found it too big for the carbon I was using and apparently tumbling causes the carbon to grind itself into dust making its way to the display.

I’ve also tried the AquaMaxx XS but my fat fingers didn’t like it when it came time to change the media. ;Sour

While looking around for something more suitable for my needs, I decided to go with the BRS Mini since it was compact enough to house the amount of carbon I’ll be running without the tumbling. The easy to open twist method was a plus but what got me was the small canister that was inside the reactor which can easily be refilled. (if you tried to fill a TLF phosban 150 without a funnel you’ll know what I’m getting at)

I will be running ROX 0.8 Carbon though my BRS Mini Reactor.​

Unpacking the reactor.

BRSMiniReadme.png


It was bigger than what I expected, the lid (evident of the RODI units style) was the same size as those RODI units. The difference was in the reactor canister which was basically half the size of those RODI silos.

BRSMiniParts2.png


Taking apart the reactor to reveal the refillable container was the exciting part as this was the main reason I purchased the unit… Upon inspection, I found that the rim of the refillable container contained several cracks.

BRSMiniCrack.png


I sent a note to BRS Support and below is an excerpt of their response:

Thanks for reaching out to us! All of the cartridges we have the same lines from the heating/ cooling process when fitting the lid and canister together for a secure fit. We have not seen any performance issues as the lines have never cracked [broke/shattered from the crack themselves]. If they do let us know and we can get you a new cartridge, but we have seen this a lot and have never had issues with the ones in house…

[if it ends up breaking] We will take care of you if it does :D

I was really appreciative of their quick response and assurance that they would take care of me if I run into any issues. I didn’t expect anything less from BRS as I have always had great experience with their support personnel. Superb! :cool:

I'm gonna park this BRS Mini Reactor post until I start the plumbing…
 
OP
OP
Bottyfish

Bottyfish

Active Member
View Badges
Joined
Jul 1, 2017
Messages
187
Reaction score
61
Location
Toronto
Rating - 0%
0   0   0
Hi All,

Early package came in via UPS and it was my skimmer!

Pretty self explanatory for putting it together (put the cup on last ;Smuggrin to avoid it falling off when you assemble the other parts)

I chose this skimmer for its value and many reviews I read while doing my research. I watched a ton of reviews on youtube of it running and in one case someone said they replaced their vertex with this as it produced less noise and wasn't much of a difference in skimmate side by side test. I have to admin I focused my budget on other equipment like my lights and water movement...

The footprint was perfect for the design I was doing for my sump, and because the outlet was at the bottom of the skimmer, I've read that this produce less to no bubbles which meant one less baffle in my sump saving me an inch of space. I'm restricted to 36" wall to edge of the corner of my room. Every inch counts.


Bubble Magus A5


Specs

18.5″ tall, with a 7″ x 7.2″ footprint
Rated 80-132 Gallons
DC24V/13W
Recommended 8 inches operating water level

Unpacking and assembly

There is a dial that as a Min 1 - Max 5 setting which spins the gear at the bottom of the skimmer to increase and decrease the hole where the water outlet is. It will allow me to adjust the height of the water internally. I've read that the outlet being so low to the bottom may restrict the outflow and perhaps cause some noise. If this happens I'll have to raise it with some egg crate or something. Stay tuned for that...

The DSP1000 Skimmer pump that it comes with is a hybrid non controllable DC pump. The regular Curve is 220V/110V so the A version requires less power, but cannot be controlled. The wheel on the pump is your standard needle wheel impeller.

It comes with a cap to block off the drain outlet in the collection cup, I wont be using the drain so the silicon tube will be stored away and Ill leave the cap there.

The overall body is light and the acrylic is 1/8" thick (or thin) so if you get this skimmer don't accidentally drop it, it will probably crack as it is not as robust as some of the other skimmers I have used. The bubble counter at the top is also made of thin plastic so I will need to remember to be careful when putting this into the cabinet not to knock and accidentally break it.

I wanted to share the collage I put together of pictures below to illustrate the out of box and assembly and some close ups that I couldn't find when doing my research.
CurveA5.png
 
OP
OP
Bottyfish

Bottyfish

Active Member
View Badges
Joined
Jul 1, 2017
Messages
187
Reaction score
61
Location
Toronto
Rating - 0%
0   0   0
Checked my tracking today and my dryrock and pump are suppose to come in tomorrow wohoo!!
 
OP
OP
Bottyfish

Bottyfish

Active Member
View Badges
Joined
Jul 1, 2017
Messages
187
Reaction score
61
Location
Toronto
Rating - 0%
0   0   0
Rocks and pump came in!

Will post some images later tonight after work.
 
OP
OP
Bottyfish

Bottyfish

Active Member
View Badges
Joined
Jul 1, 2017
Messages
187
Reaction score
61
Location
Toronto
Rating - 0%
0   0   0
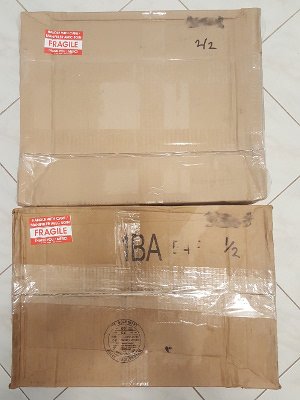
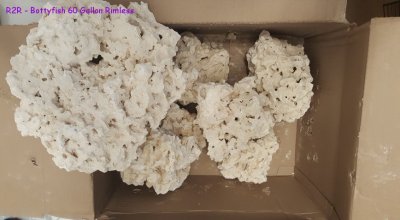
As promised, here are some pictures of the Marco Dry rocks I ordered.

The boxes... ;Joyful
Boxes.jpg

I've had experience with dry rock which I used in my previous setups in combination with DIY rock that I made mixing portland cement, oyster shell chicken feed, but with all the stores now offering dry rock I'd park that in my experience shelf and wouldn't be using that in this setup. (really went exploring with the carbon infused foam and the PVC bridges etc but not this time... ;Locktopic)

Here's a flashback...

Past.jpg


Anyway... back to my order of dry rock...

The rocks are pretty heavy than what I'm used to as I've always ordered the Pukani dry rock in the past. But I found out that BRS no longer ships those to Canada and was very sad by that. The Pukani would definitely be what I would have wanted to get.

I ordered two types of Marco, one is the regular dry rock and the second, about 15 lb of a "flat" version of the same rock which I imagine they cut to shape.

openBoxRocks.jpg

Below comparison picture, you'll see that the top rock is the flat version, its about 2.5 lbs.
The bottom of the two is the normal Marco which is about 5 Lbs.

It does have a nice look but again not as light and porous as I would have wanted for what I will be trying to do with my rockscape (I won't be giving out any clues yet :D)
RockCompare.jpg


Here are some closeups...

RockCollage.jpg


I'll be breaking some of the bigger pieces into small ones to get my rockscape going. But won't start that until my tank and stand are up.
 

Maddlesrain

Valuable Member
View Badges
Joined
Jun 17, 2016
Messages
1,630
Reaction score
1,659
Location
Seattle
Rating - 0%
0   0   0
Thanks!

Was it rimless? My order is to arrive this week so I'm super excited. It will be my first rimless ;Nailbiting

Yes! Mine is rimless as well.
Oh the suspense is killer! I hope it makes it to you safely!
 
OP
OP
Bottyfish

Bottyfish

Active Member
View Badges
Joined
Jul 1, 2017
Messages
187
Reaction score
61
Location
Toronto
Rating - 0%
0   0   0
Quick update all,

The tank and sump are in!

I have a busy day with the kids but will post something later in the evening
.

:):D;Joyful;Shamefullyembarrased;Happy:cool:
 
OP
OP
Bottyfish

Bottyfish

Active Member
View Badges
Joined
Jul 1, 2017
Messages
187
Reaction score
61
Location
Toronto
Rating - 0%
0   0   0
Hi All,

Here are some pictures of my Miracles 60G Rimless tank...

It arrived via delivery "curb side drop off". The driver was great and very helpful in helping me bring it into the house and putting it where I wanted it.

Was a bit worried when I saw the inside of the truck was full of other tanks and not much protection. I guess because he was doing a local Toronto delivery they don't take those extra steps in securing all the tanks.

Naturally after witnessing that I was prompted to fully inspect my tank for any scratches.

There were some moments when my heart skipped a beat with what appeared to be 1" + scratches... ;Blackeyeo_O;Jawdrop


But it was a false alarm and some stubborn silicone that a blade removed.

Scratches.jpg


So far the tank looks great. I haven't filled it with water or done anything except park in a room as I build the stand. I did do some close examination of the silicone work. Not your ELO's diamond joining technology but ill clean it up with a blade.

They added two small circle spacers in between the glass panels that you can see from the close up that have below. ;Cyclops

The overflow looks good and dimensions match the specs.

So measuring the tank it is 1/4 longer on each side due to the brace at the bottom so I'll adjust a bit when building my stand today.

MainTank.jpg
 
Last edited:
OP
OP
Bottyfish

Bottyfish

Active Member
View Badges
Joined
Jul 1, 2017
Messages
187
Reaction score
61
Location
Toronto
Rating - 0%
0   0   0
Here is the sump...

So I went black silicon for the sump and clear for the display. I was debating to go black on the main but didn't up liking the idea of a black line for a rimless concept which I think is suppose to mimic a snapshot of a reef setup "floating".

Sump.jpg
 
OP
OP
Bottyfish

Bottyfish

Active Member
View Badges
Joined
Jul 1, 2017
Messages
187
Reaction score
61
Location
Toronto
Rating - 0%
0   0   0
I'll have to do the baffles as that wasn't done for me when I put my order in.

1) The next few days will be working on the stand, sump before I start the plumbing. Really want to test out the system with water as I've seen on other forums people mentioning with Miracles they experienced bubbling at the seams when its full of water so hope I don't run into that issue.

2) Then I'll do the electrical and wire management etc.

3) Followed by my aquascape.
 
OP
OP
Bottyfish

Bottyfish

Active Member
View Badges
Joined
Jul 1, 2017
Messages
187
Reaction score
61
Location
Toronto
Rating - 0%
0   0   0
Alright, here is the progress for today ;Joyful

I've drew up my design on grid paper and it will be 32.5x28x40 out of 2x4 lumber.

standrender.png

The stand will have all four legs on the frame instead of directly on the floor. Due to this design, I will be incorporating pocket screws.

Just as a disclaimer ;Mask, I'm not a carpenter or expert woodworker. Any feedback would be great.

Started off by testing the mini jig... I think this little tool is terrific. It gets me perfect center pocket screw holes every time.

pocketcentre.jpg


pocket_screw.png


Back
Top