Salinity determination by density

OP
OP
JimWelsh

JimWelsh

Valuable Member
View Badges
Joined
Nov 5, 2011
Messages
1,547
Reaction score
1,680
Location
Angwin, CA
Rating - 0%
0   0   0
Good weighing practices are necessary to get the best accuracy and precision out of a balance. One of the most important aspects is that the balance, the air in the room, the flask, the water, and the mass standards, all be equilibrated to the same temperature, and that that temperature should be as close to 20C (68F) as possible. Balances can be affected by the temperature of the things being weighed (among other things), and the volume of both the water in the flask, and also the glass the flask is made of, will change over even a small temperature range. All of these things can adversely affect the calibration measurements. It is best to perform this calibration after letting all the items and materials used sit together for several hours first, so that they can all stabilize at the same temperature. The balance should also be powered on the whole time, too, for the same reason.

Even the best balances may have different responses (readings) to the same mass at different times of day, and on different days, due to changes in temperature, humidity, barometric pressure, and other factors. In this salinity determination process, whenever the flask is being weighed (whether empty or full), a mass standard is also weighed, and the measured weight of the flask is adjusted relative to the measured weight of the mass standard. This adjustment compensates for the changing response of the balance. Because the Specific Gravity calculation being performed is a ratio between the weight of the pure water used to calibrate the flask and the weight of the tank water measured at a later date, and since the Specific Gravity calculation is very sensitive to small errors, it is very important to adjust for any change in balance response over time. The use of the mass standard is a very effective tool to make this adjustment. The purpose of the mass standard is to compensate for variations in the balance's response under different conditions.

A quick internet search for "mass standards" shows that many different ones are available in various different "Classes", with different tolerances for each Class. The search will also show that these certified mass standards are pretty pricey, even for the Classes with relatively loose tolerances. The good news is that it is not necessary to use a certified mass standard of any given "Class" for this project. It is quite arguable that it is not necessary to even know the true weight of the "mass standards" to any particular degree of accuracy (within reason). Here is why that is true: What we are ultimately attempting to measure is the relative density of our tank water compared to the density of the same volume of pure water at the same temperature. The emphasis here is on the word "relative". As long as the mass standard has a constant mass, then it can still be used to compensate for balance variability, even if the exact weight of the mass standard is not accurately known.

For example, let's assume that we have an inexpensive and incredibly inaccurate mass standard that is stamped with a value of 100 grams, but it actually has a true mass of only 90 grams. When we use this mass standard to calibrate the flask, the resulting values we get for both the tare weight of the flask and also the volume of the flask at 20C will be only 90% of the accurate, true values, because of the discrepancy between the stated mass and the true mass of the poor quality mass standard. But, when we later measure the weight of the tank water in the flask, adjusted relative to the weight of our inaccurate mass standard, that measured value will also be only 90% of the accurate, true value. So, the exact same error is introduced into both sets of calculations. The net error in the resulting calculated ratio of the weight of the tank water in the flask divided by the weight of the same volume of pure water in the flask (which is, by definition the Specific Gravity) is essentially zero!

What I am currently personally using for my "mass standards" are some inexpensive weights that can be found here. Since I have access to an analytical balance accurate to 0.00001 grams at work, I can (and have) calibrated these cheap mass standards, and know with ASTM Class 2 or better accuracy the true mass of these cheap weights (which actually only meet the criteria for ASTM Class 5 or worse). But, even if I simply used the stated mass of these standards as stamped on them, the error in the resulting salinity / Specific Gravity values would be insignificant, because of the constant proportional error cancelling out, as described above.

One important note about this ability to use a mass standard of unknown true mass: This only is true when using the "one point" calibration method (which will be described later); it is not true when using the "two point" calibration method (which will also be described later). When using "two point" calibration, it is important that the true values of the mass standards used be known as accurately as possible. But if the "one point" calibration method is used instead, then the true value of the mass standard need not be accurately known.
 
Last edited:
OP
OP
JimWelsh

JimWelsh

Valuable Member
View Badges
Joined
Nov 5, 2011
Messages
1,547
Reaction score
1,680
Location
Angwin, CA
Rating - 0%
0   0   0
Another technique that can be used to improve the performance of this method, especially during the initial calibration, but also during routine use, is to average multiple measurements. When it comes to measuring things, there are basically two types of errors: Random errors, and Systemic errors. The random errors will tend to cause the measurements to bounce around both high and low relative to the "true" value. Systemic error, also called "bias", will tend to always be off in one direction, either high or low. The use of mass standards described above helps to address systemic error. Averaging multiple weighings addresses random errors.

This technique really is as simple as it sounds. Instead of just weighing the item once, you weigh it multiple times, and then take the average of those weighings. In general, the more measurements you are averaging, the better the average result approximates the "true" value.

As a demonstration of this principle, let's examine the results from some example data. In this example, I used my 300g x 0.01g balance to calibrate my 100 mL volumetric flask. To do so, I first weigh my mass standard, and then the empty flask, recording both weights. I do this 10 times in a row, for a total of 20 measurements (10 mass standard weights plus 10 empty flask weights). Next, I fill the flask with pure water, carefully setting the meniscus exactly to the calibration mark (how to do this will be described in detail later), and then do 10 repititions of weighing the mass standard followed by weighing the full flask. From these measurements, I then calculate the tare weight of the flask and the true volume of the flask. I'll spare the reader the details of all the measurements and how the calculations are performed for now, and only cite the summary data here.

In this example, if I had only used the first measurements each time, I would have arrived at a tare weight of 54.283 grams, and a volume of 100.049 mL. If I took the individual worst-case values from this data set instead of just the first values, the range of possible results would have been from 54.275 g and 99.962 mL at the low end, up to 54.321 g and 100.088 mL at the high end. But by averaging 10 measurements each time, the results would have been 54.293 g and 100.029 mL instead.

Now, the "true" values, based on averaging repeated measurements using the analytical balance with a resolution of 0.00001 grams at the laboratory where I work, rounded to three decimal places, are 54.297 g and 100.015 mL. So, as you can see, the errors of the individual measurements in this data set could easily make us off in tare weight by up to 0.024 g, and in volume by up to 0.073 mL. Averaging 10 measurements has reduced this error down to only 0.004 g and 0.014 mL which is a factor of better than 80 percent!

The data cited above was the result from averaging 10 weighings during one calibration session on one day. When I add additional data from still more similar calibration sessions spread across a total of five days, the resulting average values are still 54.293 g and 100.029 mL, with an uncertainty (2 times the standard deviation) of only 0.002 g and 0.001 mL, showing that this technique does give consistent results. Remember that the balance used for this exercise has an advertised repeatability of only +/- 0.02 grams, and yet, averaging has produced consistent results that are ten times better than that. The "random error" inherent in the individual measurements has been addressed very well by averaging, and the remaining, consistent error is some sort of "systemic error" (which will tend to cancel itself out when calculating the Specific Gravity ratio, as described in the previous post about mass standards).
 
Last edited:
OP
OP
JimWelsh

JimWelsh

Valuable Member
View Badges
Joined
Nov 5, 2011
Messages
1,547
Reaction score
1,680
Location
Angwin, CA
Rating - 0%
0   0   0
The next technique for refining the accuracy and precision of this method involves doing everything possible to fill the flask consistently with the same volume of water, both during calibration and when measuring the tank water density. There are two aspects to this. One is really just basic good measurement practices when reading the meniscus, but I will now elaborate on the specifics of how to do this. The other addresses a small but very real variability that can be minimized when filling the flask.

A volumetric flask is designed to allow a person to fill it with a known volume of liquid with very good precision. But for the precision required to perform the Specific Gravity calculation, extra care must be taken. I have previously linked to a NIST document describing the Selected Procedures for Volumetric Calibrations. In this post, I'd like to draw the reader's attention to pages 19 and 20 of that PDF (GMP Page 1 of 4 and GMP Page 2 of 4 in the document). Those pages describe best practices for reading a meniscus. For this method, I suggest using "Option A" for how to read the meniscus. I have found that it is indespensably helpful to use a black/white reading card as described to get a very good view of the true bottom of the meniscus. I also want to emphasize attention to detail when it comes to setting the meniscus relative to the calibration line on the flask. In the NIST document's diagram labeled "FRONT VIEW", the calibration line is shown as though it is an infinitely thin line, but in fact, the calibration line on volumetric flasks has a definite thickness, of course. I have found that the thickness of a typical 100 mL Class A volumetric flask's calibration line corresponds to approximately 0.04 mL of volume, or about 1 drop of water. This amount of error in filling the flask corresponds to an error of about 0.5 PPT in the resulting salinity calculation, so in order to achieve the desired improvement in salinity resolution using this method, even that small amount of error should be avoided. While I don't in any way disagree with the NIST method described, I do wish to refine the description with my own images, intended to clarify how to properly set the meniscus.

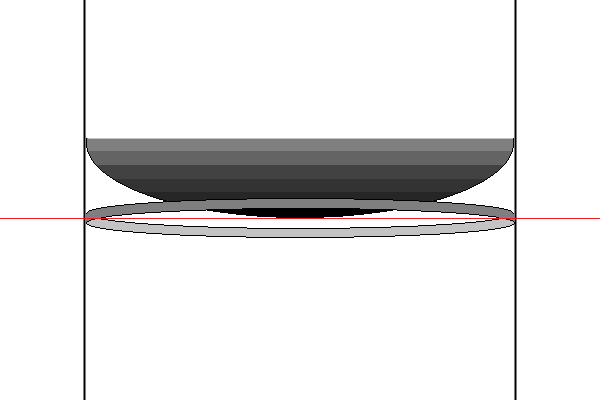
Here is an image of a meniscus properly set using "Option A", with the darkness of the meniscus that would be seen when using the black/white card, and a red line indicating how the bottom of the meniscus should be halfway between the front and back parts of the calibration line when viewed from just beneath the calibration line, as described in the "Option A" part of the NIST document:

Meniscus%201_zpsucbqser0.png


In this image, the higher, darker grey part of the calibration line is the front side, and the lower, lighter grey part is the rear side. Now, the clarification I'd like to add is that as you raise your eye relative to the calibration line, the bottom of the meniscus should remain halfway between the lower portion of the front side of the line, and the upper portion of the rear side of the line, as shown in the next two images:

Meniscus%202_zpsi7vziodq.png


Meniscus%203_zpsu8orzfiv.png


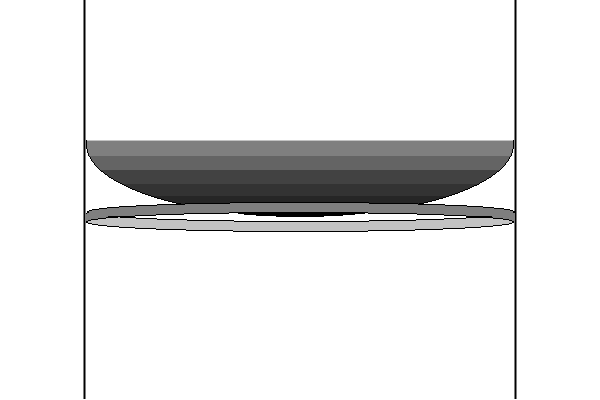
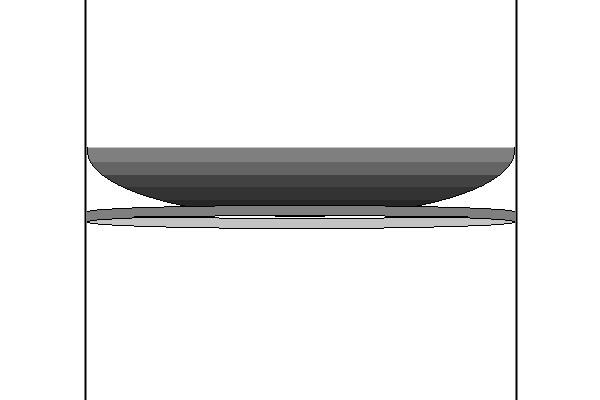
If you have the flask filled just a little too full, then the meniscus will tend to disappear behind the front side of the line before you get to the orientation in the last image, and if you have the flask just a little under-filled, then it will still be clearly visible at that angle, and it may even start to obscure the rear side of the line. If you have filled the flask just right, then when you get to the right angle, the bottom of the front side of the line, the bottom of the meniscus, and the top of the rear side of the line will all line up exactly. For my older eyes, I find a moderately strong hand lens helps immensely to see this well. And again, don't forget to use the black/white card to clearly show where the bottom of the meniscus really is. You might think you can see it clearly without the card, but in practice, the card really does help to see it properly under variable lighting conditions.

It is important to use a syringe or pipette of some kind (a Salifert test it syringe with the tip on works nicely) to add or remove the tiniest amount of water necessary to set the meniscus in just the right place to achieve what I have shown above for consistent measurement.

There is one other minor but very important detail to pay attention to in order to get consistent measurements between different flask fillings, and that is the drops that may be left adhering to the neck of the flask above the calibration line. In the NIST document, there is a section that describes the proper cleaning of glassware to ensure that all the liquid flows off of the surfaces of the glass without leaving drops behind. This cleaning process involves using a hot solution of sodium dichromate in fuming sulfuric acid to do this cleaning! I'm not into having such dangerous solutions in my home, and I doubt any hobbyists reading this are, either. Even with such extreme cleaning methods, the NIST document does also describe one of the uncertainties in their calibration method being the unknown amount of liquid that remains clinging to the neck of the flask. In practice, no matter how scrupulously I try to clean my glassware (I do use reasonably strong sulfuric acid and sodium hydroxide in the effort), I still get some drops clinging the the neck of the flask when I fill it. I estimate the extra volume of these drops can be as much as 0.03 mL or so. So, my solution, which I have found works very well, is to simply wipe the inside of the neck of the flask, after I've filled it and set the meniscus, with a rolled-up paper towel. I fold the paper towel in half, and then roll it up so that the folded edge is at one end of the roll, and insert it into the flask folded edge down, so that there are no fibers sticking down that might touch the meniscus, and wipe the inside of the flask as close as I dare come to the meniscus without touching it, rotating it as I insert it. This works wonders to reduce the uncertainty of extra water clinging to the neck.
 

siggy

My Aquariums Going Again
View Badges
Joined
Feb 16, 2017
Messages
7,123
Reaction score
21,417
Location
MI
Rating - 0%
0   0   0
x
 

Cory

More than 25 years reefing
View Badges
Joined
Oct 30, 2014
Messages
6,882
Reaction score
3,129
Location
Canada
Rating - 0%
0   0   0
Can i do this with a 100ml pycnometer instead of a graduated cylinder?
 

High pressure shells: Do you look for signs of stress in the invertebrates in your reef tank?

  • I regularly look for signs of invertebrate stress in my reef tank.

    Votes: 35 31.8%
  • I occasionally look for signs of invertebrate stress in my reef tank.

    Votes: 26 23.6%
  • I rarely look for signs of invertebrate stress in my reef tank.

    Votes: 21 19.1%
  • I never look for signs of invertebrate stress in my reef tank.

    Votes: 28 25.5%
  • Other.

    Votes: 0 0.0%
Back
Top