Super easy DIY float switch bracket!

jgvergo

Valuable Member
View Badges
Joined
Nov 29, 2014
Messages
1,301
Reaction score
1,386
Location
New York
Rating - 0%
0   0   0
A $5 piece of acrylic from home depot makes at least 5! Just heat it up over the stove, bend, drill a hole for your switch, and DONE!


You get the prize for the most timely post EVER! My float switches arrive tonight and I have some scrap acrylic laying around. I was going to cut and glue the acrylic, but your approach is easier and much better looking. Thanks!
 
OP
OP
TheHarold

TheHarold

5000 Club Member
View Badges
Joined
Oct 3, 2015
Messages
5,143
Reaction score
8,752
Rating - 0%
0   0   0
You get the prize for the most timely post EVER! My float switches arrive tonight and I have some scrap acrylic laying around. I was going to cut and glue the acrylic, but your approach is easier and much better looking. Thanks!

No problem! I just made one for myself and was surprised how easy it was.
 

rmcaum

Community Member
View Badges
Joined
Jan 27, 2014
Messages
40
Reaction score
16
Location
Lexington, KY
Rating - 0%
0   0   0
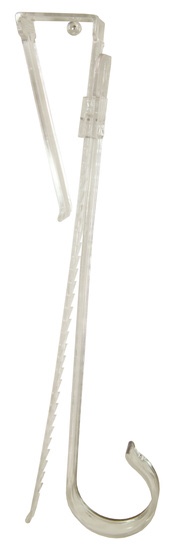
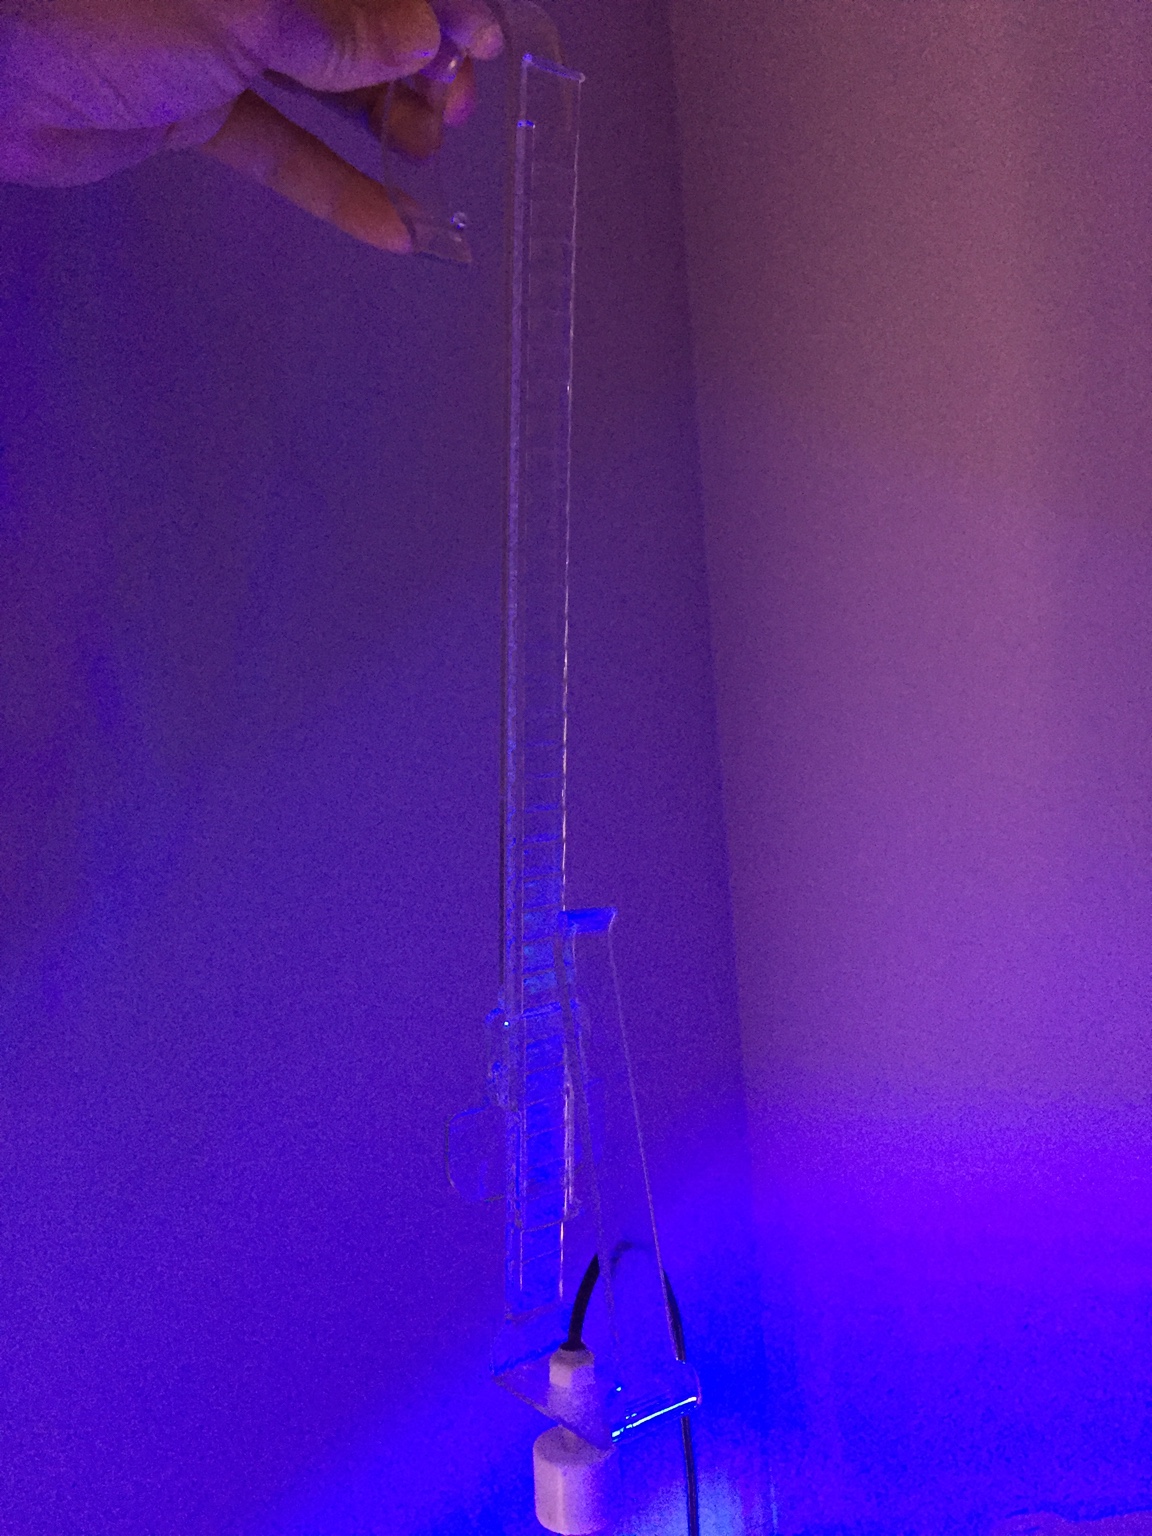
I struggled with this for awhile and almost broke down paid for the 25 dollar brackets sold specific for our hobby. My wife had one of these laying around at Christmas time. She got it and subsequently about five more at the dollar store. $1. Used a razor knife to remove the piece that is supposed to go on the backside of the door. Used a standard drill bit to put a hole for the float. I actually superglued the portion I removed to the stem to make an adjustable dual float holder. Use the portion meant to hand the wreath as the top to hang it, viola.
28d42ad571f369357d2be46ca86f8244.jpg
 

R_C

Active Member
View Badges
Joined
Feb 12, 2016
Messages
435
Reaction score
444
Location
Ocoee, FL
Rating - 0%
0   0   0
Thanks for the post. It looks awesome and very simple to make.
 

rmcaum

Community Member
View Badges
Joined
Jan 27, 2014
Messages
40
Reaction score
16
Location
Lexington, KY
Rating - 0%
0   0   0
ca0189b09b8deda07de02b161d0b5097.jpg


This one was simply for monitoring when a bucket got water in it. I didn't cut it and glue it like the ones I described above. Adding a second float tells you when your ATO is low and then very low or empty.
 

jgvergo

Valuable Member
View Badges
Joined
Nov 29, 2014
Messages
1,301
Reaction score
1,386
Location
New York
Rating - 0%
0   0   0
My final design (4 switches give me redundancy...I am allergic to floods!). I used Lexan, which is pretty easy to bend without heat.
DzAa22dRxRd4p51kz-pyf0daeuObsgLkrlH4ZX3RRvnaGPoHNQhVhxka5QB6P_Fc6QR1wf2GWj4b51lRuuPkTx8bWmjaZ1mXCl7D8PjJAIVK9HaPF8nOOySmnUqnpDd9z9q8Qd0PwxB7CPh7a3gWFzzLtufNiyTdvsHWibpQXn73slsYp_Ay0rq8igMeFKcjEAsl3Q76zkiTSOCAKdi3W374vfTfu_jbIOSYfu5ANR5hWG8DMDBn5bypcAf1i6VF-8Ex7ffqO9kCxhFauLeoQfWqxZIH_l34ZeuNh3X7hcVs_sHdLwheZlhe0L-olGw-zbNdBNsKPgEv5cvsZ5ARROBpfpHxV6X84I7hgAcvJB1e1dFxzRXNlkZCYS_z-CuMDieWh3r2KPk5eBNhKKACGL_k-g-Z1cJFwMTFG_Fn9_pzoMP83gWW3DkSqN44TE0rqLVc57hGkAJjXdxK1voQbnmXX6Iiv3zaDiuVN6ITfux8JfwU9tc1DJsXL6VApXRw8TMFSz8LV9zSMnqYiQy0iun9Ctpa1w7cALbzIaNI84Q6JknmhAMr-Y1-x6WU6Ojc_h_G=w518-h920-no
 
OP
OP
TheHarold

TheHarold

5000 Club Member
View Badges
Joined
Oct 3, 2015
Messages
5,143
Reaction score
8,752
Rating - 0%
0   0   0
My final design (4 switches give me redundancy...I am allergic to floods!). I used Lexan, which is pretty easy to bend without heat.
DzAa22dRxRd4p51kz-pyf0daeuObsgLkrlH4ZX3RRvnaGPoHNQhVhxka5QB6P_Fc6QR1wf2GWj4b51lRuuPkTx8bWmjaZ1mXCl7D8PjJAIVK9HaPF8nOOySmnUqnpDd9z9q8Qd0PwxB7CPh7a3gWFzzLtufNiyTdvsHWibpQXn73slsYp_Ay0rq8igMeFKcjEAsl3Q76zkiTSOCAKdi3W374vfTfu_jbIOSYfu5ANR5hWG8DMDBn5bypcAf1i6VF-8Ex7ffqO9kCxhFauLeoQfWqxZIH_l34ZeuNh3X7hcVs_sHdLwheZlhe0L-olGw-zbNdBNsKPgEv5cvsZ5ARROBpfpHxV6X84I7hgAcvJB1e1dFxzRXNlkZCYS_z-CuMDieWh3r2KPk5eBNhKKACGL_k-g-Z1cJFwMTFG_Fn9_pzoMP83gWW3DkSqN44TE0rqLVc57hGkAJjXdxK1voQbnmXX6Iiv3zaDiuVN6ITfux8JfwU9tc1DJsXL6VApXRw8TMFSz8LV9zSMnqYiQy0iun9Ctpa1w7cALbzIaNI84Q6JknmhAMr-Y1-x6WU6Ojc_h_G=w518-h920-no
How did you attach the pieces together? Super glue?
 

jgvergo

Valuable Member
View Badges
Joined
Nov 29, 2014
Messages
1,301
Reaction score
1,386
Location
New York
Rating - 0%
0   0   0
How did you attach the pieces together? Super glue?
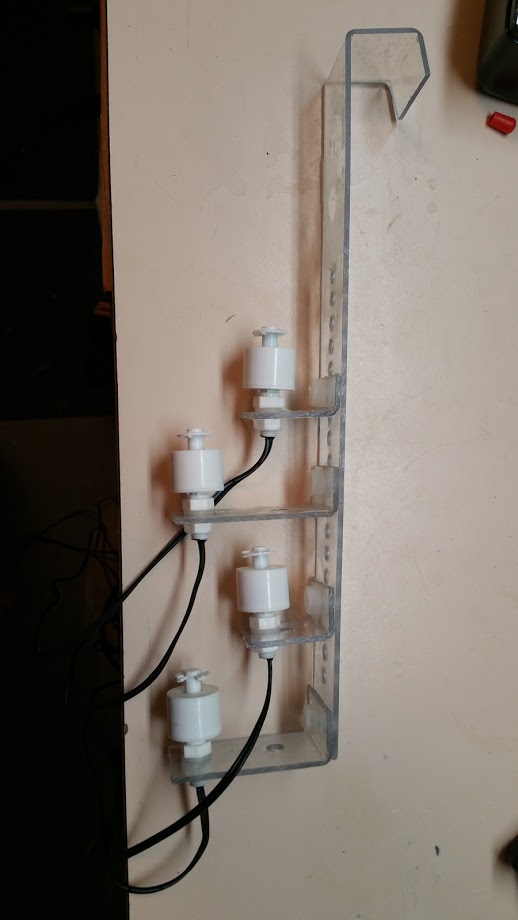
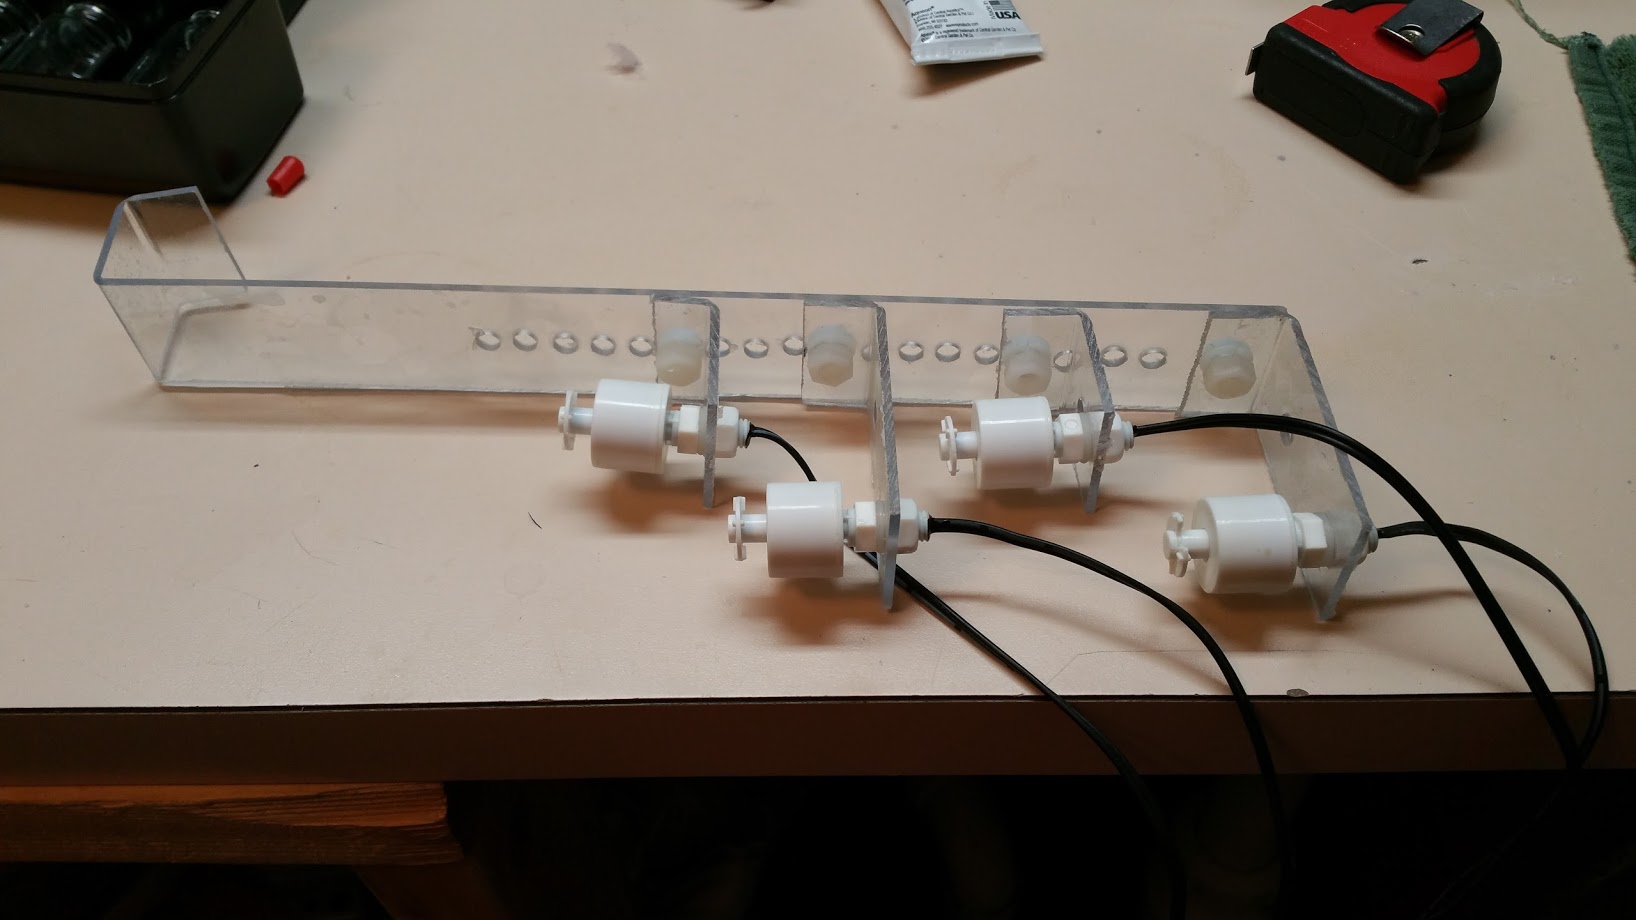
Hi TH. If you look closely, you can see that there is one long vertical piece that has a series of holes drilled in it. Then there are 4 pieces that are bent 90 degrees that have the float switched attached. The pieces that have the float switches are attached to the long vertical piece with nylon nuts and bolts (no metal allowed in the tank water!). I did it this way so it was easily adjustable, which would be nearly impossible with super glue. This picture shows it a little better.
-IormLUUDjuwJknaSgxEkqd3QNKFNeeQta0HRjnT9qYfTQ8Icg2Wh1eNtQCkcoRplJpM4gz_8N6hJwl9TwZCymQ-pLgAEBEKqcfQRNdVMX4WrPa9nodlLhpS1DEzBB8_tTplCSCuFjr8CW4BpMb9nMJX_Tw2F3o2jY17cPmHM7PJ_Vhn5ECTBD12iIvgeOjjBjsFA-pdF_HpE9Hk23zNUmdOKTPjfykth8OW1NvmcoAum9aZxtQGwh0pMHtzrfegmLd2-3nD9MAK5_3HS5M3VPMblGcHO5Y4k8Qtw7NMobf8j00TtVskfzihC9qA-RvgbsRmNIa-S9kGaozEwLLGkACBEDJOsgFU76e1_fAfSRHh5wmL6fjlNrhNlZdr1PjLULQGU84dlsgMhGzy6gM2eFNvCRgxXzHJ3Q3zQFJPZ2Q9zs5XDDoP28rJa8STAICjXn2ZmV2E5L_QovuBWX-TP3eE2xCbQlsvgkgogtfmLpFBdlVnKYC_c0rhKOqBev35Uy55tGQdKvdcFLUmMEeK0FdHwky7y7JGNNb16qYga8SMkVAkl0ztZQXtFVxxKCbbOnG7hLuzG8-mzctlHvKPY7-fnpeiWmU=w1636-h920-no
 

Drauka99

Active Member
View Badges
Joined
Nov 19, 2015
Messages
364
Reaction score
156
Location
Northwest Florida
Rating - 0%
0   0   0
And I thought I was paranoid with my ATO with an upper and lower switch and a small ato reservoir with its own low switch, also have the ato set to delay turning on till it gets a constant signal for 5 minutes. Also limited by a 50ml/min dosing pump.
 

jgvergo

Valuable Member
View Badges
Joined
Nov 29, 2014
Messages
1,301
Reaction score
1,386
Location
New York
Rating - 0%
0   0   0
And I thought I was paranoid with my ATO with an upper and lower switch and a small ato reservoir with its own low switch, also have the ato set to delay turning on till it gets a constant signal for 5 minutes. Also limited by a 50ml/min dosing pump.
My "ATO reservoir" is a 30 gallon RO/DI container that sits on the floor of a finished part of my house, hence my caution :eek:
 

Drauka99

Active Member
View Badges
Joined
Nov 19, 2015
Messages
364
Reaction score
156
Location
Northwest Florida
Rating - 0%
0   0   0
Even when I have AWC setup I plan on having a small ATO chamber separate. I plan to setup a refill program that will be manually operated. On my 93 I can go a week and a half or so with the 10 gallon container I am using now.

If you are using APEX to control your ATO you may want to look into setting up a Oscillating command for your ato program, this could be an added safety measure to onlly allow the ato pump to be cycled on for a few minutes each hour.
 

FischAutoTechGarten

Community Member
View Badges
Joined
Mar 19, 2020
Messages
37
Reaction score
40
Rating - 0%
0   0   0
Folks,
So glad I stumbled upon this thread. I was working with Lexan to build a 5 position float switch holder for my sump (water hi - sound alarm, water norm - stop auto top-off, water low - trigger auto top-off, pump-enable, water lolo - pump-disable). Your designs are better than what I was attempting.

Not allot of success working with Lexan. I'm going to try again tomorrow with a piece of acrylic... and instead of routering channels (which I was doing for super fine adjustment of the swing type float sensors),
I'm going to drill holes instead for 1/2" increment adjustments (which is really good enough) and use the up/down type float sensors.

I have a good heatgun.
 
OP
OP
TheHarold

TheHarold

5000 Club Member
View Badges
Joined
Oct 3, 2015
Messages
5,143
Reaction score
8,752
Rating - 0%
0   0   0
Folks,
So glad I stumbled upon this thread. I was working with Lexan to build a 5 position float switch holder for my sump (water hi - sound alarm, water norm - stop auto top-off, water low - trigger auto top-off, pump-enable, water lolo - pump-disable). Your designs are better than what I was attempting.

Not allot of success working with Lexan. I'm going to try again tomorrow with a piece of acrylic... and instead of routering channels (which I was doing for super fine adjustment of the swing type float sensors),
I'm going to drill holes instead for 1/2" increment adjustments (which is really good enough) and use the up/down type float sensors.

I have a good heatgun.

Wow- a blast from the past, I made this thread over 4 years ago!

Since then I got into 3D printing, so thankfully no more holding acrylic over the stovetop . New float switch bracket is modular and fully height adjustable based on a PVC rod.


FB7A2101-97F2-4D11-99E6-5FA58329069C.jpeg
 
Last edited:

jgvergo

Valuable Member
View Badges
Joined
Nov 29, 2014
Messages
1,301
Reaction score
1,386
Location
New York
Rating - 0%
0   0   0
Wow- a blast from the past, I made this thread over 4 years ago!

Since then I got into 3D printing, so thankfully no more holding acrylic over the stovetop . New float switch bracket is modular and fully height adjustable based on a PVC rod.


FB7A2101-97F2-4D11-99E6-5FA58329069C.jpeg
I just retired. You single-handedly motivated me to learn how to 3D print!
 

FischAutoTechGarten

Community Member
View Badges
Joined
Mar 19, 2020
Messages
37
Reaction score
40
Rating - 0%
0   0   0
Well, I'll post mine. Lots I would do differently.

The SwingAway Floats need to fall quite a bit to open the switch.

Also, becuase they slide in from the front, but screw in from the back, reloating into new holes requires cutting and reconnecting my lines. Should have used level swithces that slie in from the back, but screw in from the front. My bad.

FullyAssembledFloatStand.jpg
FullyInstalledFloatStandInSump.jpg LevelSwitchTerminationsSumpROStorage.jpg AllLevelsWorking.jpg
These are the float switches installed inside of the RO Water Storage.

ROWaterStorageLevelSensorsInstalledInsidePhoto.jpg

All soldered together:


FloatSwitchesConnectedOutsideOfROStorage.jpg
 
Last edited:
Back
Top