Switching Controllers from Apex to GHL

pa30crewchief

New Member
View Badges
Joined
Aug 1, 2017
Messages
6
Reaction score
10
Rating - 0%
0   0   0
n2585722 - Fallback mode off is a Apex term in the even the Apex fails the Outlet it suppose to go off. The issue was, that the apex module came back online partially, and instead of turning off the outlet like it was suppose to because it was not fully up, it actually turned some on ignoring the programming. At the time I had an apex gold monitoring because it was replacing the Apex 2016 at the time, which was controlling at the time the blue return pump and turned it off with the PH Rised above 8.4 . By the time I got home the Ph in the sump was 11.6. (Nice Milky White).

David Morris - Sorry, about that the sump in the basement. All dosing is in my sump in the basement.

I do not believe I will need to worry about this, since I have a Doser 2 now, I am no longer dosing 2 part, but calcium and Alkalinity, but will leave it in for now.

Similar failure of a Neptune Powerbar EB6 with two outlets failed on (one being heat and the other ATO!) and all others off, regardless of "FALLBACK" programming. Fortunately the heater thermostat prevented a tank overheat and the ATO back up high level sump float switch prevented a flood. Both FMMs also failed. Currently running Apex 2016 off independent 12V PS without PowerBar attached for monitoring pH, Temp, Salinity, and have restored WAV power heads and DOS for 2 part dosing. Don't get me started on the unreliability of Neptune FMMs and the attached flowmeters, optical sensors and leak detectors...I programmed many control loops based on these sensors and have learned my lesson.

Eager to follow your progression and attempt replicating with GHL on my next build. For now will strip down Apex to passive monitoring and no outlet control due to its toygrade reliability.
 

n2585722

2500 Club Member
View Badges
Joined
Jun 17, 2013
Messages
3,666
Reaction score
2,119
Location
Cedar Park, Tx
Rating - 0%
0   0   0
pa30crewchief, I would have to assume that for fallback to work that progamming would have to be in the power bar itself. On the controller I have after you setup the default you can test this by unplugging the powerbar from the buss. After a few seconds it should default to those settings. There is a chance for them not to react like that if the controller is still sending out a buss siginal even though it is not working correctly. So it is possible that the issue is the controller and not the power bar.
 
OP
OP
Ditto

Ditto

Valuable Member
View Badges
Joined
Apr 25, 2017
Messages
2,229
Reaction score
2,972
Location
Albany, NY
Rating - 0%
0   0   0
Good Morning, (Still waiting on a few parts so I can swap everything out)

First Flow Sensor Replaced: (In-Line to the Reefgium)

Picture of the Old Apex FMM:

IMG_1113.JPG


GHL Now inline:
IMG_1114.JPG


Configuration of Flow Sensor:

From within GHL Control Center Application
Expand Probe/Sensor controls
Click on Flow Sensors
Choose the Flow-Sensor Number you wish to use
Click on the Determine the Calibration button, and choose the type of flow sensor (Mine was 9000 l/h)
Connected at Level sensor (Choose the port number that the sensor is connected to) for my setup it was #4

Since this is l/h to convert to g/h you need to divide the number by 3.785 liters or below approx 380 Gallons an hour.

Flow_sensor_P4.jpg


Interesting how the FMM use to say it was 257 Gallons an hour:
Flow_Sensors.jpg
 

Nstocks

Active Member
View Badges
Joined
May 29, 2017
Messages
110
Reaction score
11
Rating - 0%
0   0   0
Rumor has it GHL released new features to myGHL.com? Is this true?

Highly appreciate you posting the comparisons between the two controllers :)
 
OP
OP
Ditto

Ditto

Valuable Member
View Badges
Joined
Apr 25, 2017
Messages
2,229
Reaction score
2,972
Location
Albany, NY
Rating - 0%
0   0   0
It does look like they release some new options in myghl. I am, trying to find release notes, but in poking around found:

Log Book Option is now on the side menu:
logbook.jpg


We can now add our own events now to the calendar under our own categories
catagories.jpg


Still playing with this, it seems you can add a single instance note, I am seeing if there a way to have a re-occurring not.

Apex fusion has a calendar event also, they can do re-occurring notices
apex_fusion_Calander.jpg
 
Last edited:
OP
OP
Ditto

Ditto

Valuable Member
View Badges
Joined
Apr 25, 2017
Messages
2,229
Reaction score
2,972
Location
Albany, NY
Rating - 0%
0   0   0
ProFilux Touch:

Very Simple to install. Connect the PAB Cable to the ProFilux Touch Control unit, plug in the Control unit that drives the display and plug in the display into the control unit and your in business.

ProFilux Touch Configuration: (Display what you wish to see on the screen)
From GHL Control Center
Click on Display
Click the check boxes next to the options you wish to display on your display.
Save changes and your done

display_1.jpg


ProFilux Touch Online: (This one is in the basement next to the Sump)
P4_Display.JPG


PS: Calcium Reactor Probe is not online yet (It not been calibrated just connected)

Apex Display in comparison:
Apex_Display.JPG


ATO Sensors:

I also placed the ATO replacement sensors online. I pretty much followed the GHL Video on a two sensor install

ATO_Online.JPG


This was Two sensor installation. and following the Video made it quite simple.

ATO_COmpleted.jpg
 
OP
OP
Ditto

Ditto

Valuable Member
View Badges
Joined
Apr 25, 2017
Messages
2,229
Reaction score
2,972
Location
Albany, NY
Rating - 0%
0   0   0
I am still waiting on the final parts that shipped out Wednesday so I can complete the installation:

Updated Firmware to 7.08 and GCC 1.0 (beta)

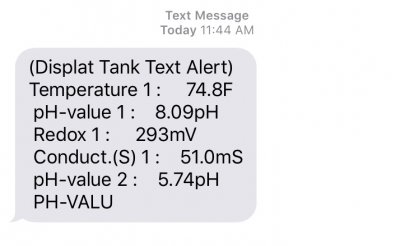
Once you have installed the update, and upgraded your Wireless Firmware, a new option appears called email notifications, you set up your email preferences, and the type of alerts/notifications you wish to receive.

alert_types.jpg


I have to say this is the feature I been actually waiting for, as I rely heavily on alerts, if an issue comes up within the tank. So I am very happy to see now that this is online for the P4.


Notifications are now working:
Date: Sat, 19 Aug 2017 16:39:08 +0200
Subject: Test
Test Message Temperature 1 : 75.3F
pH-value 1 : 8.06pH
Redox 1 : 294mV
Conduct.(S) 1 : 51.0mS
pH-value 2 : 5.72pH
PH-VALUE 3 : 8.06pH
Flow 3 : 2276l/h
Flow 4 : 1406l/h

Setup up text Notifications also:
text_message.jpg

 
Last edited:
OP
OP
Ditto

Ditto

Valuable Member
View Badges
Joined
Apr 25, 2017
Messages
2,229
Reaction score
2,972
Location
Albany, NY
Rating - 0%
0   0   0
Also with the update myghl is now recording and graphing probes within the website:

Graphing of Probes now in MYGHL:
graph_ph.jpg


orp_charted.jpg


As Apex users already know Fusion already allow you to graph your probes over a specific period of time, now MYGHL web service does it also. What I notice you can not do that Apex Fusion can do is cross compare two probes. But a great first step.. (Fusion Graph example on Post 24)
 
Last edited:

Fishnerd7

Community Member
View Badges
Joined
Aug 7, 2017
Messages
72
Reaction score
75
Location
California
Rating - 0%
0   0   0
Following intently. I like the detail in your thread here. Much needed for someone like myself who can compare. Thanks.
 
OP
OP
Ditto

Ditto

Valuable Member
View Badges
Joined
Apr 25, 2017
Messages
2,229
Reaction score
2,972
Location
Albany, NY
Rating - 0%
0   0   0
Sorry for not posting, work has had me working extensive hours so my conversion has slowed down and was also fabricating a light holder, but I am back at it.

Still left to Complete:
Migrate Chiller over
Migrate Heaters over
Migrate MP40's and Mp60's Over
Migrate Oxygen Sensor Over
Migrate Lighting and Schedule over
Migrate Calcium Reactor Over
Install 2 PAB on First Floor to Control Lights, heaters and Fans
Install Second Display unit
Install 2 Solenoids, for CO2 Scrubber for Skimmer
Install Expansion Box

On Order:
KH Director with 4 pump Doser unit
2.1 SA 4 pump Doser Unit


At the same time, I will be switching out my T5 lighting with Orphek lighting. The V4 slimline versions, with Mitras Light Bars, to be used for sunrise and sun set. I had a few friends switch to them, and love them so I thought I would give them a try, and after talking with support and sales, and the width of my tank they recommended these. (Lets see how they work) I have taken readings of my T5 lighting, and will place the LED lights over them and adjust the height for the same results.

Some Observations:
Sold as a rock without any issues (Running the latest Beta software)
Alerts have been coming in (Example when my Skimmer Bucket fills up)
System been graphing without any issues
Website can be slow from time to time
 
Last edited:
OP
OP
Ditto

Ditto

Valuable Member
View Badges
Joined
Apr 25, 2017
Messages
2,229
Reaction score
2,972
Location
Albany, NY
Rating - 0%
0   0   0
As I stated in the Previous post, I needed to fabricate a bracket to hold 6 LED lights. 3 of them are V4 Deep Blue, and 3 of them are V4 Reef. I wanted to make sure they went the entire length of the tank, and enough space in the middle to mount the two Mitras Light bars.

So using stainless steal a light holder is created to mount the lights side by side. Each light is Approx 24 inches. 1/2" along the outer side and approx 1 1/2 spacing between the lights.

First what it looks like in length:
llight_2.JPG


What one looks like up close and mounted:
light_3.JPG


And now Side by Side:
light1.JPG
 
OP
OP
Ditto

Ditto

Valuable Member
View Badges
Joined
Apr 25, 2017
Messages
2,229
Reaction score
2,972
Location
Albany, NY
Rating - 0%
0   0   0
Expansion Box is now online, and located under the fish tank upstairs. This unit has the O2 Card Installed, and will have connected to it 2 PAB, 1 Ptouch controller, 1 Vortech Controller, and last a Mitras Light bar controller.

Expansion Box: (Took me longer to run the cable)


Very Simple to install.
Connect the PAB Cable to the Expansion box.
And Follow the Steps back on Step 25 (It's very very simple)

With it now installed MyGHL Web Portal dashboard now has few more gauges. The plan is for the O2 to be installed in the sump downstairs via a 15ft BNC extension Cable from the expansion Box. Within the Expansion Box, PH controller, Salinity, ORP and temperature probe will be installed in the tank hidden within the overflow box and used for redundancy in the event an issue happens with the sump probes.
sensors_online.jpg


Flow Sensor 1 is my return pump and Flow sensor 4 is my reefgium.

Flow sensors Conparsions:
Flow Sensors can not be graphed in MYGHL and can be in the Apex Web Fusion Portal, as show in Post 63 above. You can set alerts on the Flow Sensor as shown below, like that of the Apex.

flow_alarm1.jpg
flow_alarm1_Apex.jpg
 
Last edited:
OP
OP
Ditto

Ditto

Valuable Member
View Badges
Joined
Apr 25, 2017
Messages
2,229
Reaction score
2,972
Location
Albany, NY
Rating - 0%
0   0   0
Lights all Mounted and Programmed:

This was a two step process since of the lights are controlled from the outlets and 2 are Mitras Simulation Bars which which were run down the middle to replace my Apex Lunar Module, which will be used to simulate sunrise and sunset and moon at night.

In Fusion, I use to use the Season Tables and apply them to outlets simulating my Blue would come on first, then I had 3 Metal Halide bulbs each one would turn on from East and west and turn off from East to west based on the season table, took me a while to dial it all in but was nice affect. Below is a snip-it of the code I had on one of the outlets shown in Apex Fusion.
Fusion_light_apex.jpg


Since I could not use the Season Table to control the P4 I had to come up with another way to do it, so below is what I did..

First lets show the lights mounted in the holder with the 2 Mitras Simulations Bars

IMG_1236.JPG


As you can see from the Photo above the Mitras Bar fits perfectly between them.

Step 1:
Installed Two Additional power bars to be used on the Display Tank to power up devices: (Post #25 shows how to add devices through the GHL control Center)

Powerbar 5.1 (Third Unit)

Switch Port Always on: GHL Touch Dispaly Power Supply
Switch Port #11 – Blue 1
Switch Port #12 – Blue 2
Switch Port #13 – Blue 3
Switch Port #14 – Tank Heater #1
Switch Port #15 – Not Used Yet

Powerbar 5.1 (Forth Unit)

Switch Port Always on: Mitras Driver and Expansion Box
Switch Port #16 – Reef 1
Switch Port #17 – Reef 2
Switch Port #18 – Reef 3
Switch Port #19 – Tank Heater #2
Switch Port #20 – Not Used Yet

Settings Timers:
Inside GHL Control Center, click on the Process right hand menu which will expand the Timers. (Post #40 Shows how it can also be done in the MyGHL Web Application)
timer_1.jpg


Choose the Timer you wish to set up, for me it was Timer 2
Click New
And Choose the Time interval you wish below this was 5:00am to 6:00pm
timer_2.jpg


I repeated this processes 6 times one for each of the LED based on the timer interval I set for them with the schedule of each shown below.

Timer Schedule:
Timer 2 - 5:00 to 18:00 (Blue 1)
Timer 3 - 6:00 to 19:00 (Blue 2)
Timer 4 - 7:00 to 20:00 (Blue 3)

Timer 5 - 10:00 to 15:00 (Reef 1)
Timer 6 - 11:00 to 16:00 (Reef 2)
Timer 7 - 12:00 to 17:00 (Reef 3)

Assigning the Timers to the Outlets:
Click on System
Click on Switch Channel and outlets
Click on the outlet your going to apply the Timer on and click edit
Change the Function to be Timer you would like assigned to the outlet

I repeated the process 6 times 1 for each outlet with the the final results below:

timer_3.jpg


Last edited:
OP
OP
Ditto

Ditto

Valuable Member
View Badges
Joined
Apr 25, 2017
Messages
2,229
Reaction score
2,972
Location
Albany, NY
Rating - 0%
0   0   0
Step #2:

Installed Mitras-Simu Driver Module (Used to drive the Mitras Simulation Bars)

By plugging it not into the PAB but the L1L2 and L2L4 ports of the Expansion Box

The Mitras is a Variable 1-10V device used to drive the Mitras Simulation LED. I plugged one of the Mitras Simulation LD into Output 1 and the other into Output 2.

The Mitras Simulation Bars are 4 Channel Each, one L# Channel for each color LED in the Mitras Simulation Bar

Since I am for now only going to do Blue and White, green and red can be added later, I need to first set two illumination channels.

Settings Illumination Channel:
Inside GHL Control Center, click on the Illumination right hand menu which will expand the Illumination Channels.
ill_1.jpg


Choose the channel you wish to work with and a window appears with the options
ill_2.jpg


It is Important since this is 1-10V controlled device that the Dimmable option is set so you can set the brightness of the channel from 1 to 100%.
Once you have select Dimmable click on new button and enter the star and stop time and brightness you want each interval of you light to be at.

For sunrise and sunset, I am just doing a Ramp up from 0 to 100 Blue effect and in reverse at sunset, and lower in the middle of the day
ill_3.jpg


For Moon, I am using a ramp up to 100% affect and check the box the Depends on moon-phase which will now adjust the intensity of based on the phase of the moon seen in the simulation tab
ill_4.jpg

Simulation
Clicking on the Simulation under the Illuminations shows the moon settings along with a few other nifty settings
Moon_5.jpg


Now that my Illuminations are all set up need to assign them to the 1-10V Ports:

Settings 1-10V Interface:
Inside GHL Control Center, click on the System right hand menu which will expand then select 1-10V Interface

ill_6.jpg

The Mitras Simulation Bars use four L Channels one for each Color (Red, Green, Blue and White) since I had an expansion module mine appeared on the L7 though L10, as you can see below I named mine, and set the blue and white to the illumination function I programmed above
ill_7.jpg


I programmed the remaining as Channel 32. This channel was the last one in my Illumination function list and I made sure it was set all to 0 or off.

Now I have Blue Ramp up, with Moon Effects over the tank.
IMG_1245.JPG


Taking PAR Reading also to compare between the T5 and Metal-Halide and the new LED lights.
 
Last edited:
OP
OP
Ditto

Ditto

Valuable Member
View Badges
Joined
Apr 25, 2017
Messages
2,229
Reaction score
2,972
Location
Albany, NY
Rating - 0%
0   0   0
Very useful post. I have had chronic issues with Apex 2016 and am following your experience closely.

What are your thoughts on the GHL Doser 2? Is there a way to replicate Neptune BoB/ floatswitch functionality?

The GHL solution for level sensing and flow metering looks super robust.

pa30crewchief I am sorry for missing your post,

I have not put my steps online about the doser been playing and testing it but will be soon but I Love it!!

I posted on the flow meters I like them, I wish they could be charted out or used for programming. Example I see flow dropping because of a possible leak.

I have used float switches now to turn off my skimmer and also switches for ATO also posted above.

Again I apologize for the very later reply.
 
OP
OP
Ditto

Ditto

Valuable Member
View Badges
Joined
Apr 25, 2017
Messages
2,229
Reaction score
2,972
Location
Albany, NY
Rating - 0%
0   0   0
VorTech Controller

Next on the to do list is the conversion of my 3 Vortech Powerheads (2 MP40 and 1 MP60) from my Apex WXM module to the GHL Vortech Controller.

I have a complex programming for my pumps based on the season table based utilizing 16 profiles on the Apex. To be fair to Neptune Systems you do not need to do it this way, but I always tried to simulate everything I could using the season table.

In Apex Fusion you have two ways to program your pumps, either through the use of a graphical interface where you can set the intensity you wish and the times, along with the effect you wish for the pump as shown in the screen shot below:
vor4_fusion2.jpg

or
Through the Advanced Tab where you can program it also by using profiles, which are just specific Vortech control settings you want to use for that specific period of time as show below:
vor3_fusion1.jpg


So above is what I am going to re-produce, maybe not perfect since I do not have access to the the season table but will be so close my fish and coral will not know the difference and if they do I will let you all know.:)

Adding GHL Vortech Controller

Again was very straight forward an quite simple, connect the PAB cable and then:

Inside GHL Control Center, click on the System and to the right you will see Assign devices on the right hand side click on it and highlight the Vor-tech-Controller and click Ok.
System will warn you your going to be disconnected
vor1.jpg

Reconnect with GHL Control Center and you will now see a new Menu option Appear called VorTech Overview
vor2.jpg

Expanding the VorTech Overview provides a new set of options:
Vor_3.jpg


Now the important steps, follow the steps outlined in the https://www.aquariumcomputer.com/downloads/vortech-controller-manual/ to pair the pumps to the GHL Vortech Controller. Page 7 of the manual

Reset your Pump:
Reset pump Press the mode- and set-key at the pump control unit both at the same time and hold them until the LED at the pump control unit flashes in the colors red, white and blue.
Afterwards press the mode-key at the pump control unit and hold it until the LED at the pump control unit flashes in the colors red and purple.
After that, press the set-key at the pump control unit and hold it until the pump resets. The LED switches off for a short instant and then becomes green.

Address the Pump:
Address pump Press the mode- and set-key at the pump control unit both at the same time and hold it until the LED at the pump control unit flashes in the colors red, white and blue.
Afterwards press the set-key shortly at the pump control unit. The LED at the pump control unit flashes in the colors blue and yellow.
The pump is assigned to the next available address. If the process doesn’t work properly, you have to start again with the point „Reset pump“.

Repeat each step above for each Vortech Pump
Address a further pump Further pumps can be assigned. For this, simply start with point Reset pump for any further pump.

Complete the assignment of the pumps When all pumps have been assigned, the process has to be completed. This is done in ProfiLux-Control. After activating the key end and save assignments, the LEDs of the assigned pumps don’t flash blue and yellow anymore, but they show the current operating mode. If this should not be the case for one pump, you have to begin again with the process for this pump with the point Reset pump.

Vinny and I are going back and forth I am having an issue pairing my Controllers to the unit. Both my MP40 and MP60 are QD versions. I will post the next steps once I have them paired and what we did to resolve it. I am very impressed on how fast GHL got back to me when I asked my support question again thanks Vinny for all the help.
 
OP
OP
Ditto

Ditto

Valuable Member
View Badges
Joined
Apr 25, 2017
Messages
2,229
Reaction score
2,972
Location
Albany, NY
Rating - 0%
0   0   0
My multiple Orphek LED slimline have been on the tank now for 1 full week, and the Coral seem not aware of the change. PAR reading have been taken all over the tank and I had to raise the LED from 10 inches to 11 inches above the tank to match the old PAR readings on my tank. With the lid on the tank the top of my tank at the water is approx 500, the middle 300 and approx 150 on the bottom. I have a few area's that are in the 100 PAR reading, but those are in crevices, and or entrance to some tunnels between rocks.

I am ecstatic with the results. Having the LED lights span the entire length of the tank allows for a even lighting affect across the entire tank.
Coral_1.JPG

Coral_2.JPG


Now that I been able actually see the Moon simulation in action over the last few nights using the White LED's in the Mitras Simulation Bar, I can say I am very impressed. Unlike the Apex LSM which on my tank was 5 string LED's provides a nice warm white glow across the entire tank based on the moon phase.
 

Reefing threads: Do you wear gear from reef brands?

  • I wear reef gear everywhere.

    Votes: 20 13.7%
  • I wear reef gear primarily at fish events and my LFS.

    Votes: 10 6.8%
  • I wear reef gear primarily for water changes and tank maintenance.

    Votes: 1 0.7%
  • I wear reef gear primarily to relax where I live.

    Votes: 22 15.1%
  • I don’t wear gear from reef brands.

    Votes: 83 56.8%
  • Other.

    Votes: 10 6.8%
Back
Top