Hi All,
I've finally completed my tank upgrade, from my old RSM 250 to my new 120. I had a couple main goals on this upgrade after living with the RSM 250 for a year and some change.
Goal One - Make the build as quite as possible, including as cool as possible so setup does not require a chiller.
Goal two - Make maintenance as quick and easy as possible
To that end, I did my best to get all DC pumps, and minimized any water trickling with plumbing. I also ran tubing from a nearby closet that I now use as a mixing station, to provide for AWC.
Finally, I wanted enough room in the stand to keep larger dosing containers and an algae scrubber at easy access.
Equipment Tank -
120 Sea Clear Acrylic aquarium - 48"x18"x30"
3 - RedSea ReefLED 90
2 - RedSea ReefWave 45
1 - Reef Octopus VarioS 8 Return Pump
2 - 300w BRS Heaters controlled by Inkbird ITC-306A
1 - Foursquare Aquatics APIS-60 ATS
1 - Reef Octopus Regal 150INT Varios Skimmer
1 - Fiji Advanced Sump 24
3 - Kamoer X1 Dosing Pumps
2 - Vivid Creative 1" RFG
3 - Marinecolor 5 Liter Dosing Containers
Equipment Water Closet
1 - AutoAqua AWC with 3 Smart AC Socket's
3 - Vivosun 120 pumps
1 - Sobaken YCTECH circluation pump
2 - XPAqua RO/DI Flood Gardian
1 - Marine Depot Advanced 4 Stage RO/DI Filter
Challenges I ran into -
HEAT!-
Even with all the pumps being DC, I initially had temps in the tank hitting up to 82* in the afternoon. To address the issue, I've added 4 60mm fans to the hood, spaced evenly around the lights, two suck air in and blow on the water, and 2 blow air out into the room. I've set them up on a controller to turn on when ambient temp in the hood reaches 82. This keeps my temp at about 80 during the day, and still leaves the tank near silent at night when the house quiets down.
What I have noticed is that mid morning is now when my tank is the warmest at about 80.5-81 degrees. I don't see this as a big issue, but somewhat opposite of the cycle the tanks should have. I might just attempt using a voltage stepper to slow the fans to a reasonable noise level and leave them on constantly to correct this. but I haven't decided it its worth the effort as of yet.
Return Plumbing -
Tank was originally plumbed with two 1" Return lines, and a single 1 1/2" Durso Drain. To achieve my first goal I wanted to convert to a Herbie style overflow. so I used the two 1" bulkheads for overflow and plumbed the 1 1/2" (reduced to a 1") as a return that tee'd at the top. this worked well, but relied on the check valve to stop water flow from return, and left me nervous. So I drained the tank to below the over flows, and tried again. Due to the angle of the overflow and returns I had to get creative with plumbing. Ultimately, I ended up running the 1" pipe up to top of the water level, and then used a 3-way angle/corner connection with 2 street 90's to create a 3-way U that slid directly onto the 90's attached to the return bulkhead's. I drilled a 1/8" hole in the bottom corner of the 3-way angle to break siphon. This configuration even if the check valve fail's leaves water level approximately 1/2" below the top of my sump.
Side view of overflow-

Algae Scrubber -
Ok, last issue I had was the algae scrubber... Ultimately I wanted to build something that maximized my space, was quite, and diden't cause my living room to glow purple all night long, and above all was easy to access and clean. My biggest complaint with the RSM was my ATS setup meant that weekly I had to get on a step stool, and scrape 4 lights and the chamber of algae while leaning over the top of the tank and getting beamed in the eye's with light... it was a PAIN. So I was attempting to make a scrubber that I could easily pull the screen and scrape weekly and that be it.
Big issue was that pulling something up out of the top a box would be difficult as the scrubber was already in the top half of my stand. So I attempted to make a box with a half open end that would allow me to just pull the pipe and screen from a bulkhead and slide it out the front. The first version worked almost perfectly and after adding a bit of rubber tape to stop water from dripping out it was ready to install. Fit perfectly, I had used every inch of space available to maximize screen size for the space I had.... unfortunately, I forgot to account for the inlet bulkhead and no matter how I positioned it the door stayed propped open by 1"... Back to the drawing board... So now I decide to stick with 12" dimensions, because cost of acrylic has skyrocketed from covid, and it will triple my cost for 2 more inches of screen if I by the larger sheets. Same basic plan, now a little easier since this is version 2, I add additional black acrylic in some spots to lower light spill even further thanks to the scraps from v1. After another 2 days of glue/wait/glue/wait, everything looks good, test it and works great, I install on my system, and after correcting a small leak its up and running. Three days later I look in on it, and I'm getting some good starter growth, but I notice that the acrylic sides have gotten wider, and now I'm getting a little splash out along the top. I add some rubber to the top, hoping its just settling. Another 2 days,and its spread even more and after inspections I see the back seem's are starting to split. My assumption is that I used to thin 1/8" acrylic for the sides and the heat from the light caused them to warp and split... well now what, I've got fish in the tank now, and rising levels from the move and new sand. So after much though, I suck it up and bought the Foursquare aquatics APIS-60, I'm pretty sure that v3 would have worked, but by this time I was over it, so I caved and took the easy out. You can see my review of the APIS-60 at the link below. All said an done, I'm pretty happy with my decision, although expensive, the APIS has shown amazing results and has easily met my needs.
https://www.reef2reef.com/threads/four-square-aquatics-apis-60-ats-review.748025/
Mixing Station -
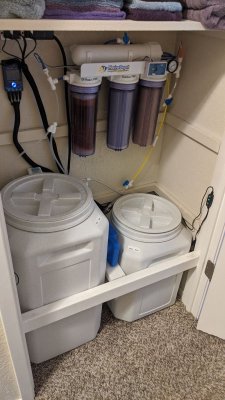
Located in a closet that shares the same wall with the aquarium. Tubing, and sensors are fished through the wall to the aquarium. Waste water from AWC and RO/DI goes to the crawl space and enters into the main drain line using a pvc saddle. Water is run from the nearby bathroom for the RODI. Each container has its own dedicated Flood Guardian so no need to swap sensor's and tubes. The Saltwater Vittles vault holds 20.2 g and RO/DI vault holds 13. the 2x4's were added to provide some support for the vaults side walls. The Vaults are not NSF certified, but are made from HDPE. Time will tell if I experience any leaching.
I hope to get this setup tuned to replace 1 full container a week in water changes, but currently I go through about 2 a week. One of the downside to the AutoAqua AWC is that you manually place sensors to determine the amount of water changed per set time period.
On the subject of the AWC, after much trial and error I have found that it works quite well. The pumps are horrible, so if this is how you plan to go, I would suggest getting the smart AC sockets so you can use the pumps of your choice. The only issue I have found is that is the low point sensor ends up out of the water (ie you lost that much water when adding new fish and didn't refill, then the pump will remove water until its failsafe is triggered (3 times the normal amount) in my case emptying the return chamber and filling my tank with bubbles. This isn't an issue if you refill to the point of the sensor being submerged.
Picks-
Mixing Station:


