Acrylic Fabrication Q & A

OP
OP
Turbo's Aquatics

Turbo's Aquatics

Super Duper Member
View Badges
Joined
Jun 7, 2011
Messages
2,806
Reaction score
4,032
Location
West Des Moines, IA
Rating - 0%
0   0   0
So, the implication is that when gluing up the 4 sided section and baffles you have to make sure everything is aligned perfectly with regards to what will be the bottom joint. And if it isn't, then what? Do you have to scrap it and start over? I thought I had seen something in the background once on that show Tanked where they were scraping some edges to make them line up, but that might have been a top joint which would be less of a concern I guess. I've seen a couple mentions of tanks being cut in half and made into smaller tanks (including in this thread) so I would expect a little misalignment after the cutting, even if you used table saw.
I've never had to scrap a job and start over. Worst case secenario, I had to actually take a 4-wall assembly and run it through my router table, and that was pretty a pretty hairy job to say the least.

With the razor blade clamp, you can do quite a bit. On one cross-braced sump where I had bonded 3 baffles together before bonding to the front wall, it ended up being off by nearly 1/8"+ (very poor planning, it was one of my first builds) and I scraped that down, it took quite a while. The thing is that when you have a large difference between the panels, you not only need to scrape the edge so that the 2 panels are flush, you also need to taper the entire panel edge (the one that is higher) so that the bottom (or top) panel doesn't have to bend very much. Also, you want that panel to sit relatively flat, and the only way to do this is to taper the entire length. That's why I say the priority is the bottom joint, because you want that to be as flat as humanly possible so that you don't have to end up putting the tank on foam to adjust for the inconsistency. The top euro, as long as that has a good bond, it doesn't necessarily have to be perfectly flat

Typically you want to get the chemicals that are labeled "Reagent Grade".
That's the term I was looking for

Here is what one I use looks like. Although I have started putting a longer blade into it. I think it helps keep it straight when you have a longer blade scraping the corner, pulling towards the edge point.
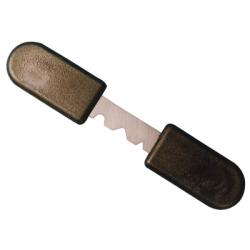
Using a long blade (like one from a ratcheting razor knife) is a great idea, I forgot to mention the "scraping to the corner" part. What that means is that you are placing the blade at a 45 degree angle across the joint so that the blade self-squares to the material. You apply a little more pressure to the side you need to knock down and take a minimal amount of material off the side that you are trying to match. With each scrape, you get closer and closer to "erasing" the bump until it's gone. If your parts are well matched, you should only have to take off a micrometer or two, which seems inconsequential but it matters.

Also remember when you are "picking" at the joint when adjusting the joint (so you can feel the ridge) this will leave a smudge on the surface you have to bond to the top/bottom, and even if you are dead-on perfect with your alignment, if you don't scrape off this smudge (5 or 6 passes with a razor blade usually does it) then you WILL end up with bubbles in that corner. I've never done this...:rolleyes:
 

dbl

It Takes Less Energy to be Nice
View Badges
Joined
Mar 13, 2014
Messages
15,945
Reaction score
90,199
Location
SW Florida
Rating - 0%
0   0   0
Alright acrylic pros, are these scraper's any good or a waste of money?

44640p.jpg
 

TaylorPilot

Valuable Member
View Badges
Joined
Aug 8, 2015
Messages
1,454
Reaction score
1,251
Rating - 0%
0   0   0
I've never needed one, they are for prepping edges that have been cut in a less than optimal method (score and snap or table saw). I personally don't think they have a wide enough blade for the corner prepping we have been talking about for the last half page or so. I would think they would be allot harder to use, because when hand scrapping an edge, nothing is keeping it perfectly square, so one corner might be higher than the other, letting in bubbles when you weld your seam.
 

Lowell Lemon

2500 Club Member
View Badges
Joined
May 23, 2015
Messages
3,979
Reaction score
16,872
Location
Washington State
Rating - 0%
0   0   0
Thanks for the reply.
A CNC machine would be great! Alas I only have the smaller things like table saw and router...
So, the implication is that when gluing up the 4 sided section and baffles you have to make sure everything is aligned perfectly with regards to what will be the bottom joint. And if it isn't, then what? Do you have to scrap it and start over? I thought I had seen something in the background once on that show Tanked where they were scraping some edges to make them line up, but that might have been a top joint which would be less of a concern I guess. I've seen a couple mentions of tanks being cut in half and made into smaller tanks (including in this thread) so I would expect a little misalignment after the cutting, even if you used table saw.[/QUOTE]

Rob,
Again it is easier to control the outcome before you start assembly. Use a series of camps and jigs like Turbo shows in his pictures before you glue. Set all the pieces together and make sure you are square and ready to glue. If you are out of square on the bottom baffle you can use a flush trimming bit (the bit has a small bearing the same size as the cutter) and a clamped guide or straight edge as a surface to trim the part back to square. Use a square to check all the sides of each piece first then move to assembly. An ounce of prevention is worth a pound of cure.
 

Lowell Lemon

2500 Club Member
View Badges
Joined
May 23, 2015
Messages
3,979
Reaction score
16,872
Location
Washington State
Rating - 0%
0   0   0
Alright acrylic pros, are these scraper's any good or a waste of money?

44640p.jpg
You are better to set up a router table with a carbide bit to remove the saw cuts before assembly. Take a look at my outline for that in this post. Scraping by hand is a exercise in futility. It is difficult to remove the same amount of material along the entire length of the part. I have one of those some where in my shop and just used it in the field to add a semi finished edge to some brace or patch.
 

Balz3352

Active Member
View Badges
Joined
May 5, 2014
Messages
498
Reaction score
253
Rating - 0%
0   0   0
Wow great stuff definitely need to read this a few times over.

What blades do you use?

Table saw and router amd whatever else you use to cut the material.
 

cromag27

octoaquatics.com - ig = @octoaquatics. view my sig
View Badges
Joined
Sep 7, 2013
Messages
8,249
Reaction score
11,239
Location
arizona
Rating - 0%
0   0   0
I'm a Freud guy myself, so I use their 'plexiglass' (sic) saw blade, double flat straight bits at various sizes as well as spiral bits at various sizes - all 1/2" shank.
 
OP
OP
Turbo's Aquatics

Turbo's Aquatics

Super Duper Member
View Badges
Joined
Jun 7, 2011
Messages
2,806
Reaction score
4,032
Location
West Des Moines, IA
Rating - 0%
0   0   0
I use a Diablo triple-chip 80 tooth plastics saw blade for table saw, a 3/4"-1" diameter Bosch 2-flute straight cutter for table router (edge prep) and a spiral up cut flush cutter for trimming off overage - I use Amana 1/4" & 1/2" $$ but top quality
 

cromag27

octoaquatics.com - ig = @octoaquatics. view my sig
View Badges
Joined
Sep 7, 2013
Messages
8,249
Reaction score
11,239
Location
arizona
Rating - 0%
0   0   0
New design for a lfs.

IMAG0068_zpsxt1rjviu.jpg
 

cromag27

octoaquatics.com - ig = @octoaquatics. view my sig
View Badges
Joined
Sep 7, 2013
Messages
8,249
Reaction score
11,239
Location
arizona
Rating - 0%
0   0   0
Two tier frag rack for one of those black plastic bins.
 

TaylorPilot

Valuable Member
View Badges
Joined
Aug 8, 2015
Messages
1,454
Reaction score
1,251
Rating - 0%
0   0   0
I am afraid that there aren't too many products that you can use at a hobby level. The higher end builders that bond plastic bottoms to glass tanks use a UV curable epoxy. I don't know too much about it, and there isn't too much info out there. They tend to keep that kind of info pretty close to the vest. What type of project did you have in mind.
 

TaylorPilot

Valuable Member
View Badges
Joined
Aug 8, 2015
Messages
1,454
Reaction score
1,251
Rating - 0%
0   0   0
Oh, well for something like that that isn't going to be structural, most people just use silicone. It doesn't adhere to the acrylic very well, but for something like a sump baffle that doesn't see allot of pressure, they work well. Same thing with an overflow box. Typically, the pressure is pushing the overflow towards the tank, so the pressure on the silicone seal is minimal.
 

TaylorPilot

Valuable Member
View Badges
Joined
Aug 8, 2015
Messages
1,454
Reaction score
1,251
Rating - 0%
0   0   0
What type of box is it. If it is a standard one that is inside the tank, and goes from top to bottom, then silicone is fine and should hold well. If is an external box, then that won't work, and you need to make the box out of glass. Just remember with the sump baffles is that they can't be tight fitting. Acrylic absorbs minor amounts of water and expands slightly. So if they are tight fitting and you install them in a glass sump, that can expand a little and crack the tank with outward pressure. I have found that if there is about 1/8 - 3/8" spacing, then they are fine.
 

Looking for the spotlight: Do your fish notice the lighting in your reef tank?

  • My fish seem to regularly respond to the lighting in my reef tank.

    Votes: 100 75.2%
  • My fish seem to occasionally respond to the lighting in my tank.

    Votes: 15 11.3%
  • My fish seem to rarely respond to the lighting in my tank.

    Votes: 8 6.0%
  • My fish seem to never respond to the lighting in my tank.

    Votes: 3 2.3%
  • I don’t pay enough attention to my fish to notice if they respond to the lighting.

    Votes: 3 2.3%
  • I don’t have any fish in my tank.

    Votes: 2 1.5%
  • Other.

    Votes: 2 1.5%
Back
Top