Acrylic Fabrication Q & A

OP
OP
Turbo's Aquatics

Turbo's Aquatics

Super Duper Member
View Badges
Joined
Jun 7, 2011
Messages
2,819
Reaction score
4,051
Location
West Des Moines, IA
Rating - 0%
0   0   0
Attached is a .zip file with the Cyro calculator. You can also get this from their website but you have to register I think

http://cyro.custhelp.com/app/answers/detail/a_id/133

I will stand slightly corrected, the thickness of the sheet depends on the length of the longest side and the height. Also, "closed" includes a brace, but that is still ambiguous as a perimeter-only brace is not equal to one with crossbraces (where required), and thickness also matters.

According to the Cyro calculator, 16" L x 24" H pushes you to 3/8" material. My gut tells me that it's not going to be so weak that it will blow out right away when you fill it or anything like that...and that you'll probably be OK. There might be a simple workaround to give you that warm fuzzy feeling that everything will really be OK. Let me think about it
 

Attachments

  • Cyro Calculator.zip
    14.1 KB · Views: 605
OP
OP
Turbo's Aquatics

Turbo's Aquatics

Super Duper Member
View Badges
Joined
Jun 7, 2011
Messages
2,819
Reaction score
4,051
Location
West Des Moines, IA
Rating - 0%
0   0   0
Bonding Order & Curing time between steps; Overage for Fillet; Planning Parts

These all kind of blend together so it made sense to cover them all in one shot.

Bonding Order

For the basic 6-sided box, there is a recommended assembly technique that goes like this:
(Note: "Front" and "Back" panels are interchangeable; it doesn't matter where you start)

1) Lay front down flat and bond the end panels to it
2) Wait minimum 8 hours
3) Lay back panel down flat, flip the entire front/sides assembly over and bond end panels to the back panel
4) Wait minimum 8 hours
5) Prep top edge of 4-wall assembly for eurobrace
6) Lay eurobrace down flat and place 4-wall assembly on top and bond
7) Wait minimum of 2 hours, longer if possible
8) Prep bottom edge of 4-wall assembly for bottom panel
9) Lay bottom panel down and place 5-panel assembly on top and bond
10) Wait minimum of 8 hours before moving, wait 20+ hours before flush trimming w/router

So that's the basic raw outline of the assembly process.

If it's a sump build, and you have baffles, you will want to install these as part of step #1. This is especially important for "structural" baffles; those being ones that are meant to separate sections with different water levels, or baffles meant to provide wall support for builds that use thinner material. Material thickness requirements/recommendations are a function of both depth and maximum width, so if you decide you are going to treat each sump section as a separate tank for calculation purposes, the baffles must be considered structural. Once the tank is built, i.e. the bottom is on, it's very difficult, if not impossible, to bond in a baffle and make it structural due to the nature of the capillary-only method.

Baffle are bonded to the front panel in step 1, then bonded to the back panel in step 3. The trick is that when you bond them in step 3, you have to start at one end and work your way to the other end, all the while maintaining alignment of the last (end) panel. So you bond the first end panel, make sure the other end panel is still roughly aligned (it doesn't have to be perfect) and let it set up for a while (maybe 20-30 minutes). Proceed to the baffles (which may or may not line up perfectly, meaning, you have to force them in position if you want them to be flush with the bottom) making sure the last panel doesn't get pushed out of it's eventual final position, then finally the last end. This is generally pretty straight forward until you get to up/downs, due to the proximity - this makes using the pins method a bit tricky (more on that later).

In Step 1, I bond all the panels in one right after the other. My only limitation is the number of jigs available. In step 3, I let the first end panel set up for a while (to make sure that manipulation of the remainder of the assembly doesn't open that joint up), then I knock out the remaining baffles and the last end joint quickly, one right after the other. The exception is when I have a significantly misaligned panel, in such a case I might have to clamp it in place and put weight on the assembly and allow that joint to firm up before going on to the next baffle. This is usually not the case though, but it depends on how well (square) you make your parts - that's another section though.

So that covers the majority of DIY builds, with respect to bonding order.

Overage for Fillets

Before going into part planning, a simple explanation of Fillets is required. I'm not talking about the tasty kind, I'm talking about the Mechanical kind.

When it comes to acrylic bonding, air intrusion into the joint is the enemy. Using a bonding technique like the Pins method allows for the formation of a fillet, which is essentially solvent + dissolved acrylic that gets squeezed/pushed out of the joint when the pins are pulled. This fillet will dry to a thin profile as the solvent evaporates, but without the fillet, the evaporation of the solvent results in air bubble creeping into the edge as the joint cures (and you won't see this right away - it will take a few hours).

If you cut all your pieces to the perfect final dimensions, then you can only allow for a fillet to form on one corner - the inside corner. The outside corner will end up with air bubbles intruding into the joint. So in order to prevent this, the trick is the cut the parts such that the outside corner also has an area where a fillet can form. After the tank is assembled, this "Overage" can be easily trimmed off with a router and a flush trimming bit.

It's worth mentioning that solvent alone is not what makes the fillet work: solvent + dissolved acrylic is what makes it work. The dissolved acrylic does not evaporate, so this in effect "seals" the joint.

Planning Parts

Per the Bonding Order, you can see that the overall dimensions of the build will drive the size of certain parts.

For purposes of clarity: "Length" is left-to-right, "Height" is top-to-bottom, and "Width" is front-to-back. Some use "Depth" to describe front-to-back but IMO this is too easy to confuse with "Height", so I opt for "Width"

1) The Length of the front, back, top, and bottom panels will match the Length of the tank
2) The Height dimension of the tank will include the Height of the front panel, plus the thickness of the top and bottom panels
3) The Width dimension of the tank will include the Width of the end/side panel, plus the thickness of the front and back panels

So that outlines the tank dimensions, and this is usually what people are shooting for. Such as, 72" x 24" x 24". But that doesn't mean that your front panel needs to be cut to 72" x 24"...this is where Overage comes into play.

With respect to the overall dimensions of the tank, some panel dimensions will also have Underage. This compensates for the thickness of the panels. The following list outlines the dimensions of each panel and how they are affected by Overage and Underage. Dimensions are called out with respect to their orientation on the finished tank.

1) Your top and bottom panels will have Length Overage and Width Overage
2) Your front and back panels will have Length Overage and Height Underage
3) Your end panels (and baffles) will have Width Underage and Height Underage

Furthermore, your front, back, and end panels will have the exact same height dimension. You will note that none of the panel dimensions you start with will actually match the final dimensions of the finished tank.

Overage needs to be approximately 1/8" - however, some panels have overage in more than one direction. So, for the example of a 72" x 24" x 24" build, your top and bottom panels will have overage in all 4 directions; so adding 1/8" to all 4 sides of the panel means adding 1/4" to the overall dimensions. The top/bottom panels would then be 72.25" x 24.25". You can use more overage, 1/8" is what I use as a minimum. I've gone to as much as 1/4" overage, usually on the top/bottom panels. What can happen is that if your edge finishing isn't quite perfect, when you put your 4 walls together it might not be a dead-on perfect square (when viewing from the top-down). I might end up a bit more like a parallelogram, and this isn't horrible, but if you're even off perfect by 1/8", then your overage is gone in 2 corners (and it excess on the other two). If it's really off...then your overage is negative, and you have to compensate for that by "forcing" the 4-wall assembly to be more square, which is usually no big deal, but it can be difficult for complicated builds. So in short, plan a little excess overage on the top/bottom panels, it's cheap insurance.

Underage needs to simply match the panel thicknesses. For the Height dimension of the front/back/end panels, add the thicknesses of the top & bottom panels and subtract that off. For the Width dimension of the end panels, add the thicknesses of the front & back panels and subtract that off.

In the example of the 72" x 24" x 24" build, let's say that you are going to use 1/2" acrylic. I won't get nit-picky and tell you that Plexiglas and Acrylite are actually 0.472" and not 0.500".

Your front/back panels will have Overage on the length dimension (so, 72" + 1/8" + 1/8" = 72.25") and Underage on the height dimension (so, 24" - 0.5" - 0.5" = 23"). Final part dimensions = 72.25" x 23"

Your end panels will have Underage in all dimensions: width (24" - 0.5" - 0.5" = 23") and height (24" - 0.5" - 0.5" = 23"). Final part dimensions = 23" x 23"

Summary of dimensions for 72" x 24" x 24" build example:

Top/bottom: Length 72.25", Width 24.25"
Front/Back: Length 72.25", Height 23"
Ends: Width 23", Height 23"
 
OP
OP
Turbo's Aquatics

Turbo's Aquatics

Super Duper Member
View Badges
Joined
Jun 7, 2011
Messages
2,819
Reaction score
4,051
Location
West Des Moines, IA
Rating - 0%
0   0   0
Solvent Welding (Pins method)

Per the post above regarding Overage and Fillets (not nearly as mouth-watering as Filets), it's time to explain the Pins method.

At the very basic essence, the Pins method is simply inserting a pin (wire) into the joint to force a very small separation of the 2 surfaces to be joined, filling this separation with solvent, waiting a certain amount of time (referred to as soak time) and then pulling the pins out. It sounds very simple, and it really is that simple. However, there are always methods of implementing this process that work best.

Here's my list of supplies for doing the Pins method:

1) ~4" wide strips of 3/4" MDF (various lengths)
2) Campermount adhesive-backed foam, 1.25" x 3/16" thick. Brand matters, the Home Depot stuff sticks to the panels and sucks royal big time. WJ Dennis brand from Menards does not.
3) Shims. The thinner, the better. Standard ones are OK but sometimes you need really really thin shims that don't have a steep taper. I found these in the form of cedar shakes, $15-$30 for a bundle. You have to sort through them but you can easily end up with 50 small shims that you will use over and over. I have a cup full of 3-4" long, 1/2" wide shims. Stick the rest in your closet for that fresh mountain getaway feeling every time to go to get clothes, ahhhhhhh!
4) Wire; I use 28 gauge picture hanging wire, you can use just about anything, even stripped & cleaned twist ties
5) some kind of angle bracket
6) clamps

I probably missed something but #1-#4 are the important ones, your clamps and brackets will vary based on how many times you are going to build something, you can improvise for a single build.

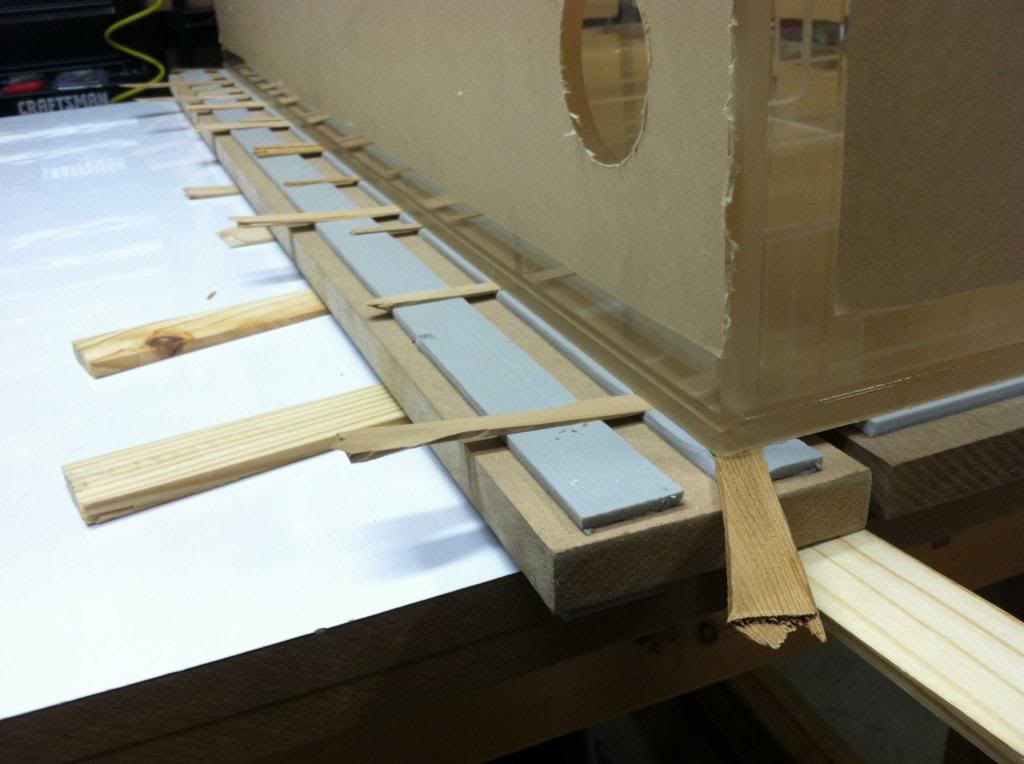
MDF Strips & why they are important.

Start by applying the foam to the MDF strips; 2 on each side like so:

IMG_1594_zpsb5a9870c.jpg


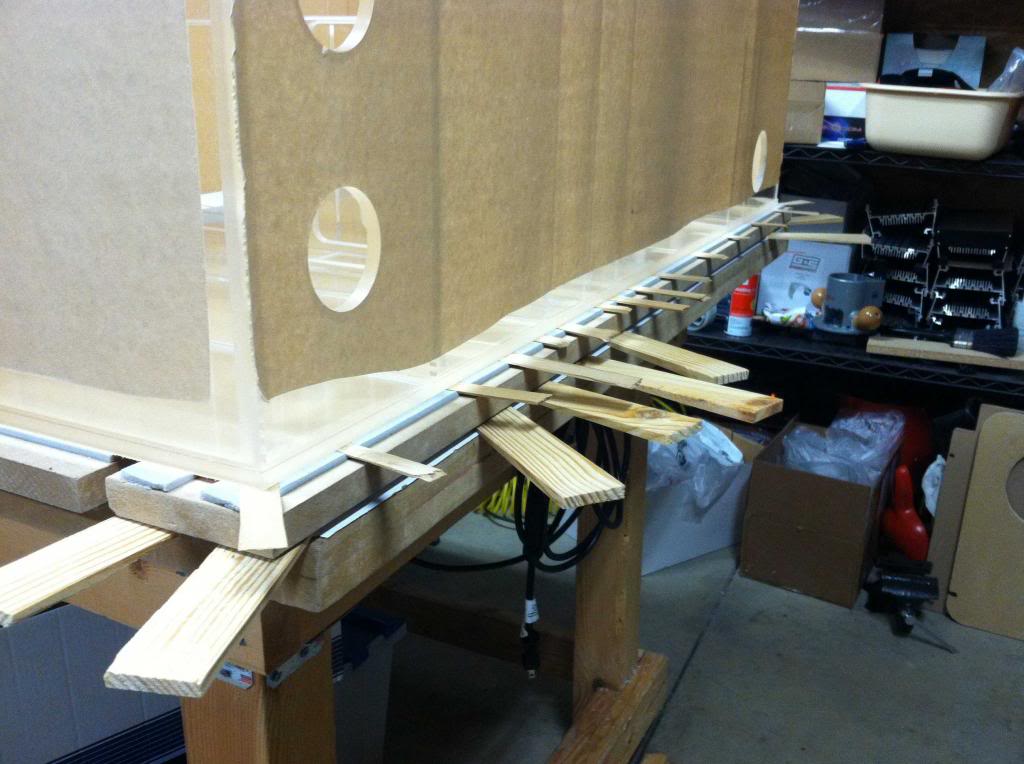
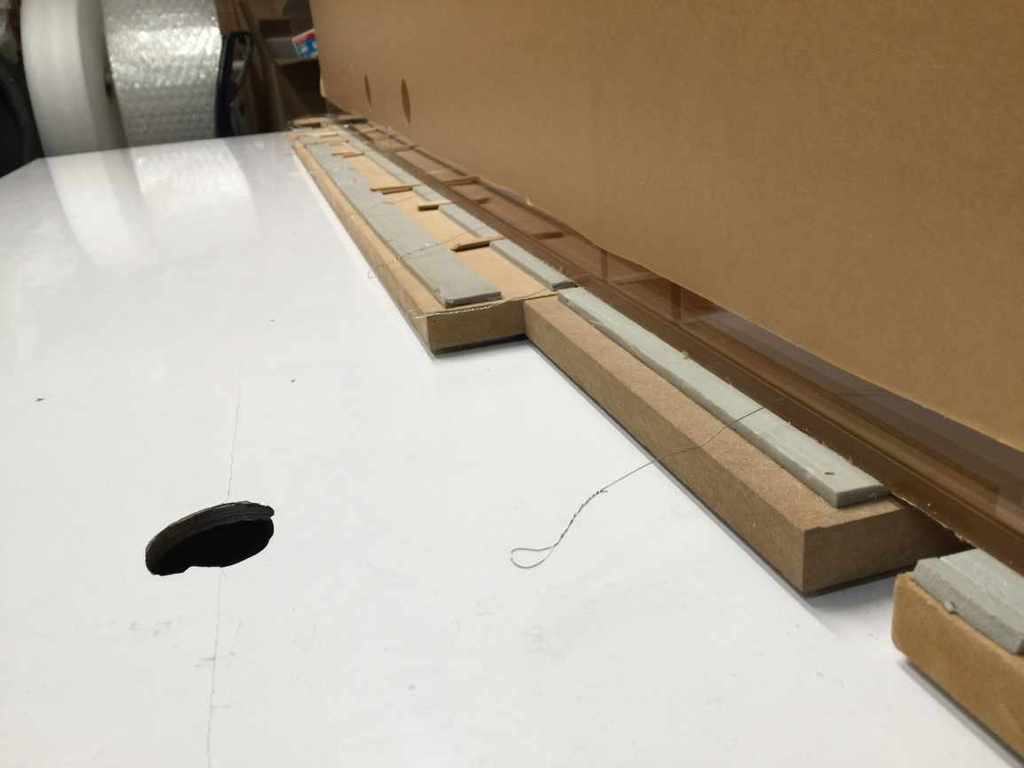
You will want something like this to span under the length of the joint. These boards do many things:

- They help remove irregularities in the work surface
- They will absorb excess solvent and prevent your work from sticking to the work surface
- Solvent won't cause the paper backing to stick to the foam
- Provides you with locations to shim in a general as well as a localized manner
- Helps spread out the effect of shimming
- Provides a cushion to push against for adding pins
- Makes you look like a pro when you post build pics

Here's an example of pretty much all of these in action:

IMG_1595_zpsd4c91f76.jpg


Big shims are in use under the MDF boards because the table in the pic may look awesome, but it sucks for big builds (very irregular in certain areas) so I have to make big adjustments to get the joint tight, then I use smaller (thin) shims between the tank and the MDF strips to make fine adjustments to the joint.

Wire

I cut the wire into pieces about 4-6" long, then I bend one end into a loop and twist it to create a "handle" that will be used when you pull the pins out. For the other end (that is inserted into the joint), you will want to clip this with a good quality wire cutter before using it. You need a clean cut! The cutter that usually comes with the wire is OK for cutting to length, but it leaves a barb on the end that can dig into the material and make it difficult to pull out of the joint. I use and end cutting nipper, which is a tool you can get anywhere pretty cheap - it makes a very clean cut.

You can (hopefully) see the pin/wire here:

IMG_5097.jpg


Right Angle Bracket

I made a few of these myself out of particle board. You can't see it, but the corner there the 2 perpendicular parts of the bracket come together is beveled off

IMG_4985.jpg


The downfall of the ones I use is that you can only access one side of the joint. I could fix this easily by cutting out the inside corner of the bracket on a table saw...one of these days.

You can also use a standard right angle bracket with the corner cut out. Whatever you use, you need the corner of the bracket that is right in the joint beveled or cut away so that it doesn't bond to the material when you run the solvent

Process

I'm going to skip over a few steps such as stripping the paper and cleaning & blowing off the bonding surfaces, but those you would obviously need to still do. So this starts with the assumption that you have are ready to set the joint up for bonding (surfaces cleaned and prepped).

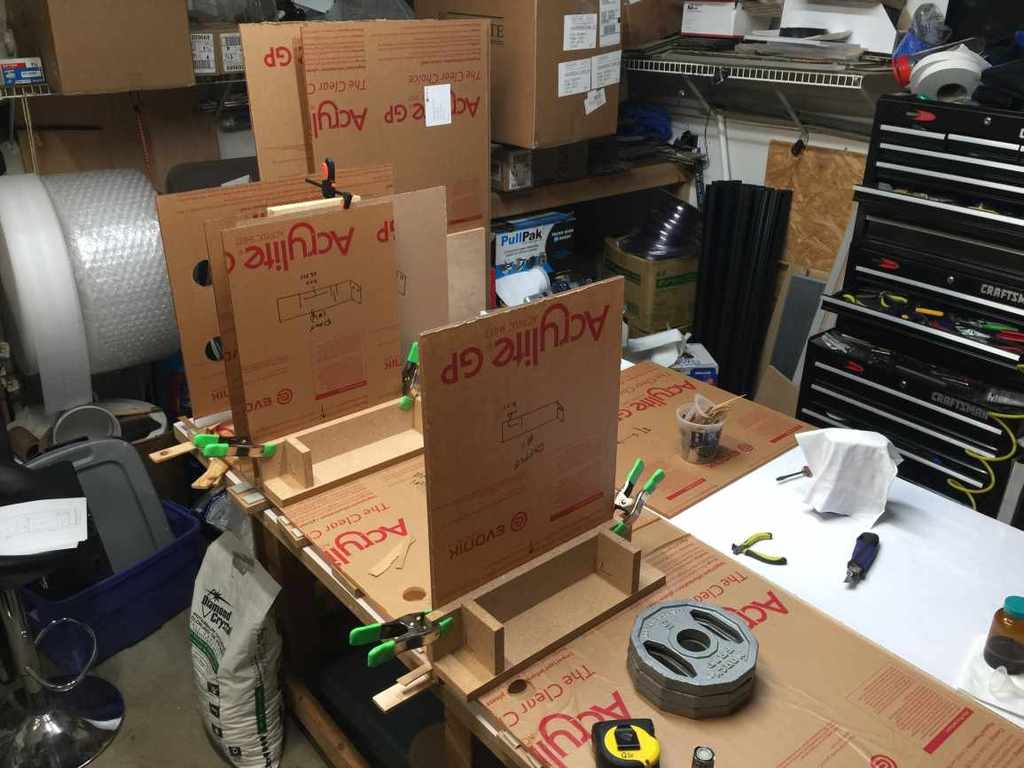
Step 1) Lay foam boards under horizontal part.

You will want to place one board parallel with and directly under the joint, such that the 1.25" wide strip of foam will roughly align with where the second (vertical) panel will be placed. Then, place additional strips such that the entire horizontal panel will be supported. You don't want the panel to sag, as this will put an angle on your joint. Use as many foam boards as you need to get the job done.

Step 2) Place the vertical panel in position and clamp to right-angle bracket.

You only (ever) need to clamp the vertical panel to the right-angle bracket. Do not clamp the bracket to the horizontal panel. You want the panel + bracket to act like one piece that you can move around. Use simple hand-squeeze clamps, no need for bar clamps or C-clamps (in fact, those would be problematic, so you don't want to use those). Make sure that the bottom edge of the vertical panel and horizontal part of the bracket are co-planar. I usually do this by holding the bracket down lightly and then bringing the vertical panel to it, letting loose on the panel a bit, then clamping them. Put the vertical panel back in position and loosen the clamps one at a time, just long enough to allow the panel to "settle". You may have to repeat this in Step 3 depending on the gap.

Step 3) Snug up the joint.

This is a "dry fit" step. Your goal here is to make those 2 pieces touch all the way along the joint, because this is the position the 2 pieces will be in after you set the joint. I find the best way to view the joint for a gap is to look along the joint from one end with decent lighting, and if necessary, hold a small flashlight and focus the beam right on the joint and run it back and forth. You will be able to see where the material is touching and where there is a gap.

You will also be able to see if you are leaving an even amount of overage across the joint. In the case of bonding an end panel to the front, this is important, because uneven overage means your panel will not end up vertical, and the finished edge of the end panel will not be perfectly flush with the top/bottom panel (which could allow air to intrude). This is usually not a huge deal unless you're just way off. In which case, what were you thinking? Geez.

Use shims as necessary to tighten the gap between the horizontal panel and the vertical panel sitting on top of it. Sometimes you will have no gaps. If you have no gaps, then congratulations, you don't need to shim...yet.

Step 4) Pinning and shimming

Remember that overage? Here's where this comes in again. Hold the pin in one hand, with the end of the pin in contact with the joint. Now press down on the overage. Pin should slide right into the joint. Boom.

Pins should be inserted every 6" or so. Too close, and it can make shimming a total pain. Too far and you might end up with not enough of a gap. You want enough of a gap to allow the solvent to wick into the joint, without it being too little which can result in not enough squish-out for the fillet.

Pins only need to be inserted far enough into the joint to cause separation; do not insert the pins such that they extend through the joint as this will form a dam and prevent solvent from wicking past the pin! Try to insert the pins about the same distance for every pin.

The longer the joint, the higher the odds that pins will get loose. You can place a shim under pins that are loose upon insertion, or under other pins that become loose as you insert new pins. But sometimes it's better to let a loose pin fall out and come back to it later, as it may not need as much shimming after the joint is fully pinned. This is especially the case for top/bottom joints where pinning 2 adjacent sides will result in loose pins that will tighten up after you put pins in the other 2 sides.

Once you have pins in place, start tugging. you don't want to tug hard, the point is to search for pins that really come out easily. A light tug should not pull a pin out, if it does, add a shim and move to the next one. Keep going until you can't tug out a pin with a full trip around the joint. This means if you have a bottom joint with 20 pins and the 11th pin is loose and requires a shim, you check all 20 pins again. That one additional shim or even a simple adjustment to a shim can actually cause a pin in a seemingly nonsensical and completely unrelated location to fall out.

Step 5) Blow out the joint

After all pins are set, blow out the gap with canned air - same stuff you blow out electronics with. It's nice and static free, just don't tip a full can too far off vertical as it will blow out the liquid, forcing you to take the joint apart to clean it off (it may look OK but, no, it's not). Sometimes the canned air will blow loose a pin and you have to go back to Step 4.

Step 6) Secure the assembly

This is optional but it helps sometimes. If you have a right-angle bracket, you can add a small amount of weight to the horizontal part to keep it in place. Don't clamp though, at least, I don't.

Step 7) Run the solvent & pull the pins

Again, I'm going to skip the specifics of applying solvent and leave that to another post as there are many pointers related to this and joint preparation, avoiding bubbles, fixing bubbles, etc...so this step assumes you understand how to apply solvent using a squeeze bottle & needle.

I usually get all ready to run the solvent, then I set the bottle down and take a moment to realize that this is it. This is the moment when you could screw the whole thing up. Then I clear that out of my head, take a couple breaths and now it's go time. Blue 42, set, HUT!

Start a mental stopwatch in your head, starting with the time you first start applying solvent to the joint. You want to allow a minimum of 15 seconds of soak time before pulling the pins, and depending on the solvent you are using, it can be as much as 30 or even 45 seconds. Much longer past that and you might have problems, depending on the material thickness (thicker material/joint, longer working time).

Sometimes, I will run a quick second pass of solvent right before pulling pins, moving at 2x speed or faster. I'll do this if I think it took a bit too long from start to end of joint, just to make sure there is enough squish-out.

Start pulling pins, starting with the same location you started applying solvent. Pulling pins without causing the vertical panel to slide is the trick - it's hard to explain, it's just something you have to learn.

You don't want to "hold" the vertical panel, because when the pin "pops" out, you have a natural tendency to compensate for this by pushing on the vertical panel. Yanking on the pin can work depending on how far you inserted the pin and how heavy the parts are (for a top/bottom joint, yanking works great until the last few pins).

What you can do it put your thumb or fingertip against the edge of the horizontal panel right next to the pin, and pull the pin with your other hand. The horizontal panel prevents you from pushing on the vertical panel upon the "pop". Or, you can lightly press down on that now ever so handy overage, the same way you did to put the pin in.

If you practice enough, you can grab the pin between your thumb and pointer finger and put your thumb knuckle on the vertical panel and "roll" your thumb backwards a bit, pulling out the pin without the "pop" jarring things badly.

All will be right with the world until you go to pull out the last pin. Sometimes when you pull that last pin, that's when things start to slide. You would be amazed how slick the joint is. I've had a 110 gallon 36" tall build made with 3/4" walls slide on me after pulling the last pin on the bottom panel joint. But that's what the next step is for.

Step 8) Making Adjustments

For an end panel or baffle, you have about 15 seconds to make adjustments before the solvent sets up enough that you won't be able to move it. During this time the critical alignment point, IMO, is the bottom joint. What I do it run my fingernail up and down (pointing it toward the direction of travel) so I can feel if there is a difference between the alignment of the 2 panels, making adjustments as needed. Again, this is a "feel" thing, and it doesn't have to be dead-on perfect. Now don't forget the other side (top joint). And don't forget to check to make sure the overage is still even! Basically this is 15 frantic seconds checking to make sure things are lined up right, followed by the realization that you can't change it now, and you just have to hope that you didn't just screw the pooch.

For a bottom/top panel, it's a much longer joint and it's easy to forget that you need to check alignment all the way around. You can pull that last pin and sit there on that end making adjustments until it looks great, only to realize that the other end slid 1/4" and part of it is off the panel. Not like that's happened to me, nope. Never happened to me. Never never never. Except for that one time.

Step 9) Loosen clamps

For a vertical panel bond (not a top/bottom joint), after you have the joint in position and it has firmed up enough so that you can't move it, perform this step. If you placed any weight on the right-angle bracket, remove it before doing this step!

Put very light downward pressure on the top edge of vertical panel, then carefully release each of the clamps one at a time - just for a fraction of a second. The thought being that while your dry-fit Step 3 should have closed the up the joint, there is a fraction of a tiny bit of material on each side that got dissolved, and you want to now close that gap. I know, we're talking nanometers here, but hey guess what air is smaller than nanometers so enough of your backtalk, keep that up and you get no dessert kiddo. Wow that was random

Step 10) Add weight

This is a good step especially for top and bottom joints, as well as the second end joint (end to back) where you have a flat surface on top so you can easily place something across the top of the assembly and add weight. Any weight will do. I've literally used a 2x4 to span across, then put 12 packs of beverages, camping chairs, soccer balls, even small dogs. Ok maybe not dogs.

For end panels or baffles (first joint) where there is no surface to lay a weight across, if you want to you can use small sandbags as long as they don't cause the panel to tip. Personally, I just put the weight back on that was removed in Step 9 and call it good.

Step 11) Check shims

I say "check" and not "adjust" because you may not need to adjust anything. Some recommend pushing all the shims in a little bit...but, if you only needed shims on 1/4 of the pins, this would actually cause the areas with no shims to loosen up. The combination of the 2-sided MDF+foam boards plus all that prep plus weights should be enough to ensure that the joint is snug as a bug in a rug at this point. But if you want to walk around and give each shim a little push to make sure it's snug, knock yourself out.

Step 12) WAIT.

Don't touch anything. Let the joint cure. The longer it sits there without any movement, the better joint strength.
 
Last edited:

traumajeff

Active Member
View Badges
Joined
Sep 4, 2014
Messages
214
Reaction score
98
Rating - 0%
0   0   0
Great update! I really want to build my own sump! What are your thoughts on having the pieces pre-cut to the right size? I'm limited on tools, and can't justify buying them just for this build.
 
OP
OP
Turbo's Aquatics

Turbo's Aquatics

Super Duper Member
View Badges
Joined
Jun 7, 2011
Messages
2,819
Reaction score
4,051
Location
West Des Moines, IA
Rating - 0%
0   0   0
The issues with precut to size is the finished edges of the front/back and all 4 sides of the ends, and squaring. The edges should ideally be router finished but that's not totally necessary. Squaring is much more important because it's harder to fix without the right equipment.

Most acrylic suppliers will have a good panel saw so they can cut to exact dimensions, but "exact" is a pretty relative term. Most are not geared towards the specific requirements of aquarium building, so unless you stress to them that you need certain dimensions to match dead-on, you'll get variations in dimensions, and even 1/10th of a millimeter (or even less) between the height dims on end vs front vs back will mean your welded joints will end up with air pockets. But, you can correct this after you bond the 4 walls together by scraping with a razor blade...its just not fun.

Also you can finish prep saw-cut edges with a razor blade, or a bench jointer, or even a tabletop router, as long as they are initially square.
 

dbl

It Takes Less Energy to be Nice
View Badges
Joined
Mar 13, 2014
Messages
15,945
Reaction score
90,203
Location
SW Florida
Rating - 0%
0   0   0
Okay Floyd, so far I’m following along and understanding your excellent tutorials and processes. I do have one question and you may eventually get to it. If that’s the case please just say so and I will await that particular lesson/post. I certainly don’t want to interrupt this great series.

As you know (because you were kind enough to help already) I’m building a sump. It’s my understanding the baffles should be bonded during the first step of post #22 above. Is it still possible, or necessary, to use the pin method for the baffles? If so, an explanation on that would be terrific. I get the pin method for the end panels, but since the baffles are “throughout the middle” of the front panel, not sure how the pin method can be achieved.

Again, if it’s something you’ll get to just say so. Lastly, thanks so much for taking the time to do this for the rest of us!!!
 
OP
OP
Turbo's Aquatics

Turbo's Aquatics

Super Duper Member
View Badges
Joined
Jun 7, 2011
Messages
2,819
Reaction score
4,051
Location
West Des Moines, IA
Rating - 0%
0   0   0
If the baffles are not structural, i.e. the "up" baffle of an up/down, or if they only serve as a section divider and there is only a slight level difference, then no you don't technically "have" to use the pins method. However one thing that the pins method allows you to do vs the simpler capillary action method (a couple of way to do this, one better than the other) is that you have more working time to adjust the panel location. When you are wanting to create a seal so that water can't leak under the baffle when you bond to the bottom, you will want the bottom edges of the baffle and the front & back panels to line up. So the first joint you bond, you will want to be able to move/adjust that baffle before it sets up.

The "better" way to do the capillary method, for the first bond, is to get it in place and then tip it slightly so that only one edge is in contact, run the solvent, wait for 10 seconds, and then tip it to vertical. In most cases, you can do this and the panel will stay vertical and you can let go of it, but if your finished edge isn't square, then gravity takes over. If you have even a simple right angle bracket, you can use the pins method and just put one pin in, or two, and do the joint quick. Baffles are pretty easy in that respect.

When you bond the other side, you can't tip the panel to create the gap so this is where it's handy to be able to use one or two pins again. Otherwise, you can just wick in the solvent and fill the joint with normal capillary action, but you will get a lot of bubbles and more will form as the solvent dries. It will hold, and I wouldn't consider that a strong structural bond (it may "pop" over time) but you can seal it so that it's watertight by running a few beads of Weld-on #16 or Craftics #33, or a thin bead of silicone even.
 
OP
OP
Turbo's Aquatics

Turbo's Aquatics

Super Duper Member
View Badges
Joined
Jun 7, 2011
Messages
2,819
Reaction score
4,051
Location
West Des Moines, IA
Rating - 0%
0   0   0
Solvent Welding (Capillary-only method)

I sort of covered this in my last post above in response to @dbl but I'll expand in this method a bit.

Solvent is thinner than water, so you can take 2 pieces of acrylic and place them in contact with each other, and when you apply solvent to the dry joint, the solvent will get naturally "sucked" into the joint. This is referred to as capillary action, or "wicking".

The solvent is exactly that: solvent. The primary ingredient of all acrylic solvent is Methylene Chloride (I call this MC for short). Off-the-shelf products like Weld-on #3 and #4 are primarily MC, along with a bunch of useless fillers that make it legal in Orange County, CA or some crazy thing like that. Literally, that is why. They serve no other useful purpose. I'll go into more detail about solvent and the different kinds available in another post.

Solvent actually dissolves the acrylic a little bit, then when the MC evaporates, the 2 pieces have been fused together. This is very similar to PVC pipe cement, which is also solvent. So why this description? Because solvent takes time to dissolve acrylic, the more time without direct material contact, the more dissolving. The more dissolving (within reason) the deeper the "fusing" on both sides.

When you perform a capillary weld, you are reducing the soak time to the minimum amount and the bond is sometimes instantaneous. This is great for crafts and things, but is usually not sufficient for a structural bond intended for a pressure vessel (a fancy term for something that has to hold water and not explode one day, randomly).

Letmetellyoualittlestory.

I helped a friend of mine repair a 180g sump: 6' x 2' x 2', all 3/8" material with a eurobrace, all capillary welded. He had grabbed it by the eurobrace and picked it up, and ripped the end of the eurobrace right off. The weld separated like it had been held together with Elmers glue. Also, the sump had a vertical seam failure that occurred in the same manner; the panels just separated right at the seam. That's a capillary weld for you. And that is why you don't use that method for tank building.

There are applications where it works, and sometimes, where you have no choice.

The best way to do a capillary weld is by placing the parts together in their final location/position (same as pins method, one panel flat/horizontal, the other vertical on top of it), then tip one panel slightly sideways so that only one edge is touching, creating an air gap. Apply the solvent and then just hold the piece there for a little bit. You don't want to wait 15-20 seconds, because your gap will be much less (vs pins) and thus less solvent, thus less working time, thus enough thuses. After 5-10 seconds, put the panel back to vertical and make any adjustments to the position (you only have a few seconds, maybe 10). Also the panel will slide on you, so when you get to that fully-vertical point, watch out for that OH ^$%# moment when it flies out of your hands and smears all over the place. With a little practice, you should be able to get it to that final position and it should stay there on it's own without tipping over after about 20-30 seconds. You can also take your solvent applicator and run a quick bead of solvent on either side of the joint to help avoid those creepy bubbles. Using this method, if you can, still provides a decent bond, and if done right, it can be considered structural to a point; good for sump baffles and other components that you really don't want to break loose, but still IMO not for external joints.

The non-preferred method is to simply place the pieces together and run solvent along the joint. The solvent will sick in very quickly and the bond will be nearly instant. Usually, you get lots of air bubbles, and sometimes pockets of material that don't get any solvent, and you can't "push" solvent in, because the solvent has bonded all around it and the air is trapped in a pocket. Some of these gaps/pockets are big enough to allow water to get through. My Dad (who makes acrylic display cabinets) made a box once using this method and we all had a good chuckle when he put water in it and it poured out around the entire bottom seam.

Here's where you might run into the need to use the direct-capillary method: if you are building a sump with baffles, and you have a set of up/downs that are 1" apart, you can bind these to the front panel one at a time, no problem. The issue comes up when bonding them to the back panel. Sometimes you can pin the 2 outer baffles (the "down" baffles) and this will force a gap to naturally form under the "up" baffle. Then you run solvent on all 3 at the same time and you're good. Sometimes, this doesn't work all sweet and nice though, and that baffle is in contact all across, and it's nearly impossible to get a pin in the middle of that panel. In such an instance, the "up" baffle is not a pressure-baffle, so you don't really care. If you have to do a direct-capillary joint here, it could be worse. the joint might look nasty, but it's only on one side and if it's on the back, who's gonna see it? (that's why you bond the ends/baffles to the front panel first!!)
 

dbl

It Takes Less Energy to be Nice
View Badges
Joined
Mar 13, 2014
Messages
15,945
Reaction score
90,203
Location
SW Florida
Rating - 0%
0   0   0
If the baffles are not structural, i.e. the "up" baffle of an up/down, or if they only serve as a section divider and there is only a slight level difference, then no you don't technically "have" to use the pins method. However one thing that the pins method allows you to do vs the simpler capillary action method (a couple of way to do this, one better than the other) is that you have more working time to adjust the panel location. When you are wanting to create a seal so that water can't leak under the baffle when you bond to the bottom, you will want the bottom edges of the baffle and the front & back panels to line up. So the first joint you bond, you will want to be able to move/adjust that baffle before it sets up.

The "better" way to do the capillary method, for the first bond, is to get it in place and then tip it slightly so that only one edge is in contact, run the solvent, wait for 10 seconds, and then tip it to vertical. In most cases, you can do this and the panel will stay vertical and you can let go of it, but if your finished edge isn't square, then gravity takes over. If you have even a simple right angle bracket, you can use the pins method and just put one pin in, or two, and do the joint quick. Baffles are pretty easy in that respect.

When you bond the other side, you can't tip the panel to create the gap so this is where it's handy to be able to use one or two pins again. Otherwise, you can just wick in the solvent and fill the joint with normal capillary action, but you will get a lot of bubbles and more will form as the solvent dries. It will hold, and I wouldn't consider that a strong structural bond (it may "pop" over time) but you can seal it so that it's watertight by running a few beads of Weld-on #16 or Craftics #33, or a thin bead of silicone even.

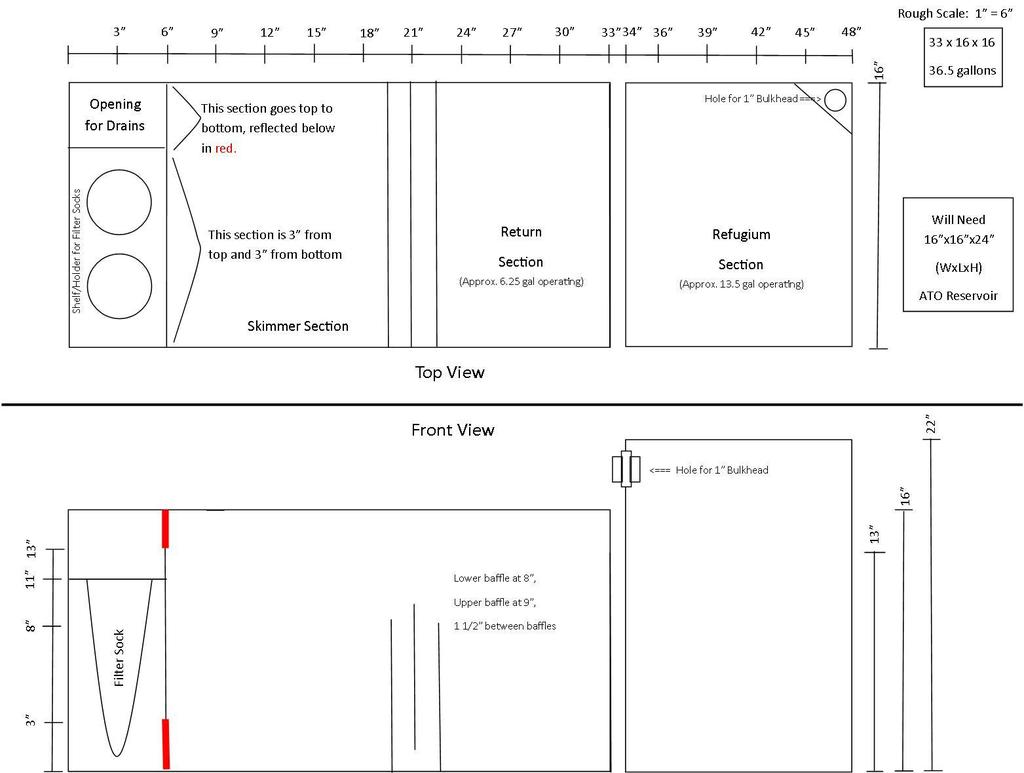
Thanks for the response. With your permission, I'm attaching a crude design drawing of what I'm planning. It's a little different in that I'm separating the "sump" from the refugium, along with a stand-alone ATO reservoir (mentioned but not shown in the drawing). So in essence, I'm building three acrylic "items". The refugium will gravity feed back to the sump and be fed from the return manifold. As discussed earlier, I've ordered and received the 1/4" cast. As you will see, there are several baffles/walls that present a challenge for the pin method, which is why I asked the original question.

Your comments, even if it is to tell me I'm nuts, will be greatly appreciated. If someone else that's done something similar, please chime in as well. As an answer to Tom Cruise's question a long time ago...yes, I can handle the truth!

 
OP
OP
Turbo's Aquatics

Turbo's Aquatics

Super Duper Member
View Badges
Joined
Jun 7, 2011
Messages
2,819
Reaction score
4,051
Location
West Des Moines, IA
Rating - 0%
0   0   0
I have to run but gave it a quick glance. Looks good, the tricky bond is going to be the vertical panel for the intake and the horizontal panel for the filter sock. There are not structural bond though, so you can use direct-capillary for this. Bond in the baffle that contacts both the front and back wall in first. You have two options here:

1) capillary weld in the overflow panel to the end and baffle before you bond the front panel on (make sure it lines up with the bottom edge of the end and the other baffle, so your bottom joint can be a good seal) and then bond the filter sock panel in, then then do the front panel. The trouble here is that once you bond that overflow panel in, this tend to limit your ability to manipulate the edge of the baffle that you need to bond to the front panel. If it's out of alignment, it's harder to force it into position because now it's braced.

2) weld the baffle as normal on to the front and back panel, then follow up afterwards with the overflow panel and filter sock panel. But, use painters tape to hold them in place while you are doing those bonds, to make sure the spacing from end-to-baffle is correct, or else you will have a gap or not enough room. Then bond the overflow panel in, then the filter sock panel. These won't look pretty, but they will work fine.

The other option is to do away with the bonded-in filter sock panel and place 2 rails in there to hold the filter sock panel. These can be 1/4" thick strips about 1/2" wide, one on the end and one on the baffle. That's if you don't care about a little water skating past the filter sock. Also that try might tend to warp a bit over time, but you can add a small crossbrace under the panel between the filter socks to help it retain shape.
 

mixer911

Make them green with envy
View Badges
Joined
Jun 11, 2009
Messages
2,422
Reaction score
748
Location
Murfreesboro
Rating - 0%
0   0   0
Well I wouldn't build a display with it, but it works fine for sumps and smaller projects. I have seen that some popular manufactures like Synergy use it almost exclusively. It machines and glues allot better than the cheaper cast stuff from overseas (acrystar). I had reservations about it also, but after using it for awhile and talking to some other fabricators, it works well. At least with the smaller boxes and products I make. The only difference I can see between it and Arkema visually is that it is a tiny bit thinner. The price is about the same (within $5 of the Arkema brand), but is the only one locally that is available in an array of colors. I imagine that is why the sump manufactures use it in their colorful sumps.

We do not use chemcast exclusively. We use Arkema, Chemcast, polycast, lucite and bayer. For the colored stuff in .236 or under we use chemcast. For structural building, as in sidewalls of sumps and any larger capacity items, we use arkema plex g and polycast. We stopped using Evonik a few years ago after receiving some bad material. It was their chinese manufactured Acrylite GP brand. We will never use any chinese or non Americas manufactured acrylic in any of our products.

Great write up by the way Floyd R!
 

mixer911

Make them green with envy
View Badges
Joined
Jun 11, 2009
Messages
2,422
Reaction score
748
Location
Murfreesboro
Rating - 0%
0   0   0
Here is a great calculator to figure out the material thickness required for a project. Ironically it's from Cyro :) http://www.sdplastics.com/cyro/aquarium/Aquarium.xls

Remember though these calculations are based on a bond with 2 part and also annealing the bond afterwards. So using a solvent weld can actually produce a weaker tensile bond.
 

tonkaoz

Active Member
View Badges
Joined
Nov 23, 2014
Messages
260
Reaction score
66
Location
bristol pa
Rating - 0%
0   0   0
So this might not be the right forum but i just bought a 400 gallon acrylic tank that has alot of scratches. I have sanded it with 400 1000 2000 and 3000 grit wet dry sandpaper. Most of the scratches are gone but i cant get it perfect . Do you have any ideas on how to get it almost perfect . Oh yeah i did polish it when i was done sanding it . Thank you
 

mixer911

Make them green with envy
View Badges
Joined
Jun 11, 2009
Messages
2,422
Reaction score
748
Location
Murfreesboro
Rating - 0%
0   0   0
So this might not be the right forum but i just bought a 400 gallon acrylic tank that has alot of scratches. I have sanded it with 400 1000 2000 and 3000 grit wet dry sandpaper. Most of the scratches are gone but i cant get it perfect . Do you have any ideas on how to get it almost perfect . Oh yeah i did polish it when i was done sanding it . Thank you

After sanding have you tried buffing with anh of the novus compounds? How did you Polish it?
 

tonkaoz

Active Member
View Badges
Joined
Nov 23, 2014
Messages
260
Reaction score
66
Location
bristol pa
Rating - 0%
0   0   0
I was gonna use novus 1 but i used plastx . I know this sounds stupid but i saw it on a bunch of videos on you tube . Its pretty clear . I just think i can get it clearer. I know with water in it it will be fine. Just wanna do it right before i put 400 gallons of water in it . Haha
 

mixer911

Make them green with envy
View Badges
Joined
Jun 11, 2009
Messages
2,422
Reaction score
748
Location
Murfreesboro
Rating - 0%
0   0   0
I was gonna use novus 1 but i used plastx . I know this sounds stupid but i saw it on a bunch of videos on you tube . Its pretty clear . I just think i can get it clearer. I know with water in it it will be fine. Just wanna do it right before i put 400 gallons of water in it . Haha

Sounds like you did it right. It just requires a ton of sanding to get it perfect. A 400 gallon tank will take forever lol
 

tonkaoz

Active Member
View Badges
Joined
Nov 23, 2014
Messages
260
Reaction score
66
Location
bristol pa
Rating - 0%
0   0   0
If i can figure out how to post pics i will show my progress . They look way better in the pics then they do up close .
 
OP
OP
Turbo's Aquatics

Turbo's Aquatics

Super Duper Member
View Badges
Joined
Jun 7, 2011
Messages
2,819
Reaction score
4,051
Location
West Des Moines, IA
Rating - 0%
0   0   0
Good info @mixer911 thanks for chiming in. @tonkaoz this is on my list but he short version is after wet sanding I use a high speed polisher (at low/med speed) and Meguair's Ultra Cut followed by Swirl Free Polish and the purple pad. Last pass with swirl free polish is at moderately highly speed
 

TOP 10 Trending Threads

WOULD YOU EVER CONSIDER HAVING A FOWLR TANK? WHAT WOULD BE YOUR FIRST FISH?

  • Yes!

    Votes: 6 33.3%
  • No...

    Votes: 6 33.3%
  • I already have one!

    Votes: 0 0.0%
  • I did have one, but I don't anymore...

    Votes: 6 33.3%
  • Other (please explain).

    Votes: 0 0.0%
Back
Top