Acrylic Fabrication Q & A

dbl

It Takes Less Energy to be Nice
View Badges
Joined
Mar 13, 2014
Messages
15,945
Reaction score
90,198
Location
SW Florida
Rating - 0%
0   0   0
This thread has been so beneficial and I'm learning something everyday, I've decided to wait until after the holidays to start my build. I want to continue to follow along here and gain some additional information/knowledge/pointers, so please don't stop now...lol.

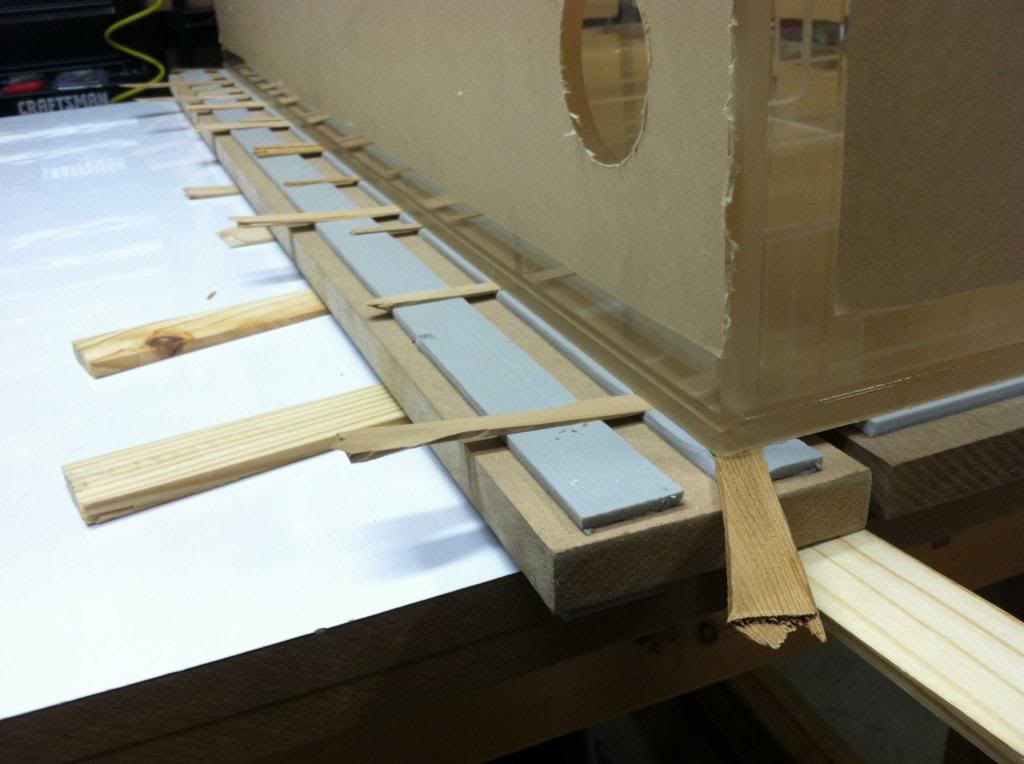
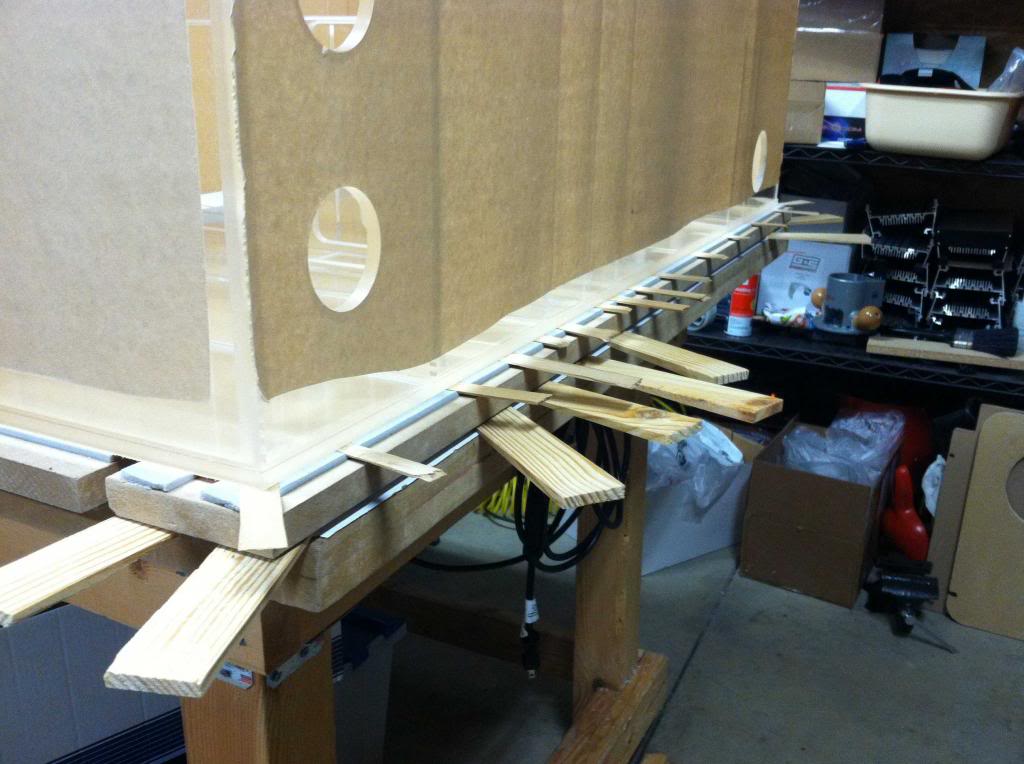
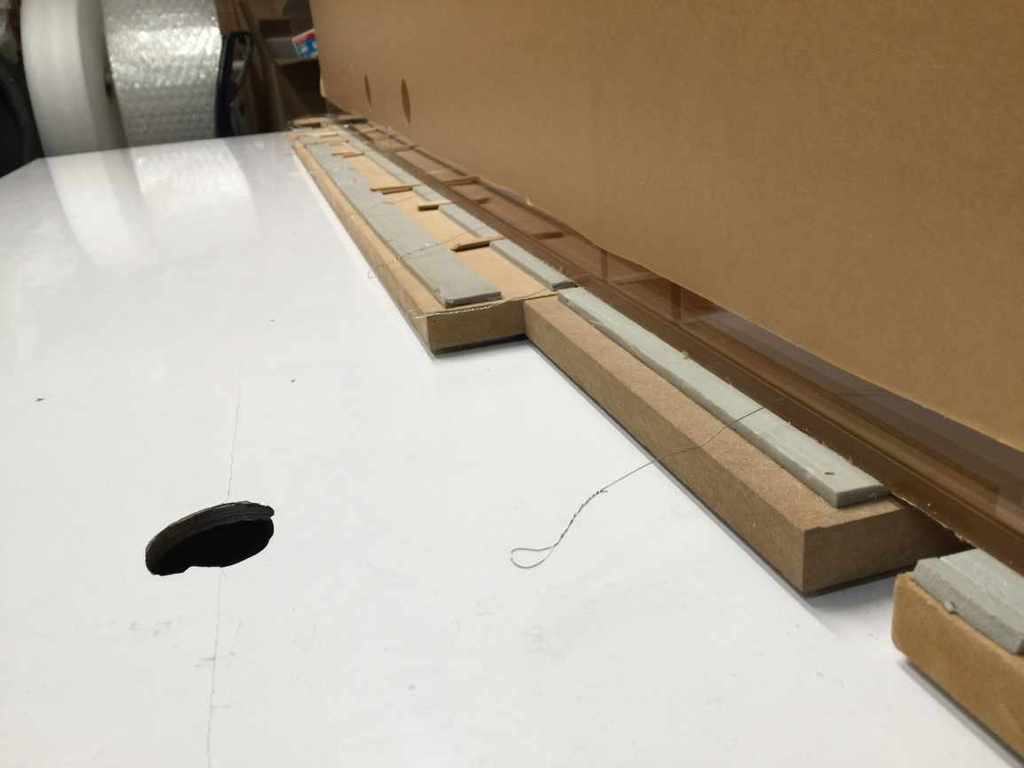
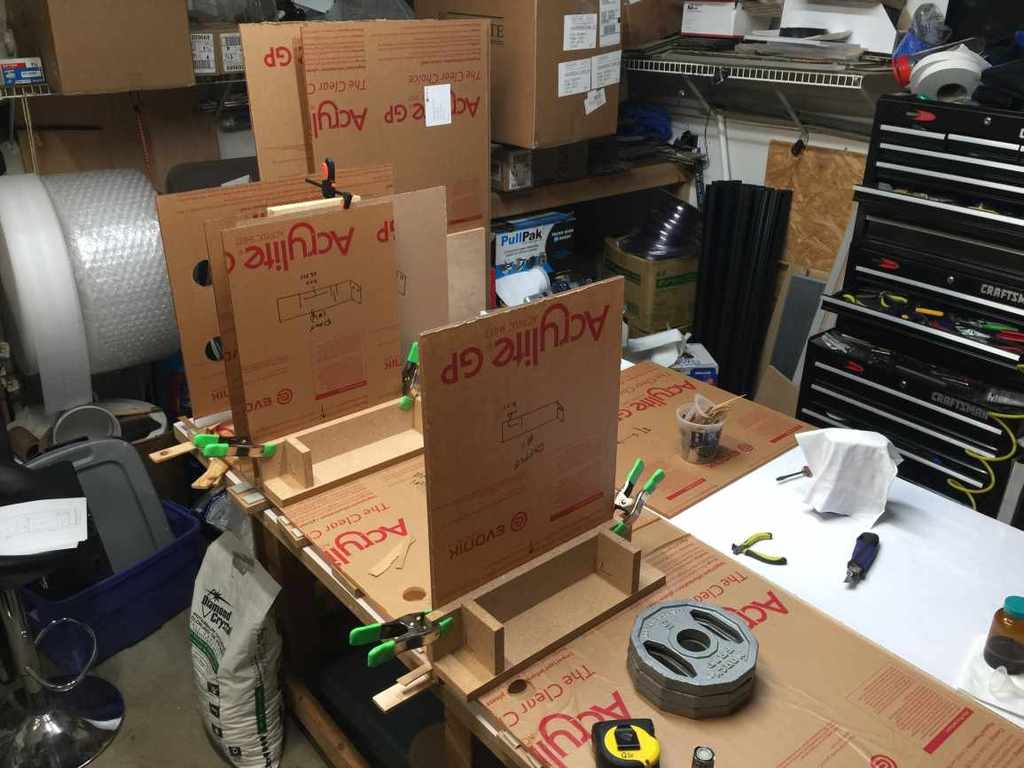
As I’d like to at least have everything I’ll need before starting, is there a special applicator you use when bonding the baffles, specifically the middle one? If I understand correctly, I won’t have any issues in the first step, bonding them to the front panel. It would seem I can simply do the middle one first. However, once flipped, my big paws won’t be able to reach between the 1 ½” space to get to the front panel. I had the same issue when applying silicone to the baffles in my current sump. They've worked but look like "detritus" and I'm trying to avoid that this time!

Again, you may be planning on a “tools to use” post, and if so, I will wait for that. Thanks again for your time and willingness to share.
 
OP
OP
Turbo's Aquatics

Turbo's Aquatics

Super Duper Member
View Badges
Joined
Jun 7, 2011
Messages
2,805
Reaction score
4,031
Location
West Des Moines, IA
Rating - 0%
0   0   0
I watch it for the technique when they do the builds. The do a 2 part and literally pour it on out of the mixing cup. It's all over and I always think... how they hell to they finish that off?
Someone else understands me!! Same here, I've actually picked up a few tricks from watching the show. I'm the guy who watches it for those transition segments where they show someone doing some seemingly random labor step for 2 seconds, I pause, rewind, pause, over and over until I can figure out what they are doing...and then I'm like Ahhhh, that's how you do that part!!
 

TaylorPilot

Valuable Member
View Badges
Joined
Aug 8, 2015
Messages
1,454
Reaction score
1,251
Rating - 0%
0   0   0
Thanks, that's basically where I'm at with it as well. I watched Tanked and my family is usually the same way your wife is. "Really? You are looking at the stand welding???" I hate the show and I watch it for the technique when they do the builds. The do a 2 part and literally pour it on out of the mixing cup. It's all over and I always think... how they hell to they finish that off? lol I just finished this with the help of the owner a few weeks ago and there were a few spots I wasn't to proud of but what can you do? https://www.reef2reef.com/threads/lcs-300dd-build.195492/page-3#post-2592873

What size pins are you using. If they are bigger than necessary, the joint can hold more solvent, and when you close it, it oozes out more than necessary. I have also noticed that when I let the joint soak a few more seconds (5-10 seconds), there is less solvent that runs out, and the solvent that does is a thicker consistency. I agree that there will always be some marking left in the corner from the solvent evaporating. I have also noticed that the higher quality acrylics tend to leave a less noticeable mark. I personally would rather fall on the side of having a little more than not enough. I would rather have a little mark on the acrylic than a seam that was allowed to draw in air bubbles because of not using enough solvent.
 

cromag27

octoaquatics.com - ig = @octoaquatics. view my sig
View Badges
Joined
Sep 7, 2013
Messages
8,249
Reaction score
11,239
Location
arizona
Rating - 0%
0   0   0
I've visited ATM before and got to walk around the facility on a private tour. the wife liked their birds and the fish in their retail store. I just wanted to grill them on their build processes. they wouldn't answer some of my questions though. lol. it was pretty funny.
 

mixer911

Make them green with envy
View Badges
Joined
Jun 11, 2009
Messages
2,422
Reaction score
748
Location
Murfreesboro
Rating - 0%
0   0   0
Well I wouldn't build a display with it, but it works fine for sumps and smaller projects. I have seen that some popular manufactures like Synergy use it almost exclusively. It machines and glues allot better than the cheaper cast stuff from overseas (acrystar). I had reservations about it also, but after using it for awhile and talking to some other fabricators, it works well. At least with the smaller boxes and products I make. The only difference I can see between it and Arkema visually is that it is a tiny bit thinner. The price is about the same (within $5 of the Arkema brand), but is the only one locally that is available in an array of colors. I imagine that is why the sump manufactures use it in their colorful sumps.

I shouldn't have said almost exclusively. I guess my point was that for small projects the stuff works fine, and if it is what you can get locally, I wouldn't shy away from it for small stuff like an ATO or dosing containers. I would advise it over some of the other no-name cast products most companies stock from the Philippines or China. But yes, I agree, I wouldn't use it for building displays or large sumps. I've always considered your products to be top of the line. Those laminate lid sumps are some of the nicest ones I have ever seen!

No worries, just want to be clear about what we use as this is important when comparing apples to apples. Nothing wrong with chemcast, just for some applications there are better options. We do not use any of their clear, just a personal preference on how it bonds. It is definitely better than any of the asian products. I had the Cyro Technical Rep at our shop to demonstrate their proper bonding processes a few years ago and he even admitted to the asian factories that make acrylic have slightly modified the molecular weight of some of the formulas.
Thanks for the compliments.

@mixer911 im glad you mentioned Acrylite, that used to be #2 or #3 on the preferred list until it was switched to China, then it's been up for debate. I know one guy that uses it a lot and like it but I've always shied away from it unless it was all I could get in a pinch. Only ended up using it once for a 180 sump and it turned out good (several baffles)

What was wrong with the batch you got that made it "bad"? What thickness material?

Agreed, US made cyro products are still great, but they only produce their thicker sheets here. Anything under 1/2" is done in china now. The problem is their quality control. We had about 50 sheets that were not bondable. We found this out after the pieces were cut and manufactured. We had cyro deny there was an issue. After extensive tests we found there was a issue with the batch and material. This goes hand in hand with the quality control at the chinese facilities. Just not worth the risk when building water tight components.
 

Lowell Lemon

2500 Club Member
View Badges
Joined
May 23, 2015
Messages
3,962
Reaction score
16,786
Location
Washington State
Rating - 0%
0   0   0
Here is a great calculator to figure out the material thickness required for a project. Ironically it's from Cyro :) http://www.sdplastics.com/cyro/aquarium/Aquarium.xls

Remember though these calculations are based on a bond with 2 part and also annealing the bond afterwards. So using a solvent weld can actually produce a weaker tensile bond.

In actual practice the correct solvent bond with the wire system as outlined here by Floyd R Turbo provides bond strengths that exceed the 750psi listed in the Cyro bulletin as a recommended method. The off the shelf products such as Weld On #42, Weld On #4 and #3 have a limited shelf life and have many components added that do not improve the bond. It should be noted that impact test of Weld On # 40 and #42 (2 part polymerized system) showed clean seam failures along the bond surface in our fabrication facility. We stopped using Weld On products 30 years ago and took the advice of a Plastics Engineer and used a proprietary mixture of solvents in chemical grade form from Integra Chemical. The result was 30 plus years of no tank failures. We did use the industry standards of acrylic thickness used by Sea Clear, Tru Vue, and Clarity Plus at the time with the exception of 300 gallon (96" x 24" x 30" tanks out of .500"...to thin). The only tank failure we experienced was that 300 gallon in those dimensions with Weld On #4 and .500" Plexi Glass G cell cast material.

I have built tanks up to 16' x 3' x 4' using a butt seam at 8' using the solvent weld technique. Both tanks are still in service since 1993. Material was 2" thick Polycast cell cast with 1 1/2" tops and bottoms. Polycast asked our company to write a "white paper" on our process but we declined due to the proprietary nature of our solvent mix. Bonds with our solvent mix would allow the actual sheet to fail at about the same rate as the seam. We tested and rejected the use of the Weld On #40 and #42 for the butt seams in the 16' long aquariums. Again this was due to clean failure along the bond seams. While the Cyro bulletin seems to be thick in its use of material if you follow the recommendations you will have a great tank with a long service life. The question is will anyone buy the tank due to cost compared to industry standard thinner tanks? In my experience cost is a factor to most customers and the useful life of a tank in the industry is less than two years due to high turn over in the hobby of hobbyist. The aquarium industry showed that many people abandon the hobby in that two year period and the tank ends up in a garage sale or empty.

Glass tanks were not an option to us at the time due to the insurance requirements as a manufacturer. The failure rate of glass tanks with associated physical injury actually prevented many of our insurance carriers from quoting us. This was back in the late 1980's. As a result we chose acrylic for our production line. Our experience seems to support the insurance industries refusal to underwrite glass tank manufacturing.

No on in the industry heat anneals the assembled tanks at this time to my knowledge. Annealing is the final step in the process and reduces the tendency to micro stress crack other wise known as "crazing". Even sanding and hand polishing the tank edges induces stress like flame polishing but not at the same level. So to prevent "crazing" Cyro recommends the thickness in their bulletin as a way to prevent the micro stress cracks. Heat annealing in essence re-programs the "memory" in the plastic making the structure stress relieved and more resistant to "crazing". Another reason for the thick material is the fact that acrylic absorbs water...I think about 2 to 3 percent if I remember. This also leads to panel deflection or bowing in the face panel over time with thinner materials. Again the Cyro Bulletin is a good source of information but not the final say.

We also have achieved bond success between cross linked acrylic and linear acrylic materials for the construction of aquarium stands in a full range of "granite colors" from Aristech Chemical. There is a whole range of possibilities that currently exist for better stand construction that is impervious to water damage...something I am currently working on.
 

mixer911

Make them green with envy
View Badges
Joined
Jun 11, 2009
Messages
2,422
Reaction score
748
Location
Murfreesboro
Rating - 0%
0   0   0
In actual practice the correct solvent bond with the wire system as outlined here by Floyd R Turbo provides bond strengths that exceed the 750psi listed in the Cyro bulletin as a recommended method. The off the shelf products such as Weld On #42, Weld On #4 and #3 have a limited shelf life and have many components added that do not improve the bond. It should be noted that impact test of Weld On # 40 and #42 (2 part polymerized system) showed clean seam failures along the bond surface in our fabrication facility. We stopped using Weld On products 30 years ago and took the advice of a Plastics Engineer and used a proprietary mixture of solvents in chemical grade form from Integra Chemical. The result was 30 plus years of no tank failures. We did use the industry standards of acrylic thickness used by Sea Clear, Tru Vue, and Clarity Plus at the time with the exception of 300 gallon (96" x 24" x 30" tanks out of .500"...to thin). The only tank failure we experienced was that 300 gallon in those dimensions with Weld On #4 and .500" Plexi Glass G cell cast material.

I have built tanks up to 16' x 3' x 4' using a butt seam at 8' using the solvent weld technique. Both tanks are still in service since 1993. Material was 2" thick Polycast cell cast with 1 1/2" tops and bottoms. Polycast asked our company to write a "white paper" on our process but we declined due to the proprietary nature of our solvent mix. Bonds with our solvent mix would allow the actual sheet to fail at about the same rate as the seam. We tested and rejected the use of the Weld On #40 and #42 for the butt seams in the 16' long aquariums. Again this was due to clean failure along the bond seams. While the Cyro bulletin seems to be thick in its use of material if you follow the recommendations you will have a great tank with a long service life. The question is will anyone buy the tank due to cost compared to industry standard thinner tanks? In my experience cost is a factor to most customers and the useful life of a tank in the industry is less than two years due to high turn over in the hobby of hobbyist. The aquarium industry showed that many people abandon the hobby in that two year period and the tank ends up in a garage sale or empty.

Glass tanks were not an option to us at the time due to the insurance requirements as a manufacturer. The failure rate of glass tanks with associated physical injury actually prevented many of our insurance carriers from quoting us. This was back in the late 1980's. As a result we chose acrylic for our production line. Our experience seems to support the insurance industries refusal to underwrite glass tank manufacturing.

No on in the industry heat anneals the assembled tanks at this time to my knowledge. Annealing is the final step in the process and reduces the tendency to micro stress crack other wise known as "crazing". Even sanding and hand polishing the tank edges induces stress like flame polishing but not at the same level. So to prevent "crazing" Cyro recommends the thickness in their bulletin as a way to prevent the micro stress cracks. Heat annealing in essence re-programs the "memory" in the plastic making the structure stress relieved and more resistant to "crazing". Another reason for the thick material is the fact that acrylic absorbs water...I think about 2 to 3 percent if I remember. This also leads to panel deflection or bowing in the face panel over time with thinner materials. Again the Cyro Bulletin is a good source of information but not the final say.

We also have achieved bond success between cross linked acrylic and linear acrylic materials for the construction of aquarium stands in a full range of "granite colors" from Aristech Chemical. There is a whole range of possibilities that currently exist for better stand construction that is impervious to water damage...something I am currently working on.

I agree when proper technique is used that "certain" solvents can produce a stronger bond than 2 part polymerized annealed joints. Annealing the joint in the 2 part process not only eliminates crazing, but also completes the molecular bond between the sheet and polymer to strengthen the joint even more. Is it practical? definitely not. We do not use any "weldon" IPS products in our manufacturing process. We have our own solvent blend we use as well. The main point is that most DIY users do not understand that using Weldon 3 to bond a 400 gallon aquarium together is not good practice. Will it work, yes, would I do it or recommend it, NO. Most people do not understand the differences between the different solvents, they just hear everyone say "Weld-on". The Cyro Bullitin is a great place to start for someone who is not sure what to use. It is by no means the final say.

Water absorption is a big factor that a lot of people also do not take into consideration. I see lots of non eurobraced sumps that are built by DIYers and even big manufactures. They will bow or deflect over a short period. We use a one piece eurobrace to account for this factor. We get inquiries all the time asking us why their current non eurobraced sump (not ours) is warping and it is only a few months old. Also in rimless aquariums the thickness factor has to be doubled if not tripled for a tank with minimal deflection. It will still happen.
 

Fishy Rob

New Member
View Badges
Joined
Jul 13, 2013
Messages
8
Reaction score
3
Location
Virginia
Rating - 0%
0   0   0
Great write up and comments! Now I want to know how you sand/scrape the 4 sided box and baffles and things so that everything contacts the bottom evenly when it's time to bond it together!
 

Lowell Lemon

2500 Club Member
View Badges
Joined
May 23, 2015
Messages
3,962
Reaction score
16,786
Location
Washington State
Rating - 0%
0   0   0
Great write up and comments! Now I want to know how you sand/scrape the 4 sided box and baffles and things so that everything contacts the bottom evenly when it's time to bond it together!

Fishy Rob,
Now you have entered the art of acrylic construction. #1 use a good quality CNC router and you will have parts that fit every time with excellent bonds.

If you are like the rest of us then you must batch cut your parts so they are the same dimension. In other words set your table saw fence once for all height cuts on the outer box. Then set your table saw fence once and cut all internal dimensions (front to back aka width) at one time. Make sure your table saw fence is producing square cuts after each cut. Follow the manufactures instructions for setting up the table saw for proper cuts. Just a hint if the edge looks like a herring bone your saw is back cutting and you will need to adjust your fence. You edge should have a pattern matching the rotational direction of the blade and that is all. Use a triple chip carbide blade for your saw. Some times Home Depot sells an aluminum and plastics blade that works pretty good. Otherwise you will have to spend money to by a special plastics blade for the saw.

The next trick is to set up a special router table and fence. The set up is critical. You have to have a fence that takes off about .200" of material at a pass and keep the cut square. This is like using a Jointer with wood to remove a small amount of material. If you have a deeper cut on the front of the piece your fence is out of square with the cutter. Same thing if the end of the cut has a deeper cut than the front edge of the cut. If all is equal the final part will be square with a smooth routed edge. Be careful the edge is very sharp when it come off the router table. Use a carbide router bit to make the cut not high speed steel. You can use a Jointer as well but you would need to use carbide knives instead of high speed steel knives.

In the end hand sanding or scraping is not going to keep you part flat and smooth because you cannot control the depth of cut along the entire edge of the acrylic. As a result you will not produce a flat square part that make the bonding strong and clear. Refer to the pin method talked about here for the water clear and bubble clear joints you need.
 
Last edited:

cromag27

octoaquatics.com - ig = @octoaquatics. view my sig
View Badges
Joined
Sep 7, 2013
Messages
8,249
Reaction score
11,239
Location
arizona
Rating - 0%
0   0   0
So who's willing to share their 'secret' formula for solvent?
 

Lowell Lemon

2500 Club Member
View Badges
Joined
May 23, 2015
Messages
3,962
Reaction score
16,786
Location
Washington State
Rating - 0%
0   0   0
So who's willing to share their 'secret' formula for solvent?

If we share our secret it will no longer be secret. That said I did mention where I purchase the chemicals. Not sure you want to purchase in the quantities necessary to make the mix. The chemicals are hazardous and require special labeling and handling when shipping. You could spend over a couple of hundred dollars by the time it is all done. You would need graduated glass or Pyrex cylinders to measure the chemicals and mix them. That adds to the cost as well. Also these chemicals and the chemicals in WeldOn products are known to cause cancer and pass the skin barrier on contact. Just so you all know not to soak your hands in the stuff.

If you like I could sell you a business with all the secrets, designs, equipment and training. I even have a 3 axis CNC router with a 6' x 10' bed that is functional. But I plan to replace it or up grade the controller and drive system in the near future. After 30 plus years I have the knowledge to make just about any tank out there....all it takes is money!
 
OP
OP
Turbo's Aquatics

Turbo's Aquatics

Super Duper Member
View Badges
Joined
Jun 7, 2011
Messages
2,805
Reaction score
4,031
Location
West Des Moines, IA
Rating - 0%
0   0   0
James has posted his mixture so it's not a totally huge secret.

The key is getting the right quality chemicals. To the purist, you want to use the most pure chemicals you can get. But that's not always cost effective.

I buy my Methlyene Chloride from Midland Scientific. I get the 99.5% pure stuff, that's good enough for just about any hobbyist level build, if you were serious you might go for 99.9% purity. Mine might be actually. I buy it in the 4 or 5L jug.

The next ingredient is Glacial Acetic Acid. This is ultra-pure (99.99%+) so it's not vinegar but it still smells like it, only a whole lot stronger (don't take a whiff). AA causes the MC to run a bit slower and increases working time. Running slower means less propensity to from bubbles in the seam because you can control it more. The catch is that AA indices crazing if you allow too long of a soak time or use too much. Generally speaking, absolutely no more than 10% in the mix, I use between 5-7%.

The third ingredient is Ethylene Dichloride. This is nasty, dangerous stuff. Also it's like $150+/gallon. Is has the same effect as AA except no crazing. It also eliminates the susceptibility of the joint to turn "foggy" if you bond in poor conditions like high humidity and/or temperature. 15% to the mixture.

So the mixture that's been recommended to me (posted by James) is 80% MC, 15% EDC, 5% AA. I'm sure there are tweaks to that and potentially other ingredients that make for an ever better mixture. Hope posting that doesn't irk you other fabricators...like I said, it's posted elsewhere so that above formulation is publicly available if you took the time to dig through a 10 year long thread.

I use straight MC and 5-7% AA. I mix 4oz up at a time in an 8oz large-mouth Amber glass jar with a Teflon-lined kid. The MC evaporates but the AA does not, so if I let it sit on the shelf long enough, I just add a little bit of MC to thin it back out - better to have too much MC than AA. I've found that the jar I use makes for a very long shelf life (especially without the junk fillers)

I've never used EDC myself, for that reason, I have to make sure my garage is temperature and himumidity controlled whenever I'm doing bonding: 68-74F and low humidity. Being in Iowa, that means a beefy heater in the winter, and in the summer I have to keep the garage door closed and open the door to the house and out a fan in the doorway overnight before I do any bonding to make sure the air and the material and the solvent is all at the same temp. If the humidity is too high, when the solvent dries (the fillet) it turns white. This doesn't necessarily affect joint strength, but to looks pretty shoddy.

Thanks for all the fabricators chiming in, at this rate the thread is starting to write itself lol. But I'm not gonna let that stop me from totally avoiding work during the day by writing up more good stuff...
 
OP
OP
Turbo's Aquatics

Turbo's Aquatics

Super Duper Member
View Badges
Joined
Jun 7, 2011
Messages
2,805
Reaction score
4,031
Location
West Des Moines, IA
Rating - 0%
0   0   0
About the MC - this stuff is closely related, chemically, to Chloroform. So let's say you have a bottle of it in your car and you get in an accident and it breaks...GET OUT.

It's also used in many janitorial strength cleaners (it is a solvent, remember). So you don't want to get that type.

On a side note, you can (supposedly) use Chloroform to bond acrylic also.

AA is flammable and then there's that 99.99% pure acid thing.

EDC is just super nasty, very much a carcinogen and all sorts of other bad stuff. So I stay away from it.
 

cromag27

octoaquatics.com - ig = @octoaquatics. view my sig
View Badges
Joined
Sep 7, 2013
Messages
8,249
Reaction score
11,239
Location
arizona
Rating - 0%
0   0   0
Step 8....

You mention the bottom joint doesn't have to be dead on. what would the allowable margin be? I'm guessing this difference cannot be compensated for using just capillary action, as well as when using the pins method?

This alignment is the one that freaks me out the most.
Solvent Welding (Pins method)

Per the post above regarding Overage and Fillets (not nearly as mouth-watering as Filets), it's time to explain the Pins method.

At the very basic essence, the Pins method is simply inserting a pin (wire) into the joint to force a very small separation of the 2 surfaces to be joined, filling this separation with solvent, waiting a certain amount of time (referred to as soak time) and then pulling the pins out. It sounds very simple, and it really is that simple. However, there are always methods of implementing this process that work best.

Here's my list of supplies for doing the Pins method:

1) ~4" wide strips of 3/4" MDF (various lengths)
2) Campermount adhesive-backed foam, 1.25" x 3/16" thick. Brand matters, the Home Depot stuff sticks to the panels and sucks royal big time. WJ Dennis brand from Menards does not.
3) Shims. The thinner, the better. Standard ones are OK but sometimes you need really really thin shims that don't have a steep taper. I found these in the form of cedar shakes, $15-$30 for a bundle. You have to sort through them but you can easily end up with 50 small shims that you will use over and over. I have a cup full of 3-4" long, 1/2" wide shims. Stick the rest in your closet for that fresh mountain getaway feeling every time to go to get clothes, ahhhhhhh!
4) Wire; I use 28 gauge picture hanging wire, you can use just about anything, even stripped & cleaned twist ties
5) some kind of angle bracket
6) clamps

I probably missed something but #1-#4 are the important ones, your clamps and brackets will vary based on how many times you are going to build something, you can improvise for a single build.

MDF Strips & why they are important.

Start by applying the foam to the MDF strips; 2 on each side like so:

IMG_1594_zpsb5a9870c.jpg


You will want something like this to span under the length of the joint. These boards do many things:

- They help remove irregularities in the work surface
- They will absorb excess solvent and prevent your work from sticking to the work surface
- Solvent won't cause the paper backing to stick to the foam
- Provides you with locations to shim in a general as well as a localized manner
- Helps spread out the effect of shimming
- Provides a cushion to push against for adding pins
- Makes you look like a pro when you post build pics

Here's an example of pretty much all of these in action:

IMG_1595_zpsd4c91f76.jpg


Big shims are in use under the MDF boards because the table in the pic may look awesome, but it sucks for big builds (very irregular in certain areas) so I have to make big adjustments to get the joint tight, then I use smaller (thin) shims between the tank and the MDF strips to make fine adjustments to the joint.

Wire

I cut the wire into pieces about 4-6" long, then I bend one end into a loop and twist it to create a "handle" that will be used when you pull the pins out. For the other end (that is inserted into the joint), you will want to clip this with a good quality wire cutter before using it. You need a clean cut! The cutter that usually comes with the wire is OK for cutting to length, but it leaves a barb on the end that can dig into the material and make it difficult to pull out of the joint. I use and end cutting nipper, which is a tool you can get anywhere pretty cheap - it makes a very clean cut.

You can (hopefully) see the pin/wire here:

IMG_5097.jpg


Right Angle Bracket

I made a few of these myself out of particle board. You can't see it, but the corner there the 2 perpendicular parts of the bracket come together is beveled off

IMG_4985.jpg


The downfall of the ones I use is that you can only access one side of the joint. I could fix this easily by cutting out the inside corner of the bracket on a table saw...one of these days.

You can also use a standard right angle bracket with the corner cut out. Whatever you use, you need the corner of the bracket that is right in the joint beveled or cut away so that it doesn't bond to the material when you run the solvent

Process

I'm going to skip over a few steps such as stripping the paper and cleaning & blowing off the bonding surfaces, but those you would obviously need to still do. So this starts with the assumption that you have are ready to set the joint up for bonding (surfaces cleaned and prepped).

Step 1) Lay foam boards under horizontal part.

You will want to place one board parallel with and directly under the joint, such that the 1.25" wide strip of foam will roughly align with where the second (vertical) panel will be placed. Then, place additional strips such that the entire horizontal panel will be supported. You don't want the panel to sag, as this will put an angle on your joint. Use as many foam boards as you need to get the job done.

Step 2) Place the vertical panel in position and clamp to right-angle bracket.

You only (ever) need to clamp the vertical panel to the right-angle bracket. Do not clamp the bracket to the horizontal panel. You want the panel + bracket to act like one piece that you can move around. Use simple hand-squeeze clamps, no need for bar clamps or C-clamps (in fact, those would be problematic, so you don't want to use those). Make sure that the bottom edge of the vertical panel and horizontal part of the bracket are co-planar. I usually do this by holding the bracket down lightly and then bringing the vertical panel to it, letting loose on the panel a bit, then clamping them. Put the vertical panel back in position and loosen the clamps one at a time, just long enough to allow the panel to "settle". You may have to repeat this in Step 3 depending on the gap.

Step 3) Snug up the joint.

This is a "dry fit" step. Your goal here is to make those 2 pieces touch all the way along the joint, because this is the position the 2 pieces will be in after you set the joint. I find the best way to view the joint for a gap is to look along the joint from one end with decent lighting, and if necessary, hold a small flashlight and focus the beam right on the joint and run it back and forth. You will be able to see where the material is touching and where there is a gap.

You will also be able to see if you are leaving an even amount of overage across the joint. In the case of bonding an end panel to the front, this is important, because uneven overage means your panel will not end up vertical, and the finished edge of the end panel will not be perfectly flush with the top/bottom panel (which could allow air to intrude). This is usually not a huge deal unless you're just way off. In which case, what were you thinking? Geez.

Use shims as necessary to tighten the gap between the horizontal panel and the vertical panel sitting on top of it. Sometimes you will have no gaps. If you have no gaps, then congratulations, you don't need to shim...yet.

Step 4) Pinning and shimming

Remember that overage? Here's where this comes in again. Hold the pin in one hand, with the end of the pin in contact with the joint. Now press down on the overage. Pin should slide right into the joint. Boom.

Pins should be inserted every 6" or so. Too close, and it can make shimming a total pain. Too far and you might end up with not enough of a gap. You want enough of a gap to allow the solvent to wick into the joint, without it being too little which can result in not enough squish-out for the fillet.

Pins only need to be inserted far enough into the joint to cause separation; do not insert the pins such that they extend through the joint as this will form a dam and prevent solvent from wicking past the pin! Try to insert the pins about the same distance for every pin.

The longer the joint, the higher the odds that pins will get loose. You can place a shim under pins that are loose upon insertion, or under other pins that become loose as you insert new pins. But sometimes it's better to let a loose pin fall out and come back to it later, as it may not need as much shimming after the joint is fully pinned. This is especially the case for top/bottom joints where pinning 2 adjacent sides will result in loose pins that will tighten up after you put pins in the other 2 sides.

Once you have pins in place, start tugging. you don't want to tug hard, the point is to search for pins that really come out easily. A light tug should not pull a pin out, if it does, add a shim and move to the next one. Keep going until you can't tug out a pin with a full trip around the joint. This means if you have a bottom joint with 20 pins and the 11th pin is loose and requires a shim, you check all 20 pins again. That one additional shim or even a simple adjustment to a shim can actually cause a pin in a seemingly nonsensical and completely unrelated location to fall out.

Step 5) Blow out the joint

After all pins are set, blow out the gap with canned air - same stuff you blow out electronics with. It's nice and static free, just don't tip a full can too far off vertical as it will blow out the liquid, forcing you to take the joint apart to clean it off (it may look OK but, no, it's not). Sometimes the canned air will blow loose a pin and you have to go back to Step 4.

Step 6) Secure the assembly

This is optional but it helps sometimes. If you have a right-angle bracket, you can add a small amount of weight to the horizontal part to keep it in place. Don't clamp though, at least, I don't.

Step 7) Run the solvent & pull the pins

Again, I'm going to skip the specifics of applying solvent and leave that to another post as there are many pointers related to this and joint preparation, avoiding bubbles, fixing bubbles, etc...so this step assumes you understand how to apply solvent using a squeeze bottle & needle.

I usually get all ready to run the solvent, then I set the bottle down and take a moment to realize that this is it. This is the moment when you could screw the whole thing up. Then I clear that out of my head, take a couple breaths and now it's go time. Blue 42, set, HUT!

Start a mental stopwatch in your head, starting with the time you first start applying solvent to the joint. You want to allow a minimum of 15 seconds of soak time before pulling the pins, and depending on the solvent you are using, it can be as much as 30 or even 45 seconds. Much longer past that and you might have problems, depending on the material thickness (thicker material/joint, longer working time).

Sometimes, I will run a quick second pass of solvent right before pulling pins, moving at 2x speed or faster. I'll do this if I think it took a bit too long from start to end of joint, just to make sure there is enough squish-out.

Start pulling pins, starting with the same location you started applying solvent. Pulling pins without causing the vertical panel to slide is the trick - it's hard to explain, it's just something you have to learn.

You don't want to "hold" the vertical panel, because when the pin "pops" out, you have a natural tendency to compensate for this by pushing on the vertical panel. Yanking on the pin can work depending on how far you inserted the pin and how heavy the parts are (for a top/bottom joint, yanking works great until the last few pins).

What you can do it put your thumb or fingertip against the edge of the horizontal panel right next to the pin, and pull the pin with your other hand. The horizontal panel prevents you from pushing on the vertical panel upon the "pop". Or, you can lightly press down on that now ever so handy overage, the same way you did to put the pin in.

If you practice enough, you can grab the pin between your thumb and pointer finger and put your thumb knuckle on the vertical panel and "roll" your thumb backwards a bit, pulling out the pin without the "pop" jarring things badly.

All will be right with the world until you go to pull out the last pin. Sometimes when you pull that last pin, that's when things start to slide. You would be amazed how slick the joint is. I've had a 110 gallon 36" tall build made with 3/4" walls slide on me after pulling the last pin on the bottom panel joint. But that's what the next step is for.

Step 8) Making Adjustments

For an end panel or baffle, you have about 15 seconds to make adjustments before the solvent sets up enough that you won't be able to move it. During this time the critical alignment point, IMO, is the bottom joint. What I do it run my fingernail up and down (pointing it toward the direction of travel) so I can feel if there is a difference between the alignment of the 2 panels, making adjustments as needed. Again, this is a "feel" thing, and it doesn't have to be dead-on perfect. Now don't forget the other side (top joint). And don't forget to check to make sure the overage is still even! Basically this is 15 frantic seconds checking to make sure things are lined up right, followed by the realization that you can't change it now, and you just have to hope that you didn't just screw the pooch.

For a bottom/top panel, it's a much longer joint and it's easy to forget that you need to check alignment all the way around. You can pull that last pin and sit there on that end making adjustments until it looks great, only to realize that the other end slid 1/4" and part of it is off the panel. Not like that's happened to me, nope. Never happened to me. Never never never. Except for that one time.

Step 9) Loosen clamps

For a vertical panel bond (not a top/bottom joint), after you have the joint in position and it has firmed up enough so that you can't move it, perform this step. If you placed any weight on the right-angle bracket, remove it before doing this step!

Put very light downward pressure on the top edge of vertical panel, then carefully release each of the clamps one at a time - just for a fraction of a second. The thought being that while your dry-fit Step 3 should have closed the up the joint, there is a fraction of a tiny bit of material on each side that got dissolved, and you want to now close that gap. I know, we're talking nanometers here, but hey guess what air is smaller than nanometers so enough of your backtalk, keep that up and you get no dessert kiddo. Wow that was random

Step 10) Add weight

This is a good step especially for top and bottom joints, as well as the second end joint (end to back) where you have a flat surface on top so you can easily place something across the top of the assembly and add weight. Any weight will do. I've literally used a 2x4 to span across, then put 12 packs of beverages, camping chairs, soccer balls, even small dogs. Ok maybe not dogs.

For end panels or baffles (first joint) where there is no surface to lay a weight across, if you want to you can use small sandbags as long as they don't cause the panel to tip. Personally, I just put the weight back on that was removed in Step 9 and call it good.

Step 11) Check shims

I say "check" and not "adjust" because you may not need to adjust anything. Some recommend pushing all the shims in a little bit...but, if you only needed shims on 1/4 of the pins, this would actually cause the areas with no shims to loosen up. The combination of the 2-sided MDF+foam boards plus all that prep plus weights should be enough to ensure that the joint is snug as a bug in a rug at this point. But if you want to walk around and give each shim a little push to make sure it's snug, knock yourself out.

Step 12) WAIT.

Don't touch anything. Let the joint cure. The longer it sits there without any movement, the better joint strength.
 

Lowell Lemon

2500 Club Member
View Badges
Joined
May 23, 2015
Messages
3,962
Reaction score
16,786
Location
Washington State
Rating - 0%
0   0   0
I agree when proper technique is used that "certain" solvents can produce a stronger bond than 2 part polymerized annealed joints. Annealing the joint in the 2 part process not only eliminates crazing, but also completes the molecular bond between the sheet and polymer to strengthen the joint even more. Is it practical? definitely not. We do not use any "weldon" IPS products in our manufacturing process. We have our own solvent blend we use as well. The main point is that most DIY users do not understand that using Weldon 3 to bond a 400 gallon aquarium together is not good practice. Will it work, yes, would I do it or recommend it, NO. Most people do not understand the differences between the different solvents, they just hear everyone say "Weld-on". The Cyro Bullitin is a great place to start for someone who is not sure what to use. It is by no means the final say.

Water absorption is a big factor that a lot of people also do not take into consideration. I see lots of non eurobraced sumps that are built by DIYers and even big manufactures. They will bow or deflect over a short period. We use a one piece eurobrace to account for this factor. We get inquiries all the time asking us why their current non eurobraced sump (not ours) is warping and it is only a few months old. Also in rimless aquariums the thickness factor has to be doubled if not tripled for a tank with minimal deflection. It will still happen.

I used to build a lot of sumps without the euro brace. I used 5/8 polished cubes in the corners and with the internal baffles we never had a bowing problem with the .236 of yesteryear. Sold hundreds of them over the years. Never had a call on any problems both with the dealers or customers. Maybe we were just lucky instead of good!

I have been working on a few rimless tanks in .472 with different sizes out of Arkema (Plexiglas G) cell cast sheet. I am trying to determine if using 1000psi rating instead of 750psi in the formula printed in stresses and strains 5th edition will produce an acceptable small tank to medium tank. This is the origin of the formula provided by Cyro. So far the water column is 16" and the tank is 18" to allow for pump turbulence and possible wave makers that some people may want to use. The face panel and back panel seem to bow less than 1/8" combined. Need more time to see what happens when it reaches peak water absorption. the 1000psi rating was something Clarity Plus used for their Excel spread sheet all those years ago. One of the designers shared the information with me. I am trying to source PolyCast cell cast but only the Military spec is carried in the Northwest. This is due to Boeing and the aerospace industry in the Pacific Northwest. I have noticed a great reduction in quality from all the old cell cast providers like Plexiglass G, Acrylite GP, Acrylcast, and other product lines. I refuse to use any other product than U.S. made. That leaves only two manufactures that I know of Polyone (PolyCast) and Reynolds Polymer. Reynolds is not a player as they want to fabricate the product for you due to the cross linked resin they use. They will not share the formulation for their bonding agents or sell them to you. So you are left with Weldon #35 as a bonding agent. It works well enough for some Cylinders I purchased and bonded for a sprinkler manufacture's display.

I really love the look of a rimless tank and the various filtration possibilities like Tunze. One of the best tanks I ever had was a 100 gallon acrylic with all Tunze equipment. What a great tank that turned out to be. Watched it more than TV! Looking at glass both assembled and cut to size and polished to build some tanks as well. Not sure the best way to go anymore, But the ADA tanks from Amano are sure great looking. I would love to have a quality product line like that.
 
OP
OP
Turbo's Aquatics

Turbo's Aquatics

Super Duper Member
View Badges
Joined
Jun 7, 2011
Messages
2,805
Reaction score
4,031
Location
West Des Moines, IA
Rating - 0%
0   0   0
Step 8....

You mention the bottom joint doesn't have to be dead on. what would the allowable margin be? I'm guessing this difference cannot be compensated for using just capillary action, as well as when using the pins method?

This alignment is the one that freaks me out the most.
It doesn't have to be dead-on, but you want it to be as dead-on as you can get. If your height dims of all 4 walls aren't a perfect match, or if you have a slight "parallelogramming" of the ends, or if your finished (routed) edge isn't square w/r to the faces, then you might no be able to line them up. In that case, you should strive to make the bottom side of the joints as flush as possible so that you will have minimal scraping...leaving the major scraping to the top joint prep, where the build won't see direct water pressure.

For scraping, I take a standard box cutter razor blade and 2 pieces of wood, then clamp together.

image.jpg


Tricky to use this and not round off an edge, but it can be done. What I figured out is, don't flush trim anything until all 6 pieces are together. Or at least, don't flush trim the vertical seams until after you scrape the bottom joint (where the ends meet the front/back). This is because when scraping, you have a tendency to apply pressure all along the assembly, then when you get to the corner, you are scraping a smaller area so the same pressure takes off more material and you round off that corner. But, if you're going to trim that off later, it's less of a concern.
 

Fishy Rob

New Member
View Badges
Joined
Jul 13, 2013
Messages
8
Reaction score
3
Location
Virginia
Rating - 0%
0   0   0
oQUOTE="Lowell Lemon, post: 2620742, member: 54361"]Fishy Rob,
Now you have entered the art of acrylic construction. #1 use a good quality CNC router and you will have parts that fit every time with excellent bonds.

If you are like the rest of us then you must batch cut your parts so they are the same dimension. In other words set your table saw fence once for all height cuts on the outer box. Then set your table saw fence once and cut all internal dimensions (front to back aka width) at one time. Make sure your table saw fence is producing square cuts after each cut. Follow the manufactures instructions for setting up the table saw for proper cuts. Just a hint if the edge looks like a herring bone your saw is back cutting and you will need to adjust your fence. You edge should have a pattern matching the rotational direction of the blade and that is all. Use a triple chip carbide blade for your saw. Some times Home Depot sells an aluminum and plastics blade that works pretty good. Otherwise you will have to spend money to by a special plastics blade for the saw.

The next trick is to set up a special router table and fence. The set up is critical. You have to have a fence that takes off about .200" of material at a pass and keep the cut square. This is like using a Jointer with wood to remove a small amount of material. If you have a deeper cut on the front of the piece your fence is out of square with the cutter. Same thing if the end of the cut has a deeper cut than the front edge of the cut. If all is equal the final part will be square with a smooth routed edge. Be careful the edge is very sharp when it come off the router table. Use a carbide router bit to make the cut not high speed steel. You can use a Jointer as well but you would need to use carbide knives instead of high speed steel knives.

In the end hand sanding or scraping is not going to keep you part flat and smooth because you cannot control the depth of cut along the entire edge of the acrylic. As a result you will not produce a flat square part that make the bonding strong and clear. Refer to the pin method talked about here for the water clear and bubble clear joints you need.[/QUOTE]

Thanks for the reply.
A CNC machine would be great! Alas I only have the smaller things like table saw and router...
So, the implication is that when gluing up the 4 sided section and baffles you have to make sure everything is aligned perfectly with regards to what will be the bottom joint. And if it isn't, then what? Do you have to scrap it and start over? I thought I had seen something in the background once on that show Tanked where they were scraping some edges to make them line up, but that might have been a top joint which would be less of a concern I guess. I've seen a couple mentions of tanks being cut in half and made into smaller tanks (including in this thread) so I would expect a little misalignment after the cutting, even if you used table saw.
 

High pressure shells: Do you look for signs of stress in the invertebrates in your reef tank?

  • I regularly look for signs of invertebrate stress in my reef tank.

    Votes: 42 32.6%
  • I occasionally look for signs of invertebrate stress in my reef tank.

    Votes: 29 22.5%
  • I rarely look for signs of invertebrate stress in my reef tank.

    Votes: 25 19.4%
  • I never look for signs of invertebrate stress in my reef tank.

    Votes: 33 25.6%
  • Other.

    Votes: 0 0.0%
Back
Top