I'm sure you are tired of this question. I love the control panel and want to do something close on a R.S.R 350. Could you give more details? Did you use shelving, painted? How did you attach both bottom and top? Any other help would be greatly appreciated.
Navigation
Install the app
How to install the app on iOS
Follow along with the video below to see how to install our site as a web app on your home screen.
Note: This feature may not be available in some browsers.
More options
You are using an out of date browser. It may not display this or other websites correctly.
You should upgrade or use an alternative browser.
You should upgrade or use an alternative browser.
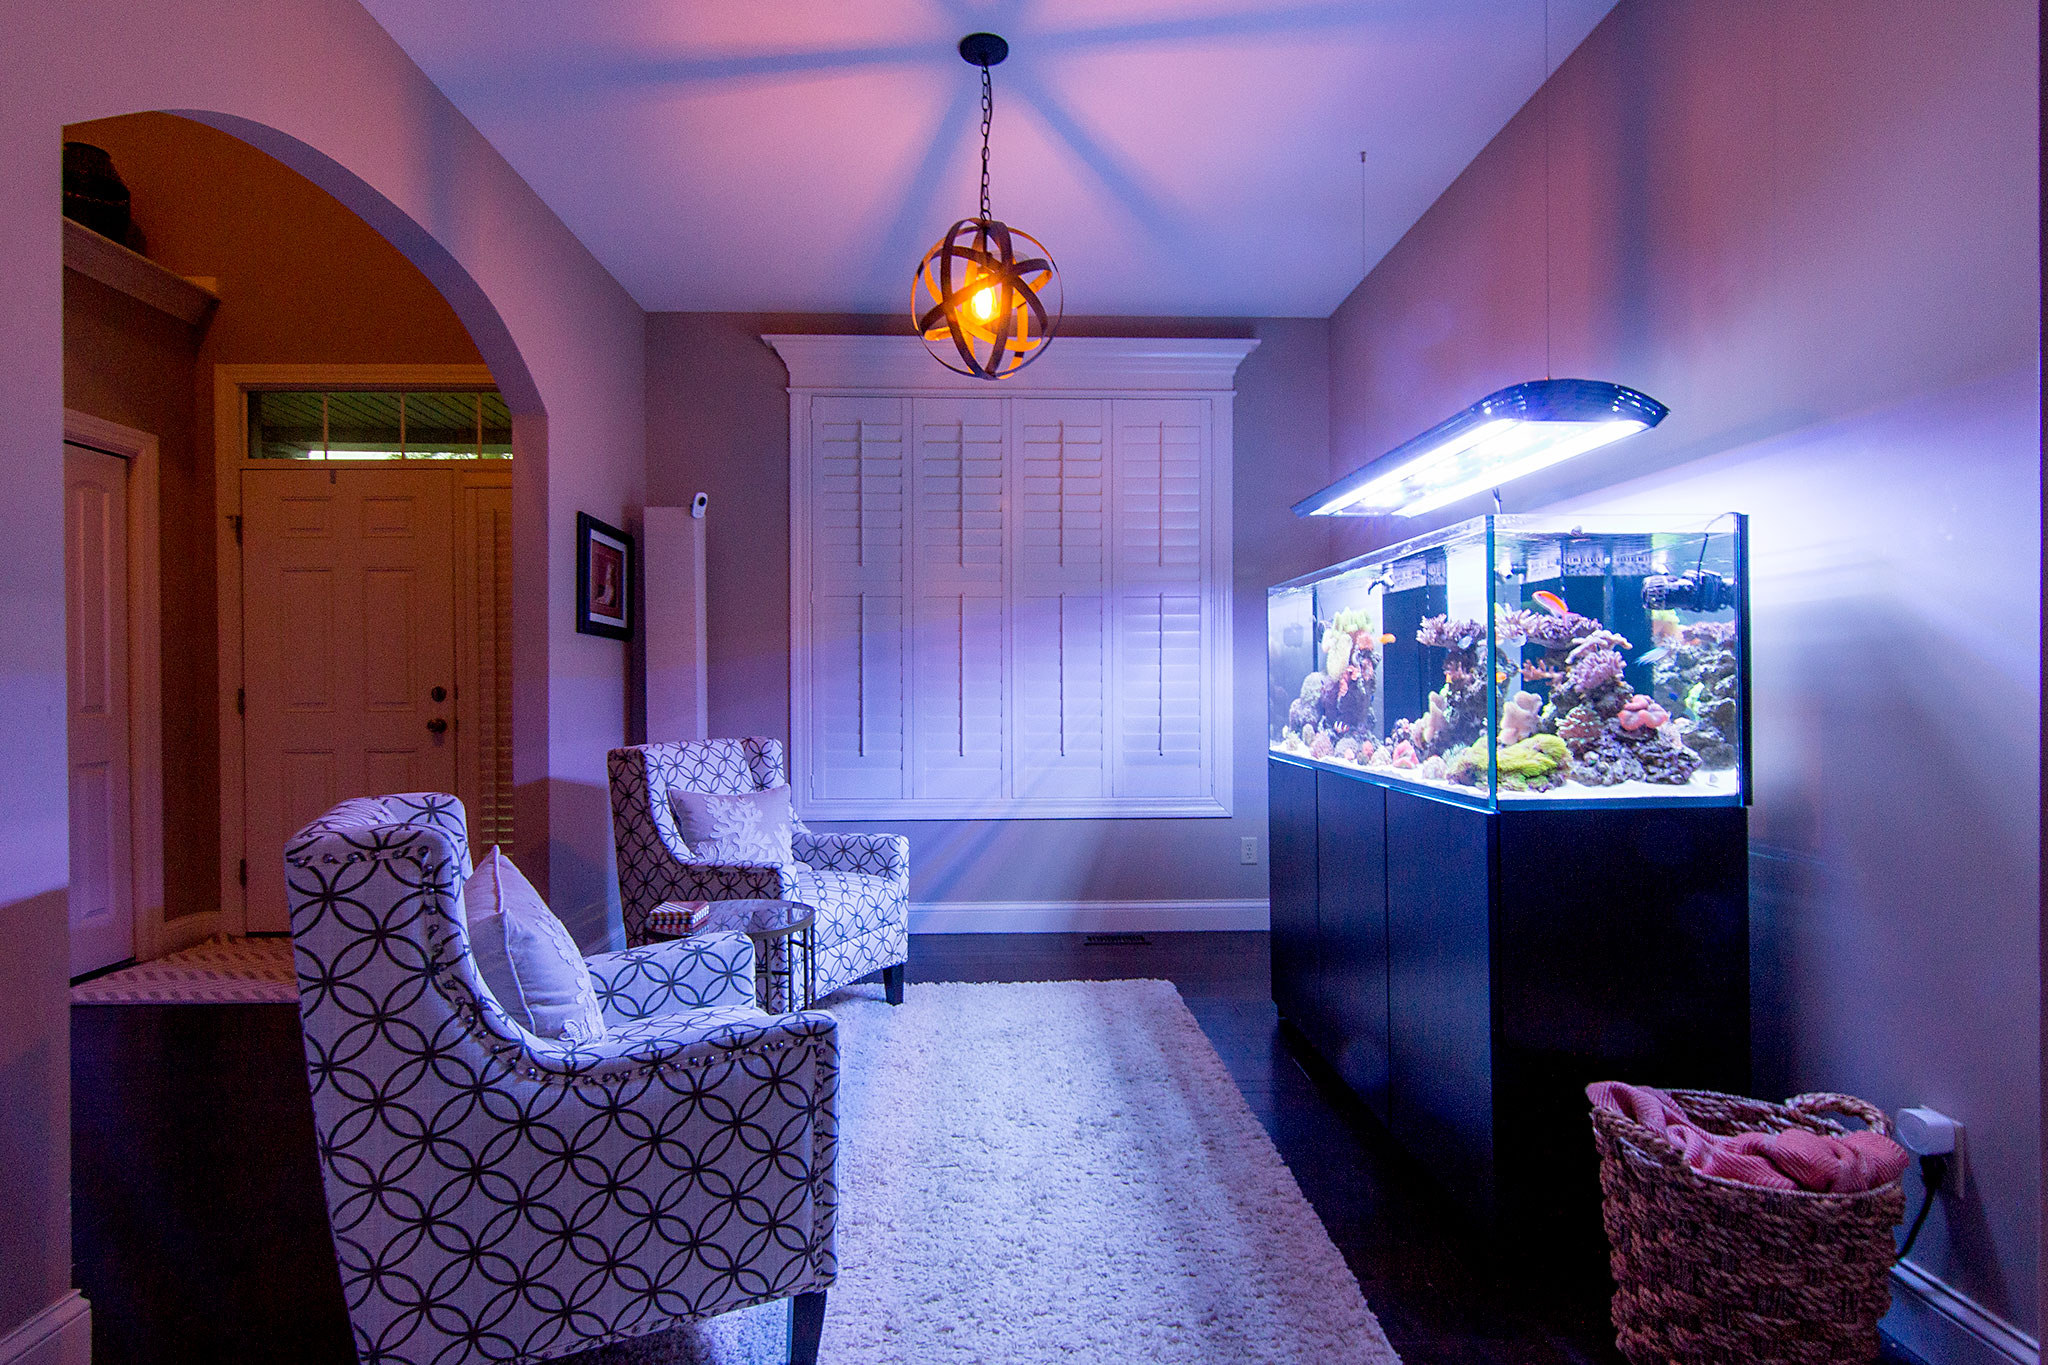
Broadfield's Red Sea Reefer 450 Build - OCD Inspired... Going Back To a Reef
- Build Thread
- Thread starter Broadfield
- Start date
- Tagged users None


OP
OP
Broadfield
Red Sea Reefer Consultant... Non Affiliated
View BadgesExcellence Award
Reef Of The Month
Photo of the Month
Reef Squad Emeritus
Midwest Reefer
I'm sure you are tired of this question. I love the control panel and want to do something close on a R.S.R 350. Could you give more details? Did you use shelving, painted? How did you attach both bottom and top? Any other help would be greatly appreciated.
Nope, I never get tired of helping others out!
Ironically my cabinet setup is/was actually temporary. I just wanted to get something in there easily and quick... which I did. So I bought black Rubbermaid wood shelving from Home Depot and then cut it to length. I simply spray painted the cut end just in case it could be seen at the edge. I used L brackets on the backside to hold the top plate in place. Then of course the middle plate is hinged to that. The bottom plate is simply pressure fit in place so it's easily removable for service and to refill my DOS. The back plate, which holds my Apex EB8 and power bricks, is simply screwed to the back of the cabinet. I used a simple bolt latch to hold the middle plate up when servicing:

I ditched the loop that comes with it and simply drilled a hole on the interior side panel of the cabinet for the bolt to slide into. The hole only needs to be 1/4" deep or so. I then used some black paint on a touchup brush to paint the raw wood inside of the hole.
Thank you so much. Really helps.Nope, I never get tired of helping others out!
Ironically my cabinet setup is/was actually temporary. I just wanted to get something in there easily and quick... which I did. So I bought black Rubbermaid wood shelving from Home Depot and then cut it to length. I simply spray painted the cut end just in case it could be seen at the edge. I used L brackets on the backside to hold the top plate in place. Then of course the middle plate is hinged to that. The bottom plate is simply pressure fit in place so it's easily removable for service and to refill my DOS. The back plate, which holds my Apex EB8 and power bricks, is simply screwed to the back of the cabinet. I used a simple bolt latch to hold the middle plate up when servicing:
I ditched the loop that comes with it and simply drilled a hole on the interior side panel of the cabinet for the bolt to slide into. The hole only needs to be 1/4" deep or so. I then used some black paint on a touchup brush to paint the raw wood inside of the hole.

OP
OP
Broadfield
Red Sea Reefer Consultant... Non Affiliated
View BadgesExcellence Award
Reef Of The Month
Photo of the Month
Reef Squad Emeritus
Midwest Reefer
Thank you so much. Really helps.
No problem, just let me know if you have any other questions or need more specifics.
Finished my media reactor setup. I decided to do a manifold inline with the return line. I did 3/4" hose(about 6" long to eliminate vibrations) out of the pump and then into 3/4" schedule 80. Up from there into the 3/4" manifold, which T's out to 1/2" gate valves and into the reactors. Works absolutely perfect. This is my first time doing anything with plumbing at all, so I was pretty happy with the results.
IMG_4098 by Toby Broadfield, on Flickr
IMG_4060 by Toby Broadfield, on Flickr
IMG_4085 by Toby Broadfield, on Flickr
IMG_4078 by Toby Broadfield, on Flickr
A shot of my water change line. Simply priming this line, turning off the pump, open the valve in the image, open the drain valve in the basement... instant syphon to drain the entire main sump area. I love sitting in the chair in front of my tank and using Apex Fusion to turn on the basement pump to pump salt water back up to the sump. I really hated lugging buckets around with my old tank.
IMG_4108 by Toby Broadfield, on Flickr
Sir just a question, I have researched but cant find anything and Im still new to aquariums. How do these reactors work? I see they are not sitting all the way in the sum but rather hanging on from the manifold. what I read from their website is that the water comes in thru the bottom and up back to the display tank. Im ready to order a couple as soon as I can clear up on how they work.
great build btw.
OP
OP
Broadfield
Red Sea Reefer Consultant... Non Affiliated
View BadgesExcellence Award
Reef Of The Month
Photo of the Month
Reef Squad Emeritus
Midwest Reefer
Sir just a question, I have researched but cant find anything and Im still new to aquariums. How do these reactors work? I see they are not sitting all the way in the sum but rather hanging on from the manifold. what I read from their website is that the water comes in thru the bottom and up back to the display tank. Im ready to order a couple as soon as I can clear up on how they work.
great build btw.
The water inlet is the center fitting on the reactor. The water travels down the clear tube in the middle of the reactor and then travels back up through the bottom plate. The water is then forced through the outlet... which is the fitting that is offset on top.

The water inlet is the center fitting on the reactor. The water travels down the clear tube in the middle of the reactor and then travels back up through the bottom plate. The water is then forced through the outlet... which is the fitting that is offset on top.
Thank you very much. ordering mine today. I plan on using carbon on one, do you recommend buying two and using a different type of media in the other?
OP
OP
Broadfield
Red Sea Reefer Consultant... Non Affiliated
View BadgesExcellence Award
Reef Of The Month
Photo of the Month
Reef Squad Emeritus
Midwest Reefer
Thank you very much. ordering mine today. I plan on using carbon on one, do you recommend buying two and using a different type of media in the other?
I can't really tell you what "you" need, but I definitely recommend two reactors and maybe even a 3rd gate valve for whatever you may need in the future. I'm actually going to add a 3rd port on mine.


After reading through the reefer thread how did I just now stumble across your build thread! Glad that I did, lots of great idea's to replicate! I'm really liking the manifold idea the more I think about it and now I need to figure out how to hard plumb the return line into the reefer piping on the 250!
OP
OP
Broadfield
Red Sea Reefer Consultant... Non Affiliated
View BadgesExcellence Award
Reef Of The Month
Photo of the Month
Reef Squad Emeritus
Midwest Reefer
What size snap grommets did you use for running the mp40 cables through?
I simply used 3/4" for all of the ones on my electronics panel.
After reading through the reefer thread how did I just now stumble across your build thread! Glad that I did, lots of great idea's to replicate! I'm really liking the manifold idea the more I think about it and now I need to figure out how to hard plumb the return line into the reefer piping on the 250!
Thanks man! I hope something in here can be of help.
OP
OP
Broadfield
Red Sea Reefer Consultant... Non Affiliated
View BadgesExcellence Award
Reef Of The Month
Photo of the Month
Reef Squad Emeritus
Midwest Reefer
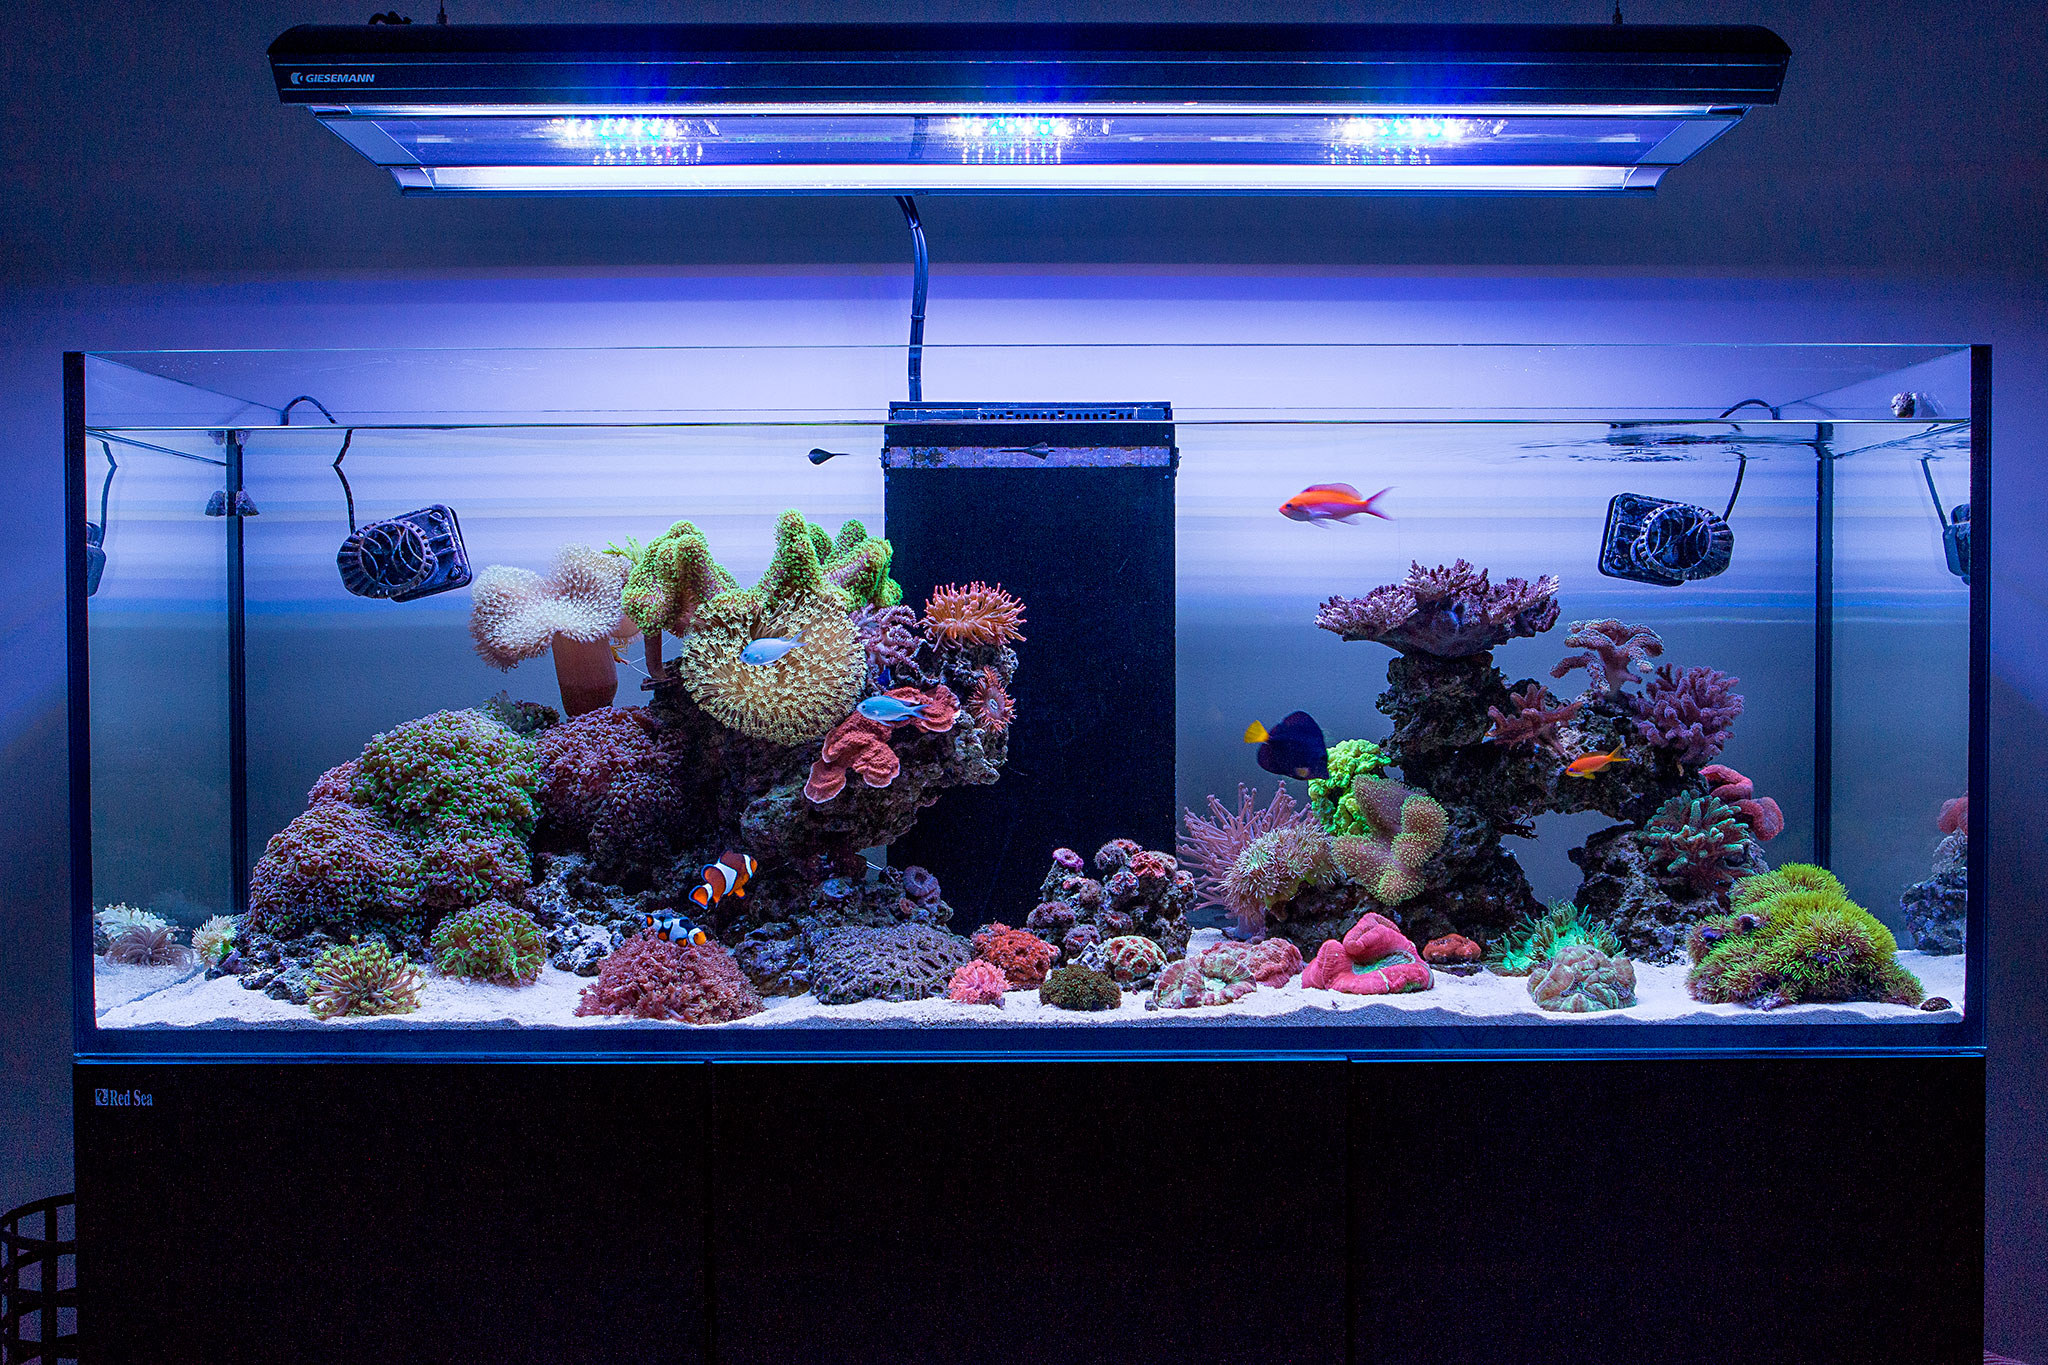
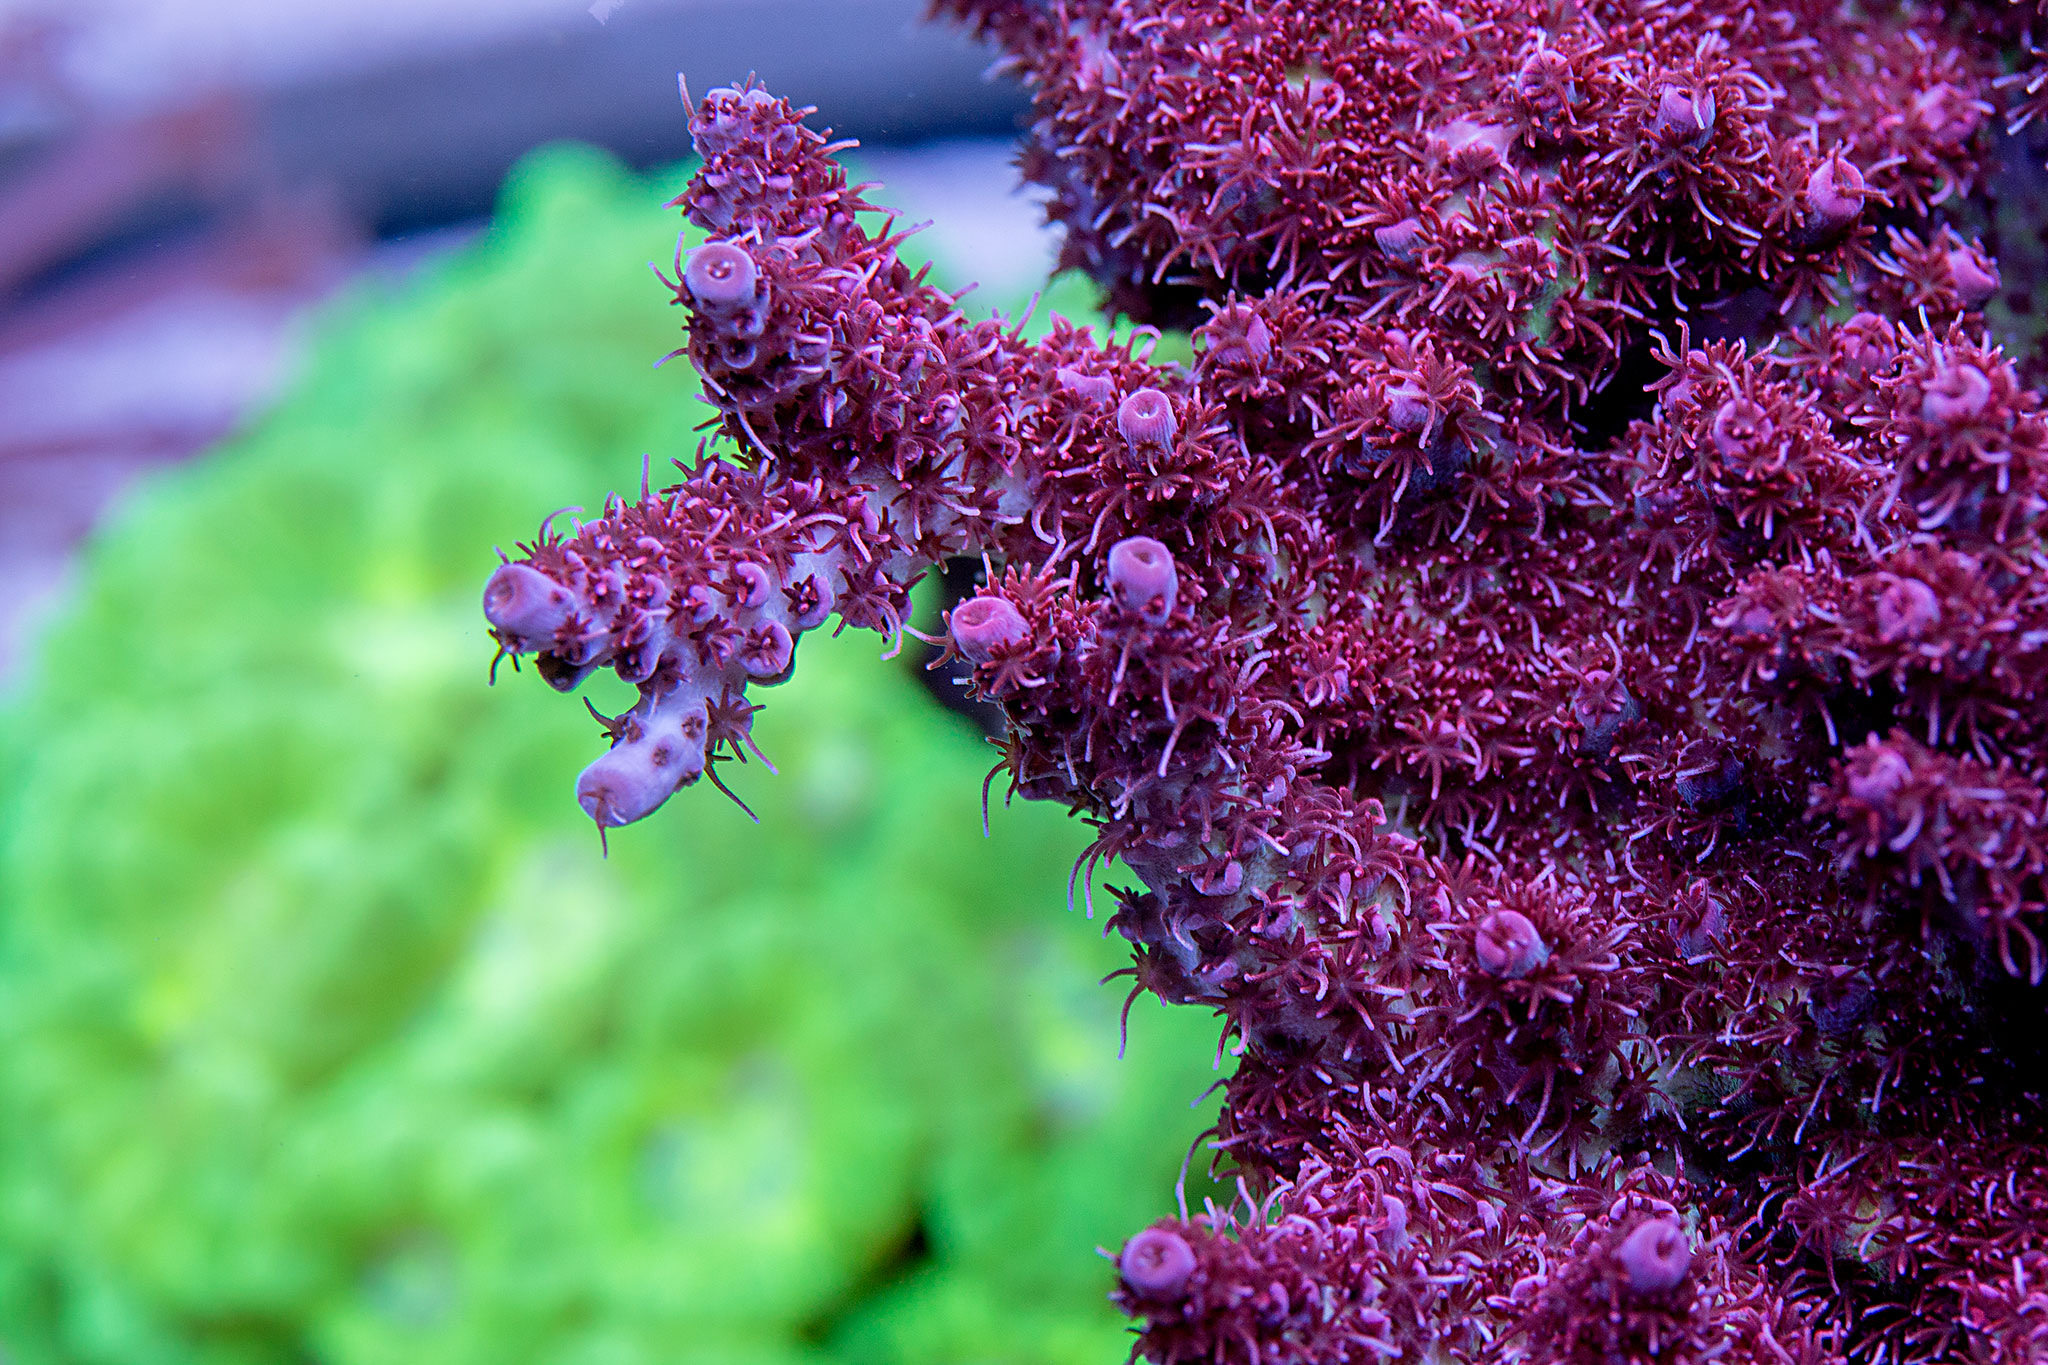
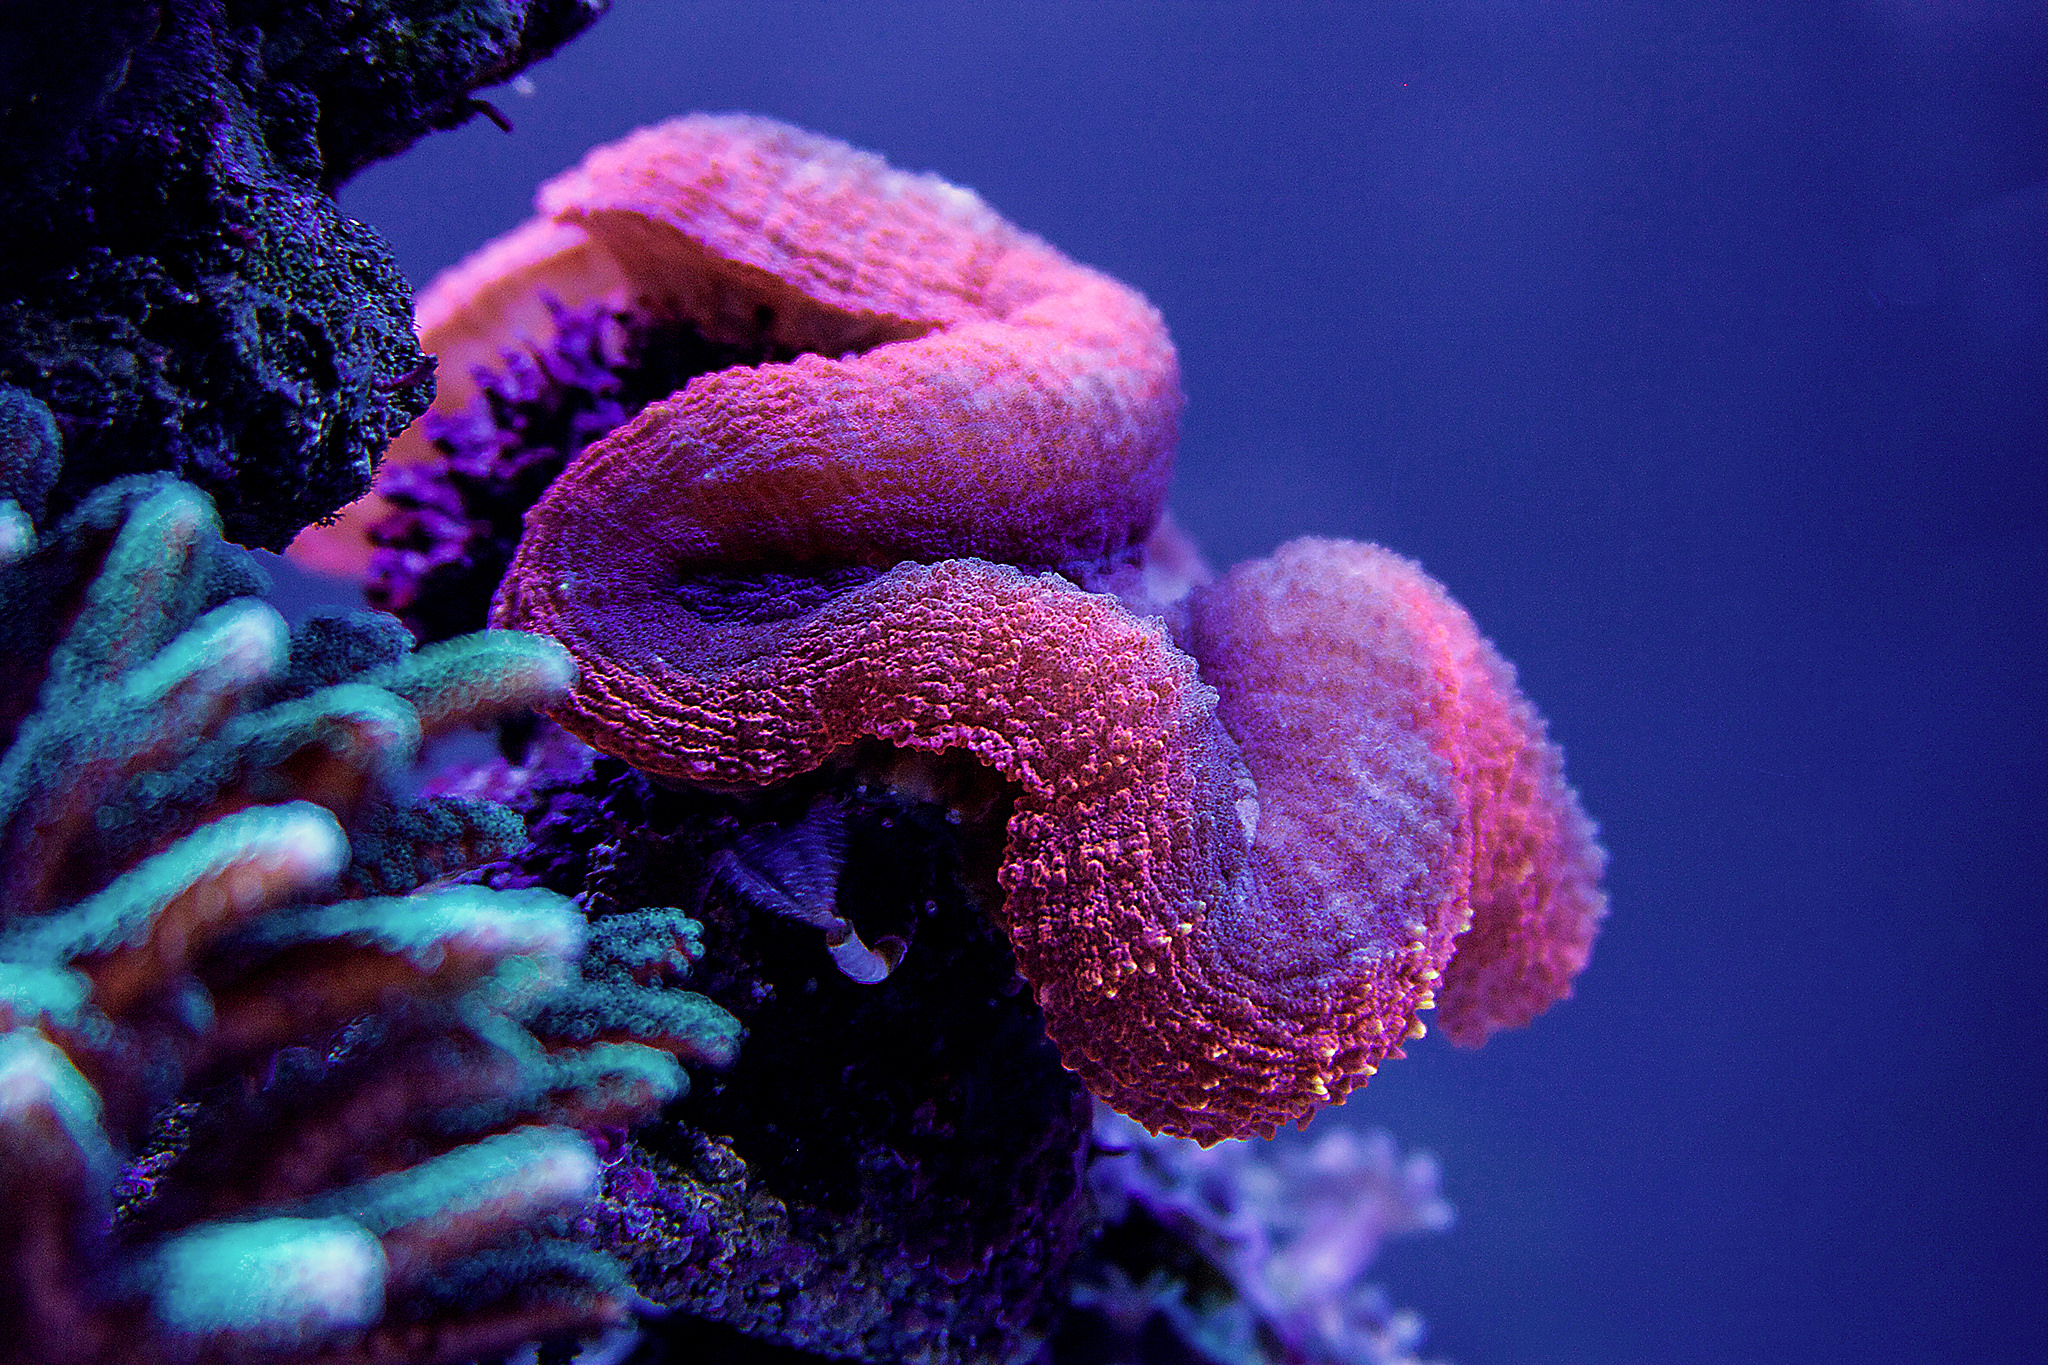
Had a good friend come over tonight to help teach me how to take proper images with my Canon 50D. He also quick schooled my on processing RAW images and some basic Photoshop skills to make sure my images look like they do in real life.
 IMG_4434 by Toby Broadfield, on Flickr
 IMG_4278 by Toby Broadfield, on Flickr
 IMG_4421 by Toby Broadfield, on Flickr
 IMG_4402 by Toby Broadfield, on Flickr
IMG_4434 by Toby Broadfield, on FlickrIMG_4278 by Toby Broadfield, on FlickrIMG_4421 by Toby Broadfield, on FlickrIMG_4402 by Toby Broadfield, on Flickr
Wow absolutely breath taking[emoji33][emoji33]!!!! I love the glass back and being able to see through the tank a beautiful and elegant effect I must say. Truly inspiration for my tank. It's a beautiful aquarium a true work of art in your home. Thank you for the build .. Great work , keep it up!! [emoji106][emoji106][emoji106]

Ok, I have a major update, but not necessarily by choice. I completely removed all of my sand and rock, then replaced with all new. Here's why:
When I did my original aquascape, I used rock that I aquired from a friend. The pieces weren't ideal, but I used hydraulic cement to make structures that I was happy with... bonding smaller rocks together to make larger ones, making overhangs etc. Everything was fine for the first three months. I then noticed a couple of the cemented joints starting to "break" down. The cement was getting soft and starting to deteriorate. The small dark grey parts of the cement were flaking away and making the sand in the area look bad. Luckily, the "infected" areas were not really structural ones so I didn't worry about it too much. The areas where I really needed the support were still solid and completely intact. Until about a month ago when those areas started to also break down. Now the sand really looked bad and I was going to be facing a landslide of reef rock before too long. On top of that, I was never happy with the sand. To start off, it was REALLY dusty. It also wasn't consistent. It had larger chunks of stuff that would color up with surface algae and then look really out of place in the sand. So being completely fed up, I ordered up 120 lbs or Marco Rocks and Tropic Eden Miniflakes. In the past, I used Marco Rocks in my nano and was 100% happy with them.
I put all of my coral in my sump and performed a 24 hour swap. First getting the rock out and then the messy job of getting the sand out... without removing any of the water. Here it is with everything out:
IMG_5122 by Toby Broadfield, on Flickr
I think I clogged up about 20 filter socks throughout this process lol. It was very late at this point so I let the tank clear up over night and then I continued on with it when I got home from work the next day. I did my aquascaping with the new Marco Rocks. Since they sent me a nice variety of large pieces, I didn't have to bond anything together to get the look I was after. Next up was the Tropic Eden sand. Let me tell you, this stuff is basically dust free... it's unbelievable! Then I simply moved the corals back into the DT and I was good to go. I used a bottle of Dr. Tim's All-In-One to make sure I didn't have a crazy cycle. All parameters tested great every day. I had a very minor, 1 week long diatom bloom. And that was it. I have had great results with Dr. Tim's in the past and the results were equally impressive this time around. Back in business:
IMG_5285 by Toby Broadfield, on Flickr
IMG_5307 by Toby Broadfield, on Flickr
A quick video I made for documentation:
I'm actually really happy that this happened. I wasn't 100% happy with the original rock work and hated the sand.
Wow, I might just have to do the same...
OP
OP
Broadfield
Red Sea Reefer Consultant... Non Affiliated
View BadgesExcellence Award
Reef Of The Month
Photo of the Month
Reef Squad Emeritus
Midwest Reefer
Nice pics!
HA! - I have been working on getting some I took today, to look even half as good as the ones you took yesterday. I'm learning... learning that I want a better lens lol.

OP
OP
Broadfield
Red Sea Reefer Consultant... Non Affiliated
View BadgesExcellence Award
Reef Of The Month
Photo of the Month
Reef Squad Emeritus
Midwest Reefer
Last edited:
OP
OP
Broadfield
Red Sea Reefer Consultant... Non Affiliated
View BadgesExcellence Award
Reef Of The Month
Photo of the Month
Reef Squad Emeritus
Midwest Reefer
 IMG_5735 (1) by Toby Broadfield, on Flickr
Similar threads

- Replies
- 2
- Views
- 143
- Replies
- 1
- Views
- 131


