IM Lagoon 25 EXT Build

OP
OP
DWill

DWill

Active Member
View Badges
Joined
Jan 11, 2020
Messages
444
Reaction score
375
Rating - 0%
0   0   0
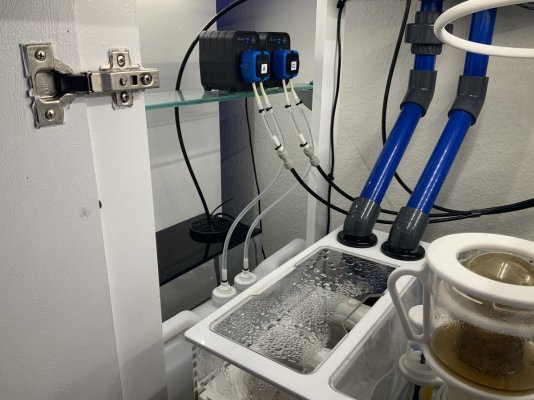
a quick update on the build. Not a lot to show visually. The Apex is installed and up and running. I need to calibrate the salinity and pH probes. I found a old Gen three iPad in a desk drawer and put it into service as a monitor. It’s to old to run the app but works on the Fusion website or to access’s the external Fusion software.

I’ve probably invested 40+ hours in programming it so far. I still have to install and program the ATO. That shouldn’t be too difficult.

The Apex comes with a very, very steep learning curve especially if like me you and zero experience writing code. I would not it’s user friendly for the average person. It’s pretty simple to install and use as a monitor but beyond that the learning curve is very steep.

Fortunately there are a couple Apex pages herE on Facebook with a group of awesome people that will help you. At least one of those persons has written and posted articles here on R2R. Those articles are a invaluable source of information.

other than that I set the XR15 up and it’s ready to turn on in a few days. I really like the XR15 and the new Mobios app make it extremely easy to get the light up and running.

I've done a few five gallon water changes over the last several days to bring Nitrate down. The plan is to test it tomorrow and if
nitrate is down to a acceptable level I’ll start to move things over from the 10 gallon. The remainder of the fish should come of QT in a couple weeks. When those go I the tank will be pretty much up and running.

i should have another update by the end of the week.

CBD885AF-B301-4B55-BC50-A1594D95538C.jpeg
 
OP
OP
DWill

DWill

Active Member
View Badges
Joined
Jan 11, 2020
Messages
444
Reaction score
375
Rating - 0%
0   0   0
ive been waiting on parts. Still waiting on the BRS reactor and some other small parts. In the meantime here’s this week’s projects…

ATO system and low sump level monitor using 3 optical sensors, one solenoid and a Apex PMUP pump. Two sensors will be the high and low sensors for the ATO and the solenoid will close and turn off the ATO pump if both sensors fail. They ATO will be fed from a 6 gallon reservoir. Eventually I’ll put a low level optical sensor in the reservoir.

The third optical sensor will be a low level sensor in the return section of the sump. That sensor will turn all the pumps in the sump off if it opens. The Varios will shut itself down when it runs dry, this primary run dry prevention and built in Varios protection will be the backup.

I picked up 2 Kamoer X1 Pros to dose calcium and alkalinity. I plan to at least attempt to switch them from vinyl tubing to RODI tubing. I can’t find where anyone has done but I think I have a way to get it done. If it works I’ll post it up here.

Thanks again for taking the time to follow my build thread.

4106B95D-C357-4617-AC95-4B75D62B9A77.jpeg
 
OP
OP
DWill

DWill

Active Member
View Badges
Joined
Jan 11, 2020
Messages
444
Reaction score
375
Rating - 0%
0   0   0
A quick update. Pretty much the final big parts for the build arrived today.
BRS reactor, a few plumbing parts for it and some GFO and Carbon.
The plan is to get this and the dosing pumps installed and running over the weekend. I also need to move the Apex salinity probe to a different are of the sump.

i have the basic install of the Apex ATO in. I’m waiting on a mounting bracket for the solenoid and a 24V extension cable then I can finish that of. I think I think the bracket is due Monday and the cable Wednesday.

I also adapted the Kamoer X1 Pro dosing pump to use RODI tuning (see the pics).

I used 1/4 barb x stem John Guest fittings and straight couplings.
I cut short lengths of the clear tubing that come with the Kamoer dosing pumps to use between the small X1 barb fitting and the JG stem x barb.

I dipped the clear tubing into boiling water to soften it and push it on to the barb side of the JG stem x barb. This isn’t easy, I had to reheat the tubing many times. One it was the barb I grimes the so that the small Kamoer barb fitting runs fluid directly in to the JG barb (see pictures). I secured the Kamoer tubing on to the small kamoer barbs with zip ties. This probably isn’t necessary but it felt like a loose connectio, I want to be sure it can’t slip off.

I pushed the stem on the JG fitting in to one side of a coupling the other side will have RODI tubing. Hopefully if you read this and look at the pics it will make sense.

5EEB1084-24C4-42FF-8D7C-B88C7F016533.jpeg 512152A4-8B72-4093-A0FC-823E2DEDD365.jpeg AD5A06DE-BF77-4E0E-83F2-4983C160C0CC.jpeg 155AF2C3-2ADC-46A0-ADA0-882D6A08866E.jpeg
 

Espino963

Active Member
View Badges
Joined
Dec 27, 2019
Messages
282
Reaction score
190
Rating - 0%
0   0   0
Making great progress! One of the cleanest builds around. Can't wait for the transfer
 

BighohoReef

A reefer in need is a friend indeed!
View Badges
Joined
Apr 14, 2020
Messages
3,997
Reaction score
11,346
Rating - 0%
0   0   0
This is inspiring! I just snagged a IM25 Lagoon. Was mapping out what the future tank would look like and I'm seeing some great possibilities from your build thread! Amazing looking setup, so clean and the stand fabrication was awesome!!!
 
OP
OP
DWill

DWill

Active Member
View Badges
Joined
Jan 11, 2020
Messages
444
Reaction score
375
Rating - 0%
0   0   0
Sorry for the long break in posts. Life as college football coach in the times of Rona can be time consuming. But fear not things have been moving a bit on the 25 lagoon and there’s more plans in the works.

A quick update… more to follow later today.

I moved all the frags over from the IM to gallon about 6 weeks ago. They all did well with the exception of a Duncan, but it wasn’t doing well in the 10 either. I think I’m the only reefer that can’t successfully keep a Duncan. I have no idea what’s wrong with it, it isn’t dead, it just hasn’t done well since I got it in March.

Three weeks ago I added a few more frags. I added a torch, a couple hammers, a few Zoa frags to start the garden and a purple candy cane to go with the neon candy cane that came over from the 10 gallon. All the frags are doing well.

I went through a Cyano bout a couple weeks ago, not sure what set that off. I tried to get rid of it without chemicals but i couldn’t get a handle on it, on the end I dosed Chemiclean and the Cyano was gone in a couple days.

The Kamoer X1 Pro dosing pumps have been installed and both are running flawlessly. The RO tubing mods I did has worked with zero issues. I’m happy I made the mod though the stock tubing would work fine as well. The main reason for the mod was my sump is set up for RO tubing.
The Alk pump has been running for about 5 weeks, Alk hasn’t varied by more than .3 on the Hanna since I turned the pump on. I started the calcium pump a week ago and so far Calcium is stable at 440 ppm +/- 3-4 ppm. So I’m pretty happy with the Kamoer pumps over all. The app that runs them however is ok, not really very good but serviceable. I am considering switching out to Versa pumps.

I’m finishing up a DIY battery backup for the MP10. The backup Ecotech sells isn’t bad but it’s SEVERELY OVER PRICED unnecessarily over priced in my opinion. I have less than 60.00 invested in the backup I’m building and I have a battery with nearly 3X the capacity of the Ecotech backup. I’ll pics and write up out later today.

Current pics of the tank and the Kamoer pumps are attached. Thanks for following my build thread. Hope someone reading finds something helpful to them.

4FD202C9-AF08-4440-882D-C8A80C9699DB.jpeg 95DA8DC9-00AB-4BAC-8D65-0ADC2672856B.jpeg EE5DCDD7-D907-4AAF-8B00-ED1B945599B6.jpeg 8AFA193E-B01A-4A2B-B747-5783B24FF604.jpeg
 
Last edited:
OP
OP
DWill

DWill

Active Member
View Badges
Joined
Jan 11, 2020
Messages
444
Reaction score
375
Rating - 0%
0   0   0
This is inspiring! I just snagged a IM25 Lagoon. Was mapping out what the future tank would look like and I'm seeing some great possibilities from your build thread! Amazing looking setup, so clean and the stand fabrication was awesome!!!
I can only take credit for the design of the stand/cabinet. I have negative zero woodworking skills.

A good friend of mine came over and built it while I helped by staying out of the way. I did underestimate the amount of electronics going on the build. That cabinet is jammed full and still have another FMM module and I’m adding a second MP10. Don’t know how or if I can fit it all in.

So, I’m thinking of building a new controller cabinet that will sit next to the tank on the left side. I’ll either a second 5 gallon ATO reservoir or I’ll move the dosing pumps and containers where the electronics are now.

I’m also doing some research on a solar/batter wall to run the entire system and take it off my power bill.
 
OP
OP
DWill

DWill

Active Member
View Badges
Joined
Jan 11, 2020
Messages
444
Reaction score
375
Rating - 0%
0   0   0
New parts for the 25 Lagoon.

Added another MP10 to right side of the tank. Plan is for this to be the secondary pump running in anti-sync with the left pump being the primary.

Now I have to figure out Mobius and that’s not a easy task. Not sure who writes Ecotec’s software or why they signEd off on the software. It’s not intuitive at all and unnecessarily complicated. I’ll get it figured out but it just should t be as difficult as it is.

Anyway, the new MP10 is installed just have to get it working now.

86176F66-1082-4C8C-9307-CF67A18867BC.jpeg A19C1D11-AAE4-4798-B0BE-67E736CF17BC.jpeg F9ABAFC3-E375-46E3-8E08-B15530AC9DE0.jpeg
 
OP
OP
DWill

DWill

Active Member
View Badges
Joined
Jan 11, 2020
Messages
444
Reaction score
375
Rating - 0%
0   0   0
I’ve been meaning to post this for over a week, but, life keeps getting in the way. i Want to apologize for any typos etc. it’s late and I can’t sleep. I’m posting from my iPad in the dark using one finger to type.

Anyway, when I started the. 25 Lagoon build I planned to put both a battery backup and some sort of UPS on the system. Since I’m using Vortech pumps in the display I though I’d just use the Echotech battery back up. It’s plug and play and I thought for the price there had to be some sort of wizardry in that box, or, at the least a LiFe or some sort of lithium battery.

Well… I was wrong when I decided it was time to get the back up I decided I’d dig and see what’s there to suppler the price. Honestly, I was shocked to find out that for nearly 200.00 youre getting nothing more than pretty ancient technology.

What the echo tech backup battery actually is no where near worth what they charge for it. Even the components they use are not top their. The components are all pretty mid level quality certainly not low end. The thing is even if AE note h were paying Amazon retail prices for the batter backup components they still be holding at least a 70% - 80% margin.

Put simply, what Ecotech reatails their backup for is a pretty big price goug. Certainly there’s little actual value for the consumer.
All in I’ve got a reliable backup system for under 60.00. That’s far less than half the cost of the Echotech setup.

So I decided I’d build my own backup, I set out looking for parts. In the end I built the entire back up for less than 60.00 and I could have shaved of another 10.00 - 12.00 simply bu using a slightly less of.

I won’t go into too much detail on how I built it, I think the pictures are self explanatory. If you have question post them here or reach out to me PM.

The parts list is very simple.

- A SLA battery whatever size you want.
You could also use a lithium based battery as long as you’re familiar with that battery chemistry. That was my original idea when I decided to DIY a backu. I opted for SLA to keep the costs down. Also because this is (or will be) a redundant backup.

- A float charger. Just get one large enough to charge your SLA battery in a reasonable amount of time.

- A few feet of good quality wire. How much depends on how far your battery is from your tank.

- A few connectors to connect it all and make the battery easily removable for maintenance or replacement. I used Deans connectors (see the pics) mostly because I have a bunch of them around because of my RC hobbies. In my case I used two lug connectors to connect the charger to the battery and two Deans connectors to be able to separate the charge wires and the wires to the driver if I want or need to remove the battery i can do it because of these connectors.

- The connection wire from Echoteck to connect the battery to the driver. You can make this wire yourself, but, in this case it’s faster, easier, less expensive and cleaner to get the Ecotech wire.

- A box to put the batter in (obviously optiona)

- some decent soldering skills a good equipmen. soldering in reality is optional, you could get away using “crimp” connectors. I think soldering is cleaner, easier, more secure and last longer. I also already have the equipment from other hobbies, so soldering or not wasn’t really a tough decision to make.

All I did was prep the box, solder the wires for the driver onto the battery lugs, cut the wire running between the battery and the driver to length and solder on the two dean. But the battery in the box put the lid on the box, plug in the driver and the charger and it was done.

As I mentioned the picture tell the DIY build story pretty well, but if you have question please ask. I’ll do my best to answer. Here’s a sequence of build pictures …

8FBAD78D-B4D6-4158-AA6E-24AC902D627C.jpeg 24075BD9-3359-4D60-8564-76F4502BFA96.jpeg FC4E96BB-A9E4-4714-B801-8E54D86A897A.jpeg ABFB7B3A-5E0D-42D3-AADB-60DA55FF51E4.jpeg 46EE15DF-CDD7-4C80-A25F-BF699FBDE06E.jpeg 3FD88DB6-E884-4361-99FE-BEE5A6883C4A.jpeg 1ABD3681-B24C-43CA-9E18-2E27A4468FDB.jpeg A2C06B70-D8FE-4E98-9B04-AC2E848C605F.jpeg 479466B8-C8E8-40AB-B201-55BA1267109B.jpeg D941DD54-1907-48D0-A13E-AF7C96151B64.jpeg 21868010-ED87-4D4D-BB52-1C7B00AC3C44.jpeg
 
Last edited:
OP
OP
DWill

DWill

Active Member
View Badges
Joined
Jan 11, 2020
Messages
444
Reaction score
375
Rating - 0%
0   0   0
So, a few months in on this DIY project. Started getting some inconsistencies in Alkalinity and Calcium test results. I calibrate the pump s every month, they are usually within .1-.2 ml of each other song a 5 second fill time for calibration. This time they were FB by a couple ml’s.

I ran the pumps in prime mode and noticed a lot of air bubbles in the lines of both pumps. After checking the connections I found the tubing I’d heated to stretch over the 1/4 barb x stem fittings was loose on the barb side. It had to be a source of a air leak.

So, I set about reworking the dosing lines while keeping the transition to RO tubing.

I went on McMaster-Car and ordered some 3mm x 4mm barbed hose couplings. Amazon turned up some 5/32 ID x 1/4 OD silicone tubing.

The 3mm side barb fitting fits perfect into the tube on the dosing pump. The 5/32 ID tubing fit the 4mm side of the barb fitting. The tubing also stretched easily over the 1/4 barb on the 1/4 barb x stem RO fitting. I was able to eliminate the 1/4 x 1/4 RO coupling on the pump inlet side (see the pic) thus eliminating another sourcf potential air leaks.

On the outlet side I used the San engine fittings but retained the RO coupling so that I could convert to RO tubing going to the sump doing tubes.

Re-plumbing the dosing lines at the pump took about 20 minutes after which I primed the lines. All the air purged from the lines and it all seems to be working better than the old method, it all fits together much better.
 

Attachments

  • 57CAECBE-9EF8-4E21-A1C4-A68A7305E978.jpeg
    57CAECBE-9EF8-4E21-A1C4-A68A7305E978.jpeg
    194 KB · Views: 41
OP
OP
DWill

DWill

Active Member
View Badges
Joined
Jan 11, 2020
Messages
444
Reaction score
375
Rating - 0%
0   0   0
Upgrading my skimmer. At least I thought I was.
I’ve been thinking about getting a Deltec Skimmer for a while.
They went on sale for Cyber Monday so I ordered this 400i.

It arrived today I unpacked and took it apart to rinse before installing it.
Sadly the upgrade is going to be delayed. I found the collection cup is not completely glued to the bayonet fitting. If I try to use it anyway it will leak.

I emailed Deltec this evening. I guess we’ll see how good their customer is.
 

Attachments

  • 2D24C260-CAC9-41C5-A4C2-F3BEAD36D955.jpeg
    2D24C260-CAC9-41C5-A4C2-F3BEAD36D955.jpeg
    140.2 KB · Views: 36
  • EBD1BA80-A2F9-498B-A0E6-B7B4E6D4F432.jpeg
    EBD1BA80-A2F9-498B-A0E6-B7B4E6D4F432.jpeg
    154.9 KB · Views: 40
OP
OP
DWill

DWill

Active Member
View Badges
Joined
Jan 11, 2020
Messages
444
Reaction score
375
Rating - 0%
0   0   0
Installed the new skimmer. I have it running on low for a couple days to “break it in”. Though I don’t think it’s necessary to do, I cleaned it in citric acid before I installed it.

it’s running at a low power setting and high water level for a couple of days. I did turn it up to the highest power setting and adjusted the water level to see how much noise it makes.

This skimmer is silent, I mean absolutely silent. With this skimmer and the Varios return pump I’m running the only thing I can hear is the air leaving the skimmer, and I have to listen closely to hear that. I’m going to put a small bag of carbon on the top. With that I think it will be completely silent. The only thing I’d like to see different is to have a longer cord from the pump going to the controller. This one barely makes it over to the equipment side and I had to route it up along the top for it to reach. Maybe there is an extension available.

Kudos, to Deltec’s outstanding customer service. I called them early yesterday about the defective skimmer cup and a new cup was on my doorstep today.

I ran out of room in the equipment cabinet so I mounted the skimmer pump controller on the door. Not to worry though, I’m drawing up a new improved larger cabinet today.

3466286D-6941-4E5B-88A5-DD4353ED2DB6.jpeg 0CFF73FE-A24D-4D9F-A4FA-B470B17E645C.jpeg
 
Last edited:
OP
OP
DWill

DWill

Active Member
View Badges
Joined
Jan 11, 2020
Messages
444
Reaction score
375
Rating - 0%
0   0   0
How’s the lagoon doing?
It’s a bit of a challenge right now. Fighting to keep nutrients up. It has Dino’s because of the low nutrients. I’m working on it. Going to start dosing Brightwell Nitrate tomorrow.
 

High pressure shells: Do you look for signs of stress in the invertebrates in your reef tank?

  • I regularly look for signs of invertebrate stress in my reef tank.

    Votes: 36 31.3%
  • I occasionally look for signs of invertebrate stress in my reef tank.

    Votes: 28 24.3%
  • I rarely look for signs of invertebrate stress in my reef tank.

    Votes: 21 18.3%
  • I never look for signs of invertebrate stress in my reef tank.

    Votes: 30 26.1%
  • Other.

    Votes: 0 0.0%
Back
Top