Isaac's CADE 1500s2/ Peninsula Reef Build

OP
OP
Isaac Alves

Isaac Alves

www.instagram.com/theloneaquarist/
View Badges
Joined
Nov 22, 2015
Messages
2,107
Reaction score
1,310
Location
Rancho Santa Margarita, CA
Rating - 0%
0   0   0
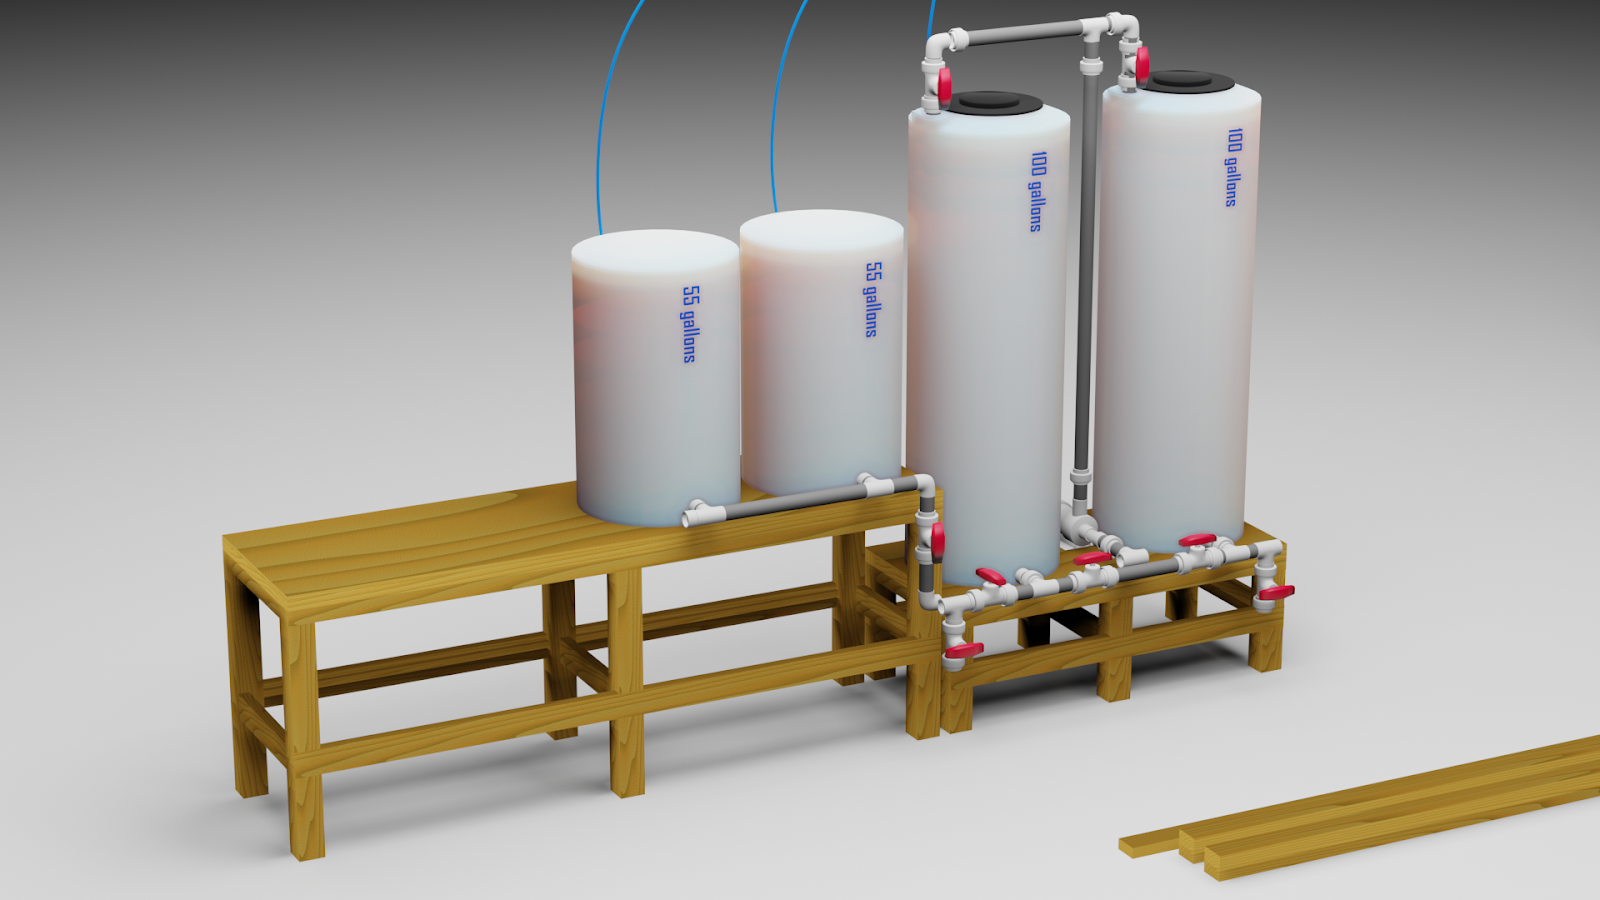
just to let you know if you would rather have imperial instead of metric on the manifolds if you have any old 1/2 in true union ball valves laying around the connector fits right inside the collar for the metric ones that come on the cade

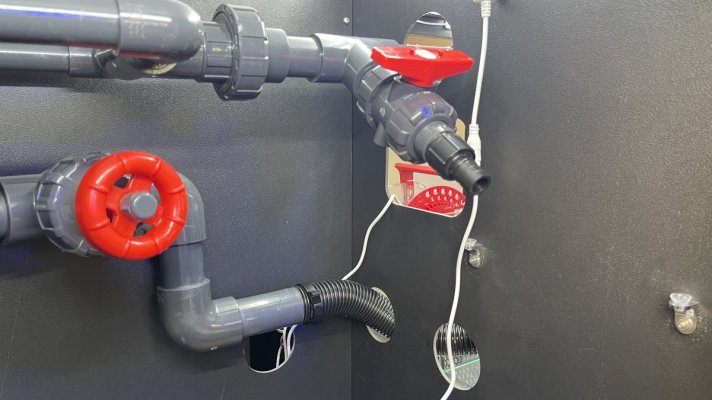
I’m more interested in the pvc size for the two big overflow drain pipes in the sump, one has the gate valve. i need to mod these pipes to get the ReefMat 1200 to fit. I’m thinking of shortening the pipes to have the gate in the chiller section.
 
OP
OP
Isaac Alves

Isaac Alves

www.instagram.com/theloneaquarist/
View Badges
Joined
Nov 22, 2015
Messages
2,107
Reaction score
1,310
Location
Rancho Santa Margarita, CA
Rating - 0%
0   0   0
Reference Metric Pipe comparison chart
(via flexpvc.com)


MetricStandardsChart.jpg

This is for my own reference as I plan on the adjustment to the Cade Overflow main pipes. Others might find this useful.
 
OP
OP
Isaac Alves

Isaac Alves

www.instagram.com/theloneaquarist/
View Badges
Joined
Nov 22, 2015
Messages
2,107
Reaction score
1,310
Location
Rancho Santa Margarita, CA
Rating - 0%
0   0   0
Doing major changes to the overflow drains in order to fit in the ReefMat 1200 into the first sump section.

First, the main drain that goes right into the ReefMat:

Moved the gate valve into the chiller section of the cabinet. I think this will work for me. Everything is cemented up nicely.

D199B9F2-C669-4CC0-BBEF-BF1F02118C2D.jpeg


F9D75163-C8A8-4DBE-9E43-ED81F315FEF7.jpeg
 

Attachments

  • 58BA6378-189C-4FD2-A5AA-91BEAC5EBDE9.jpeg
    58BA6378-189C-4FD2-A5AA-91BEAC5EBDE9.jpeg
    165.9 KB · Views: 67
OP
OP
Isaac Alves

Isaac Alves

www.instagram.com/theloneaquarist/
View Badges
Joined
Nov 22, 2015
Messages
2,107
Reaction score
1,310
Location
Rancho Santa Margarita, CA
Rating - 0%
0   0   0
Second overflow (emergency) drain:

I needed to make room for the gate valve. I tried several options such as jacuzzi pipe, the remainder of the ReefMat pipe, pond pipe (which is too thin between the ribs in my opinion). Ultimately I just pointed a heat gun to a portion of the pipe to bend it slightly around the area where the gate valve lives. Carefully keeping the pipe along the same horizontal plane, so I was able to keep the horizontal flow that the Cade originally had with the pipe exiting the top square cut out.

6E5EAF34-AD15-4046-AEDE-6A948B86F1D9.jpeg


There’s enough room to comfortably turn the gate


64F0B91A-2B45-40B8-996D-87700B5A95B4.jpeg


and the emergency drain fits nicely alongside the ReefMat piping:

DE875FC6-B000-407D-B48D-311CC1198D69.jpeg


67581D0A-A604-4287-ABDD-E51ABC7ABEEF.jpeg


715E9034-0F35-484C-9C41-EAE42D6AA89C.jpeg
 
OP
OP
Isaac Alves

Isaac Alves

www.instagram.com/theloneaquarist/
View Badges
Joined
Nov 22, 2015
Messages
2,107
Reaction score
1,310
Location
Rancho Santa Margarita, CA
Rating - 0%
0   0   0
So I didn’t put the ReefMat motor and wires in…duh. So I had to redo the emergency drain pipe and try something else.


:confounded-face:
 
OP
OP
Isaac Alves

Isaac Alves

www.instagram.com/theloneaquarist/
View Badges
Joined
Nov 22, 2015
Messages
2,107
Reaction score
1,310
Location
Rancho Santa Margarita, CA
Rating - 0%
0   0   0
I went back to utilizing the remaining Red Sea ReefMat piping.

AE240E36-9A0E-45C2-9F39-1C6E8924FE4F.jpeg


C008322E-A959-4B61-975A-0ABC33BA01EB.jpeg


E0FF6C63-D385-42F9-B1F1-FFCA67C40448.jpeg


368FC1E5-4BDD-44D6-A37C-CAEB7E01CA1A.jpeg


Everything is accessible now. The motor works. And I’m able to easily open the roller carriages without any hindrance.


BC4BF1C6-21D9-4075-AB92-4B2E272759FE.jpeg


I actually prefer the flexible tubing now so I’m glad I updated it.

Now I still need to do a leak test on everything. But for reference I used the pipe sealant that came with the ReefMat to seal the pipe around a slightly larger than 1” pvc which is bonded/ cemented into the metric 40mm drain pipe. It was a snug fit.

26FF0D24-461E-41DE-ADE5-C48B1690DCA9.jpeg
 
Last edited:
OP
OP
Isaac Alves

Isaac Alves

www.instagram.com/theloneaquarist/
View Badges
Joined
Nov 22, 2015
Messages
2,107
Reaction score
1,310
Location
Rancho Santa Margarita, CA
Rating - 0%
0   0   0
80/20 Light Mounting System to hold an Aquatic Life 48” T5 Hybrid Gen3 Fixture
and 2 Radion G6 XR30s Blues
.

This unit was designed by my friend, and local reefer, Tim. Tim stopped by this morning to do final measurements, as well as to make sure the pieces and setup will be easy for me NOT to mess up.

I really like this system. It will allow me to pivot the fixture side-to-side to quickly clean lights, change light bulbs, and allow full top access to the tank. It also will manually slide up or down as needed. Best of all it's strong. I can rest a lightweight wooden canopy-skirt to blend in with the living space and lessen light spill (if needed).


mk61pDhSgRkRD74uv7hiMX8mjGWSjGd3kD3fAw53Qc6gWkE0KlW7FIefs2kOL8VeE_3ObMJO5p75azN0yPEN6MGbmc08l4RS2Z7nAanwvPf-XLOKOpdXR0xX0kzhFABO8fvOJ1fJNRO_8dxcXQs

Parts list:

gcKaKN6l70cvwAs1XhJHNEmOlP168IV_aiG1TcH6NtVq4PxZY1fia-eskQsgce_65xmHRoxCZuFOMeLY5KTHH-376zvLJkqE565YmUDVbp5-PYU0SQCMU-t6qpdLK25GwgxOhwViya6xdvtvKSU


I ordered from both www.tnutz.com and 8020.net -- TNutz is having a really nice discounted sale on some parts right now.
 
Last edited:
OP
OP
Isaac Alves

Isaac Alves

www.instagram.com/theloneaquarist/
View Badges
Joined
Nov 22, 2015
Messages
2,107
Reaction score
1,310
Location
Rancho Santa Margarita, CA
Rating - 0%
0   0   0
Looks good, and fantastic write-up so far! I'll definitely be following along.

Really digging the light mount btw :)

I'm really excited about the light fixture as well. I'll document the process of putting it together and how well it functions. In case others are using similar Cade 1500 peninsula style tanks with the hybrid fixtures.

Right now I'm seeing that 8020.net is processing my order. I'm curious how long it will take them to cut and finalize my order.
 
OP
OP
Isaac Alves

Isaac Alves

www.instagram.com/theloneaquarist/
View Badges
Joined
Nov 22, 2015
Messages
2,107
Reaction score
1,310
Location
Rancho Santa Margarita, CA
Rating - 0%
0   0   0
Full parts list for Light Mount Extrusion system. In case anyone is looking at something similar. I'm still waiting on parts from 8020.net but I think they should be delivered today via the UPS shipping tracking data.


The Part #s and prices are all from 8020.net, but if I purchased from Tnutz I note the part number and cost below the 8020 listing.


Part #Price per inchQtySizeTotal CostDescription
1530-LS-Black

9P57gEyD6Y_NL4yFPTeRoDCB9q5B4NX5dzbQOVlWBypNA1leFAY6LTxrwSB_AaIvkYqYCT7bBu1LiN_IphXT6Q_-ZcNkTXeY8S9nllYCaR2EzUa-LqIlzhVGhV16LBKm5Y3HEYaQvpCMnV5im3qxoq0
$1.591x82 inches$130.381.5" x 3"
1515-ULS-Black

M940Y_scTdK6nuGr4m3MBSRNx0AkICLwP-p6roVLX4cAsra4eDw8f9U9UOSLRZJi5JRwyYbYNC3JFVOXBMCfNslyuexxgdwX6mbGqYae0H2sMM9cY76-sUUeDKjMZxwhKDiNbFv0Ty4JHMwWmXYb-W0
$0.811x75$60.751.5" x 1.5"
1515-ULS-Black

M940Y_scTdK6nuGr4m3MBSRNx0AkICLwP-p6roVLX4cAsra4eDw8f9U9UOSLRZJi5JRwyYbYNC3JFVOXBMCfNslyuexxgdwX6mbGqYae0H2sMM9cY76-sUUeDKjMZxwhKDiNbFv0Ty4JHMwWmXYb-W0
$0.811x48$38.881.5" x 1.5"
1515-ULS-Black

M940Y_scTdK6nuGr4m3MBSRNx0AkICLwP-p6roVLX4cAsra4eDw8f9U9UOSLRZJi5JRwyYbYNC3JFVOXBMCfNslyuexxgdwX6mbGqYae0H2sMM9cY76-sUUeDKjMZxwhKDiNbFv0Ty4JHMwWmXYb-W0

$0.811x7.5$6.081.5" x 1.5"
1515-ULS-Black

M940Y_scTdK6nuGr4m3MBSRNx0AkICLwP-p6roVLX4cAsra4eDw8f9U9UOSLRZJi5JRwyYbYNC3JFVOXBMCfNslyuexxgdwX6mbGqYae0H2sMM9cY76-sUUeDKjMZxwhKDiNbFv0Ty4JHMwWmXYb-W0

$0.811x4.4$3.561.5" x 1.5"
6870-Black

YPi2IceXgWIsWQts5SV42D2ctgCacUxKyDqax5z3g8vkhnfpU8E_LtniDyGMKSq3nFLcggls_dxdFUfeEd3bSrhNJG-8El2hTCQSPRHgy1SsQKcwArp-6wF4Pv9C6ipI6uhEZUUD-Ng2au_poaKgGOU
$81.462xNA$162.92Sliders
6800

[Purchased at TNUTZ #LH-015-B]

XxDEI8Se-WwCU6NKxA4aOa4QLRBCRyky0tkWTWQBkHe0W3r8OjxcTK2J_Bt9v1EsVANYn6UYAprCQRptyAWUX9ZFWq2YHbuTD1CAT5HikX6q9k-vdDuG87ea5h_yQ39I99ePkPbHceq8J63ujwONkxA
$19.59

Tnutz cost:
$11.45
1xNA$19.59

Tnutz total:
$11.45
15 Series "L" Handle Linear Bearing Brake Kit
4332-Black

[Purchased at TNUTZ #CB-015-A-BLACK]

5v0S74qCp4fWz1wkwAj8nCw4yNLGl6DTxLH-H4mEiYnjs-muW5iJEVvC3eQagK5Y-TJhx-9Wn8M_vI0ukhTRxMmpUDG_LLpjlNp44BZ-DJ2Iin5WH9QrRtXOf2YYqvjSmFpk-Q9MVtDUn3id0Ctl_IA
$9.03

Tnutz cost:
$4.35
3xNA$27.09

Tnutz total:
$16.65
2 hole Gusset
2061
[Purchased at Tnutz #HAN-015]

6lwdWFWRtHrck2QKmNiC9iKcYvzSUAbO2Xs8IVlRD7yawfjR_5VNSK0P9b_NN6RZLpNaq1evLQzbVZ6F_fsGT2b5Wpiki8Zuu_SkC976XnU5X1fyj8RdIFpXNs1ejbpPGo7YTL_nQmIIAi_UzhQSuKg
$9.77

Tnutz cost:
$4.40
1xNA$9.77

Tnutz total:
$4.40
Door Handle
4405-Black

59nzfgPuybNy9taNtZUWZOz9nrsDRBk1J2ruOpui71I7rrxguYxvCqZ1UQ3Alrfur56D5TsSTq768_-zrqCEGPH6U8aTg6gstQ9sSpqBkGTj7oX0lYZxgpWvG_rwCKXCCzx3r972z15QJPN3-Y14mAM
$32.504xNA$130.00Pivot Assembly
2045-Plain

PtxRRws7LhISIaVVoVFeECpCzwoqLfcwh7V6io2WqxgY_fK4BZjUSX9_UzMtVyrYwOqwTm1NwBgJg4ttKL_2PldU6Jc4kw84GyU486y-8ngipGL2ZMMfm0hkmVv_ScPm0SKBIkXzyH-OyAdHMKEkUWk
$2.462xNA$4.921.5" x 3" Cap
3274

zqTXjbC6EaOrVH0D0CS6_Tlx9LwUS-E-U3KxHZ0cb01NExuMz0DDItRLSbB1estS7_rN2Nwlk3QO_81qSdpZjm7QSFDWQlLYJcYYvBgLJwNi0UsTAKFW81Cyq8gwJGYtetKLgsUvUXRZuVnWwBwCoJE
$0.184xNA$0.72Push In Fastener
3282

[Purchased at Tnutz #DT-015]
vmDeS1i-SzSbmvKQhGVmOaMNR3luak9iDvdEVVESVYmsXmR69LwyB1YHAF2m5V4urI3sHAxMloo5a7g9_HhM4phncj9iScBWFYwZ3bUeG6wV06xFJBdXPpK6AOkETlOiJ8BlrwLShCgfqXG0VDfTdGw
$2.65

Tnutz cost:
$0.85
8x5/16-18$21.20

Tnutz total:
$6.80
(DT-015) Drop-In T-Nut with flexible rubber handle - 5/16-18

3320

A02ldgEoPcGZp1PuRqCmlbD-r6xU_XYixqUrz_6mM1mVycsh8eNTk1ch5na_IehkWrvDEBpSp430aEPzQ09X5D4ZKZlK_zIdlFAcwVZ2kfHwKrnhADmFHA5hKECzHEMHeQkiBuRNvgSGkhsOQDkDK1E

$0.956x5/16-18 x 11/16” $5.70FBHSCS & ECON T-NUT
3454 Black Bolt Assembly

3zHf9Gv_I9jA5qw_-qBlDozhRhvxuTmpsqw6OyhG_yli2xuq-Kwu02RAxI7RTzss9l6aKooYTPuo6rE3iVNbDff_phFFP7P3VP6KSTW_59OUgE10ZavgKIE2m_jwKQLrbnNMVwkj-Lnbr8xWcbaidp0


Comprised of:
PN3110
5/16-18 x .625" Socket Head Cap Screw (SHCS)

PN3278
5/16-18 Slide-in Economy T-Nut - Offset Thread

$0.782x5/16-18 x .625" $1.56Bolt Assembly: 5/16-18 x .625" Black SHCS and Slide-In Economy T-Nut - Offset Thread - Black Zinc
 
Last edited:
OP
OP
Isaac Alves

Isaac Alves

www.instagram.com/theloneaquarist/
View Badges
Joined
Nov 22, 2015
Messages
2,107
Reaction score
1,310
Location
Rancho Santa Margarita, CA
Rating - 0%
0   0   0
8020 shipments came in.

Ordered on July 12 and received on July 19th. That’s pretty good since it included cutting extrusions for me. And the packaging came in nicely via UPS. Also included a full packing list. What I didn't realize when I ordered from 8020 was that they ship the necessary nuts/bolts/washers needed for each component --- this wasn't clear to me on their website so I had ordered extras.

Both boxes:

OlopTo5HzJCEnQFaCQ9LRsTw66wdJhTPi4hfIA3EWWh4pKqFXBDS8KNf4fNIHGbfJmfRLAbz3siwhx5JI7mfR5gLqMfNmiR7wwmCYVBFMvoex57LohoWxKZORaQT2gLke-IksSAA--BIKHsKOD2xFsQ


Smaller components were layered in a smaller box:

w4RF_3XtsjGKXliafiooDXdiOoghy9PALDZBqeBiWq-A_CrSlsbvOamV_Ik5MRyt1FOYY59RULAvJCcSd9hC6f38oSEgnfrSiDOwYMXgGTnDSo7HnzhnApSwTQZ0PodzmPxmORvWqZj3XKoTW3E


First layer, all small components packed individually and labeled:

EEEq-fo796dPNs-2rwgS8L-iF6MgzaCaD7MNrttfXdLDMmi71RpqdVy6c9-98M4xm4PXoAMJ-S80Zn27i3DdxIS-diOFYLWZ5B0oWaiI8wnuOFyL34sgvglPd326MDyQshzdGex2czA5lKTgWl9PKTc


Second layer had the heavier assemblies shrink-wrapped and labeled:

vS7EDVsSa8TVU92NGZbXM5_YUsIsW0auXgJA9PVtefnOGPMhshk1ZcCOgfpVHzxcD-D-vt22kQgAlOVg5JvArcIsBUOYBMjVtqhyLutA-uhnnZ7wYtSgzeRc09ahCr13ggX7V656rp-3XV0QLXj2QVE


All parts:

THcoE_QH0wHtC8k8rH3E6IfMU8kMWfp4YOqtXuKT864QhrT-G_P_b3HWbE7omgSs2N6vPVSfh5ewEmxv_dmQzHpYdpVFpll1v9Tgc-IoxHtbwAwdR_koQwF3F8wU7664RTi71G-xnKdsEFVLjcqpeQ0


The extrusions were serran wrapped tightly and packed in shipping paper and a rigid long box.


Qwu8o5rUm1wC879dPuNKcYdv9P2wpnnxsTbyq6Ph_YPAd8sYzqzCAf6Z_Mka9cOZzvAFDG-O8uRzYorKqA60zczGY_BG96QB9lRPnHmCC5JTr1HwJoGEZEj0Z8YGiaJsopxcRMTZOQ_yBxCEOR2UNVw


TNUTZ came in a few days earlier, but these were only small bolts/ handles, and gussets. They arrived via USPS and were basically stuffed in a priority USPS box. But for the price difference from 8020 I’m good with it.

I do wish it had a packing list. But your online account will have the shipping list on their website.


rozpTR4G1Jj__XhABTp8MxLmYHN9ag5ll7EUhyUfpCdSJ8n32HJM6mOhAlKN_959e7uPnYSqtPY11JkvEodwCL7GTT63HRhgYsmMIupxi17iKQvK_eMfahQChw-PoG6kYec7UdhNPlWC-XwHhhZtB2U
 
OP
OP
Isaac Alves

Isaac Alves

www.instagram.com/theloneaquarist/
View Badges
Joined
Nov 22, 2015
Messages
2,107
Reaction score
1,310
Location
Rancho Santa Margarita, CA
Rating - 0%
0   0   0
RODI Mixing Station Upgrade


My “real” job ate up most of my time last week so not much was done outside of planning for an RODI station upgrade. I had to put the Cade display light build on hold after doing an inventory and making sure I got all of the parts. Although, I refocused on upgrading my salt mix station. I currently have just enough to ensure my 70 gallon Artisan Cadlights is good. But I need more reserve RODI and Salt water ready to go for the upgraded Cade Aquarium volume.


I was able to get a hold of 2x 100 gallon barrels with 1” inch threads from a local vendor. But I want to repurpose my current drums to ensure I have enough RODI ready to fill these guys up. My intent is to have ~200 gallons of salt mixing across two 100 gallon drums.

This means that I need to change my layout a bit in the garage and add some structure for the larger barrels. Here’s my model I’m targeting. I build it to scale using Blender so I can refer to the model to get sizes and cuts, etc.


pCyIg1nSeks2p_fslua8NNzsCXg-zh-K3AkFJU0iY6qRb6wWY3M2DxBGAk2GLxtmCxHAtt2Yj8dtL9e-Tr3xYedBGk6afmv45l2177Qqn07uB7bcQH2ft6G18pKusg0q6PW2oqWEQ26jSrQvBoM


This will give me shelving in the second row as well as provide space for storage.


New 100 gallon poly tanks look like this:

NjwZzSjgvwmH1fNUndQ2XjvipppwMWrSX8r8u-Iqt9PX3nzXL_RItylswrFxbN-WviSFgNCrCfeZmKjIVv-AoBVvF9xyOE6VfLMpTFDeNSBFES8mBDdfMZTzHhdISE7UrX4DCCB37pU3HHY6HM8
KLCAmJ9k3FkeOMo-TqwfoeqnDsekzwh2D9IH1u_XnMaN-0N_TXlYV_D_XekPO6brhWTp_TlBWIE2o1r2toZn3-QWnC9vcJnGkibGnoSgkLIzQDcOtrhOlK_n2NCEqPKb2jfMtZ_6To7mnIcI7p4
l46J-FFsHeiZrlFgDgsCJWar2OzgWtYQ6UDo-fS02ngqeAokYV6eBcAhhVHux-HMHFWz3fCvTwr-F2GRo5qMKFSzKBx84i7qjczMb7he2vmOKQwps0o_4jWJPUKW8sRFyexg4VaoWvx2pGHkaT4


So Saturday and Sunday were taking up getting some inexpensive lumber (not cheap because wood is not cheap right now). Notching the 4x4s with a table saw, waxed up, took a lot longer than I expected.


VQtB-6rcjFp41G6bivG-_eFafQiTrlxXC0nXKACfizxWkEvkSqa1lU6odiUnbNVHgBQP_WQ4-9fJAJZTSDr0WIUtFTRXxNQz8woNMDI26Br9VyAlnsPRsSrgr9gwBYUXDLNk3oja4Jb28O0dmqM
gzQFl9liBtWvURGv99Na4MSd5HUaCYpm12czux_SjCJDx5X7vcs9aCjSQ2g2yx9CHIg430SL8bRSUqdPdmzocR1gBdYOGWUPDnGhP682PO40MZ4KLMt7lJ-Tdsq1Wb-72m0VRY4gA5UbasyFG2E
rTqvBe260xGR19gtBeZxHyYRLW4MUDD5oBh2LWBdmpUUg9XBgpnDE3nnuCu3GFx1i2S60t8qucNE5EvoGKp7dzgJeBNHHvKMtoNtPKnRLDvIs1F89LVtbaDwB_FBXyQy0gl9U_nxyhvcu2I5zPI


I got the main framing done and will need to lag screw in the cross beams and mount the and top and bottom surfaces. I’ll be doing a little every day this week.


kyCZAXNvJo1jbvK8we4dF3VWcM57Z8Njqo10Wm8105A5aBOEJ-ZY9lgVTqj-YYNb1cWMZh6U9YResF6oPRoA9k1M2Gj6Sc58_qEGiVaXGIS2kZeX6N9IvEYZm5n0QrHoTYwWZepDTF0LG7V9biJGTSs
 
OP
OP
Isaac Alves

Isaac Alves

www.instagram.com/theloneaquarist/
View Badges
Joined
Nov 22, 2015
Messages
2,107
Reaction score
1,310
Location
Rancho Santa Margarita, CA
Rating - 0%
0   0   0
Looks fantastic, nice work.

Are you going to run a sediment filter on the mixing station? 10/10 would recommend

I'm using a 7 stage RODI system that is already installed in my garage that was being used for my current displays.

Here's a picture I shared on Instagram some time ago:
 

sphinx15

Active Member
View Badges
Joined
Dec 3, 2018
Messages
137
Reaction score
250
Location
Fort Collins, CO
Rating - 0%
0   0   0
Pretty slick!

I actually meant on the mixing station itself. I have one on the pump for mixing saltwater. It's crazy how much crud gets pulled out. My saltwater container has stayed remarkably clean ever since I set up the filter.
 

Looking for the spotlight: Do your fish notice the lighting in your reef tank?

  • My fish seem to regularly respond to the lighting in my reef tank.

    Votes: 93 76.2%
  • My fish seem to occasionally respond to the lighting in my tank.

    Votes: 15 12.3%
  • My fish seem to rarely respond to the lighting in my tank.

    Votes: 8 6.6%
  • My fish seem to never respond to the lighting in my tank.

    Votes: 0 0.0%
  • I don’t pay enough attention to my fish to notice if they respond to the lighting.

    Votes: 2 1.6%
  • I don’t have any fish in my tank.

    Votes: 2 1.6%
  • Other.

    Votes: 2 1.6%

New Posts

Back
Top