Kyle's Nuvo 40 Office build

Kyle Rinker

Active Member
View Badges
Joined
Feb 15, 2017
Messages
139
Reaction score
149
Rating - 0%
0   0   0
I must admit I should have documented this from day 1, but I didn't. I will be spending a while playing catch up from the last year of work in creating this tank and moving it (twice o_O). Until I get to up-to-date additions, I will add the date ranges the individual events occurred. This is my third reef tank, but I learned a TON and continue to learn a lot as this build develops.
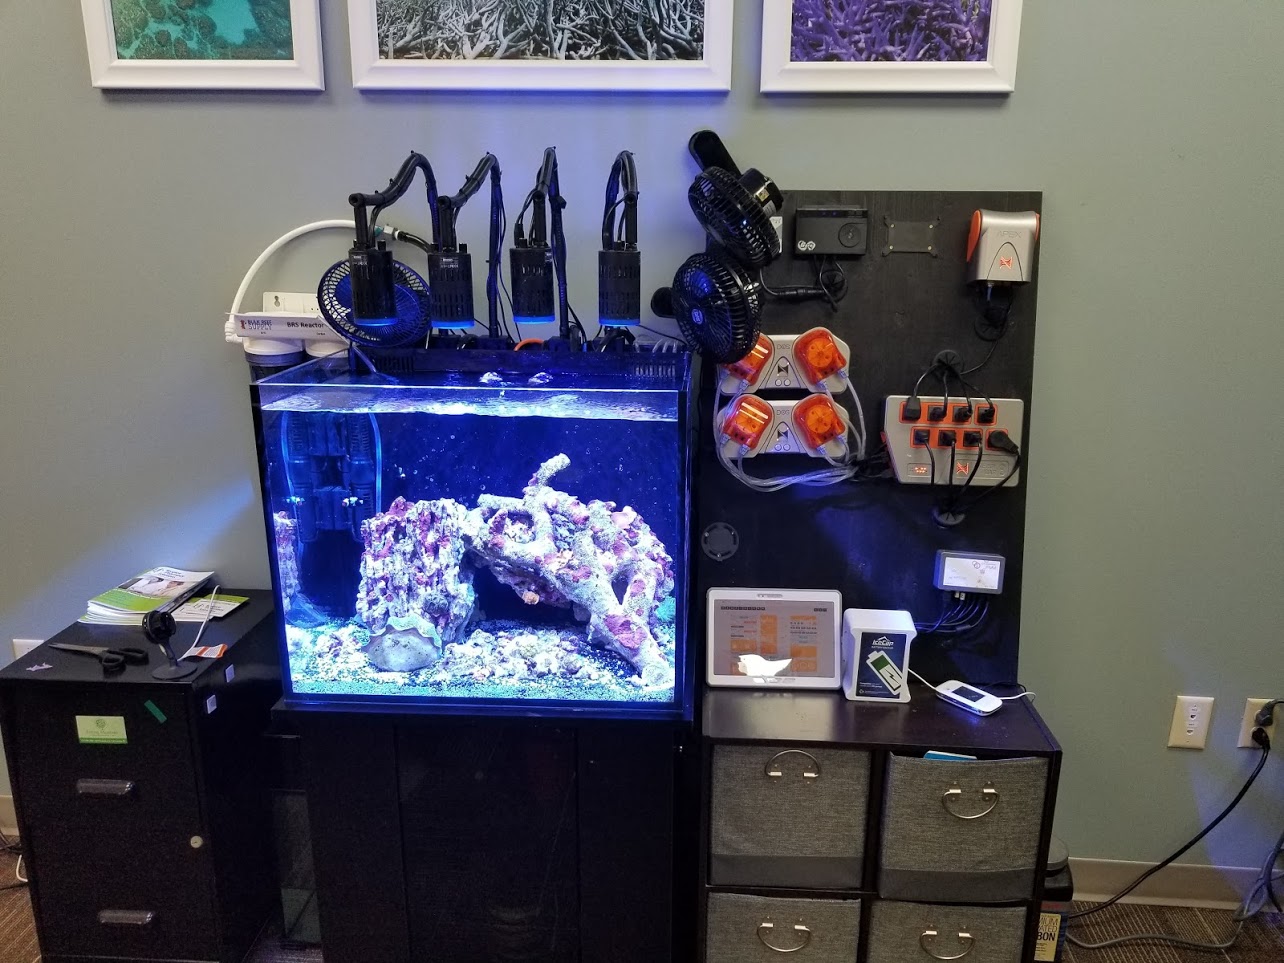
Specs:
Innovative Marine Mini Nuvo Mini 40
Return: Jabao DCT4000
Heater: Neo-therm 100
Wave: Maxspect Gyre XF230
Lighting: Maxspect Ethereal (update later--no longer using the Ethereal)
Skimmer: Tunze Comline Doc Skimmer 9004
Filtration: DIY algae reactor made from Deepwater Aquatics Quattro Media Reactor filled with chaeto
Monitoring: Apex 2016
Sandbed: Indo-Pacific black Agra-alive!
Cooling: fan connected to Apex/temp controller
Rock: Pukani and Tonga branching
Dosing: Triton Core 7
ATO: Neptune Apex ATK
ATO reservoir: Innovative Marine Aqua Gadget 5 gallon hydrofill reservoir
Aquarium stand: Marineland Simple Modern 24" (no longer sold)
Additional equipment will be discussed as it entered the build

Current photo:
dygta9_RzV0B-4Xsb6sRh52LKUpNIrI-fZST64XNrevUEO7uOmu5O4YLobMN7Qojaxtlmpgr2MzlYp2PSLpmryldNbjLfmcWBWaJT3s3qllK3r5ygOX5dwRGUzLS035_cT2cBDFn-_I83i-ba-7pGE7HTr1YREbNmV8Z_ZLoSZklIMY_7QAfRDDIdFo5ulOcx4ApOKSgs07rpZmmPhQs1L2F9ZgAFpx0LjrtTISzMeQl0pCD6F-rLwBy839M_kS_9_gyMAzZUYH3IZEYxNaOm5Wo0-l8fH0nL_04Kr5sGXj1al_yvvNrYBd4jwgGJG4vXJBoR3sZqeD8y5TOlAhgyeYsEmRZMJRMTPBa8_5A7NoKohoeHsRBos0iaJVKDr1A_exJKRg_kpFU3YLiqJs6uJr9x-mIMZnj_wQjgJQHfMgi5E3eZ1TcCon0y7ZyKd44AW0e5lrlPATCjvnb_DMWkHD9klUn-C9xcGAWXJc34jMkGdiGu8n3-INmr3RKd34nA3Xia3copLvg7qPYWMI_wPVU4-t8BpeXDH2xTpIQdGGwA2L391ZJXSabkwcM0DKW9K5ZESNOMmz7_lZqKtxL116fOIRallX3Isd1XcUR=w1284-h964-no
 
OP
OP
Kyle Rinker

Kyle Rinker

Active Member
View Badges
Joined
Feb 15, 2017
Messages
139
Reaction score
149
Rating - 0%
0   0   0
6/2/17: Build begins
I knew I needed something easy to manage for an office tank. I work as a nurse manager in a busy setting and don't have a ton of time on a daily basis to work on tank related stuff. So with a lot of researching, I decided to go with a 40-gallon all-in-one. Large enough to not be considered a "nano" but small enough to easily do water changes and keep space requirements to a minimum. The Innovative Marine Nuvo Mini 40 seemed to be the best fit. A silicone job like you wouldn't believe without seeing and ultra thick high clarity class. The quality difference is immediately noticeable compared to other similarly sized tanks. I wanted a stand that fit the tank well but also didn't cost a fortune. I don't care that much for the Innovative Marine stands, so I looked elsewhere. Fortunately, my LFS had a Marineland simple modern stand that fit the tank perfectly. The stand is still made from traditional particle board, but the joints are super strong and the stand doesn't sag. Another benefit of the Marineland stand was that it was already put together--no assembly required ;Happy. A further benefit was that my LFS was able to order the Nuvo 40 for me from their supplier for about $75 less than everywhere else I looked, including online shops.


upload_2018-6-26_19-23-44.png
While I was awaiting the tank and stand to come in, I had started the cure/cycle process with my rock. I specifically asked @Bulk Reef Supply to send me dry pukani that was large enough to be easily chiseled to create caves and other pukani pieces that were interesting shapes/sizes. I also requested two pieces of tonga branch that had multiple branches. I was not disappointed. I used the method described by BRS for curing rock, with some caveats. I ran the rock in a 44 gallon brute can for 4 weeks with a 10% highly concentrated bleach solution. I used a cheap powerhead to keep the water moving. After those four weeks, I ran the rocks in RODI water and did a 100% water change every week. I tested for chlorine with a dip strip kit until there was none detectable. I then moved the rocks to the office for aquascaping. I used RODI water instead of salt water because I was going to complete the cycle in the tank--I just wanted to get the nasties off of the dry rock prior to putting it in the tank. I must say, the rocks turned out fabulous!
20170602_203316.jpg
 
OP
OP
Kyle Rinker

Kyle Rinker

Active Member
View Badges
Joined
Feb 15, 2017
Messages
139
Reaction score
149
Rating - 0%
0   0   0
6/5/17 to 7/20/17
I slowly moved pieces of my tank the 50 miles to my office while my rocks cured.
20170605_130625.jpg
It may be small, but moving this thing on my own was no easy task. I couldn't believe how much packaging there was inside the box for the Nuvo 40--definitely the best packaging I've ever seen for a tank.

20170605_130632.jpg
I started with stock filtration and return nozzles but quickly upgraded to the spinstream nozzles and some other enhancements.

20170611_103923.jpg
The Tunze 9004 skimmer barely fit inside the filtration chamber. I believe this is the skimmer that @Bulk Reef Supply used when they set up the same tank.

20170611_103934.jpg
Innovative Marine aquagadget 5 gallon reservoir

20170614_124927 (2).jpg
Neptune Apex ATK for auto top off

20170626_194134.jpg
Media basket replaced the standard filter sock. I planned to put marine pure spheres in one chamber, chemi pure in the middle, and filter floss on the top

20170626_194051.jpg
Maxspect Ethereal LED for lighting. This light seemed like the best possible all-in-one solution for a reef tank at the time. A more in-depth review will be coming later, including why I ultimately went away from continuing with this light.

20170626_194111.jpg
Jabao DCT 4000 for a return. I replaced the stock return pump from Innovative Marine with this DC option. I bought it on a hope and a prayer that it would fit into the return chamber.

20170704_130019.jpg
And it did fit, only if I turned it nose first to stick it down into the chamber, and then turned it level once at the bottom. Talk about a tight fit! I also used a cobalt neotherm 100w heater.

20170703_160846.jpg
Maxspect Gyre xf-230. It took quite a while for me to grasp how the controller worked, but once I figured it out, I loved it.

20170717_144648.jpg
I knew I needed somewhere to mount all of my Apex equipment, so I picked up a "hoby board" from Lowes, that was basically strips of pine put together in a tongue and groove fashion. It totaled 24"x36". I decided to use black stain but had to put on about 12 coats to finally get it as dark as I wanted it.

20170720_124037.jpg
Finally, all in place and awaiting the setup day!
 
OP
OP
Kyle Rinker

Kyle Rinker

Active Member
View Badges
Joined
Feb 15, 2017
Messages
139
Reaction score
149
Rating - 0%
0   0   0
Setup day: 7/22/2017

50 miles may not be a bad drive, but taking everything that far to set up a tank away from home sure bites. Distance means taking a lot of stuff and the need to take extras of things, and to double and triple check your plans to ensure you would have absolutely everything needed. And wouldn't you know it, I still had to make a hardware store run from my office ;Facepalm
20170721_211443.jpg
I believe in the concept of using what you have, so I repurposed these old cat litter buckets. 9 buckets of salt water and 3 of fresh RODI traveled with me to the office. Prior to reusing these buckets I always wash out with a 10% bleach solution and then scrub with a 10% white vinegar solution and finally rinse out with RODI water. I may have only saved $50 by not buying buckets, but that's another frag or two in the bank ;)

20170722_063344.jpg
The "rule of thirds" is the most classic method for developing most framed objects, including aquascapes. I used a tape measure and scotch tape to make a grid to ensure I had rockwork that would be visually interesting.

20170722_064125.jpg
I have found that when having a specific structure in mind, you have to mold the rocks into what you want, not just stick them in the tank. This was another reason I used "dry rock" and opted to finish the cycle in the tank. I didn't have to worry about rushing to keep the rocks wet. I think all together I spent about 2.5 hours sawing, chiseling, and sanding the rocks to be exactly what I wanted. I also found that I was able to epoxy them together better when dry.

20170722_064521.jpg
I went cheap with this one. Rather than ordering reef epoxy, I used what is available from most big box stores. From everything I have read, it is reef safe.

20170722_064129.jpg
I intentionally tried to make a structure that was symmetrical but not fully balanced. I like the look of somewhat unbalanced structures because, in nature, things don't just fall perfectly into place. I cut the corner of this rock at two different angles so I could stand it on its corner and lean it backward.

20170722_070131.jpg

With patience, slow methodical work, and a few hand tools, I was able to make these 3 pieces of rock look like one large piece with an overhang.

20170722_072355.jpg
Top view of the finished rock structure. I should state that in a later move, a couple pieces of this rock were removed. I will explain that in a later post, as well as post a timelapse video of the most recent move a few weeks ago.

20170723_115313.jpg
After placing and gluing/epoxying all the rocks in place, I spread the sand around. I was able to use a single back of Indo-Pacific black Agra-alive. I love the salt and pepper look of the sand and I found it to be a large enough weight to not blow all over the tank while also not being too large of grains. The tank was then filled with saltwater that had been mixed 24 hours prior and the ATO was set up to keep levels steady. I also put in a full 8 oz of Bio-Spira. I began the annoying process of waiting to add the first livestock. I must say that this was the first setup I had used a bleach cure followed by and RODI cure. I hardly ever had any hair algae or other unwanted nasties, so I will certainly be using this method again in the future.

I did run into a problem with my Apex I had not anticipated. A large reason I got the 2016 model was that it had wifi already built in. I did not anticipate the fact that my employer had specific ports on the network blocked that did not allow the Apex to connect to the cloud. After being reassured by IT that my request to unblock the ports was "out of the ordinary", I had no other choice. I went to AT&T and changed my wireless plan to include a MiFi. To my amazement, I was able to do enough switching around on my plan that it didn't cost me any extra money :D. I was then able to connect the Apex to Fusion through my wireless hotspot.

20170722_072350.jpg
 

SPR1968

No, it wasn’t expensive dear....
View Badges
Joined
Feb 21, 2017
Messages
20,046
Reaction score
124,735
Location
Nottinghamshire England
Rating - 0%
0   0   0
Looking great there Kyle and thanks for taking the time to post all the pictures documenting the build.
 
OP
OP
Kyle Rinker

Kyle Rinker

Active Member
View Badges
Joined
Feb 15, 2017
Messages
139
Reaction score
149
Rating - 0%
0   0   0
Livestock added: 8/16/2017
After cycling the tank for 3.5 weeks, it was time to add some livestock. I had been testing with an ATI master test kit from the beginning just to ensure the cycle was complete. After completing the cycle, I moved on the test kits by Red Sea, Salifert, and Hanna. Immediately prior to adding the livestock I also added a second 8 ounce bottle of Bio Spira. For the most part, I added several hermits, a mix between blue and red legs. I also received a halloween crab and about 12 or so mixed sized empty shells for the crabs to move into later on. But the star of the show was the clown fish I received. I had always wanted to get a lightning maroon clown for their vibrant coloration and unique mottled white patterns. I was always discouraged by their price tag, though. It sure seemed like divine intervention that LiveAquaria had a mega sale on them at the same time I was ready to add my first fish ;Woot.
20170821_152844.jpg
The lightning maroon quickly gained the name "spooky" because of the ghost or skull-like pattern on its right side.

20170815_162750.jpg

20170816_165924.jpg
 
OP
OP
Kyle Rinker

Kyle Rinker

Active Member
View Badges
Joined
Feb 15, 2017
Messages
139
Reaction score
149
Rating - 0%
0   0   0
8/25/17 - 9/15/17
Additional livestock was added to the tank. I regret to inform you that I am a somewhat lazy aquarist and do not have a quarantine system set up. I know that a quarantine system does not need to be elaborate, and in fact, can be a simple plastic tote with an airstone and sponge filter. I even have sponge filters sitting in my sump for my 125 gallon tank at home, just in case I need an emergency quarantine sometime--but alas, I don't practice proper quarantine procedures routinely. Not having quarantined my corals will have bitten me in the rear end on this build. In this post, you will see some of the SPS I added to the tank. My first mistake was adding SPS corals that quickly. My second mistake was not quarantining them. After some time, I did notice what appeared to be slow tissue necrosis from many of my hard corals. I eventually lost 2 acroporas, 1 sunset monti, and a jack-o-lantern leptoseris. I thought I had lost my pocillopora, but it did survive. Although I learned a valuable lesson, I will still admit I don't quarantine like I should. At this time I also added what I thought was a standard black ice clownfish, but as time went on I truly believe this is a black snowflake clown. Also, in the photo behind the goniopora, you can see a stary blenny peaking out.
20170915_170300.jpg
20170915_170249.jpg
20170915_170322.jpg
20170825_155832 (1).jpg
 
OP
OP
Kyle Rinker

Kyle Rinker

Active Member
View Badges
Joined
Feb 15, 2017
Messages
139
Reaction score
149
Rating - 0%
0   0   0
9/18/17 - 11/25/17
This period of time was largely about finding balance in a new aquarium and trying to be patient to add corals. I had originally wanted to make an SPS dominant tank, but my love for zoanthids and some LPS made me quickly change my mind to a mixed reef setup. I have to admit, fully mature SPS dominant tanks are beautiful, but the tanks that truly take the most patience and thought are mixed reefs. The amount of complexity that goes into keeping that variety of corals happy takes a lot of understanding of coral needs for light, flow, and nutrients. I added several pieces of acropora, montipora setosa and superman monti, some acans, a lobo, and a few zoa frags from my tank at home.

20171125_143813.jpg

20171125_153302.jpg
20171125_145438.jpg

20171125_153134.jpg
20171125_152702.jpg
20170918_110025.jpg


20170918_110013.jpg


20170918_110018.jpg
 
OP
OP
Kyle Rinker

Kyle Rinker

Active Member
View Badges
Joined
Feb 15, 2017
Messages
139
Reaction score
149
Rating - 0%
0   0   0
12/14/2017 - 12/20/2017

By this time I had added a purple firefish, which is visible in the video below. I also had started to see the first of the tissue necrosis on my SPS corals. This is visible in some of the acros in the video, as the tissue had started to turn brown and the colors washed out. I wasn't sure what had actually taken my corals for a hit, but I had assumed it was STN. I tried multiple things to keep my corals happy. My parameters were all spot on. Nitrate 0.25, Phosphate 0.01, Alk 8.7, Calcium 420, Mag 1300. I couldn't figure it out. I thought at first that maybe my corals were getting too much light, so many of the hard corals eventually were moved to the sandbed. It didn't help. Looking back, I think I know what caused the problems. I'm no longer convinced it was STN, but rather starvation. I will explain more in a later post that covers the events closer to the present day, but I did end up switching lights and have had great results.

This was also the time I started running Triton Core 7 elements. I bit the bullet and bought a second Neptune DOS. I had originally planned to use @Randy Holmes-Farley recipes, as I did at home in my 125, so I had only purchased 1 DOS originally. But, after realizing how little of the Triton elements I would need for this tank, I bought them, the second DOS, and some fantastic dosing containers.


20171220_154332.jpg
 
OP
OP
Kyle Rinker

Kyle Rinker

Active Member
View Badges
Joined
Feb 15, 2017
Messages
139
Reaction score
149
Rating - 0%
0   0   0
RIP Nuvo 40
Long story short, I knew I needed to reduce to 1 tank. I started breaking down my 125 at home and decided I simply couldn't get rid of my home tank. So, the office tank is going. Needless to say, I will be selling my 4 Kessil A160WE lights. All 4 have goosenecks, 90 degree adapters, and would come with a spectral controller. If you are interested, send me a message, but I plan to otherwise sell my extra equipment locally. You can find my new build thread for my 125 gallon here: https://www.reef2reef.com/threads/kyles-125-build.441900/
I am starting over from scratch on my 125. Pretty much the only thing I will be keeping is my stand I built for it and my Omega 150 skimmer. I hope to be breaking down this tank over the next few weeks. So to end this thread, here is a current photo of my Nuvo 40.
20180622_103445.jpg

20180713_204218.jpg
 

Attachments

  • Photos.zip
    5.3 MB · Views: 128
Back
Top