Reef Noob's 425 XL v3 sump

Noobreef

Community Member
View Badges
Joined
Oct 13, 2019
Messages
37
Reaction score
16
Rating - 0%
0   0   0
Hi fellow reefers!

Reef Noob here. A basic introduction of myself, i have not owned any reef aquariums before this. This 425 XL will be my first as ive been reading forums that go 'bigger is always better'.

I have researched saltwater tanks for close to 3 years now, and have finally pulled the trigger. I have had experiences with freshwater fish as well as ornamental shrimps.

The reason of this thread is basically for all you pros to advice me as i am not only a Reef Noob, but a plumbing noob as well. There werent many reefers out there with the v3 sump + attaching it to an external chiller, which in my case is a must.

However, i have an OCD thing whereby once i start researching, it never ends. Basically covered BRS tv, reef2reef, reefergil and loads others but of course knowledge is neverending.

My plans for my 425 xl are

1) Retain most of the 425 xl's original functions changing only the original return pipe into my custom pipes because it needs to be attached to a chiller for where i live in.
2) I will custom design the return and a manifold system that consists of 3 20mm outlets for reactors/outlets etc, a water filter set converted into a reactor that is on top of the manifold, and a Tee off junction fora UV set.
3) The chiller will be located outside of my house. I will PROBABLY be using a Vectra L2 (1 1/4 plumbing) to pump the water around 8 meters horizontally through and fro to the chiller + the manifold which will have a ball valve attached.
4)Ball valves, pipings, check valves are hardcore industrial grade that is white/red themed , so hopefully it should be hardy. Cost a bomb tho.

The aim is to basically create a dream tank, eventhough it would take me months to carry it out (which is fine for me as my new place is getting ready)

So far, i have purchased most of the equipments such as

1) a BM c5 skimmer
2) 2 reactors
3)1 XR 15 g4pro and one XR30 G3 Pro with their stands
4) a CR120 Calcium reactor

A full list of what i have and the price i purchased it for is all on my facebook page. Most of the things i bought were either second hand/ a good bid off ebay or hand me downs. Most things i bought for a fraction of the original price.


THE SUMP STORY

WhatsApp Image 2019-10-21 at 4.37.31 PM.jpeg
WhatsApp Image 2019-10-21 at 4.37.32 PM.jpeg


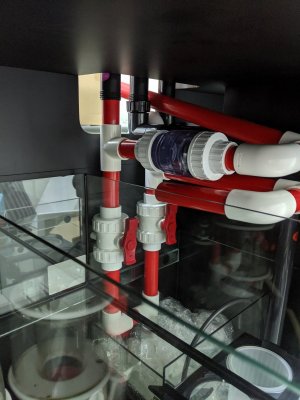
The v3 sump is TIGHT. The return pump area being on the right makes NO regard for external plumbing. But i think i can manage with everything that is going on in there.

As you see above, the red and white pipes are actually 1 1/4 elbows slowly elbowing towards back of the tank towards the chiller.

L2 in many cases might be an overkill, but judging by the amount of elbows im using T.T i think its just about enough.


Questions:

1) For an Vectra L2, can my outlet and return be the same size of 1 1/4 pipe and at the same time pumping to the manifold which is at 20mm? Or must i reduce the return to say 25mm?
2) is the ATO provided even worth using or should i just get an external one
3) how to efficiently seal the return without buying Red Sea's original parts (as from where i am, its not easy to get ANYTHING from red sea at all). Right now, my red 32mm piping fits all the way into the pipe, and gets tight as i push it in further. I was thinking a layer of rubber gasket inside the red tube, plus loads of silicone glue between the inlet and the red tube to seal it from water. AFTER that, a few layers of rubber paint to top it all off. ( this way, when i think of using back the original pipes, its not impossible to dismantle them!)

I hope the pros over here at reef2reef could give me any pointers/advices =)
 
OP
OP
Noobreef

Noobreef

Community Member
View Badges
Joined
Oct 13, 2019
Messages
37
Reaction score
16
Rating - 0%
0   0   0
The Sump Story Episode 2

Just playing around with the pipings through dry fitting them. The reason for the 2 valves for the return pump is actually a redundancy plan (eventhough im not sure itll work). The when RIGHT is OPEN and LEFT is CLOSE, water flows to the chiller located outdoors and returns through the U shaped return and to the tank.

However, if for some sort of reason my chiller needs maintenance or leaking or whatever, i can CLOSE RIGHT and OPEN LEFT. Water should stop flowing to the chiller and instead directly flow into the tank through the main return line.

Note to self: This should mean i need another valve to close of the Tee behind the tank to make sure water does not backflow into the chiller from the opposite direction.

WhatsApp Image 2019-10-22 at 2.12.05 PM.jpeg
WhatsApp Image 2019-10-22 at 2.12.05 PM (1).jpeg


None of these are fit, i am just playing around to see what i can achieve, taking into account ALL redundancy and failure points since i can take it slow and steady.

Comments?
 
OP
OP
Noobreef

Noobreef

Community Member
View Badges
Joined
Oct 13, 2019
Messages
37
Reaction score
16
Rating - 0%
0   0   0
Finally figured out how to got everything I want into one system. Third try allowed me to add a 32mm heavy duty valve into the second return line. This ought solve my problem.

And also I was retaining the hang on ATO provided by red sea.

Slowly finalising the design. Stay tuned!
IMG_20191025_165420.jpg
img_20191025_165425-jpg.1259296
IMG_20191025_165425.jpg
 
OP
OP
Noobreef

Noobreef

Community Member
View Badges
Joined
Oct 13, 2019
Messages
37
Reaction score
16
Rating - 0%
0   0   0
Third attempt of designing a 'perfect' sump kit. Came a long way from playing and fixing Legos and Gundams.

Plumbing is waaaaay more fun.

Will explain all of its functions when I am done finalising the plan.

Inputs are welcomed !
IMG_20191030_125451.jpg
IMG_20191030_124634.jpg
 

SuncrestReef

That Apex guy
View Badges
Joined
Jan 18, 2018
Messages
4,214
Reaction score
9,217
Location
Oregon
Rating - 0%
0   0   0
Looks great! If you want any ideas, check out my Reefer XL 425 build thread. My tank is older with the v2 sump, but some of the ideas are still applicable.

Good luck!
 
OP
OP
Noobreef

Noobreef

Community Member
View Badges
Joined
Oct 13, 2019
Messages
37
Reaction score
16
Rating - 0%
0   0   0
After several attempts, the sump is finally taking shape into what I envisaged it to be!

There will be a UV filter on the left, and on the right it goes to an external filter housing on the right compartment.

I thank my experience of building Legos when it comes to plumbing! =)
IMG_20191101_122147.jpg
 
OP
OP
Noobreef

Noobreef

Community Member
View Badges
Joined
Oct 13, 2019
Messages
37
Reaction score
16
Rating - 0%
0   0   0
Reef Noob's customised Ecotech Radions Part 1

IMG_20191109_162937.jpg
IMG_20191109_172004.jpg
IMG_20191109_175824.jpg
MVIMG_20191109_220210.jpg


Sprayed the first layer on my Ecotech radions and RMS mount. Going for sanding, and then adding a white surfacer. Exciting times ahead!

Step 1. Always sandpaper and use toner to clean off the melted rubber or 'sticky' substance off the radions.
Step 2. Rub with alcohol and make sure it's as smooth as possible and no more dirt on the metal parts
Step 3. Line em up!
Step 4. I'm using samural metal primer to spray first layer on the radions and all the metal parts first.
 

Reef-junky

2500 Club Member
View Badges
Joined
Dec 5, 2017
Messages
2,888
Reaction score
4,374
Rating - 0%
0   0   0
Have you thought about using evaporation for cooling instead of a chiller? Are those all ball valves? Gate valves work better for flow control.
 
Last edited:
OP
OP
Noobreef

Noobreef

Community Member
View Badges
Joined
Oct 13, 2019
Messages
37
Reaction score
16
Rating - 0%
0   0   0
Have you thought about using evaporation for cooling instead of a chiller? Are those all ball valves? Gate valves work better for flow control.


Hello there!! To answer your question, I will have add on mini fans to help cool down the tank. Maybe I'm the sump area, or else it'll just look ugly on the DT. But xhier will be a must as I live in in Malaysia, And the temp here can get full on cray.

As for gate valves, there are none with the size I wanted here in Malaysia. So I figured the 3 mains from the pump will either be OFF or ON. Though I know gate valves are not good at controlling flow.

Good day!
 
OP
OP
Noobreef

Noobreef

Community Member
View Badges
Joined
Oct 13, 2019
Messages
37
Reaction score
16
Rating - 0%
0   0   0
IMG_20191108_140436.jpg


My custom plumbing coming into place!!

Got everything fitted well and nice. Next is some screw on holders and some zip ties!
 
OP
OP
Noobreef

Noobreef

Community Member
View Badges
Joined
Oct 13, 2019
Messages
37
Reaction score
16
Rating - 0%
0   0   0
Just FYI, red sea uses 2 brands for their piping. SANKING and LESSO, and can be purchased online etc from china. I believe it is metric pipes, as standard pipes just doesn't fit.

Red Sea only used custom screw on joints ( which I'm sure with enough digging, I can find the supplier as well). The pipes, elbows, all of my valves and check valves etc are all readily available from Sanking and LESSO.

Lucky(or unlucky because it costs a BOMB) for me, I managed to purchased a ridiculous amounts of it because I was unsure whether it was enough in the first place. Wasn't easy to get it here in Malaysia.

So my plan is I'll unseal the glue ends of the return section if I can forgot cutting up the return pipes. I will be keeping the original red sea screw on caps, and glue it to my red pipings back up to the DT, and because it fits well, it gives me the original seamless seal with the addition of the original ability to breakdown the tank easily when I need to.

The discovery kinda makes me a little more ballsy to cut up pipes knowing I can replace them!

My 'no-compromise' tank is really eating time and money for sure!

IMG_20191112_114216.jpg
 

splitting_lanes

Active Member
View Badges
Joined
Aug 20, 2019
Messages
424
Reaction score
533
Location
San Jose, California
Rating - 0%
0   0   0
Following!

a side note, I’ve been to Malaysia, I left in the morning on the day after Christmas in 2004, an hour before the tsunami hit...
 
OP
OP
Noobreef

Noobreef

Community Member
View Badges
Joined
Oct 13, 2019
Messages
37
Reaction score
16
Rating - 0%
0   0   0
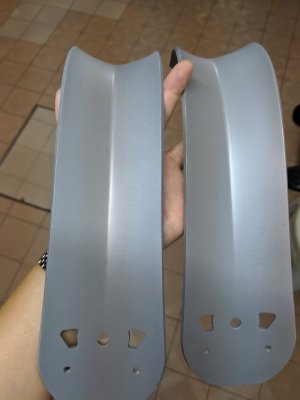
Since I still have some time until my new place is ready for my tanks, I decided to spray paint my Radion RMS Mounts and G4Pro +G3Pro

Firstly i took everything apart, which was MISTAKE no 1( will come back to it after this)
Radion apart.jpg

Went for a quick clean with some white vinegar and water, to clean off any remaining dirt since i bought this second hand!
74214146_2475833562654876_7507223587795763200_o.jpg
70280537_2482398545331711_7957103205685395456_o.jpg


I used Samurai Metal Etching Primer Spray as the first layer. Basically SECOND MISTAKE here. I thoroughly sprayed to make sure everythings even,

WhatsApp Image 2019-12-29 at 12.13.01 AM (1).jpeg


I moved on to Rust O leum White spray x2 paint. The metal bars were easy to take care off. The other parts however, not so easy!


And the final later is Enamel Red from ACE hardware, which was the perfect red!
74819093_2490578301180402_3825269706869178368_o.jpg


and WAH LAAAA

THIS WAS THE FINAL PRODUCT!

75299787_2493617340876498_6176775691682447360_o.jpg


Everything themed RED and White, JUST HOW I LOVE EM!

Talking back about the mistake, PLEASE DO NOT REPEAT MY MISTAKES WHICH IS-----

SPRAYING OVER PARTS THAT ARE JOINT - MAKING IT SO MUCH HARDER TO RECONNECT THE PARTS WHEN DONE

I spent the remaining days using sand paper to sand over the joint parts, so that everything goes back into place. And ACETONE does not help, thanks to the METAL ETCHING PRIMER I USED!!!


Life! Well never try never know! hahha 75327083_2482624498642449_3073681130495410176_o.jpg
 
OP
OP
Noobreef

Noobreef

Community Member
View Badges
Joined
Oct 13, 2019
Messages
37
Reaction score
16
Rating - 0%
0   0   0
Following!

a side note, I’ve been to Malaysia, I left in the morning on the day after Christmas in 2004, an hour before the tsunami hit...

WOW. Hope you still managed to enjoy some Malaysian hospitality!
 

splitting_lanes

Active Member
View Badges
Joined
Aug 20, 2019
Messages
424
Reaction score
533
Location
San Jose, California
Rating - 0%
0   0   0
WOW. Hope you still managed to enjoy some Malaysian hospitality!
Oh, I was in Malaysia before the tsunami, so lucky to be in the air when it hit.

I loved Malaysia, all I had was good times on Penang. Great people!

are you going to obtain any coral/fish for your tank locally? I went snorkeling, saw lots of fish...
 
OP
OP
Noobreef

Noobreef

Community Member
View Badges
Joined
Oct 13, 2019
Messages
37
Reaction score
16
Rating - 0%
0   0   0
And guys, this was the semi finished Ecotech RMS Mount, fully modified Reef Noob style !

Comments?


IMG_20191204_121841.jpg
IMG_20191204_121826.jpg

IMG_20191204_121901.jpg
 
OP
OP
Noobreef

Noobreef

Community Member
View Badges
Joined
Oct 13, 2019
Messages
37
Reaction score
16
Rating - 0%
0   0   0
Hi there again! Back with a short post. These were some of the other designs that i was playing around to see whether it was a viable plan. At this point i got the essential ideas of plumbing-

1) mainly the return has to be connected directly into the return line of the original red sea piping|
2) pump connected to the return line + additional manifold
3) return line goes to the outdoor chiller and comes back in, and directly to the DT

The first picture wasnt very viable as the weight of the pipes and the valves are just too dang heavy. to keepit upright wouldb be a problem!

I finally settled on the2nd picture, which gives a much more minimalist look.

I have also hard plumbed a 18w UV steriliser from Jecod directly into the manifoldm controlled by a valve for on/off

Finally, on the far left, there is also a Manifold Return Line, which in theory if i switch off the valves to my chiiller/DT and the middle emergency valve(coincidentally exactly what the second picture is showing) , I am able to run a complete circuit within the sump itself.

This is mostly used for the maintenance of the sump:
1) when cleaning sump area, detritus doesnt get pumped into the DT
2) take some of the pressure off the pump that i was going to use
3) planning to run a mud reactor off an acrylic container which is still in KIV atm

Anyway, just a short update!


IMG_20191030_124636.jpg
IMG_20191119_153335.jpg
 
OP
OP
Noobreef

Noobreef

Community Member
View Badges
Joined
Oct 13, 2019
Messages
37
Reaction score
16
Rating - 0%
0   0   0
Hi there! Just a short update on my Red Sea 425xl.

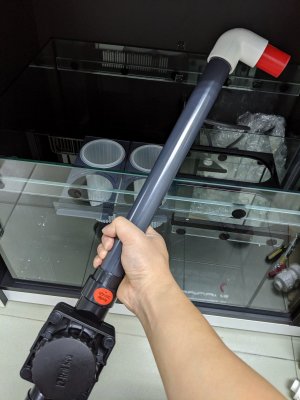
Since ive been listening to how bad the red sea main control valve is, i have decided to change it (after much protest from the red sea owners group on Facebook) to a heavy duty gate valve

IMG_20191112_112658.jpg


Main reason for the above (control valve) is that to tune the Red Sea to almost silent, you are required to make small adjustments/change for the amount for downflow, or basically just tuning it. However, because the changes are so small, ANY changes in water level will cause you to make MORE adjustments. And also upon each adjustments, there is also a latency that takes effect which kinda complicates the matter a little more.

HENCE- CUT IT OUT AND BURN WITH HOT FLAMES FROM MORDOR.

IMG_20191112_125609.jpg


The above is the only attachment that needs to be retained. As mentioned, the piping arent standard piping, so you will need to use Metric Standard (correct me if im wrong) standards which can be found online.

AND WAH LAAA


WhatsApp Image 2020-01-03 at 11.22.41 AM.jpeg


The new 40mm gate valve which is fitted into the plumbing system through a reducer from the stock 32mm piping return line. The gate itself can be removed to be cleaned when needed, and its pretty dang sturdy.

Cost about USD30, and was imported from China.

Thats about it! Will be back with more updates soon!

Toodles IMG_20191112_112658.jpg
 

Creating a strong bulwark: Did you consider floor support for your reef tank?

  • I put a major focus on floor support.

    Votes: 34 44.2%
  • I put minimal focus on floor support.

    Votes: 19 24.7%
  • I put no focus on floor support.

    Votes: 22 28.6%
  • Other.

    Votes: 2 2.6%
Back
Top