dang. It's not *quite* enough. As I understand it, it should be trivial to create a simple on/off relay box, the same as the power strip, but with DC in and DC out, yeah? 5.5mm jacks are pretty much ubiqutious. I bet that's something a lot of people are looking for but don't know they're looking for - you'd get all the benefits of a power bar but without all the extra bricks.
I discovered that link I posted was useless, I couldn't really find anything nice and relay modules are only those blue things so I am going to make one this week, it'll work directly with a Pi or controller.
I discovered that link I posted was useless, I couldn't really find anything nice and relay modules are only those blue things so I am going to make one this week, it'll work directly with a Pi or controller.
Am I wrong to think that you could just replace the connectors on the existing AC power strip design, and instead of feeding in 120vAC, you could feed in 24vDC? It'd be much bigger than needed, but should be drop-in.
Am I wrong to think that you could just replace the connectors on the existing AC power strip design, and instead of feeding in 120vAC, you could feed in 24vDC? It'd be much bigger than needed, but should be drop-in.
I've now got a working prototype on my desk. Now I just need to figure out how to house it. Which is really 'how small of a junction box can I get away with'. Thanks for the help!
I've now got a working prototype on my desk. Now I just need to figure out how to house it. Which is really 'how small of a junction box can I get away with'. Thanks for the help!
Hello, I was planning to build a Reefpi controller using a rpi zero and came across the robo-tank board. This is excellent work you have done @robsworld78 !
I’ll be using it for a new 40 breeder build with at least 1 temp sensor, 1 ph, ATO, wave maker pump, and lights.
I have a question regarding the power strip. I already purchased an American DJ scrp8 relay pack and would like to know if it would work with the db9 connectors on the Robo-tank board?
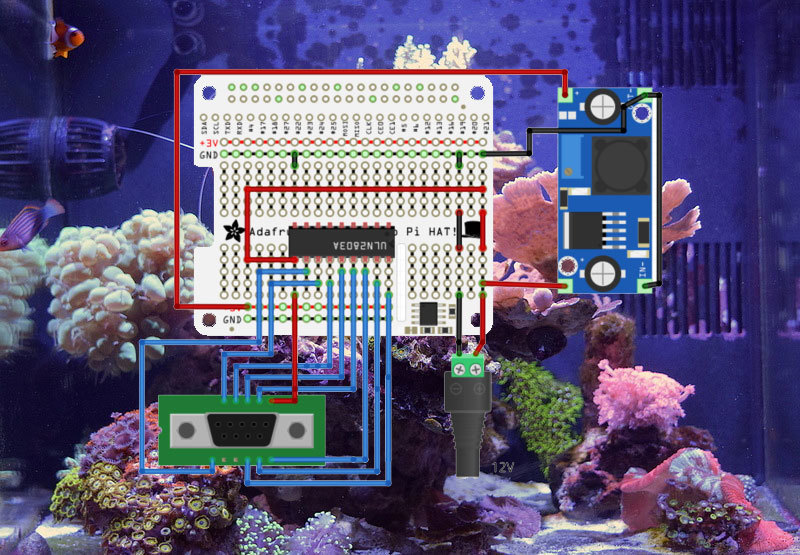
Thanks Adahm, unfortunately it won't work with those power bars, they require +12v to switch each relay. I designed my power bar so I could run the DB9 directly to various GPIO pins on the Pi so they could be used for other things as well. To use that power bar you would need to build out the circuit shown here. Where the ULN2803A connects to the 8 Pi GPIOs would instead go to the DB9.
This guide will walk through the build process of controlling AC equipment using an automated power strip (power controller). The power controller allows scheduled and on-demand control. Power cont...
Hi @BlakeL, I do have and shipping v2 however I'm not liking it mainly due to assembly as things are so cramped, it's turning out to be more difficult than v1 which isn't good for me or others who get DIY. This is rather unfortunate and now I'm working hard on making a big change, I'll post about it when it's complete. At this point I'm not planning to get anymore v2 and hoping to have this ready to ship in the next 2-3 weeks.
Hi @BlakeL, I do have and shipping v2 however I'm not liking it mainly due to assembly as things are so cramped, it's turning out to be more difficult than v1 which isn't good for me or others who get DIY. This is rather unfortunate and now I'm working hard on making a big change, I'll post about it when it's complete. At this point I'm not planning to get anymore v2 and hoping to have this ready to ship in the next 2-3 weeks.
@robsworld78 I just received my V2 today, is there anything I should be aware of as it sounds like you are not happy with the board? also, can you tell me which resistors I need to remove on the sensor extension board so I can use non-optical level sensors please?
@robsworld78 I just received my V2 today, is there anything I should be aware of as it sounds like you are not happy with the board? also, can you tell me which resistors I need to remove on the sensor extension board so I can use non-optical level sensors please?
Sorry for taking so long to get back, it should work ok, if you have any problems let me know. The main reason is assembly but the boards also seem lower quality, I don't know if it's because they are cheap 4 layer boards but something different about them and I don't like it, the more I touch them the less I like. It's really disappointing for lots of reasons and really sorry to everyone for getting exciting and I drop this. I need to make this as easy as possible for it to work and unfortunately this was a step back.
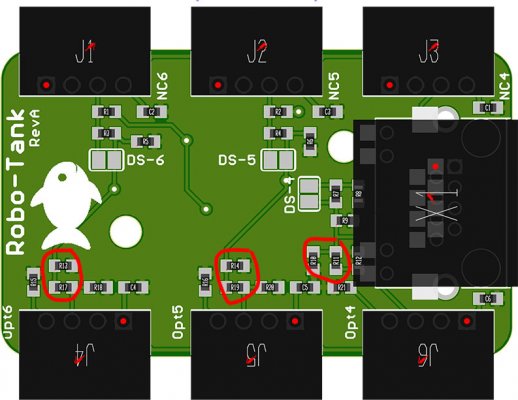
Ah yes those resistors, something I do have fixed. Here's an image showing the 2 resistors circled for each port. Once you remove those the Optical port won't work and the non-contact should.
Probably but they will be DIY which in a sense I'm setting people up for trouble. The RJ45 isn't fun especially with things in the way and the 40 pin header for Pi is in the middle of a bunch of connectors, SMH...
Got my Robo-tank last week. Completed the setup and install. It was a breeze. Got the ATO working a day before leaving on vacation, threw in the ph probe and temp sensor as well, but didn’t have time to calibrate them. Seems the values are close enough, ok for now.
I used a tunze osmolator pump for the Ato, works well, but I had to get a 12v power supply, initially I had it set up with a 24v left over from a jebao power head and didn’t have time for a buck converter. Had a little bit of confusion with the DC outlets, buys simply moved the pump wires around to find the one that was working with the backup float.
Also set up remote access through duckdns on home assistant and a camera looking at the tank. Have checked it every day and it’s working pretty much on auto pilot.
I can see how many seconds and when the ATO came on which I can’t do with my apex.
Have not been able to send emails, I didn’t create an Adafruit account, just entered info in the email section, but have not received any alerts yet, nor the test email. Will figure it out once I get back.
Will try to start a build journal and throw up some pics and config.
of course the password is for my gmail account. I will try a few different emails and see if it comes through.
Currently I tried sending as a text to my phone, which I tested to be working when I send an email to it with my gmail account, I receive a test message.
The test email is just not coming through from reef-pi