Skep's 225 gallon build

OP
OP
Skep18

Skep18

Valuable Member
View Badges
Joined
Feb 3, 2018
Messages
1,091
Reaction score
848
Location
Southeast US
Rating - 100%
1   0   0
the warranty issue is a tough one for me too. I'm looking to put into a wall and can't use one of their stands. I'm a little nervous to spend $3k and void the warranty right off the bat, but I'm not sure any other builders would honor their warranty if I have a stand built by my contractor.

Looking forward to following along.

After working with them, I think they understand situations like yours with built-ins. Maybe you could get their stand and conceal it behind the wall, or do you have something already built in? Also just ask them. They maybe able to work with you if you send them photos and information about for setup. They were really great to work with.
 
OP
OP
Skep18

Skep18

Valuable Member
View Badges
Joined
Feb 3, 2018
Messages
1,091
Reaction score
848
Location
Southeast US
Rating - 100%
1   0   0
Well, I've definitely been continuing to research but I kinda realized no amount of online posting would make things go faster. Consider it my first lesson of patience in this hobby. Lol. As such, I'll add updates when there's content.

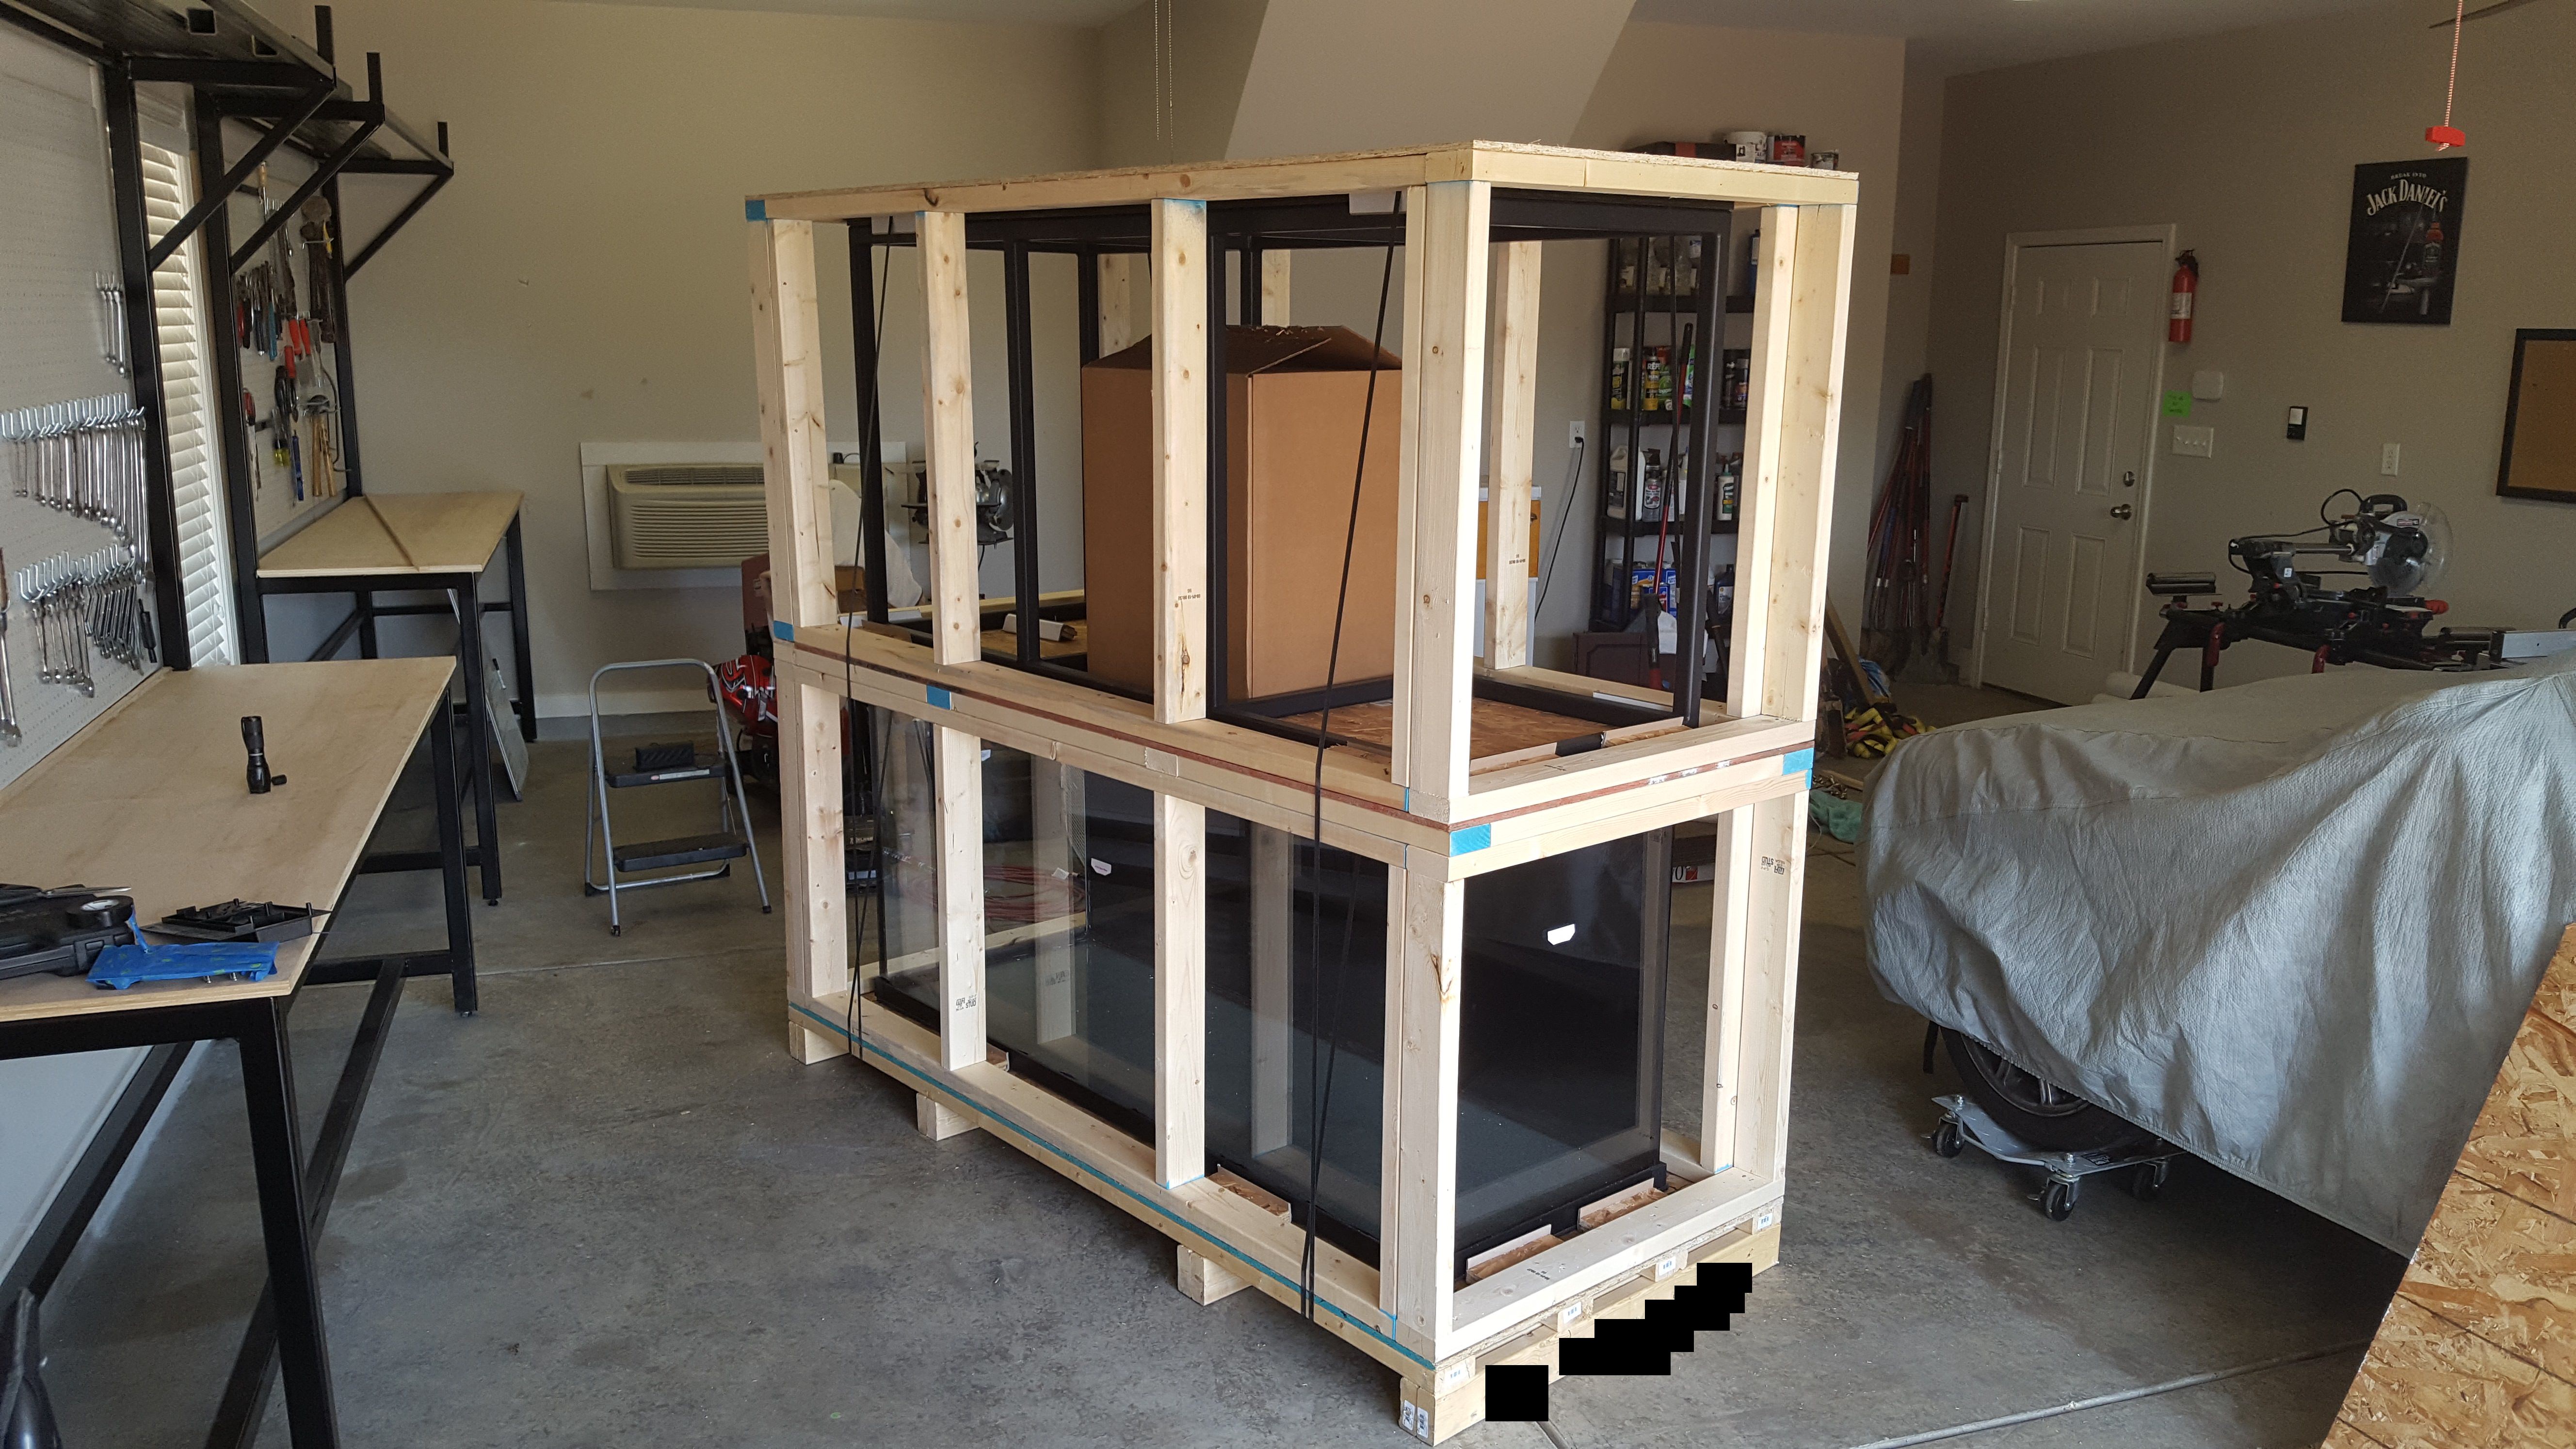
With that said, I had a visit from XPO yesterday. The tank has arrived. Pictures are below. I rented the suction cups and everything. I will say, despite the rental price, they are definitely worth it. The sales guy told me it would be the best money I've spent to get them. He was not wrong.

I'm working through some things with the manufacturer but I'll try to give a detailed review here soon.

mtP9pd2.jpg


iLG6Qeu.jpg
 
OP
OP
Skep18

Skep18

Valuable Member
View Badges
Joined
Feb 3, 2018
Messages
1,091
Reaction score
848
Location
Southeast US
Rating - 100%
1   0   0
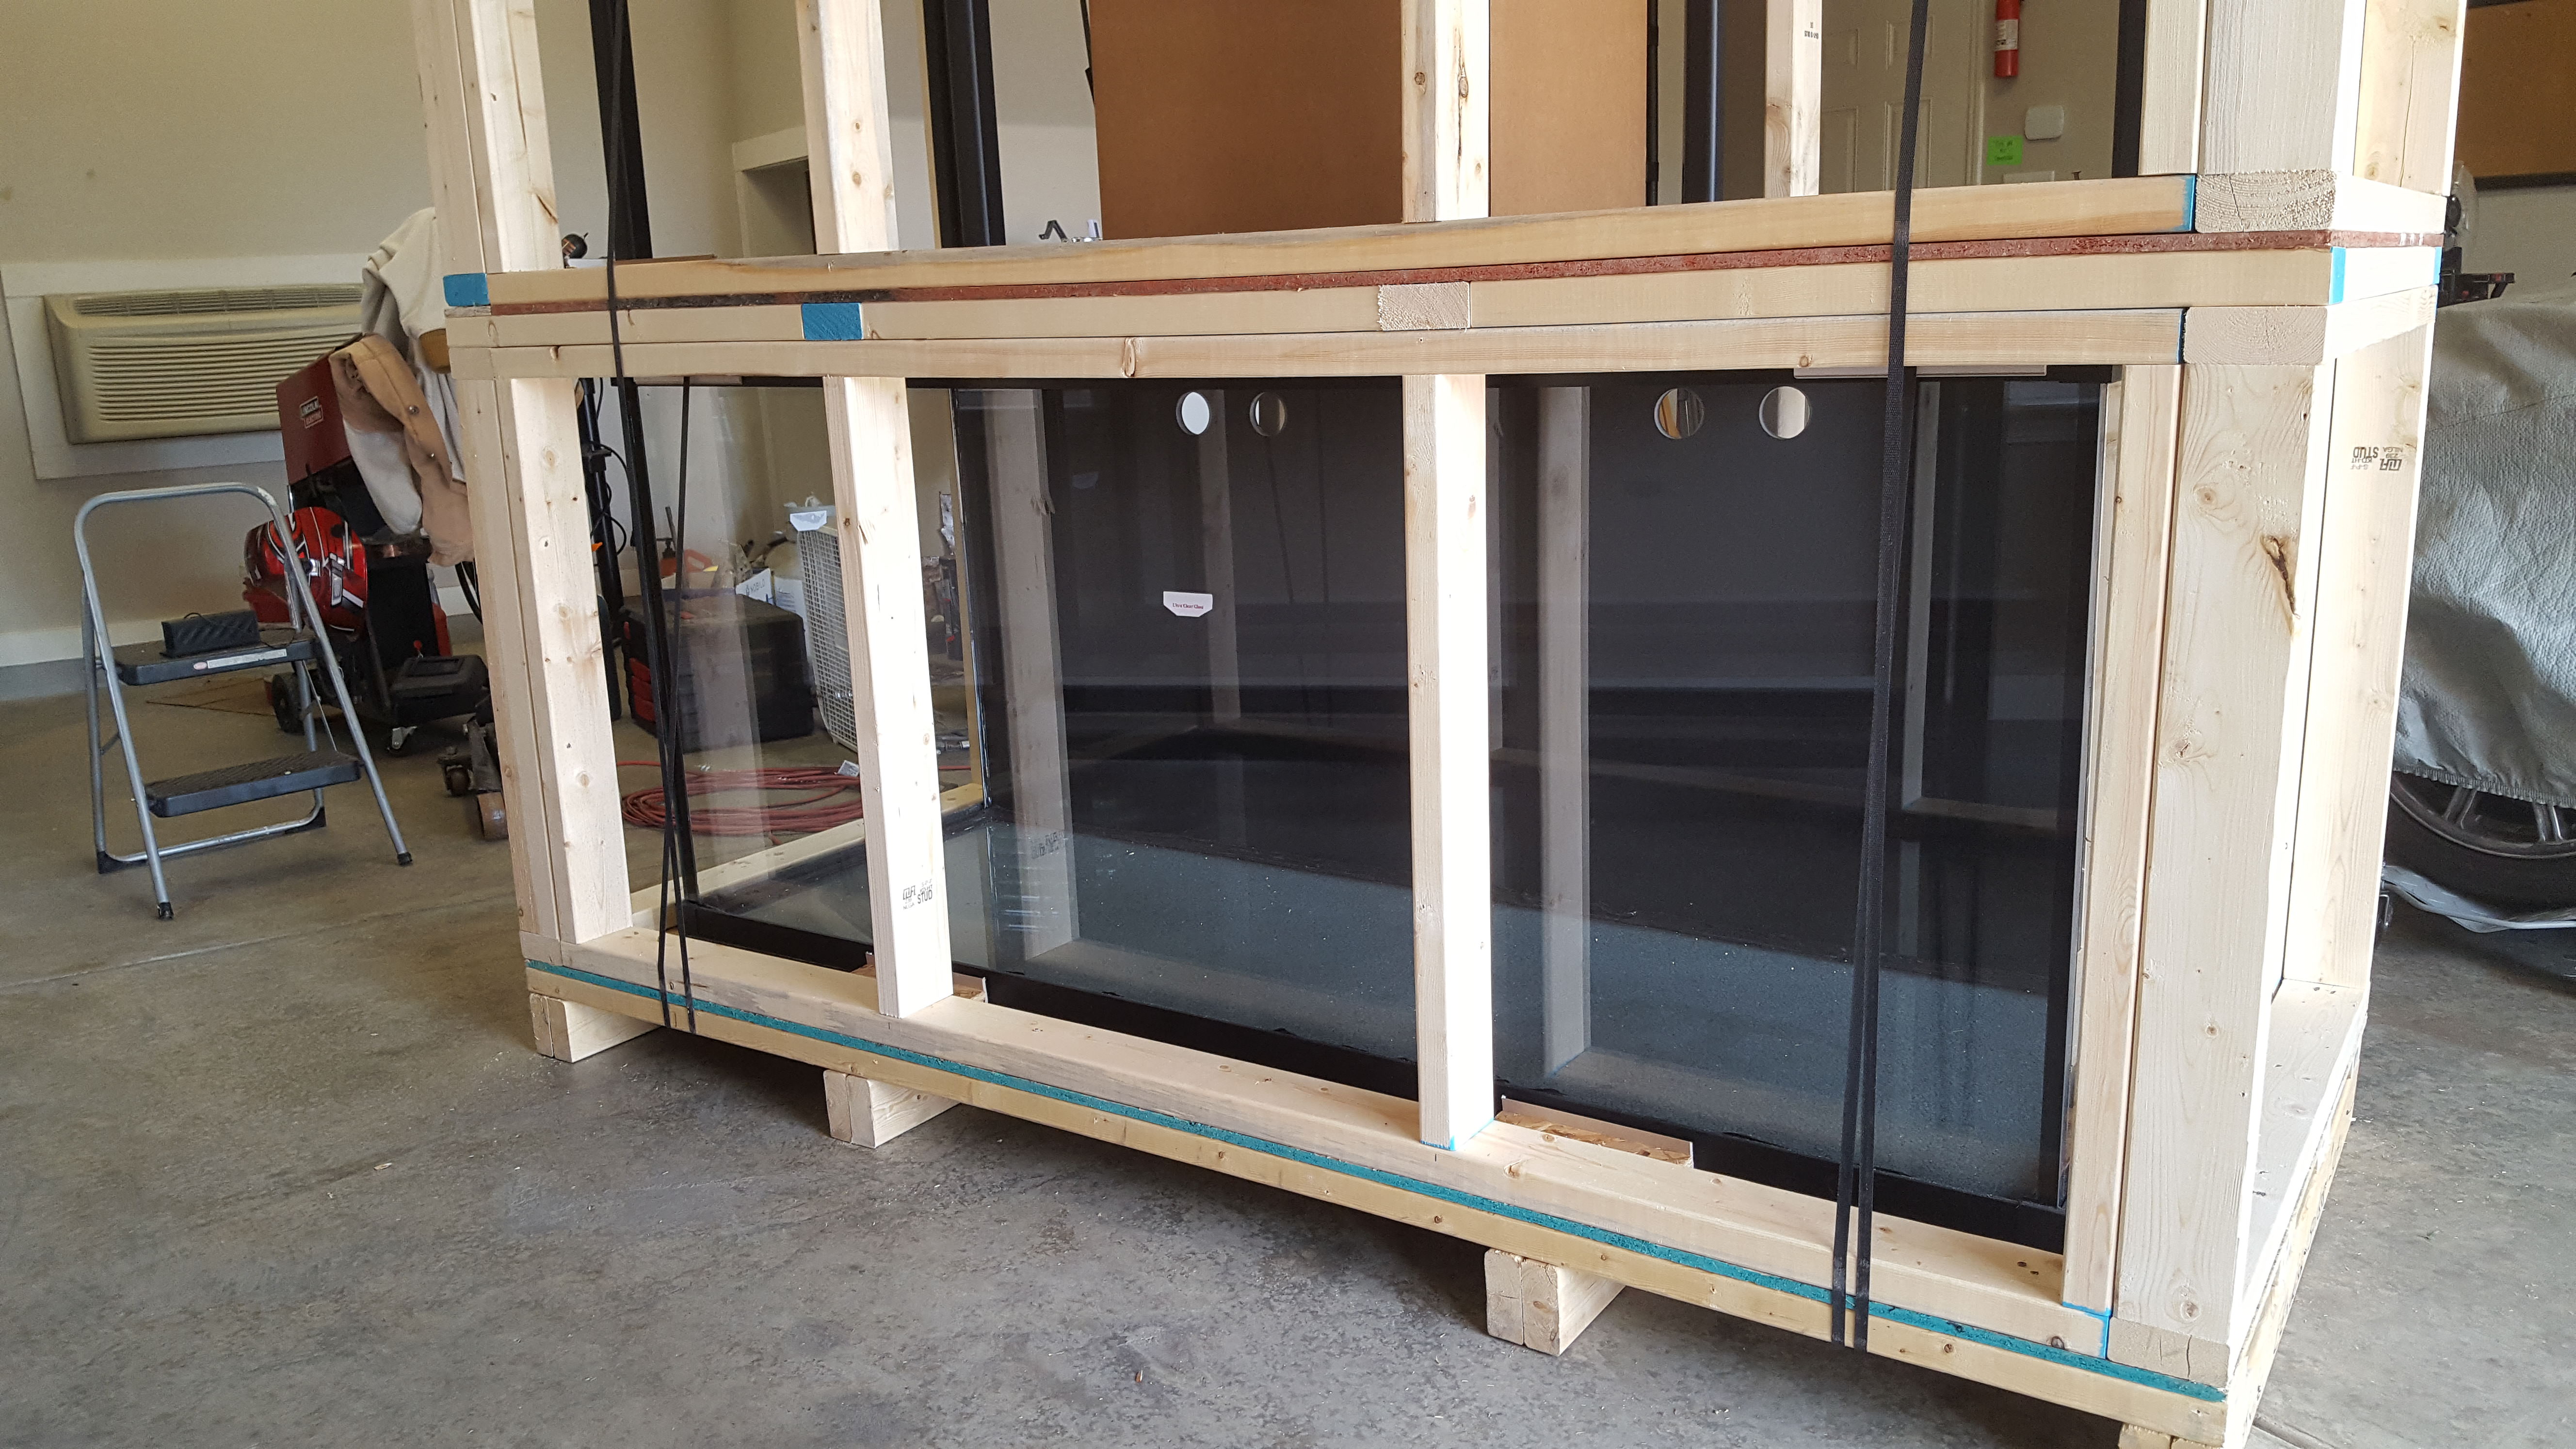
More shots of the tank moved inside.

I forgot to mention above, I had to change the hole dimensions. The ones on the drawing added up to more than 72". Lol. So instead I took the dimensions of each weir box, subtracted them from 72" and divided that by 3. Now it should leave 3 equal gaps surrounding the two overflows.

tank pic 1.jpg


tank pic 2.jpg


tank pic 3.jpg


tank pic 4.jpg


tank pic 5.jpg


tank pic 6.jpg


tank pic 7.jpg
 
OP
OP
Skep18

Skep18

Valuable Member
View Badges
Joined
Feb 3, 2018
Messages
1,091
Reaction score
848
Location
Southeast US
Rating - 100%
1   0   0
Just placed an order for the following:

- 1/ea Maxspect Gyre XF280 WITH CONTROLLER
- 1/ea Maxspect Gyre XF280 WITHOUT CONTROLLER
- 1/ea Reef Octopus Elite 220INT Super Cone Protein Skimmer
- 1/ea Reef Octopus Varios-8 Controllable DC Water Pump

Went with a new vendor on here, @Aquatic Sealife . So far, they've been great in communication. Apparently they're a newer online presence. But from seeing their Facebook site, they've been a LFS for some time. At any rate, great vendor so far. Yay for New Orleans!
 
OP
OP
Skep18

Skep18

Valuable Member
View Badges
Joined
Feb 3, 2018
Messages
1,091
Reaction score
848
Location
Southeast US
Rating - 100%
1   0   0
Small update.

The Varios-8 came in on the above order. Still waiting on the other items but I'm being told that @Aquatic Sealife is expecting them in any day now.

Also, Logan @Reef Breeders tipped me off, but the new Photon 32 V2+ with the improved controller came in stock via the sale price. Picked up two of those. Very impressed so far with the build quality. I obviously haven't done much with them but just holding them and turning one on, they look great!

20180521_142903.jpg


20180521_142931.jpg


20180521_143118.jpg
 
OP
OP
Skep18

Skep18

Valuable Member
View Badges
Joined
Feb 3, 2018
Messages
1,091
Reaction score
848
Location
Southeast US
Rating - 100%
1   0   0
A little update.

Still waiting on my skimmer and gyres. They were originally tentatively scheduled to be in the country earlier this week. Unfortunately, the scheduled day of arrival I was updated that the distributor said the items would be roughly another week before they came in. Fingers crossed, we shall see.

I'm definitely continuing to learn more and more about patience. However, I am starting to accumulate some of the bigger $$$ items. Not only does my own impatience make me want to get going on things but I would like to have the peace of mind of warranty for this items while they are covered. Not a huge factor but the last thing I want is to have a couple hundred dollar item break premature after being stowed away for a year.

That said, I am amassing some of these items so I could plan out my sump build. I wanted to have the items in hand so I could accurately design the sump to work properly with the equipment. Unfortunately, I have some other projects around the house that are really taking up a lot of my time. I'm a big DIY person when/where its appropriate but with so much on the honey-do list, I reconsidered the DIY sump. Looking into it, I priced acrylic out and some tooling and it doesn't seem to be a big savings to DIY vs retail. A few hundred, maybe as high as $500 but considering the time it'll take me away from other projects, the $500 savings seems less worth it. That and some of the retail sumps are really looking nice. They definitely have a more sophisticated design to them being able to utilize CNC's and all.

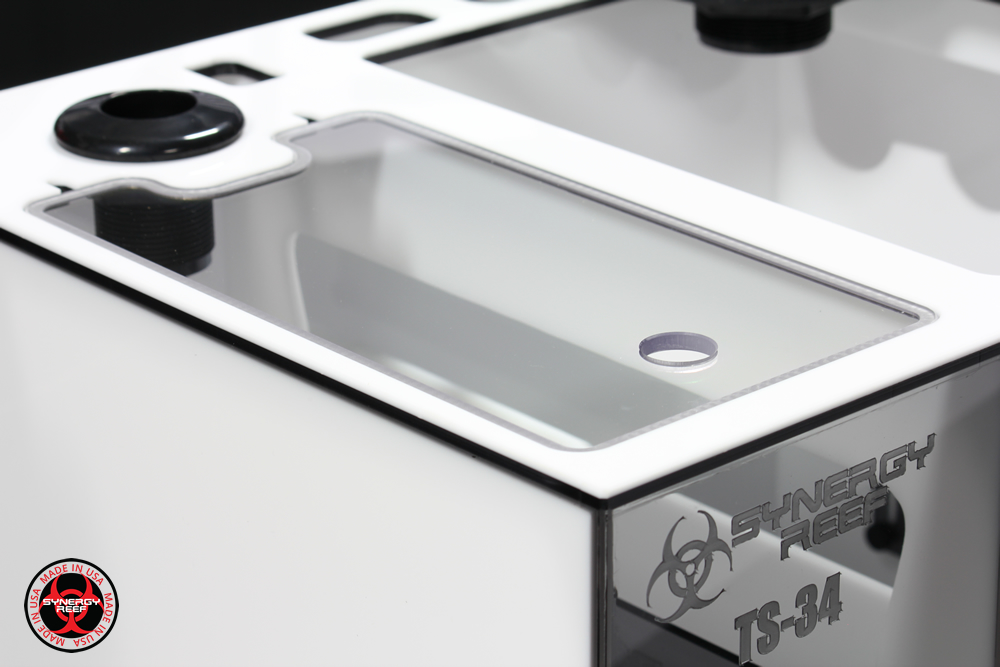
So... I've placed an order for the Synergy Reef CL-44 sump and the CL series 10gal ATO. If I were to DIY a sump, I'm sure it'd take me a few weeks to really get it all together and made. That paired with having to wait on back ordered items, putting water in my tank seemed pretty far off. So now all I have to focus on is installing the plumbing and puting the equipment in place. I may have to do some electrical however I can run on the available outlets in the meantime.

I am having them modify the sump to have the rear return bulkhead hole cut to fit a 1-1/4" bulkhead instead of the 1" originally included. I wanted to keep the head pressure to a minimum as to allow me to run the VarioS-8 at the lowest power setting for the target flow rate. This should in theory keep the pump noise down as much as possible.

I also got the options for the probe holders and the refugium baffle. I got the sump in the Red/White color. This should match the skimmer and return pump pretty nicely. I ordered mine with the flow direction right-to-left so the overflows and equipment will be closer to the corner of my room, away from the living area as to minimize the noise pollution but below is what it should look like.

Front-Right-CL-Red-White-w-ATO-top-1200x681.jpg
 
Last edited:

Heuey51

Community Member
View Badges
Joined
Feb 5, 2018
Messages
83
Reaction score
77
Location
Georgia
Rating - 0%
0   0   0
This is an awesome sump
A little update.

Still waiting on my skimmer and gyres. They were originally tentatively scheduled to be in the country earlier this week. Unfortunately, the scheduled day of arrival I was updated that the distributor said the items would be roughly another week before they came in. Fingers crossed, we shall see.

I'm definitely continuing to learn more and more about patience. However, I am starting to accumulate some of the bigger $$$ items. Not only does my own impatience make me want to get going on things but I would like to have the peace of mind of warranty for this items while they are covered. Not a huge factor but the last thing I want is to have a couple hundred dollar item break premature after being stowed away for a year.

That said, I am amassing some of these items so I could plan out my sump build. I wanted to have the items in hand so I could accurately design the sump to work properly with the equipment. Unfortunately, I have some other projects around the house that are really taking up a lot of my time. I'm a big DIY person when/where its appropriate but with so much on the honey-do list, I reconsidered the DIY sump. Looking into it, I priced acrylic out and some tooling and it doesn't seem to be a big savings to DIY vs retail. A few hundred, maybe as high as $500 but considering the time it'll take me away from other projects, the $500 savings seems less worth it. That and some of the retail sumps are really looking nice. They definitely have a more sophisticated design to them being able to utilize CNC's and all.

So... I've placed an order for the Synergy Reef CL-44 sump and the CL series 10gal ATO. If I were to DIY a sump, I'm sure it'd take me a few weeks to really get it all together and made. That paired with having to wait on back ordered items, putting water in my tank seemed pretty far off. So now all I have to focus on is installing the plumbing and puting the equipment in place. I may have to do some electrical however I can run on the available outlets in the meantime.

I am having them modify the sump to have the rear return bulkhead hole cut to fit a 1-1/4" bulkhead instead of the 1" originally included. I wanted to keep the head pressure to a minimum as to allow me to run the VarioS-8 at the lowest power setting for the target flow rate. This should in theory keep the pump noise down as much as possible.

I also got the options for the probe holders and the refugium baffle. I got the sump in the Red/White color. This should match the skimmer and return pump pretty nicely. I ordered mine with the flow direction right-to-left so the overflows and equipment will be closer to the corner of my room, away from the living area as to minimize the noise pollution but below is what it should look like.

Front-Right-CL-Red-White-w-ATO-top-1200x681.jpg
 
OP
OP
Skep18

Skep18

Valuable Member
View Badges
Joined
Feb 3, 2018
Messages
1,091
Reaction score
848
Location
Southeast US
Rating - 100%
1   0   0
Skimmer arrived today. This thing looks pretty great. Build quality is top notch. You can feel the quality in materials and see the attention to detail. Now just have to wait for the sump to arrive to begin plumbing.

20180530_141729.jpg


20180530_162219.jpg


20180530_162454.jpg
 

Ocelaris

Valuable Member
View Badges
Joined
May 3, 2016
Messages
1,786
Reaction score
1,157
Rating - 0%
0   0   0
Looking good. I am in a similar build process about a month behind you. I have a ~250 gallon ordered, a Reef Octopus 220 Regal (older model with Varios 6 pump upgrade), and going to order the synergy CL-44 sump. Looking forward to your plumbing!
 
OP
OP
Skep18

Skep18

Valuable Member
View Badges
Joined
Feb 3, 2018
Messages
1,091
Reaction score
848
Location
Southeast US
Rating - 100%
1   0   0
Some more progress.

I received my Maxspect Gyre XF280 pumps and controller. I also ordered an IceCap Salinity Tester. Hoping it'll be easy enough to use and, given any inaccuracies, have mental adjustments to make this thing a tool of convenience. I've ordered a refractometer to be safe though.

20180618_122413.jpg


Also got a 20L for a quarantine tank. Painted the back and bottom with the Rustoleum Black Gloss.

20180618_122551.jpg


Heard from Synergy Reef today. My sump should be shipping out on Wednesday.

Also picked up a bunch of stuff from the hardware store. Gonna make some headway on the stand, at least what's needed to get equipment installed.

Finally, made a decent order with BRS. Buncha red PVC, some salt, heaters, etc.

More updates to come in the coming days!
 
Last edited:
OP
OP
Skep18

Skep18

Valuable Member
View Badges
Joined
Feb 3, 2018
Messages
1,091
Reaction score
848
Location
Southeast US
Rating - 100%
1   0   0
Decent update today.

Tank Stand

I didn't take any photos yet as I've just been absent minded about it but I've made some good progress on the wood for the stand. I've cut out the random intricacies for the floor of the stand. Drilled holes for mounting screws. Bought the #8-32 1.5" stainless steel machine screws that I'll fasten it down with. Painted both sides of the bottom with Kiltz oil-based primer so far. Going to finish it with some "Glidden Porch and Floor - Gloss Interior/Exterior Porch and Floor Polyurethane Oil Paint." I used this on my shop workbench recently and really ended up liking it. Long story but in sorting through the miriad of floor finishes in an attempt to look for a durable benchtop paint, this stuff's labeling was pretty straight forward and is comprised of stuff I've been satisfied with in the past (polyurethane and oil paint, lol). Other paints name everything as their own and sometimes can end up something that wasn't expected.

Glidden paint (except mine's white) just for reference in case anyone is interested:

glidden.jpg


Here's how it turned out on my workbench. Mind you, I laid it on really thick here and did minor sanding before I should have as it was slightly tacky. But given time to cure fully between coats, I could definitely see this stuff coming out really nice. Probably more importantly, if Kiltz oil-based primer is good, this stuff should hold up against salt water really well.

bench far.jpg


bench close.jpg


Here's the actual cut fish tank stand bottom, again, only primered right now. This is actually the underside, hence the splitting in the "C" side top veneer of the "B/C" plywood. It' otherwise pretty much the same only the top side is smoother and has edges routed differently:

Stand Bottom.jpg


I also got 3 pieces of 0.25" plywood. I plan to frame out the wall with it, covering some insulation. This will hopefully help with noise, temp/condensation and protect the wall from salt spray. All will be finished with the Glidden.


Sump

HALLELUJAH!!! The Synergy Reef CL-44 sump came in today @mixer911 ! The quality is outstanding. I know these guys were working hard to finished orders before going on holiday leave. Much appreciated. I did get a little scratching in the last overflow area as the height adjustable baffle was secured with tape and it looks like it fell off in transit but this should only be very minor cosmetic stuff. I expect it'll get some scratches here and there over time anyways. Oh well.

We did have some excitement fitting in my 1.25" return bulkhead hole. Turns out they could only do that a couple ways. We ended up putting the second return bulkhead in the back as well, moving the lid forwards. Only 0.75" bulkhead could fit next to it as well, no 1".

Synergy Reef CL-44.jpg


And it was definitely packed really well but let me just say... OH. MY. GOD. The packing peanuts were EVERYWHERE!!!

Packing Peanuts.jpg


Other Stuff in the Mail

Got some random stuff in the mail. Filling the gaps with the proverbial "nickle and dime" items as I feel I'm getting close to at least getting some fish to QT. I'll use the Instant Ocean (IO) salt for QT I think. I want to try the Red Sea Blue Bucket salt for the main display.

Also got a bunch more PVC in. I'm totally, right now...
  • 7 pieces of red 1.5" PVC
  • 1 piece of red 1.25" PVC
  • 1 piece of black 1.25" PVC
I'm hoping this will be enough for my drain lines and only my return from the sump to the back of the tank. I'm going to run black PVC up in the canopy just for the hidden factor as I hope it'll blend in well and not reflect ambient colors into the tank via lighting.

Random BRS.jpg


PVC and Salt.jpg


Quarantine Tank

Almost done getting all the stuff for the quarantine tank. Here it is a little more put together. Just basic stuff. Well recommended by R2R via Google search, the AquaClear 30 HOB. Got a AquaClear powerhead with venturi coming in the mail. Hopefully this will inject air sufficiently without needing a loud obnoxious air pump. Eheim Jager heater. PVC stuff. etc.

QT.jpg


Water Change Vessel

Finally, got a Brute 44gal can for water for now. I think I'll end up with some nicer, larger vessels. I've already reached out to a local supplier and got quotes for half a dozen tanks ranging from 55gal to 125gal. FYI to all, expect around $100 to $250 respectively for that kinda thing. As the gallons go up, the price definitely does as well. But I'm not sure exactly what sizes I want, where I'll put them, how much I'll actually need them, if they need to be mobile, etc. So for not I'll go with this and build up a change station as I better understand what I want out of it.

Brute.jpg
 
Last edited:

Ocelaris

Valuable Member
View Badges
Joined
May 3, 2016
Messages
1,786
Reaction score
1,157
Rating - 0%
0   0   0
Looks great, I've got a cl-44 just like yours but black and white coming in a few weeks. Take lots of plumbing pics :)

Do you have room for a water changing station? I have two of the brutes (32 gallons) for my water changing station. If I had room for larger I would, but makes water changes super easy.
 
OP
OP
Skep18

Skep18

Valuable Member
View Badges
Joined
Feb 3, 2018
Messages
1,091
Reaction score
848
Location
Southeast US
Rating - 100%
1   0   0
Looks great, I've got a cl-44 just like yours but black and white coming in a few weeks. Take lots of plumbing pics :)

I believe you meant black/red but I definitely will! If you don't see the angles you're interested in, just let me know. I can take more.

Do you have room for a water changing station? I have two of the brutes (32 gallons) for my water changing station. If I had room for larger I would, but makes water changes super easy.

Its in the laundry room right now. I'm not sure if I am going to set it up in there or in the adjacent garage. My concern is the local weather. Where I'm at it gets pretty hot. This week its like all 90's (Fahrenheit). Idk if that temp will heat the garage too much to keep reservoir temps at tank levels. I plan on putting some body of water out there and monitor it to find out.
 

Ocelaris

Valuable Member
View Badges
Joined
May 3, 2016
Messages
1,786
Reaction score
1,157
Rating - 0%
0   0   0
The sump I ordered is white and black I meant. Picture below. I'm very curious how you plumb it, as I'm wrestling with the distance I have to make the returns (about 30" horizontally).

For the water changing, I don't even bother heating my 32 gallons and it doesn't drop the temp that much,maybe a degree or two at max, so it may not matter?

I'm curious how you attach the panels. I'm also getting a steel stand and I have to mount doors and panels.

I know oil is a good choice for wet surfaces, but today's water based catalytic finishes are just as durable as the older oil based ones. This is the brand of finishes that I've used for years on cabinets, stairs, closets etc... The finish is extremely hard and durable. You can paint it on, but I usually spray with a cheap hvlp gun we bought to make all the kitchen and bath cabinets for the two houses we've owned.

When we refinished the wood floors, we also used a catalytic water based finish which has held up really well. When you add the catalysts, it's different than the normal evaporative finishes.

https://www.targetcoatings.com/

Here's the sump color scheme I ordered.

Return_Lid.jpg
 
OP
OP
Skep18

Skep18

Valuable Member
View Badges
Joined
Feb 3, 2018
Messages
1,091
Reaction score
848
Location
Southeast US
Rating - 100%
1   0   0
Hmmm... I just noticed that probe holder is just chillin on the bottom of the sump, detached... Guess I'll have to find out if that is also acrylic and get some adhesive to put it on?
 
OP
OP
Skep18

Skep18

Valuable Member
View Badges
Joined
Feb 3, 2018
Messages
1,091
Reaction score
848
Location
Southeast US
Rating - 100%
1   0   0
The sump I ordered is white and black I meant. Picture below. I'm very curious how you plumb it, as I'm wrestling with the distance I have to make the returns (about 30" horizontally).

For the water changing, I don't even bother heating my 32 gallons and it doesn't drop the temp that much,maybe a degree or two at max, so it may not matter?

I'm curious how you attach the panels. I'm also getting a steel stand and I have to mount doors and panels.

I know oil is a good choice for wet surfaces, but today's water based catalytic finishes are just as durable as the older oil based ones. This is the brand of finishes that I've used for years on cabinets, stairs, closets etc... The finish is extremely hard and durable. You can paint it on, but I usually spray with a cheap hvlp gun we bought to make all the kitchen and bath cabinets for the two houses we've owned.

When we refinished the wood floors, we also used a catalytic water based finish which has held up really well. When you add the catalysts, it's different than the normal evaporative finishes.

https://www.targetcoatings.com/

Here's the sump color scheme I ordered.

Return_Lid.jpg

As far as plumbing, I was lucky enough to find the thread below concerning plumbing dual overflows. But I don't think 30" horizontal should be an issue. Just ordered some Weld-On P70 Clear Primer and Weld-On 705 Medium Grade, Fast-Setting Cement. Given the hassle of accessing these pipes ever again after its all setup, I don't want a leak EVER. That said, on Amazon the price of these are not much higher than the Oatey equivalents in the local Big Box stores.

https://www.reef2reef.com/threads/dual-synergy-shadow-overflows.346367/

I made SUCH a big deal making my VarioS-8 output a 1.25" ID as that's RO's recommendation and only included hardware. I want as little restriction as reasonable as I want to run the pump as low a setting as I can to achieve the desired flow. That made the sump more complicated than maybe it had to be. And now I realized standard sizes for silicone hoses pretty much stop at 1 inch ID. Luckily I found a useful thread where someone searched eBay for metric sizes. I found the link below with an eBay seller selling 32mm ID, 38mm OD soft, food grade silicone hose by the meter. Not the cheapest but seems pretty valuable if it keeps things quiet. Might even be able to use it on the skimmer?

https://www.ebay.com/itm/1Metre-Foo...c3:m:moMO5DF2Vhq0L1o3ZqhmQtg&var=561970497895

As far as the panels, I'm just going to veneer over the metal exterior a plywood skin. I might drill/tap into the steel but probably will more than likely just attach it to the plywood top and bottom of the stand. Then I can attached my doors or whatever to that. Should be fine.

I did drill/tap the bottom plywood to the stand using #8-32 machine screws.

Now that you post that image, I forgot it came in that color. Looks good!
 

NY_Caveman

likes words, fish and arbitrary statistics
View Badges
Joined
Sep 8, 2017
Messages
17,008
Reaction score
108,390
Location
New York
Rating - 0%
0   0   0
Great detail in this thread! Cannot wait to see it evolve!
 
OP
OP
Skep18

Skep18

Valuable Member
View Badges
Joined
Feb 3, 2018
Messages
1,091
Reaction score
848
Location
Southeast US
Rating - 100%
1   0   0
Another update.

RODI Setup

I finally got around to making water. I bought this kit months ago and just got around to setting it up. I hooked it up to my washing machine water line.

01 RODI Setup.jpg


I was definitely curious as to what pressure I was getting into my house. My last house was more in suburbia and the pressure was more what I would call normal. I moved somewhat out to the "country" so-to-speak and WOW... I saw pressures as high as 95psi from the wall!!! I'm a little concerned about my pipes but everything's jammin' so I'm not gonna sweat it for now.

02 PSI.jpg


Also found out that I have a leak in my unit. At first I thought it was coming from the carbon canister threads. I went to look for the included canister wrench only to realize my kit didn't seem to include one. I kept everything in its shipped packaging and didn't find it. Also I don't recall noticing one. No worries though as BRS is awesome, they sent me one, no questions ask. Even though its $4, its the customer support that's the point.

Fast forward, I come out later to see the adjacent canister wet as well. Further looking, turns out its dripping at the plastic fitting between the two filter housings. Once again, BRS sent out the $1 part asap. Luckily its leaking at like 1 drip per hour so its not bad at all. I probably won't bother putting it in until I have to replace my first carbon filter.

02 RODI Leak.jpg


I did go ahead and install my float valve. I didn't know how high people tended to install them. I didn't want it too high as to make any moving difficult (although I don't know that I'll move this much) but not too low as to waste space. In the end I installed it within the handle area to add a "bumper" for protection. I'm happy with the fill level.

03 Float Valve.jpg


04 Water.jpg


Fish Stand

Made some more progress on the fish stand. Well, at least on the house part of it. I figure I need to install the sump to run the plumbing. I need to install the fish stand bottom to install the sump. To ever push the stand back in place, I need to line the back wall and vapor barrier the wall and stand bottom (my intentions, not required). So I'm at the point of installing my "wall guard" or basically, the back wall of the stand.

I'm making it 1 inch off the wall as to clear some of my chair railing and trim. It's going to eventually be finished on the outside to look like my kitchen cabinets so I'm taking it to the same height. This will be my anchor of sorts for the canopy and stuff.

Boards ripped to 1in for standoffs.

05 Rips.jpg


1/4in plywood, Kiltz coated the back side so far to seal the wood up.

06 Ply.jpg


Then, as of today I've mounted some of that wood on the wall.

12 Wall.jpg


I also finished the top of the stand bottom shelf with the garage floor, polyurethane oil paint. Two quick thick coats left to cure in the sun. Could have been sanded between, coated thinner, etc. to look better but it will work.

11 Stand.jpg


Quarantine Tank

Well, I did a thing. Probably a bad thing but my desire for results as well as my intentions to time things to get fish in my DT as soon as reasonably possible, I went ahead and got a few small fish. ;Muted Specifically, the wife wanted two Benggai Cardinals we saw and I was set on a little Firefish/Fire Goby. To make myself look worse, I went to local stores as it seemed practical to see what's available locally before making an animal endure shipping in my locally 90*F+ weather. I wish I can say I got my fish from a reputable small LFS. Unfortunately they came from the big box corporate place "where the pets go." Now, I will say this particular Petco is definitely the best one in my city for saltwater. I've always known they had more of a selection than any other one around. They even sell corals and had a tank from the local reef club on display with their advertising. I bought them only because they actually looked good and healthy. I knew what I wanted but definitely told myself I wouldn't buy them if they didn't look well. That said, these fish all looked bright eyed and active in store. They will definitely be going through a long QT period.

I know I should have let the tank cycle for a few weeks but instead I went ahead and added IO Bio Spira. The bottle was well in date and I've had luck in the past using Bio Spira, although this was back when it was in a soft pack and was refrigerated. Nonetheless, the fish are doing good so far. I have my Red Sea test kit coming in the mail Thursday (another bad thing I did, no test kit before fish). I also have Amquel+ on-hand for any ammonia spike or surprises as indicated by my little badge until Thursday. 48hr in I've done a 25% WC for good measure. I have also dosed a bit of Bio Spira each day to support the bacteria situation.

As far as the fish go, they are eating pretty well. They are definitely getting better each day as they settle in. They take to frozen brine shrimp well. Following some of Austin Lefevre's guidance (but obviously not all :() I'm feeding small portions of what they'll eat more often. I only accidentally bought the frozen brine in the LFS on my way out. At home I realized I meant to get MYSIS shrimp, not BRINE shrimp. know brine shrimp is not nutritious but they are eating it well. I did get some frozen mysis the next day. They eay that somewhat but not as well as the brine. I alternate nontheless.

I also made a lid out of some lexan I had lying around. Used the router and learned some lessons on working with plastics for sure. Its far from pretty but it works to keep the splashing and humidity in. The tank gets a lot of air via the powerhead which has a venturi included.

07 Lexan.jpg


I threw on a shop light for the time being.

09 QT Light.jpg


However, despite making the lexan lid and having the LED shop light, I really just couldn't make myself happy with this haphazard look. So I've ordered the Aqueon LED hood for this tank with a second daylight bulb. It definitely seemed wasteful as the light is junk in terms of capability. But I figured it would help me inspect these little buggers more properly. With the dim lighting, they are pretty hard to see regarding any small, close up details.

Its this hood only the 30in size.

aqueon-deluxe-led-full-hood-for-aquariums.jpg


Also made a little useful tool with some child medicine syringe to kinda imitate a ghetto version of "Julian's Thing" to suck up detritus off the tank floor. Far from impressive but has a use.

10 Detritus.jpg


The End (of this update).

Thanks for reading!

EDIT: Idk why but I cannot delete this image below from the reply....

12 Wall.jpg
 
Last edited:

More than just hot air: Is there a Pufferfish in your aquarium?

  • There is currently a pufferfish in my aquarium.

    Votes: 30 17.6%
  • There is not currently a pufferfish in my aquarium, but I have kept one in the past.

    Votes: 27 15.9%
  • There has never been a pufferfish in my aquarium, but I plan to keep one in the future.

    Votes: 32 18.8%
  • I have no plans to keep a pufferfish in my aquarium.

    Votes: 73 42.9%
  • Other.

    Votes: 8 4.7%
Back
Top