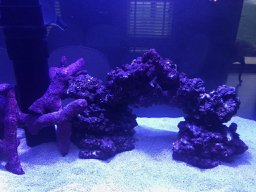
150 gallon island reef tank

Bruce60

Active Member
View Badges
Joined
Oct 28, 2018
Messages
212
Reaction score
269
Location
Bloomsburg, PA
Rating - 0%
0   0   0
This is both a new type of tank for me, and my first time posting my build on a forum, so wish me luck leading us on this journey.

A bit about me. I have had tanks of various types, sizes and shapes for almost 50 years. I've had a 400 gallon marine predator tank ... a 3 gallon iMac fresh tank...A 12 gallon nano reef...A pie-shaped tank. I also have two dogs and a job that keeps me busy.
iMac Fish.jpg
New tank spot.jpg

I moved into this house last spring. I thought this spot between the support pillars separating the living room from the kitchen area would be perfect for an island tank viewable from all sides. The distance between the inside of both pillars is 68". Had a structural engineer check the structure underneath while inspecting the house and got a green light to proceed.

By the time I was settled into the house it was the end of the summer. I had been thinking about the unique needs of an island tank. How do you move water in and out of the tank? How do you provide power? I realized that I would need the overflow to be in the center of the tank but was concerned about its footprint. I knew the tank was going to be 60" long - it was not worth the cost of customizing for a few additional inches. I had tanks that were 36" tall in the past, and was not going over 24" this time. Given the space the tank could be either 24" or 30" deep.

In doing research on tank builders I came across Custom Aquariums (had purchased Glass Cages before with positive results). What intrigued me about CA besides they built tanks like, well...tanks, is their unique H2Overflow and concealment column. They can run a 1-1/2" overflow and two, 3/4" returns through a single 3" sleeve, taking up much less precious tank real estate. I was skeptical of their H2Overflow and if it would really work as advertised. There were not many reviews but the few I were able to track down were positive. I've always been a bit of an early adopter, so I went and placed the order in the fall of 2018.

With the holidays it was not until January that the tank arrived. I had gone and ordered not only the tank with their concealment column, but also a 36" tall stand and their modular HDPE sump system.
It was packed amazingly well, and with a little help got it in place.
Tank arrives 1.jpg
Tank arrives 2.jpg

Tank in place 1.jpg
Tank in place 2.jpg


Next, the slow process of getting the plumbing and electrical systems set up...please be patient.
 
OP
OP
Bruce60

Bruce60

Active Member
View Badges
Joined
Oct 28, 2018
Messages
212
Reaction score
269
Location
Bloomsburg, PA
Rating - 0%
0   0   0
Equipment: I spent a lot of time thinking about the equipment I wanted to use. There are many more good choices than in the past. I also needed everything to fit under the stand. I spent quite a bit of time planning out various layouts with different equipment before making my final choices. My last large tank setup was about a decade ago, and I include what I did then for reference.

Circulation: Last time around I used Eheim for the returns and Tunze Streams for circulation. This time for the main return pump I decided to try the Maxspect Duo 9K. I have two 3/4" returns from the sump and was intrigued by the double impeller. I also like the control over flow you can get with DC motors. For the circulation in the tank I got a pair of Maxspect Gyre 230's with a controller. I also have a small pump I am using for flow into a refugium.

Skimmer: I tend to prefer external skimmers to the in-sump ones. Last time I used Deltec skimmers with the self cleaning head and everything. This time around I decided to go back to basics and got a Lifereef skimmer. Since I got a 36" tall stand I had a bit more room to work with and decided on the 30" tall VS3-30 with a Blueline 30HDX pump to feed it. Love that I only need one pump for the skimmer.

Lighting: Last time around it was MH for lighting. This time I got a 48" hybrid T5 and LED fixture. For the T5's I am using two Coral Plus bulbs and two True Actinic bulbs. For the LED I got two Radion XR15 G4s.

Controller: Last time I programmed my own stuff. This time I decided to give Apex a try.

Putting it all together: Here is an image from the dry test of putting everything together to see how it fits. The blue arrows show the main sump water flow. Green arrows flow through the refugium and red arrows through the skimmer. There is a strainer for the intake to the skimmer and a 45 degree elbow for the skimmer outflow back into the pre-baffle section. The refugium is fed through one of the 3/4" green hoses in the back and flows back through the large connector in front. Looks like it is all going to fit!
Equipment test labeled.jpg

There was electricity in the support pillars, so I had an electrician isolate the outlets into a dedicated 20 amp circuit with GFCI. Fortunately, there's a gap between the floors that allowed me to run wires in and out.I drilled through the floor of the stand to get the wires in and out.
Power.jpg
Wiring floor.jpg
Here is the final look of the electrical panel. I organized and put wires in the tracks as much as possible. I labelled each wire with what it powers and the appropriate outlet on the energy bar.
Wiring panel.jpg


Finally, here is an image of the tank being filled. I first filled the system and tested it with fresh water before adding salt to the system directly. You can see the concealment column installed in the center of the tank. You can also see the lights hanging from the ceiling.
Filling tank.jpg


...more to come...

Power.jpg


image.png
 
OP
OP
Bruce60

Bruce60

Active Member
View Badges
Joined
Oct 28, 2018
Messages
212
Reaction score
269
Location
Bloomsburg, PA
Rating - 0%
0   0   0
Sorry it has taken me so long to get back to this journey...life has been busy!

IMG_0489.jpg


These images are from mid-April with the tank full, and with live rock and live sand. I purchased the rock and sand from a LFS. A young man from the store helped me pick out the rock, and we spent well over an hour and a half picking and building different things until we settled on this aquascape. Since this is an "island" tank that is viewable from all sides, it was an interesting challenge. The view from the other side of the tank...

IMG_0491.jpg


A couple of closer views of the aquascape...

IMG_0497.jpg
IMG_0498.jpg


More to come shortly. IMG_0497 (1).jpg
 
OP
OP
Bruce60

Bruce60

Active Member
View Badges
Joined
Oct 28, 2018
Messages
212
Reaction score
269
Location
Bloomsburg, PA
Rating - 0%
0   0   0
This is the tank in its current state, about five months after live rock/sand. Good progress, but still quite a ways to go. Views from all four sides:

Sept19ViewSouth.jpg

Sept19ViewNorth.jpg
Sept19ViewEast.jpg
Sept19ViewWest.jpg


More to come...
 
OP
OP
Bruce60

Bruce60

Active Member
View Badges
Joined
Oct 28, 2018
Messages
212
Reaction score
269
Location
Bloomsburg, PA
Rating - 0%
0   0   0
Thanks for the thumbs up and kind comments!

This fish currently in the tank are:
Ocellaris clown (first fish in the tank!)
Royal gramma
Yellow wrasse
Yellow tang
Atlantic cherub pygmy angel
Pajama cardinals (7)


Sept19ThreeFish.jpg

Candy cane coral with three fish

Sept19Five fish.jpg
Sept19Angel.jpg


I have a mix of inverts, including a variety of snail, hermit crabs, a sand sifting starfish and a cleaner shrimp.
 
OP
OP
Bruce60

Bruce60

Active Member
View Badges
Joined
Oct 28, 2018
Messages
212
Reaction score
269
Location
Bloomsburg, PA
Rating - 0%
0   0   0
Current corals:

Candy cane coral (see previous post for image)
Torch coral
Duncan coral
Red Pavona
Zoa
...and I think the last one is a birdsnest (can anyone help identify?)

Sept19Torch.jpg
Sept19Duncan.jpg
Sept19RedPavona.jpg
Sept19Zoa.jpg
Sept19SPS.jpg


That's it for tonight.
 
OP
OP
Bruce60

Bruce60

Active Member
View Badges
Joined
Oct 28, 2018
Messages
212
Reaction score
269
Location
Bloomsburg, PA
Rating - 0%
0   0   0
I know...I am bad about keeping up on a build thread. We are in the middle of a day and half of snow, so let's see what i can accomplish. I am approaching 2 years since the water started flowing and there is a lot I've learned this go around.

Reminder, this is a 150 gallon (5' by 2' by 2') island (viewable from all four sides) tank and I wanted a clean look, so everything had to fit into the stand. As a result, I had the stand made 36" tall instead of 30" tall to be sure I had enough room to access everything. Nobody seems to notice the difference in the display height.

Stand.jpg


Sump/Fuge: I went with Custom Aquarium's Seamless Sump and this is the best choice I made for this setup. Why? Needing to have both the electrical and wet equipment in the same stand in close proximity drew me to the one-piece molded HDPE containers with glass covered recessed lids to keep the water in and away from the electrical components. You can see that after two years the inside of the stand is DRY AS A BONE with no salt or corrosion on any of the electrical system. Also, their system is modular, meaning it comes in and out the doors easily. The ATO container is to the right of the fuge.

Skimmer: I took advantage of the taller stand to get a 30" Lifereef external skimmer with a Blueline 30HDX pump. It was easy to drill the sump for the bulkheads to connect the skimmer into the sump just before the baffle. This is the old-fashioned venturi skimmer where the single pump provides both supply and drives the venturi. Simple to run...pretty much set and forget (the image is deceptive, the cup is actually empty, not full). Little noise and no odor in the stand.

Blue kneeling pad: Located between the ATO container and the electrical panel, it is good for old knees (not to mention quick prayer at times).

Electrical: Most of the electrical is on a panel on the right and the back wall. Includes an Apex controller with multiple peripherals, Gyre controller, DC pump for refugium controller, battery backup that powers Gyre and fuge pump. More on that later.

R2R Towel: Far from least, the orange R2R towel that is perfect for drips or a quick wipe.
 
OP
OP
Bruce60

Bruce60

Active Member
View Badges
Joined
Oct 28, 2018
Messages
212
Reaction score
269
Location
Bloomsburg, PA
Rating - 0%
0   0   0
Water flow.jpg

How does the water flow through the stand? Hopefully this will help. Flow through the sump follows the blue arrows. Flow through the skimmer pink arrows and flow through the refugium green arrows. The gray dotted lines represent the water levels in various sections (return is the only area where the level will vary based on evaporation).

The tank has a center overflow and return since its viewable from all four sides. The overflow is a single 1-1/2" hose that empties into the sock compartment on the left rear. All the water flows into and through the single sock (if you use one). The chamber is also more than large enough to mount the probes (pH, Temp, Salinity, ORP).

The water then travels down the right angle from the sock compartment to the baffle/return compartment. The water travels down through the initial compartment into the baffle. The skimmer is plumbed into this section with water drawing into the skimmer pump from the lower bulkhead and returned to the section through the upper bulkhead. There is also plenty of room and baskets to place carbon or other materials in this section.

From there the water travels through the baffle into the return section. I originally had a Maxspect Duo pump feeding the dual 3/4" returns however, the pump was not able to generate the flow rates I desired. So, I replaced the Duo with a pair of Apex COR-20's. I actually was intending to purchase the COR-15's but in asking a question of the Neptune Systems people I learned that you are not supposed to power two COR-15's through the iLink ports on the Power Bar, as that can exceed the maximum power draw. [I could not find that anywhere in Neptune's documentation and the PB does have three iLink ports-and I subsequently learned that others do successfully run two COR-15's through the PB]. Sigh, so I have two return pumps that never go over 40% power and two extra power bricks that I didn't need adding heat to the stand.

Also in the return section is a smaller pump that feeds the refugium through a 1/2" hose you can see looping over from one compartment to the other in the rear of the stand. The water returns from the fuge through the 1-1/2" hose that makes for a great towel holder. The fuge has an additional small pump for water flow in the fuge. The ATO feeds into the return section. I currently manually dose additives into the baffle section where there is excellent flow between the sump flow and skimmer flow, but am considering adding some dosing pumps at some point.
 
OP
OP
Bruce60

Bruce60

Active Member
View Badges
Joined
Oct 28, 2018
Messages
212
Reaction score
269
Location
Bloomsburg, PA
Rating - 0%
0   0   0
I am upping my game with this 360 degree video around the entire tank. First time making, recording a voice over and uploading a video to YT.


Please enjoy!!
 
OP
OP
Bruce60

Bruce60

Active Member
View Badges
Joined
Oct 28, 2018
Messages
212
Reaction score
269
Location
Bloomsburg, PA
Rating - 0%
0   0   0
Yes, I ran across the Concealment Column in my research. the 3" black PVC pipe contains the 1-1/2" overflow drain and two 3/4" returns, with little room to spare. But so much better than the 8" by 8" overflow box I was contemplating for separate bulkheads instead of one large one.
 

Gedxin

Valuable Member
View Badges
Joined
Jun 11, 2021
Messages
1,004
Reaction score
2,345
Location
SoCal
Rating - 0%
0   0   0
Amazing setup and beautiful livestock with the 4 side view! I also appreciate the stand water flow and descriptions. Gives me some ideas for my next tank.
 

Algae invading algae: Have you had unwanted algae in your good macroalgae?

  • I regularly have unwanted algae in my macroalgae.

    Votes: 18 34.0%
  • I occasionally have unwanted algae in my macroalgae.

    Votes: 11 20.8%
  • I rarely have unwanted algae in my macroalgae.

    Votes: 4 7.5%
  • I never have unwanted algae in my macroalgae.

    Votes: 5 9.4%
  • I don’t have macroalgae.

    Votes: 14 26.4%
  • Other.

    Votes: 1 1.9%
Back
Top