Breezy's 200g Adventure

BreezyMM

Active Member
View Badges
Joined
Jul 29, 2020
Messages
195
Reaction score
342
Location
Baton Rouge
Rating - 0%
0   0   0
I bought this tank off of Craigslist about a year ago and It has been sitting in my garage ready to be setup. Due to Covid, my wife and I are both now working from home until the end of this year so we decided to invest some money into converting our garage into a home office. The idea immediately popped into my head that I could now have a fish room! Here are a few pictures of the tank, stand, and canopy. The canopy has a hinge that allows me to open and close it for access to the tank. The dimensions are 72" L x 24" W x 26" H.


IMG_20200723_142257.jpg
IMG_20200723_142307.jpg
IMG_20200723_142325.jpg


The tank is in our dining room and my garage is right on the other side of the wall. The plan is to plumb the tank through the wall and into the garage so that all of the sump equipment would be easily accessible for maintenance and also to cut out the noise. Also the garage has a major benefit, the concrete is at a slight angle so any sump overflow issues would naturally drain towards the garage door and out to the driveway instead of on the carpet. As soon as I got my sump in, I quickly realized that I would have to build a stand to account for the slope in the garage.

IMG_20200715_090449.jpg
IMG_20200715_090501.jpg
IMG_20200715_090307.jpg


As you can see I had to cut a long taper in the stand in order to level the sump. It is not perfect as there is a small gap in the middle but it is solid and level. I had also drilled my first hole just to help position the sump. The sump is a Triton 44 v2. The dimensions are 44" L x 16" W x 15" H. I decided to go with blue pipe to match the sump and I wanted it to look nice since I have a good view of the sump from my computer desk.

IMG_20200719_174306.jpg
IMG_20200719_174333.jpg
IMG_20200719_174401.jpg


I had to cut and paint 2x4s to use with the standoffs since the pipe was sitting a few inches off of the wall due to the schedule 80 elbow. Also, I messed up a bit and drilled the holes a little too close together vertically so was I not able to fit unions on the two long pipes. Also, I was using paper tower to wipe off excess glue/primer while fitting pipe and ended it making it look a bit worse. At this point I was short 1 bulkhead so I had to dry fit the emergency drain until I could get the fittings I need.
 
OP
OP
BreezyMM

BreezyMM

Active Member
View Badges
Joined
Jul 29, 2020
Messages
195
Reaction score
342
Location
Baton Rouge
Rating - 0%
0   0   0
Got the emergency drain plumbed in and one of the return lines. Shortly after I got it all glued I remembered about the extremely expensive check valves that I bought but forgot to put in.

IMG_20200724_182739.jpg
IMG_20200724_182750.jpg


IMG_20200724_182838.jpg
IMG_20200725_082545.jpg


I had to cut the pipe out and redo it. While I was at it put in a union.
IMG_20200725_112649.jpg


I based my second return on the BRS 160 and put in a manifold to run a carbon reactor. I also ran the pipe all the way across and put in another ball valve. My idea here is I can put a garden hose attachment and run the hose underneath the garage in order to perform small water changes.

IMG_20200725_130745.jpg
IMG_20200725_130800.jpg


Bonus Mistake: I drilled into a stud (the stud was in a odd place and I was confident so I didn't use a stud finder)

IMG_20200725_082517.jpg
 
OP
OP
BreezyMM

BreezyMM

Active Member
View Badges
Joined
Jul 29, 2020
Messages
195
Reaction score
342
Location
Baton Rouge
Rating - 0%
0   0   0
Lots of updates: Plumping Overflow, Leak Check, Dedicated Electrical

I purchased a 7 stage 75 GPD RO/DI system from BRS about a year ago in preparation for this project. I just recently unboxed it and did a temporary set it up under my sink to fill up my tank. It is hooked up to a hose that I added awhile back that I used for a chiller when brewing beer. I didn't have the line on a float switch or anything so for safety I decided to not run it overnight or when I could not monitor it. In total it took about 4 days to fill the tank. After the tank was filled and I had the return pumps running I was very happy to not have any leaks.

IMG_20200726_131319.jpg
IMG_20200726_133913.jpg


The overflow is a standard bean animal with two returns.

IMG_20200725_161439.jpg
IMG_20200725_161443.jpg


After I had the tank running the trickle pipe was still about 1" below the weir and the water dripping down the overflow was making more noise than I was comfortable with. I drained the overflow and pulled out the trickle pipe plumping to raise it a bit higher to stop the noise. Also, I had originally glued the tee to the trickle pipe after it was inserted in the overflow so I had to actually cut the pipe out because I could not rotate it 360 degrees inside of the overflow. I added a union to the pipe so I didn't have to deal with this in the future.

I was originally concerned with the height of the trickle pipe being so close to the water level but was assured that this should not be a problem: https://www.reef2reef.com/threads/bean-animal-trickle-pipe-height-question.744256/#post-7781398

I was also a little concerned with the emergency being so close to the water line and I wanted the line to be dry and not have any water go down it unless the other two were clogged. Instead of pulling it out of the overflow and redoing it, I cut a coupling in half and put it on the top. This added about 1/8" height which was perfect.

IMG_20200803_093807.jpg


I also had an electrician come by and install a dedicated gfci breaker and two wall outlets specifically to run my sump equipment. I just currently have the heater and pumps hooked up but I will eventually build a panel to mount all of the controllers and hide the wires. The return pumps are both Tunze and are rated for 750 gph. There were included when I originally purchased the tank. I have not measured the flow but I am guessing I am getting only about 3-4x turnover because of head pressure and my plumping has several 90 degree elbows. I eventually want to replace them with DC pumps specifically because these are a bit louder that I want. I will be able to re-purpose them for a saltwater mixing station or something. The heater is a old Eheim that I had. I will also eventually replace this with something new once I start putting livestock in the tank.

IMG_20200803_093354.jpg
 
OP
OP
BreezyMM

BreezyMM

Active Member
View Badges
Joined
Jul 29, 2020
Messages
195
Reaction score
342
Location
Baton Rouge
Rating - 0%
0   0   0
Small Update: Cooking Rock, Aquascape planning

I currently have a 75g fish only tank with 2x banggai cardinals, 2x pajama cardinals, 2x clowns, yellow tang, and a mini maxi. It has been running for about 3 years:
MVIMG_20191027_172613.jpg


I want to reuse the rocks and sand in the new tank but I don't want to remove too much filtration before I can transfer the fish. I removed about half of the rocks form this tank and put them into the cooker. I had some cyano problems on a few of the rocks so I want to kill as much of it as possible before I add the rock to the new tank. Going to cook the rocks for a few weeks.

IMG_20200803_094151.jpg


In the meantime. I ordered about 50 pounds of dry marco rock, 120 pounds CaribSea Seaflor special grade sand, and a 24" XL CaribSea arch. I debated a long time about the arch because it was so expensive. I'll try to give a good faith review when it comes in for everyone interested. I also debated going with Tropic Eden Reeflakes but I checked a few times over a month and they were always sold out.

Tip: The cheapest seaflor special grade sand I found was from petsmart (If you sign up to be a member you even get free shipping)
 

Mastiffsrule

Where ever you go, there you are, so be nice 2 you
View Badges
Joined
Feb 10, 2019
Messages
8,440
Reaction score
33,571
Location
Charlotte
Rating - 0%
0   0   0
Evening,

Great find off Craigslist. Looks fairly new. Plumbing came out nice. What are you using for lighting on this? Everything from the 75 eventually going over to this one?
 
OP
OP
BreezyMM

BreezyMM

Active Member
View Badges
Joined
Jul 29, 2020
Messages
195
Reaction score
342
Location
Baton Rouge
Rating - 0%
0   0   0
Evening,

Great find off Craigslist. Looks fairly new. Plumbing came out nice. What are you using for lighting on this? Everything from the 75 eventually going over to this one?

Thank You! I have done a little bit of plumbing in the past but this was by far the most ambitious. I can actually talk a little bit intelligently to people about this now. I know what a bushing is! haha.

When I bought the tank the guy gave me some of his old equipment as well which included return pumps, power heads, lights etc. The lights are 2x Aquatic Life T5 4 bulb 36". Basically a older model of this:

1598275989134.png


They are programmable and have a blue and white setting which I think should be sufficient. I recently bought a mounting kit and they are currently handing from my canopy. I have a write up planned for alot of that. I also have a write up planned for the my RODI install and aquascaping / sand but I just need to get to it hehe. I eventually want to get some LEDs to go along with them. Lighting is soo expensive so it might have to come later.

I am planning on moving everything over to the new tank. I can't want to get to the point and I can start buying new fish and corals. I have been planning this project for about a year and a half so I have not bought any new livestock since then.
 
OP
OP
BreezyMM

BreezyMM

Active Member
View Badges
Joined
Jul 29, 2020
Messages
195
Reaction score
342
Location
Baton Rouge
Rating - 0%
0   0   0
I guess it’s safe to say work is going to be enjoyable in that garage! Nice build!

Thank you very much. Yes the sump in the garage right next to my "office" is very nice. I find myself thinking about my todo list while blankly staring at the sump during the day. I put office in quotes since my son decided that he loved to hang out here as well and has started taking over. I will post pictures of it soon!
 

revhtree

Owner Administrator
View Badges
Joined
May 8, 2006
Messages
47,770
Reaction score
87,275
Rating - 100%
1   0   0
Congrats! I like that sump stand you built there!
 
OP
OP
BreezyMM

BreezyMM

Active Member
View Badges
Joined
Jul 29, 2020
Messages
195
Reaction score
342
Location
Baton Rouge
Rating - 0%
0   0   0
Update: RODI Install

I had several ideas of where to install the RODI system. I originally wanted to install it in the laundry room but my wife veto'd that idea since she has plans to install shelving in the future. After some research and inspiration from other posts on reef2reef I decided to run all of the tubing through the attic and install it right next to the sump which is a very good spot for a future mixing station.

So I started cutting holes in the wall again:
IMG_20200801_155228.jpg


A trick I do to fish wires through thick insulation is to use a toilet pipe snake. It is sturdy enough to jab through but flexible enough to be able to bend it around a bit. The plan is to run two RO tubes through the attic and and tap into the washer machines cold water and drain.

I used a normal electrical box and a cable decorator face plate to make it look a lot better than just coming out of the wall or the ceiling. I had purchased a bunch of tubing on sale from BRS but it was all white so I marked the fresh water line with blue tape.

IMG_20200801_162518.jpg
IMG_20200801_162532.jpg


Running it in the attic was the literal worst. It was the middle of summer and the attic is probably 95 degrees. I had to work in cramped spaces with tons of insulation and drill through double layered 2x4's to get to the wall cavity in one area.

IMG_20200802_152842.jpg


I mounted the RODI system using standard drywall mounts.

IMG_20200801_171230.jpg
IMG_20200801_171648.jpg


I plumbed it in a way that I could turn on the RO part and have all of the output drain into the waste line until the TDS starts to stabilize, then I can open the last value and have it run into the DI part to save a bit of the DI resin.

IMG_20200802_184129.jpg


IMG_20200802_184136.jpg


I've already used this setup for two water changes and it has been very convenient. I am temporarily using a large storage tub to make and mix the water then I pump it directly into my sump when the temp and salinity are good. My plan is to eventually get some large 30-50 gal water storage contains and a dedicated pump for a easy mixing station and so I can always have RO water on hand.

At this point I have been running the tank for about 5 weeks after adding the live rock / sand to the new tank and the parameters have been testing 0 Ammonia, 0 Nitrite, and .2 Nitrate for 2 weeks. I have already transferred over the livestock from the old tank and everything is going well. I have a write up and pictures planned for the rock work and tearing down the old tank but I wanted to show off what it currently looks like because I am pretty pumped about how it turned out. Im just extremely behind on writing this stuff up.


IMG_20200822_153423.jpg
 
OP
OP
BreezyMM

BreezyMM

Active Member
View Badges
Joined
Jul 29, 2020
Messages
195
Reaction score
342
Location
Baton Rouge
Rating - 0%
0   0   0
Update: Aquascape

I purchased about 50 pounds of marco rock and a few pieces of Caribsea rock. I wanted to build a stand alone island on the left side of the tank since I have about a 270 degree viewing angle. I wanted to be able to have a good view from the front and from the side. For this structure I used epoxy on almost all of the pieces.
IMG_20200726_131410 (1).jpg
IMG_20200726_131336 (1).jpg
IMG_20200818_160009.jpg


The right side of the tank I went with the traditional rockwall. It built it using most of the rocks from my old tank and the 24" XL arch from CaribSea. The arch was a mixed bag, I got really frustrated with it. From almost every angle, it looked like a perfect arch and not at all natural. All of the positions I was able to get it stable didn't look good at all. The position I eventually went required 2 additional people to hold it in place for 15 minutes while epoxy cured enough for it to be stable. Another issue was that it is very heavy and the left point of it was directly on the glass bottom. I put a small piece of acrylic on the bottom of it to distribute the weight a bit. Ultimately I am very happy how it came out though I could have saved a ton of money by just using marco rock and doing it myself.

IMG_20200818_160031.jpg


Not much to say about the sand. I used CaribSea Seaflor. Rinsed it well and mixed in a bit of sand from my old tank.


IMG_20200818_160014.jpg
IMG_20200818_160024.jpg


This is the final result:


IMG_20200822_153423.jpg
 
Last edited:

SteveMM62Reef

Valuable Member
View Badges
Joined
Sep 21, 2020
Messages
2,241
Reaction score
1,433
Location
La Plata
Rating - 0%
0   0   0
I have that same BRS RO/DI, was time to buy some new sediment cartridges, so I bought the 150 gallon upgrade. Using a booster pump set at 75psi, I can produce 200 gallons per day, with a lot less waste water.
 
OP
OP
BreezyMM

BreezyMM

Active Member
View Badges
Joined
Jul 29, 2020
Messages
195
Reaction score
342
Location
Baton Rouge
Rating - 0%
0   0   0
I have that same BRS RO/DI, was time to buy some new sediment cartridges, so I bought the 150 gallon upgrade. Using a booster pump set at 75psi, I can produce 200 gallons per day, with a lot less waste water.

Nice! I am considering getting booster pump. My psi is normally around 50 but I have seen it drop to 40 before. How often do you have to change out the resins/filters? I'm not sure what my house water is but the TDS is around 5-6 right before the DI stage. I made about 400g so far and none of the resins look slightly used.
 
OP
OP
BreezyMM

BreezyMM

Active Member
View Badges
Joined
Jul 29, 2020
Messages
195
Reaction score
342
Location
Baton Rouge
Rating - 0%
0   0   0
Update: Old Tank Breakdown

After I tested 3 weeks of good parameters in the new tank I decided it was time to breakdown the old tank and transfer the fish to the new setup. I had already scavenged most of the rock and about half of the sand to seed the new tank.

IMG_20200812_163827 (1).jpg


At this point I needed to figure out how I was going to drain the tank. In the past, I just used a sand vacuum to do water changes and it was not too bad. Using a syphon with a 1/4" line was going to take all day to pump out 75 gallons of water. I came up with this 200 IQ solution:


Since then I have purchased a cheap fountain pump from Lowe's and about 30' of 1/2' tubing to help with the large water changes for the 200g.

In doing this I made a pretty big mistake, I decided to do this on my lunch break (I am currently working from home). The plan was to drain the tank and then clean the rest up after work. After the tank was drained, the entire house smelled like fish waste. My wife (who is also working from home) demanded that I take a half day and finish what I started.

Just imagine the smell
IMG_20200820_134547.jpg


I got all of the sand and shells scooped out. Moved the tank outside and soaked the tank and all of the equipment in a vinegar bath for about a week.

IMG_20200822_104735.jpg
IMG_20200822_104727.jpg


All Clean

IMG_20200822_120802.jpg
 
OP
OP
BreezyMM

BreezyMM

Active Member
View Badges
Joined
Jul 29, 2020
Messages
195
Reaction score
342
Location
Baton Rouge
Rating - 0%
0   0   0
Update: First Coral

So for about 2 months I got lazy and decided not to post here. Most of my previous descriptions are in the past tense. After this post, I think I will have finally caught up with everything. I purchased a leather toadstool from my LFS around the beginning of September. Here are some progression pictures from Sept to October.

First added to the tank 9/4/2020
9-4-2020.jpg
9-4-2020_1.jpg


9/21/2020
9-21-2020.jpg
9-26-2020.jpg


10/9/2020
10-9-2020.jpg
10-9-2020_1.jpg
 
OP
OP
BreezyMM

BreezyMM

Active Member
View Badges
Joined
Jul 29, 2020
Messages
195
Reaction score
342
Location
Baton Rouge
Rating - 0%
0   0   0
It has been awhile since I updated (like 2 years) but I wanted to share the terrors I just got for the (new) frag tank. The tang is slightly under a half inch.


20220809_175906.jpg
20220809_175915.jpg


Drill bit for scale.
20220809_143601.jpg
 
OP
OP
BreezyMM

BreezyMM

Active Member
View Badges
Joined
Jul 29, 2020
Messages
195
Reaction score
342
Location
Baton Rouge
Rating - 0%
0   0   0
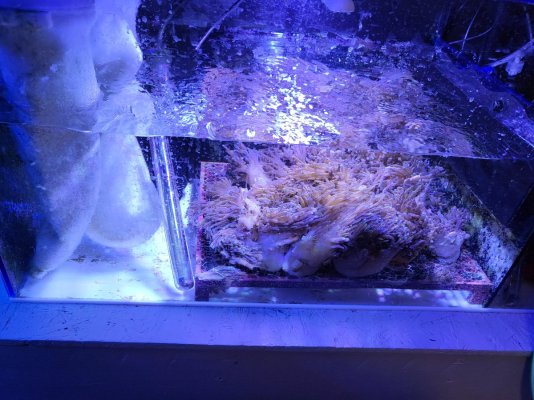
Cespitularia Refugium:

20230901_165634.jpg
20230901_165623.jpg


20230901_165641.jpg


This coral was completely taking over my frag tank. I pretty much cannot sell anymore at my LFS and not much interest around my area so I am going to use them as nutrient removal. Added a powerhead + waterproof full spectrum light. Much prettier than sump full of hair algae.
 

High pressure shells: Do you look for signs of stress in the invertebrates in your reef tank?

  • I regularly look for signs of invertebrate stress in my reef tank.

    Votes: 27 34.6%
  • I occasionally look for signs of invertebrate stress in my reef tank.

    Votes: 20 25.6%
  • I rarely look for signs of invertebrate stress in my reef tank.

    Votes: 12 15.4%
  • I never look for signs of invertebrate stress in my reef tank.

    Votes: 19 24.4%
  • Other.

    Votes: 0 0.0%
Back
Top