A stand plan and a tricky little corner

Brew12

Electrical Gru
View Badges
Joined
Aug 14, 2016
Messages
22,488
Reaction score
61,034
Location
Decatur, AL
Rating - 0%
0   0   0
Admittedly I haven't really thought about doors for this idea but hinges for recessed Euro style cabinets would work. This puts the beam straight under the tank without a whole lot of extra lumber cluttering up the corners. Still get your shelf and extra 6" of floor space front to back in the bottom.

60x30standunderV2.png
I'm loving this idea. Much better.

Aren't joist hangers like that designed for outdoor use though, and would therefore be somewhat hardy? Would it make a difference to coat it with clear coat or something similar to protect it from all the moisture? Redundant to set the joist in the hanger, and then add a few screws to really hold it in place in case the hanger gives out?

Guys, I really appreciate all your advice! Thank you!

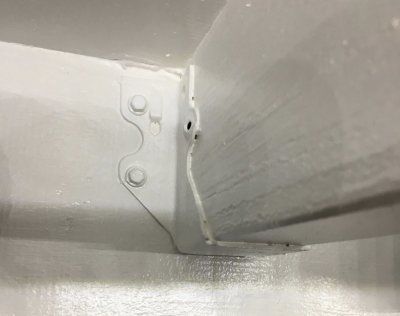
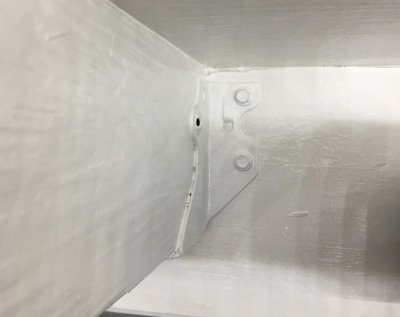
They are for outdoor use, but not for the salt spray environment that can exist in our sumps. I used Flex Seal (rubberized paint) to coat everything inside my stand. This includes the fasteners. Otherwise, it will rust out eventually.
 

don_chuwish

Smells something fishy
View Badges
Joined
Mar 21, 2012
Messages
3,013
Reaction score
3,386
Location
A better place
Rating - 0%
0   0   0
Admittedly I haven't really thought about doors for this idea but hinges for recessed Euro style cabinets would work. This puts the beam straight under the tank without a whole lot of extra lumber cluttering up the corners. Still get your shelf and extra 6" of floor space front to back in the bottom.

Thinking about it some more (can you tell I enjoy this stuff?) I worry about the comment that @SallyWho made about wanting to stand on it. That unsupported plywood makes a great shelf but not a great step. Might want to run a 2x4 across there, or even just 3/4" plywood about 5" wide.
What I keep railing against design wise is maximizing internal space, minimizing lumber, and making it easy to build accurately. It can actually be tricky to keep everything perfectly square and plumb when cutting and assembling these things.

About the joist hangers, time will tell, but at the 11 month mark:
fullsizeoutput_3ae4.jpeg fullsizeoutput_3ae5.jpeg
 
Last edited:
OP
OP
SallyWho

SallyWho

Well-Known Member
View Badges
Joined
Jul 20, 2017
Messages
765
Reaction score
570
Location
SW Missouri
Rating - 0%
0   0   0
Thinking about it some more (can you tell I enjoy this stuff?) I worry about the comment that @SallyWho made about wanting to stand on it. That unsupported plywood makes a great shelf but not a great step. Might want to run a 2x4 across there, or even just 3/4" plywood about 5" wide.
What I keep railing against design wise is maximizing internal space, minimizing lumber, and making it easy to build accurately. It can actually be tricky to keep everything perfectly square and plumb when cutting and assembling these things.

About the joist hangers, time will tell, but at the 11 month mark:
fullsizeoutput_3ae4.jpeg fullsizeoutput_3ae5.jpeg
Roger that, on adding a 2x4 to shore up the extra space so it can bear my weight during maintenance! Do you have any tips on making sure everything stays perfectly square and plumb when I cut and assemble all this? I have a speed square, and the saw I'll be using has a laser to help me keep the blade on track so I don't accidentally cut anything on an angle.
 

don_chuwish

Smells something fishy
View Badges
Joined
Mar 21, 2012
Messages
3,013
Reaction score
3,386
Location
A better place
Rating - 0%
0   0   0
All the cuts should be square, no miters, so the saw set at 90 should be good. But always check it before starting - cut something and put a square on it. Adjust the saw if needed. Push it through the wood slowly - too fast can make the blade flex. HEARING PROTECTION.
As you assemble things, don't rely on just the little speed square - measure corner to corner on things. When I was assembling my top and bottom 'ladder' frames they wanted to pull out of square even though the cuts were perfect (drove me NUTS). So I used long clamps to pull at opposing corners to bring it into square, then screwed down scrap plywood as bracing. Then put the plywood top on the other side, construction adhesive and screws. A nail gun to tack things in place quickly helps, then you can go around with screws without worrying about it moving.
 
OP
OP
SallyWho

SallyWho

Well-Known Member
View Badges
Joined
Jul 20, 2017
Messages
765
Reaction score
570
Location
SW Missouri
Rating - 0%
0   0   0
Darn it. I was going to get started on this after the next pay period, but I just found out I have to have surgery next month. Looks like I'm going to have to put it off until I find out how much surgery is going to cost me. :/ But thanks for helping me to get this right, guys! Once I have the money, I'll be ready to get this stand built!
 

Brew12

Electrical Gru
View Badges
Joined
Aug 14, 2016
Messages
22,488
Reaction score
61,034
Location
Decatur, AL
Rating - 0%
0   0   0
Darn it. I was going to get started on this after the next pay period, but I just found out I have to have surgery next month. Looks like I'm going to have to put it off until I find out how much surgery is going to cost me. :/ But thanks for helping me to get this right, guys! Once I have the money, I'll be ready to get this stand built!
Ouch! Take care of yourself, the tank can wait!
 

Algae invading algae: Have you had unwanted algae in your good macroalgae?

  • I regularly have unwanted algae in my macroalgae.

    Votes: 48 34.8%
  • I occasionally have unwanted algae in my macroalgae.

    Votes: 29 21.0%
  • I rarely have unwanted algae in my macroalgae.

    Votes: 11 8.0%
  • I never have unwanted algae in my macroalgae.

    Votes: 10 7.2%
  • I don’t have macroalgae.

    Votes: 36 26.1%
  • Other.

    Votes: 4 2.9%
Back
Top