Another Oceanic 144 half circle

OP
OP
Mkeller088

Mkeller088

Active Member
View Badges
Joined
May 17, 2019
Messages
146
Reaction score
174
Location
Jensen Beach Fl
Rating - 0%
0   0   0
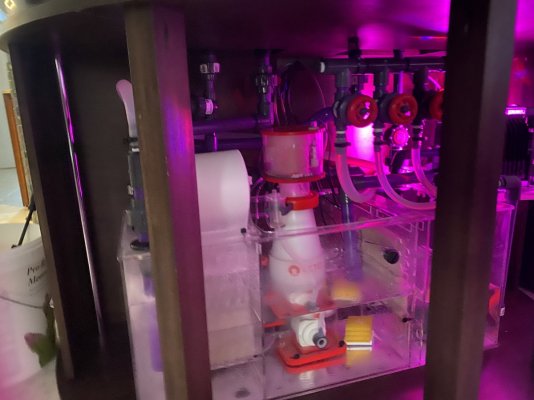
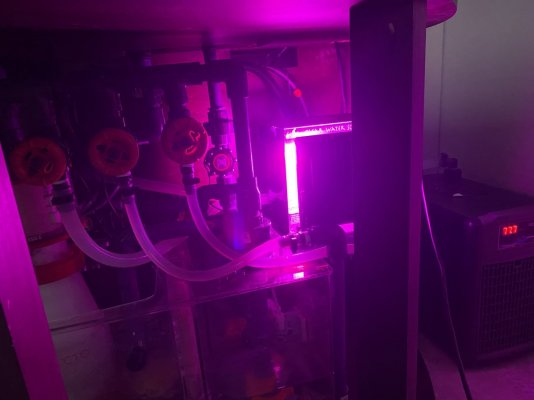
Stand is almost ready. Maple top and bottom, pecan supports and back wrap around. Did the sump, scrubber and UV fitting today. Top and bottom will be veneer added 3 inches of depth for more room
3323DB6B-E707-4FE6-BBD6-FD9EBFDC9E37.jpeg
88C99C32-DEBE-494F-81CE-7C6ACA5778E3.jpeg
6206ACBF-80FE-418C-BC2A-58AB763364CE.jpeg
24C96FDA-63E0-4F8F-856F-097743338863.jpeg
 

spfahnestock

Active Member
View Badges
Joined
Feb 27, 2020
Messages
224
Reaction score
310
Location
Ashtabula, Ohio
Rating - 0%
0   0   0
Stand looks amazing. I have been thinking of how I will do mine and the placement in the house. I am leaning towards a standard rectangle stand to have additional room underneath for equipment.
 
OP
OP
Mkeller088

Mkeller088

Active Member
View Badges
Joined
May 17, 2019
Messages
146
Reaction score
174
Location
Jensen Beach Fl
Rating - 0%
0   0   0
Stand looks amazing. I have been thinking of how I will do mine and the placement in the house. I am leaning towards a standard rectangle stand to have additional room underneath for equipment.
That’s why I added 3 inches of depth. I want to be able to slide my sump in and out of the left side, the stock stand is a 14 inch opening most stumps are 15 inches nowadays.
 
OP
OP
Mkeller088

Mkeller088

Active Member
View Badges
Joined
May 17, 2019
Messages
146
Reaction score
174
Location
Jensen Beach Fl
Rating - 0%
0   0   0
The stand is done. Custom hole for UV bulb replacement on the top. 2 holes in the side for the chiller. Piano hinged door for gettin the sump in or out easily I love it.
F4F8B1B4-EC58-4E1C-A155-62BB351926AC.jpeg


0C383324-6215-46F5-B9F5-94C725726FF0.jpeg F6811B89-4C60-4675-9518-C0E78D148549.jpeg
 
Last edited:

spfahnestock

Active Member
View Badges
Joined
Feb 27, 2020
Messages
224
Reaction score
310
Location
Ashtabula, Ohio
Rating - 0%
0   0   0
@Mkeller088 not trying to hijak your thread but I have a question on how you will be plumbing your tank. Are you going to bring your return lines up the back and over the lip of the tank?

I have the same tank and just took a good look at the overflow boxes. I originally thought there were three holes but turns out there are only two holes per side.
 
OP
OP
Mkeller088

Mkeller088

Active Member
View Badges
Joined
May 17, 2019
Messages
146
Reaction score
174
Location
Jensen Beach Fl
Rating - 0%
0   0   0
PLUMBING
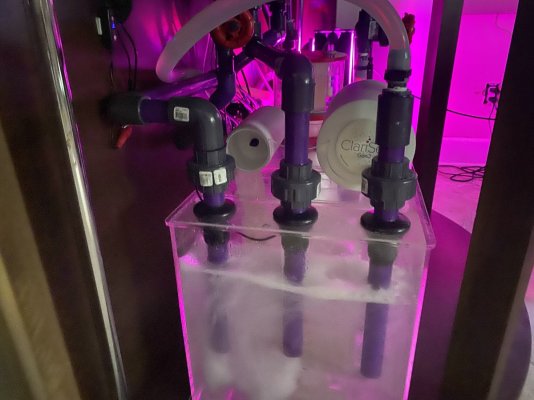
Durso’s. Straight return up the right side with flow sensor.
Drains are in, left side has an overflow dump valve. I’m sitting here trying to figure out if I need that. The more I ponder, the more I think I’ll get rid of it. To be continued. Next, the manifold, scrubber and UV.
7BB00789-D730-4379-A0D8-642AB73DD52E.jpeg
D2BD9E9E-9C45-468F-8072-7EAB9125C0E6.jpeg
91925D26-1B0E-4CCE-9529-470431783310.jpeg
28EF0EF2-2A6D-4D70-97D9-1065495BB447.jpeg
 
OP
OP
Mkeller088

Mkeller088

Active Member
View Badges
Joined
May 17, 2019
Messages
146
Reaction score
174
Location
Jensen Beach Fl
Rating - 0%
0   0   0
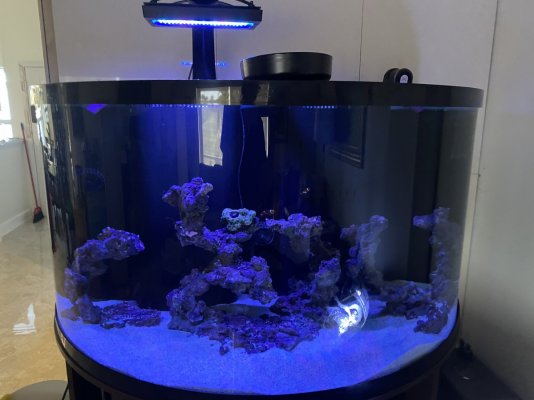
No leaks, 4 fish in, I couldn’t be happier. This was a learning experience I really have enjoyed. Curved wooden doors for the stand are next. This build was a blast.
780102F1-3643-44D9-97D9-18C30FA137E8.jpeg
3B2F6F46-D0F2-446F-9204-98CEF7AB1918.jpeg
 

Attachments

  • 564A9575-FD2A-42FE-9FC5-40918B9F4CB9.jpeg
    564A9575-FD2A-42FE-9FC5-40918B9F4CB9.jpeg
    187.3 KB · Views: 26
  • 0055784D-B736-45BC-9C08-681F0FE1EA26.jpeg
    0055784D-B736-45BC-9C08-681F0FE1EA26.jpeg
    153.3 KB · Views: 33
  • E56D03C2-AB2F-4941-B03B-EECD101820B3.jpeg
    E56D03C2-AB2F-4941-B03B-EECD101820B3.jpeg
    87.5 KB · Views: 31
  • 61B482E3-27CE-42F2-8D6D-D6D329B83EB2.jpeg
    61B482E3-27CE-42F2-8D6D-D6D329B83EB2.jpeg
    130 KB · Views: 33

spfahnestock

Active Member
View Badges
Joined
Feb 27, 2020
Messages
224
Reaction score
310
Location
Ashtabula, Ohio
Rating - 0%
0   0   0
Tank is up and running and so far so good. Lights will be turned off after today (I really wanted to see it up and going).

The only task left is to set up my auto doser. I want to have this handle the microbactor dosing and then transition "as needed" to other items.

Let the cycle begin.

144.jpg
 
OP
OP
Mkeller088

Mkeller088

Active Member
View Badges
Joined
May 17, 2019
Messages
146
Reaction score
174
Location
Jensen Beach Fl
Rating - 0%
0   0   0
Tank is up and running and so far so good. Lights will be turned off after today (I really wanted to see it up and going).

The only task left is to set up my auto doser. I want to have this handle the microbactor dosing and then transition "as needed" to other items.

Let the cycle begin.

144.jpg
Very nice!!
 

reefofsteele88

New Member
View Badges
Joined
Mar 31, 2022
Messages
1
Reaction score
0
Location
destin
Rating - 0%
0   0   0
I don’t recommend trying it. Especially on a curved tank. Many years of experience is a must. I’ve tried to train people, and distorting the glass is always a problem the first year. Heat must be monitored, feathering is a must, constant movement, start and stop on the glass not before or after.....so many nuances. If you need one done, let me know.
I have a 144 oceanic and def need some scratch removed
 

Being sticky and staying connected: Have you used any reef-safe glue?

  • I have used reef safe glue.

    Votes: 76 86.4%
  • I haven’t used reef safe glue, but plan to in the future.

    Votes: 6 6.8%
  • I have no interest in using reef safe glue.

    Votes: 3 3.4%
  • Other.

    Votes: 3 3.4%
Back
Top