Build Thread

atruex

Community Member
View Badges
Joined
Jan 25, 2022
Messages
45
Reaction score
35
Location
Star
Rating - 0%
0   0   0
Alright, let's see how this goes. I figure it would be cool for my future self (hopefully) to document my tanks progress, and what better place, than somewhere where I can receive feedback/thoughts, and maybe help a future newbie out. This will be my first ever reef tank, and I am going into it with the hope that spending enough money/time means I will be successful.

After a lot of thought and consideration for the room I have available downstairs in my house, along with some convincing of the wife, I have everything ordered. Let's go.


Tank:
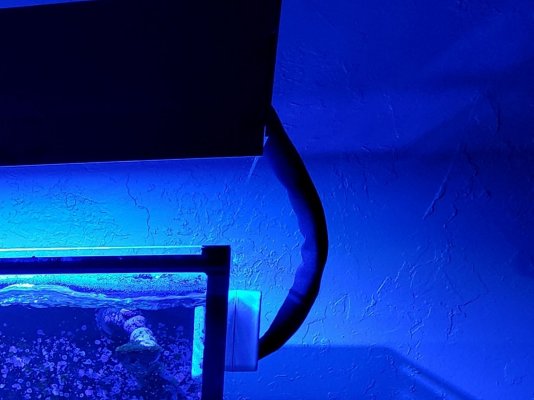
Red Sea Reefer 200XL (wish it was a bit bigger, but I got to work with the space I have)

Filtration:
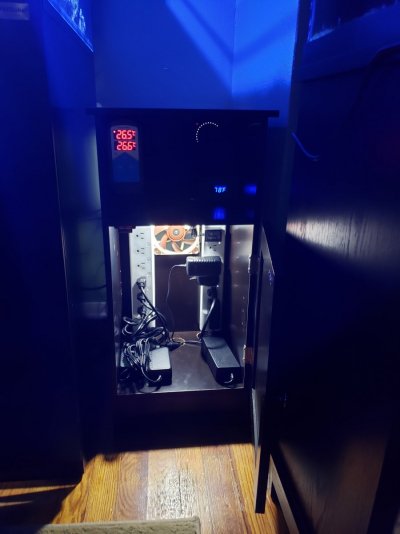
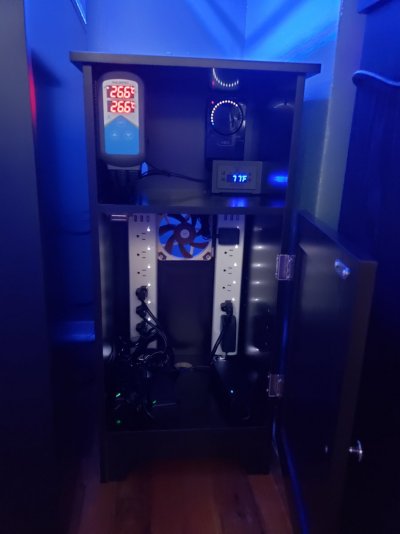
Return pump - One Neptune COR 15
Skimmer - Red Sea Reefer RSK-300
Heaters - 200 Watt Titanium
Flow - (2) Ecotech Mp10

Lighting:
Display - Ecotech Radion Gen 5 XR-15 Pro

Control:
Neptune Apex system
Neptune DOS system for dosing and automatic water change.
Neptune Trident system
Neptune ATK system
 
OP
OP
atruex

atruex

Community Member
View Badges
Joined
Jan 25, 2022
Messages
45
Reaction score
35
Location
Star
Rating - 0%
0   0   0
To catch everyone up on where I am at currently. I received the tank about a week ago. The week prior I took a 5 hour round trip to Twin Falls, ID to pick up a used Trident, Radion XR15 Pro w/ mount, RODI, 2x DOS pumps, and some misc plumbing. Since then I acquired everything else. I have gotten my plan set, my mixing station mostly set up, and the tank put together.

The tank should fit nicely in this corner. I was debating a bigger one, and putting it upstairs in my office. I figured placing it on hard floor, where we spend the majority of our time would be best.
20220119_003118.jpg


I drilled several holes into my walls, one going from where the tank is placed, to my pantry and from there, straight back, under my stairs, and to the garage where I have my water station set up. Using a rod, I fished string, and kept enough slack on both sides so I could easily route cables/tubing back and forth.

20220115_204136.jpg


I tapped my RODI unit into the cold water inlet for my water heater using a saddle valve. I am not satisfied with the saddle valve. It does not provide much pressure to my RODI, and I think I overtightened it, as there is a very small leak coming from the valve. I will need to fix this here soon I am sure... Would be interested to see anyone else's water heater/RODI solution.

20220116_172606.jpeg


I also got two brute trash cans, installed a water level detector, float valves, and some valves to allow me to drain either if needed. In my salt container, I have some cheaper power heads that I will be able to use to help mix the salt. I need to find an easy way to transfer my RODI water into the salt container, I have a cheap spare pump so will likely use that to transfer.

I also still need to clean up all of the tubing. My garage has no drain, so I ran the drain line outside, installed a Y and will use this drain line for my auto water changes as well. Hoping once everything is put together, it will be easier to clean up all of the dangling tubes and cables.

20220123_185805.jpg


I got the light installed, this is going to look awesome once I get some livestock in there. I know I'll likely need to remove it when I put the rock in, but I couldn't wait to see it.

20220119_204638.jpg


Also got my ATO container built. This is just a 12 gallon dog food container that I made some modifications to. Not pictured, but I also got my ATK installed in here. The Reefer 200 comes with a glass 1 gallon top off container that goes into the sump. I installed my ATK to fill that tank up, as I am not sure if I will have enough room in my return chamber to fit the ATK.

20220123_151711.jpg


Cords still a mess, wonder what people usually use for cable management in here?

20220124_220244.jpg


That catches everyone up to where I am now, up next is building a control board so my pantry doesn't look like a complete mess all the time. Updates to come, but if anyone has any thoughts/feedback up to this point, it would be greatly appreciated!
 

thatmanMIKEson

Reefing ain't easy$
View Badges
Joined
Jan 10, 2021
Messages
4,974
Reaction score
5,004
Location
florida
Rating - 0%
0   0   0
This is my latest electrical cabinet, it works great and a good way to keep the water away from your electrical, i tidy up cords with neoprene sleeves, they fit multiple cords then zip up.
 

Attachments

  • 20220119_174611.jpg
    20220119_174611.jpg
    99.5 KB · Views: 67
  • 20220119_170633.jpg
    20220119_170633.jpg
    79.8 KB · Views: 56
  • 20220125_230910.jpg
    20220125_230910.jpg
    133.3 KB · Views: 64
OP
OP
atruex

atruex

Community Member
View Badges
Joined
Jan 25, 2022
Messages
45
Reaction score
35
Location
Star
Rating - 0%
0   0   0
This is my latest electrical cabinet, it works great and a good way to keep the water away from your electrical, i tidy up cords with neoprene sleeves, they fit multiple cords then zip up.
That looks great. I am hoping to build something similar that will fit on one of my pantry shelves. Did you find the installed fan to be necessary? Was curious if mashing together all that stuff in an enclosed case would cause issues.

Ordering those sleeves now. Do you use the same sleeves to manage cables in your sump?
 

thatmanMIKEson

Reefing ain't easy$
View Badges
Joined
Jan 10, 2021
Messages
4,974
Reaction score
5,004
Location
florida
Rating - 0%
0   0   0
That looks great. I am hoping to build something similar that will fit on one of my pantry shelves. Did you find the installed fan to be necessary? Was curious if mashing together all that stuff in an enclosed case would cause issues.

Ordering those sleeves now. Do you use the same sleeves to manage cables in your sump?
Yes the fan is necessary for me, its Temperature controlled. I added one to my first cabinet after the fact. This one i built in first with no hesitation, with all the power bricks in a small space its surprising how hot it gets I have it turn on @92° and off @ 85°, I am an I.T guy and keeping those components from over heating will make them last.

I use those sleeves for most of my wires its easy to add a new wire just unzip, and they have different sizes if you get the exact size you need it looks really good. Between those and the velcro wire wrap it will clean things up!
 
OP
OP
atruex

atruex

Community Member
View Badges
Joined
Jan 25, 2022
Messages
45
Reaction score
35
Location
Star
Rating - 0%
0   0   0
Yes the fan is necessary for me, its Temperature controlled. I added one to my first cabinet after the fact. This one i built in first with no hesitation, with all the power bricks in a small space its surprising how hot it gets I have it turn on @92° and off @ 85°, I am an I.T guy and keeping those components from over heating will make them last.

I use those sleeves for most of my wires its easy to add a new wire just unzip, and they have different sizes if you get the exact size you need it looks really good. Between those and the velcro wire wrap it will clean things up!

Yeah, that's a good idea. What controller are you using for the fan? I have done similar things with arduino/pis before, but I assume there's already something out there.

Thanks for the help! Will update this thread once I get it made
 

thatmanMIKEson

Reefing ain't easy$
View Badges
Joined
Jan 10, 2021
Messages
4,974
Reaction score
5,004
Location
florida
Rating - 0%
0   0   0
Yeah, that's a good idea. What controller are you using for the fan? I have done similar things with arduino/pis before, but I assume there's already something out there.

Thanks for the help! Will update this thread once I get it made
I use this controller by coolerguys and they have fans also but its a 3 pin controller but accepts 3 or 4 pin fans. I just use a random fan I have..

Coolerguys Thermal Fan Controller (Rev. 4)


This is the one I actually bought but might as well save 14$

Coolerguys Programmable Thermostat Fan Controller Kit for Standard 3pin Fans
 
OP
OP
atruex

atruex

Community Member
View Badges
Joined
Jan 25, 2022
Messages
45
Reaction score
35
Location
Star
Rating - 0%
0   0   0
I use this controller by coolerguys and they have fans also but its a 3 pin controller but accepts 3 or 4 pin fans. I just use a random fan I have..

Coolerguys Thermal Fan Controller (Rev. 4)


This is the one I actually bought but might as well save 14$

Coolerguys Programmable Thermostat Fan Controller Kit for Standard 3pin Fans

Thank you. Just ordered. Will be able to make use of the random fans I have lying around
 

Sean Clark

7500 Club Member
View Badges
Joined
May 16, 2019
Messages
8,055
Reaction score
31,574
Location
Michigan
Rating - 0%
0   0   0
Nice setup so far. I like your water level indicators on the Brute cans and the white one. Smart. Following along.
 

thatmanMIKEson

Reefing ain't easy$
View Badges
Joined
Jan 10, 2021
Messages
4,974
Reaction score
5,004
Location
florida
Rating - 0%
0   0   0
Thank you. Just ordered. Will be able to make use of the random fans I have lying around
There you go.

I have been using furniture grade cabinets from homedepot or Walmart for the electrical cabinet and that makes them more appealing to place next to the aquarium, and if big enough they can be dual usage, for house hold things or stuff you don't want to put under the aquarium and they just look like a piece of furniture when closed up. Sometimes that will fly with the significant other better than taking up her pantry ;) lol, good luck im following along

(Edit) that spot in front of the receptacle, the aquarium is plugged into would be great for a cabinet, or long bench with storage...just an idea
 
OP
OP
atruex

atruex

Community Member
View Badges
Joined
Jan 25, 2022
Messages
45
Reaction score
35
Location
Star
Rating - 0%
0   0   0
There you go.

I have been using furniture grade cabinets from homedepot or Walmart for the electrical cabinet and that makes them more appealing to place next to the aquarium, and if big enough they can be dual usage, for house hold things or stuff you don't want to put under the aquarium and they just look like a piece of furniture when closed up. Sometimes that will fly with the significant other better than taking up her pantry ;) lol, good luck im following along

(Edit) that spot in front of the receptacle, the aquarium is plugged into would be great for a cabinet, or long bench with storage...just an idea
lol!

Great idea. It is not visible in that picture, but the couch is just barely cut out. It would sadly block up the walk way right there (I would have otherwise got a larger tank). I was able to luck out on the pantry space so I must go that route. I would prefer having it isolated to a cabinet for sure, my house layout is just sort of strange.
 
OP
OP
atruex

atruex

Community Member
View Badges
Joined
Jan 25, 2022
Messages
45
Reaction score
35
Location
Star
Rating - 0%
0   0   0
Nice setup so far. I like your water level indicators on the Brute cans and the white one. Smart. Following along.
Thank you! I am filling one with RODI now!

I took this coming Monday off in hopes that I can get everything finished, get my aquascape built, and start my cycle.

... As I typed that I realized I will probably not be able to finish all of that on Monday...
 
OP
OP
atruex

atruex

Community Member
View Badges
Joined
Jan 25, 2022
Messages
45
Reaction score
35
Location
Star
Rating - 0%
0   0   0
Figured an update is due.. As I thought, I was not able to get anywhere close to "done" this week, so my eyes are set on this weekend for beginning my cycle. I did however complete my mixing station, and I got my control box built into the pantry. I also have a plumber fixing the mistake I made when installing the saddle valve (screwed it to tight, d'oh!). Got the cables somewhat under control in the sump. There are just so many, for such a small space..


For my control board I just used some melamine from home depot, some cheap plastic grommets on amazon, and some rubber feet I had lying around so I didn't scratch the floor. I cut it as an "L" so I could pull it out and get back there easily if I need to. Cutting out the insert for the DOS was definitely the hardest part.


20220131_113642.jpg

20220131_160552.jpg


I don't love how it turned out, but it's better than a mess of parts and pieces, and will at least keep things hidden.
20220201_195902.jpg


Sump after some attempted cable management.
20220201_202731.jpg


20220202_155529.jpg
 
OP
OP
atruex

atruex

Community Member
View Badges
Joined
Jan 25, 2022
Messages
45
Reaction score
35
Location
Star
Rating - 0%
0   0   0
Things are starting to come together! I have my aquascape built, and I think I am ready to start the cycle! Sadly the LFS is out of the salt I want to run, and I need more DI resin to make more water. May try my luck at a different store this weekend.

The aquascape turned out okay. Hoping I have enough hiding spots and places for coral. Would love to hear others thoughts on it.

I first roughly set it up on a chair rolling mat
blue3.jpg


I then used some epoxy to solidify the contact points, and put it in the tank.
blue2.jpg

blue4.jpg

blue.jpg
 

Sean Clark

7500 Club Member
View Badges
Joined
May 16, 2019
Messages
8,055
Reaction score
31,574
Location
Michigan
Rating - 0%
0   0   0
I see that you used the tried and true "red solo cup" method.

Looks good. Maybe a little tight to the glass for cleaning from what I can see. I like the overall shape.
 
OP
OP
atruex

atruex

Community Member
View Badges
Joined
Jan 25, 2022
Messages
45
Reaction score
35
Location
Star
Rating - 0%
0   0   0
I see that you used the tried and true "red solo cup" method.

Looks good. Maybe a little tight to the glass for cleaning from what I can see. I like the overall shape.
haha yeah, the cup method worked great!

I am worried about cleaning, I ordered the flipper float. It has not gotten here yet, but I may need to adjust. I left ~1" on all the sides I will clean.
 

ID-Reefer

Active Member
View Badges
Joined
Oct 8, 2020
Messages
458
Reaction score
642
Location
Boise
Rating - 100%
1   0   0
Great build so far. Following along. Almost looks as though you had an experienced mentor giving you advice? ;).

As said above - can't tell from photos, keep a couple inches min between glass and rock so you can run your magnetic glass cleaners through. Eventually you may end up with a coral growing towards the glass as well. Something to consider. I have some SPS that has grown to and up my back glass but I don't clean my back glass so no biggie. Side glass especially glass you would be viewing from would likely be an issue and if rock work is to close it will quickly be covered with Coraline if you can't get a scraper over it.

Excellent start.
 
OP
OP
atruex

atruex

Community Member
View Badges
Joined
Jan 25, 2022
Messages
45
Reaction score
35
Location
Star
Rating - 0%
0   0   0
Great build so far. Following along. Almost looks as though you had an experienced mentor giving you advice? ;).

As said above - can't tell from photos, keep a couple inches min between glass and rock so you can run your magnetic glass cleaners through. Eventually you may end up with a coral growing towards the glass as well. Something to consider. I have some SPS that has grown to and up my back glass but I don't clean my back glass so no biggie. Side glass especially glass you would be viewing from would likely be an issue and if rock work is to close it will quickly be covered with Coraline if you can't get a scraper over it.

Excellent start.
Hey thanks, yeah I have been getting some good advice from this guy who promised me an endless supply of free corals! ;)

Yeah, will need to likely be careful of placing corals to close to the viewing glass. May have to take some rock out/break it for more room.
 
Back
Top