Clay's 75G Barebottom Build

killergoby

Community Member
View Badges
Joined
Jun 15, 2020
Messages
51
Reaction score
17
Rating - 0%
0   0   0
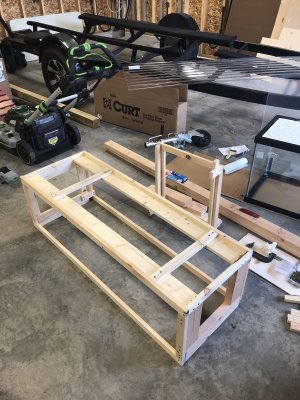
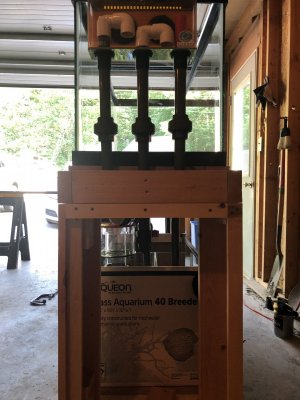
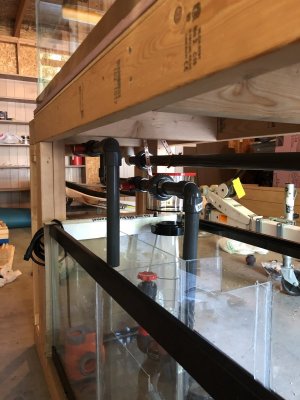
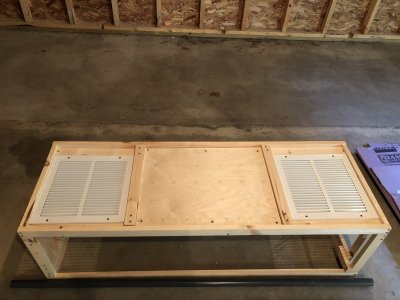
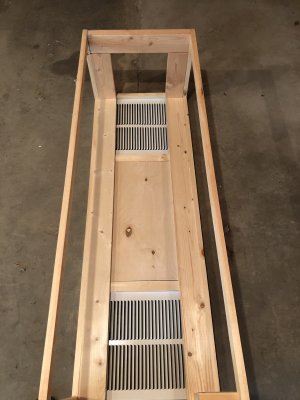
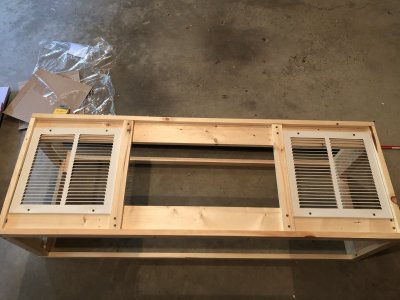
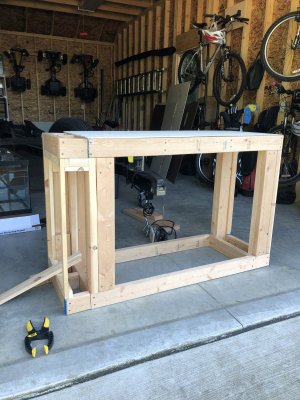
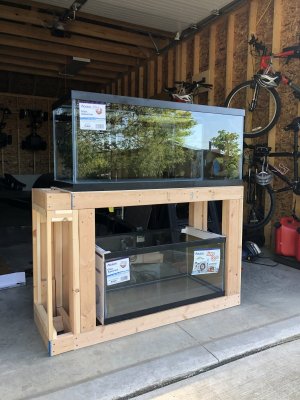
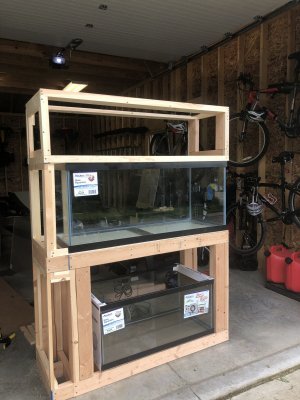
In the process of quarantining away from my aquarium, and in the very near future moving, I decided to build a new system for my fish/corals that will last at least the two years on my next lease. My fiancé is not completely on board with the idea of going bigger for the aquarium, so I convinced her that this new system will be about the same size as the current aquarium. Currently my tank has a bunch of hang-on equipment and a canister filter, and I feel like that is a bit of an eyesore and I've always wanted to switch it to a sump system with a refugium. So the system was designed to maximize the amount of water volume without impacting the footprint within the apartment. I went with a 75G display tank and a 40G sump. I built a stand to hold the aquarium top at my armpit level so that I can view easily and don't have to bend/lift my body to work with my hands in the tank. Additionally, since I've been building this at the house I grew up in (10 hours drive from my apartment) I wanted something I could fit (barely!) into my subaru. I decided on a 35" tall stand which gives me about 8" of height above the sump and the appropriate height of the 75G when the additional height elements such as under-tank foam are added to that height. I also will be going with an LED system and so I designed a tank stand which can work against the wall or as a peninsula, with parts of the stand to cover the piping and cords, as well as the LED fixture within the canopy.
IMG_6217.jpg 61334560961__5D5C579C-BF32-47C9-B017-640DD7346CCD.JPG 61343497228__F198395D-EC39-445C-9031-003447C38AED.JPG 61348820078__81EDAE26-924F-46DE-B171-37243FBD1BD0.JPG
 
OP
OP
killergoby

killergoby

Community Member
View Badges
Joined
Jun 15, 2020
Messages
51
Reaction score
17
Rating - 0%
0   0   0
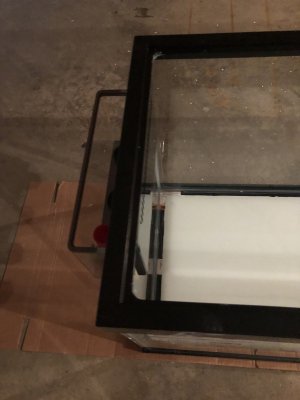
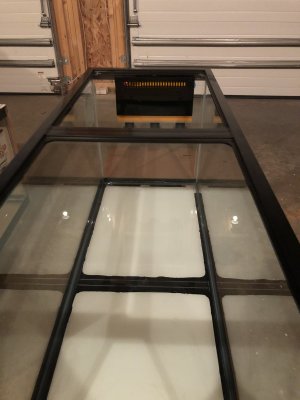
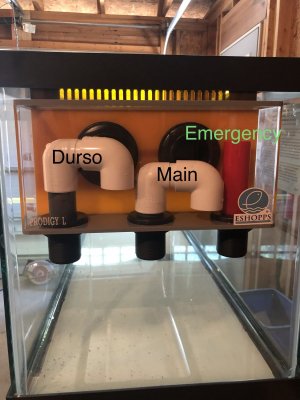
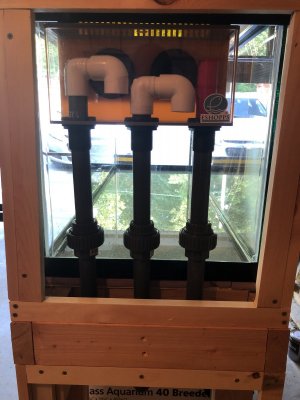
As for how the sump will work, I decided to go with an "overflow kit" rather than to build my own, as the new ghost overflows are simply far better than what I could manage myself, and they come with nice hole saws so that I don't have to worry about messing up. I went with the new Eshopps Prodigy Overflow (Large), which has two 1 1/4" overflow holes through the tank and three 1" overflow siphon pipes to go to the sump. I chose this because of the ability to build a bean animal plumbing design and so that I would be able to reuse the box by simply drilling new holes if i choose to upgrade tanks in a few years. Installation was simple and went very well. The overflow was a bit difficult to line up due to the black trim on my aqueon glass aquarium displacing the saw guide, but I managed to drill both holes with the right hole being only 1mm below the left. It will bother me until the end of time, but 1mm doesn't tip the box much at all over 12" of length and I honestly didn't notice until i was measuring it.

You'll also notice I've painted the bottom of the aquarium white. I plan on going barebottom and while I intend to grow corals over the entire bottom of the aquarium, this will keep aesthetics a bit closer to sand until I do so.

IMG_6246.jpg IMG_6247.jpg IMG_6264.jpg
 

RL6723

Active Member
View Badges
Joined
Mar 14, 2019
Messages
138
Reaction score
166
Rating - 0%
0   0   0
In the process of quarantining away from my aquarium, and in the very near future moving, I decided to build a new system for my fish/corals that will last at least the two years on my next lease. My fiancé is not completely on board with the idea of going bigger for the aquarium, so I convinced her that this new system will be about the same size as the current aquarium. Currently my tank has a bunch of hang-on equipment and a canister filter, and I feel like that is a bit of an eyesore and I've always wanted to switch it to a sump system with a refugium. So the system was designed to maximize the amount of water volume without impacting the footprint within the apartment. I went with a 75G display tank and a 40G sump. I built a stand to hold the aquarium top at my armpit level so that I can view easily and don't have to bend/lift my body to work with my hands in the tank. Additionally, since I've been building this at the house I grew up in (10 hours drive from my apartment) I wanted something I could fit (barely!) into my subaru. I decided on a 35" tall stand which gives me about 8" of height above the sump and the appropriate height of the 75G when the additional height elements such as under-tank foam are added to that height. I also will be going with an LED system and so I designed a tank stand which can work against the wall or as a peninsula, with parts of the stand to cover the piping and cords, as well as the LED fixture within the canopy.
IMG_6217.jpg 61334560961__5D5C579C-BF32-47C9-B017-640DD7346CCD.JPG 61343497228__F198395D-EC39-445C-9031-003447C38AED.JPG 61348820078__81EDAE26-924F-46DE-B171-37243FBD1BD0.JPG
Looking good!! Cant wait to see the stand skinned!
 
OP
OP
killergoby

killergoby

Community Member
View Badges
Joined
Jun 15, 2020
Messages
51
Reaction score
17
Rating - 0%
0   0   0
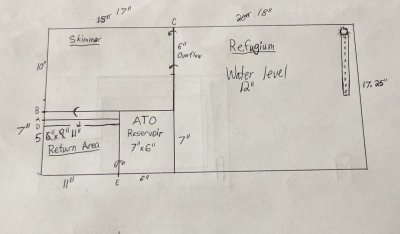
The sump design I kept very simple, only the three things I felt were most important: Refugium, Skimmer, ATO. I tried to minimize the space taken by the return pump and skimmer so that I could have the most area for the refugium possible. This was a mock up before I decided to move the wall over 2" to provide extra drain space for my oversized overflow. The dimensions are correct but it's not exactly to scale. I purchased a Reef Octopus 150INT as my skimmer and a COR15 pump as my return. Definitely overpowered but I decided to go with the high nutrients in, high nutrients out strategy with this tank as its way better to be able to feed more due to extra filtration capacity than have to limit how many critters I have. Also the COR15 works with the APEXel I already have on my current reef, and would easily scale to a larger system if necessary. I will have the main siphon dump into the skimmer portion, and the durso pipe running to the refugium for minimal throughput for the refugium compared to the overall sump throughput. Water flows from the refugium to the skimmer, then through a bubble trap to the return portion. ATO will go over the wall directly into the return portion and only contain about 2G of RO water (+ any additives I determine to schedule by adding to the top off water.

IMG_6232.jpg
 
OP
OP
killergoby

killergoby

Community Member
View Badges
Joined
Jun 15, 2020
Messages
51
Reaction score
17
Rating - 0%
0   0   0
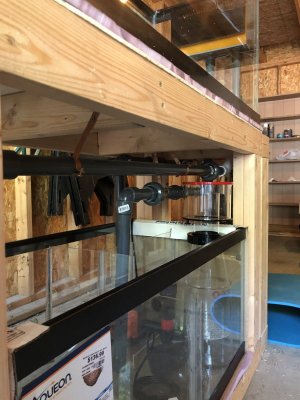
The plumbing for this tank was fairly simple, a return from the COR15 and three overflow drains from the Prodigy overflow box. I have the main siphon tube from the overflow running into the skimmer portion of the sump, the durso additional flow going into the refugium portion, and the emergency pipe suspended above the return portion so that if it has any flow through it I will hear the water hitting the surface. This way I will have flow through the refugium that is not determined solely by the flow rate of the return pump and I can have a slower area for pods and macro algae to develop. I used schedule 80 PVC for most of the plumbing and its all dry fit right now as I have to move the stand across the country and would rather seal it all at the final location than where I'm building it.

61369463160__0AC0436F-BEC1-440C-88CC-7924C2013946.JPG IMG_6275.jpg IMG_6274.jpg IMG_6276.jpg
 
OP
OP
killergoby

killergoby

Community Member
View Badges
Joined
Jun 15, 2020
Messages
51
Reaction score
17
Rating - 0%
0   0   0
It's been a while since I updated, I had to do multiple things higher priority on my list (including moving all my stuff), but the final half of the building phase is coming into fruition the next couple of weeks.
 
OP
OP
killergoby

killergoby

Community Member
View Badges
Joined
Jun 15, 2020
Messages
51
Reaction score
17
Rating - 0%
0   0   0
I finished the non-cabinetry work on the stand by adding venting to the roof of the canopy and waterproofing all the outer surfaces of the stand components. I used square vent fans from menard's so that I wouldn't have to see ugly light spill from the LED's but I could still have adequate gas exchange from within the tank canopy to the rest of the room.

61591371311__94732CF6-9A76-4DA6-AB56-B515DCA5603F.JPG 61591373851__9D259D53-A491-4850-812E-25A15C788161.JPG 61591094022__C270A4AF-18E9-43B1-B30D-BFE4A561B7D9.JPG
 
OP
OP
killergoby

killergoby

Community Member
View Badges
Joined
Jun 15, 2020
Messages
51
Reaction score
17
Rating - 0%
0   0   0
You may be wondering what exactly is going on with my previous aquarium system. At my former apartment I had a 40G system with a canister filter, Icecap 1k gyre, and an Apex that I planned on incorporating into this system. I was gone from the east coast since March but had a friend come into the apartment to check on things in May. Other than him topping off the evaporation and refilling the automatic feeder, no one had done anything to the aquarium from March 13th until the beginning of July. This would be a major concern for evaporation issues even with a 5G ATO, but thankfully the system was only a glass top and canister filter which returned much of the evaporated water back into the tank. However, no additives or additional food could be introduced to the aquarium and so besides the tiny contribution of the automatic feeder, the tank has been a closed system for 4 months. This obviously has resulted in some casualties, but how many? I didn't have a video set up for my apex so the only metrics to go off of were the probe readings and the word of my (non-reefkeeping) friend who said that there were a lot of fish still in the tank.
 
OP
OP
killergoby

killergoby

Community Member
View Badges
Joined
Jun 15, 2020
Messages
51
Reaction score
17
Rating - 0%
0   0   0
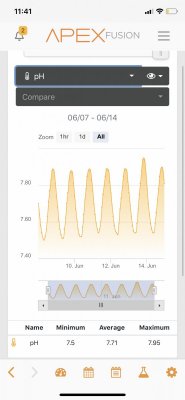
First, the information I had from my Apex for the 4 months away from the tank. Metrics remained outside of my planned normal range but after a number of weeks they finally "stabilized" to a specific range.

IMG_6322.jpg
 
OP
OP
killergoby

killergoby

Community Member
View Badges
Joined
Jun 15, 2020
Messages
51
Reaction score
17
Rating - 0%
0   0   0
My automatic feeder was set to feed 5 times a day what was essentially the tiniest pinch of food. For stocking I had 3 Dispar Anthias, 1 Blue Chromis, 1 Bicolor Blenny, 2 clownfish (1 Picasso clown and 1 discount picasso which lost the markings as he grew), 1 ORA Orchid Dottyback, and 1 Banggai Cardinalfish. Generally I would support this with planktonic or fish egg feedings twice daily and frequent water changes/algae removal for nutrient export.
 
OP
OP
killergoby

killergoby

Community Member
View Badges
Joined
Jun 15, 2020
Messages
51
Reaction score
17
Rating - 0%
0   0   0
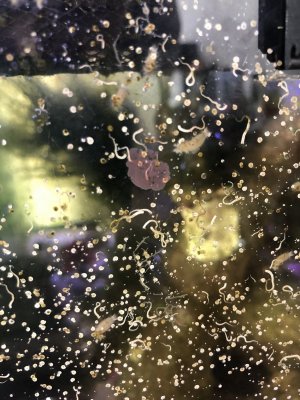
To my surprise on finally returning to my aquarium, the influx of food from the automatic feeder, along with other developments, kept them all alive and happy. The banggai cardinal is about doubled in size since I left. I am certain that the automatic feeder is not enough food for the anthias and the other inhabitants, so what was keeping them alive? Well with no nutrient export in the tank for 4 months, multiple things happened:
-The algae growth could begin uninhibited by cleaning/removal and with even more nutrients
-the tuxedo urchin decided to fully remodel, and with 4 months of time to dislodge them was able to move almost every frag/small coral to a new (sometimes upside down) location
-pulsing xenia which was isolated was no longer isolated and grew much better with a dirty tank
-amphipods and isopods proliferated like wildfire
-filter feeders sprung up all over glass and equipment

IMG_6326.jpg
 
OP
OP
killergoby

killergoby

Community Member
View Badges
Joined
Jun 15, 2020
Messages
51
Reaction score
17
Rating - 0%
0   0   0
It is clear that the dirty tank provided so much algal growth that my anthias and banggai cardinal have had a buffet of pods to feed on, as in a couple days of being back to observe, I have witnessed countless pods meet their demise in the day time.

 
Last edited:
OP
OP
killergoby

killergoby

Community Member
View Badges
Joined
Jun 15, 2020
Messages
51
Reaction score
17
Rating - 0%
0   0   0
Here are some additional isopod/amphipod videos. The corners where the sand meets the glass have the most shelter and growth of life inside the algae cover. Hydroids, flatworms, and mostly isopods/amphipods are easily hidden from any predation on the edges of the sand bed.
 
OP
OP
killergoby

killergoby

Community Member
View Badges
Joined
Jun 15, 2020
Messages
51
Reaction score
17
Rating - 0%
0   0   0
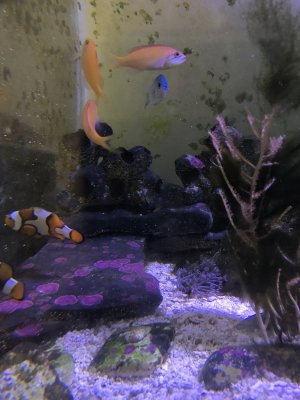
Here are about half the fish (anthias, chromis, clowns, blenny) in one shot, the bicolor blenny is in the barnacle rocks in the back. Not a clean tank, but one that is healthy enough to keep all non-corals alive for 4 months with no casualties.

61385127832__80A8157F-D79B-472D-BD2E-26DEC9111CBB.JPG
 
Last edited:
OP
OP
killergoby

killergoby

Community Member
View Badges
Joined
Jun 15, 2020
Messages
51
Reaction score
17
Rating - 0%
0   0   0
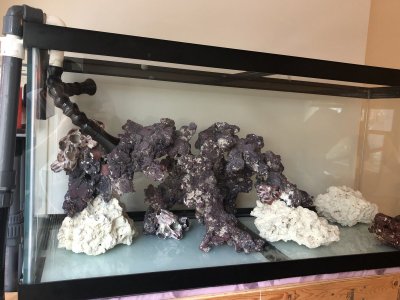
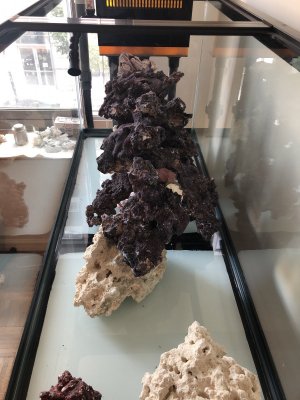
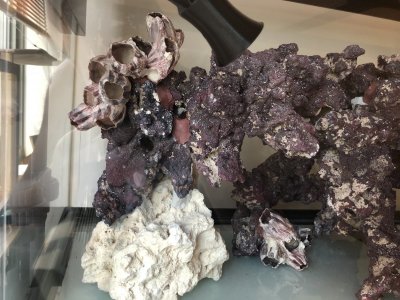
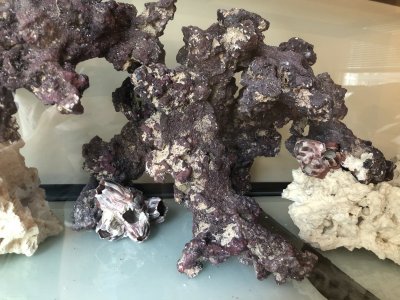
As for the new tank, I have begun building the aquascape. I want a SPS island that takes up 2/3 of the space, and then my LPS can go lower towards the far end of the tank.

This is built with all the new rocks, and the old tank live rock will go into building the LPS structure and into the sump/fuge. I will have my branching/plating acros and montis on the top of this structure once the tank has progressed to that stage. I used epoxy and recessed acrylic rods to adhere the structures together, using a 1/2" masonry drill bit to make the holes for the acrylic rods. I tried to space out the barnacle structures this time since all the anthias and my blenny always fight over them.

61670526198__08BF9C10-CB1B-48E7-BC8A-51C974339BB2.JPG 61670555819__1BEB3B49-4667-496E-AD05-BE32ADB1B134.JPG 61670527094__C3065D8C-BFE2-422E-B17E-D2E7DA7EB380.JPG 61670527839__4B0BF652-D6C1-408A-8632-522833E5A79D.JPG
 
Back
Top