Oh! Thats Loki, he is a white eye moray. He is the biggest goofball and his eyes make him look even goofier! Great eel and this purple head and speckled body really has brightened since I got him as a baby! Here is a better picture of him
What type of rock are you working with? Manmade, Marco, Australian, FL Gulf boulders, dry rock that has been bacterial cycle completed?
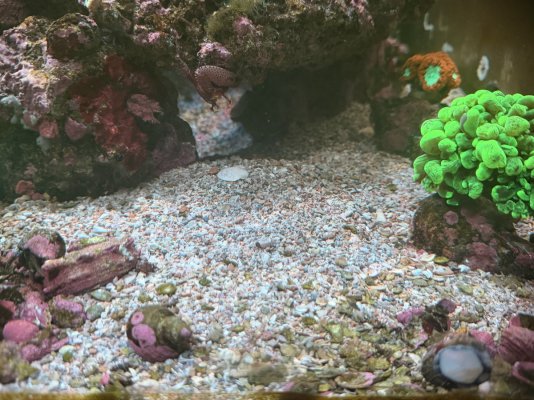
I just started my new system 3 months ago ( the display). I started cycling my old dry rock collection at the beginning of April with several steps taken over 6 months.
As the tank was filling, I started adding the rock and sand in stages.
The first bit ( the basement) of rock to go in was a combo of flat cut Marco style rocks with manmade frag plug mounts inverted to use as footings. This raised the flats about an inch off of the glass. Next I added all of the sand in which was a combo of reef grade and Fiji Pink.
This lower level was to create a steady foundation for my main scape and to give a protected living area for some burrowing fish/prawn couples without the worry off toppling aquascaes.
Next came the main scape. This was created with old Haitian live rock that had been dry for years before the six month cycle. I did a blind scape as the water was cloudy from the sand being added. This rock is porous, leafy and easy to lock together in some cool shapes without glue.
Tank was a bit of an insta-cycle and added a few fish within a few days. And then let it do its thing without any additions for 2 months.
I’ve had the heavily glued/cemented scapes in my past three displays and won’t go that route again. It locks you in to a fixed setting and the pieces get extremely heavy both from water absorption and coral growth. All three times, the rocks had this cool bonsai look but that all disappears as the corals grow in. Hopefully…
I have been reefing for just over 25 years and have always found that strategic stacking fits my style a bit better. Of course you want to leave your scape as intact as possible, but to have the ability to shift things if needed helps a ton. Also moving whether it be tanks or into a new home, being able to pull individual rocks can be a bit safer for your corals.
This was the “blind” scape I ended up with. This is the next morning and still a little cloudy
This was a few days ago. A little rearranging was done about three weeks ago to give a bit more dimension. Also created a shelf behind the structure on the left. Just got added this week, hence why it’s so white. Used some Tunze magnets and it is free floating from the main island. Hope is to maybe inhabit a ritteri nem and keep it off of the main structures.
Love these scapes, but I’ve labeled myself as an “expert overstocker” so not sure this would work for sleeping/hiding places for my 18 fish. It is beautiful though. Love the concept and how the whole room goes together along with the tank.
Totally fair, and thanks! I will say, these rocks are a honeycomb of small hiding places that work well for the many small fish I have, and there are some bigger tunnels and spaces built in too but once I went from two angels up to four larger fish with a fox face and tang, there definitely was conflict over enough sleeping spaces. So I think you are right on that front.
In my case I added some more stacked rocks behind the built structures to create a few more options without blocking the look I was going for. But even then I would characterize what I have as 'just enough ' caves and sleeping areas for a relatively few large benthic fish.
Tradeoff is more swimming space for the chromis and tang.
I used glue cement more glue more glue more cement there's some good tutorials on I think it was BRS YouTube and my buddy showed me how to do it all and I had to go high vertically to cover the center feed stacking would definitely not have worked in my situation can't wait to get some corals attached to them coming soon
I played around with tidal gardens method of gluing rock on some of my scape and I was happy with how it turned out!
I used a medium gel super glue and fine aragonite sand out of the water. Made a very firm bond for me.
Here are some images of my aquascape add on. Think it turned out nice. I’m happy with it.
This is the only glued together structure in my reef. It essentially let me turn some smaller nano sized pieces into a two piece interlocking cave rock.
Here is when I added rock to my scape for more coral space.
What type of rock are you working with? Manmade, Marco, Australian, FL Gulf boulders, dry rock that has been bacterial cycle completed?
I just started my new system 3 months ago ( the display). I started cycling my old dry rock collection at the beginning of April with several steps taken over 6 months.
As the tank was filling, I started adding the rock and sand in stages.
The first bit ( the basement) of rock to go in was a combo of flat cut Marco style rocks with manmade frag plug mounts inverted to use as footings. This raised the flats about an inch off of the glass. Next I added all of the sand in which was a combo of reef grade and Fiji Pink.
This lower level was to create a steady foundation for my main scape and to give a protected living area for some burrowing fish/prawn couples without the worry off toppling aquascaes.
Next came the main scape. This was created with old Haitian live rock that had been dry for years before the six month cycle. I did a blind scape as the water was cloudy from the sand being added. This rock is porous, leafy and easy to lock together in some cool shapes without glue.
Tank was a bit of an insta-cycle and added a few fish within a few days. And then let it do its thing without any additions for 2 months.
I’ve had the heavily glued/cemented scapes in my past three displays and won’t go that route again. It locks you in to a fixed setting and the pieces get extremely heavy both from water absorption and coral growth. All three times, the rocks had this cool bonsai look but that all disappears as the corals grow in. Hopefully…
I have been reefing for just over 25 years and have always found that strategic stacking fits my style a bit better. Of course you want to leave your scape as intact as possible, but to have the ability to shift things if needed helps a ton. Also moving whether it be tanks or into a new home, being able to pull individual rocks can be a bit safer for your corals.
This was the “blind” scape I ended up with. This is the next morning and still a little cloudy
This was a few days ago. A little rearranging was done about three weeks ago to give a bit more dimension. Also created a shelf behind the structure on the left. Just got added this week, hence why it’s so white. Used some Tunze magnets and it is free floating from the main island. Hope is to maybe inhabit a ritteri nem and keep it off of the main structures.
48x24x16” display. Approximately 80 gallons. I’m not sure the weight of the rock. I’ve had it in my yard for years. It’s very porous so I’d guess it’s less than it appears. Maybe 100lbs ? Really guessing. It’s been a long time since I weighed rock.
I used to buy it by the box and don’t remember the weight on them. I’d say this is 2.5 boxes.
How are you liking the TBS live sand? Any chance you could post a closeup photo of it? The photo on their website looks like it is pretty dark and has lots of shells in it (which is not the look I'm after) but your sandbed looks very nice in that photo!
Also, how many lbs of live sand in what size tank is that?
I redid one of my Australian live rock structures yesterday. I mostly relied on stacking and jig sawing but I also needed to use some expoxy and glue. This structure can be pulled apart into 10+ smaller pieces:
I redid one of my Australian live rock structures yesterday. I mostly relied on stacking and jig sawing but I also needed to use some expoxy and glue. This structure can be pulled apart into 10+ smaller pieces:
I previously had a Marko Rock aquascape that filled up more of the tank. Interestingly this scape seems to provide more hiding spaces despite consisting of less rock. The way I guage things I check out the tank late at jgith with the lights off. Now all the fish have some place to sleep / hide. Previously I had 2-3 chromis who hid in the corners of the tank at night. I presume they prefer the rockscape. I believe this is because of the structure of the rock pieces which are essentially dead SPS skeleton which provides a lot of nooks and crannies to hide between.
Aquascape sparingly in the display tank. I'd stack it in the water and use two-part epoxy putty to stabilize the structure. Remember two things: 1) The rock is just a place to put corals; and 2) All of the rock doesn't have to be in the display tank.
I'd put all of the live sand and much of the live rock in the sump and overflow partitions. Leave lots of room in the display tank for fish and corals.
Some of the joints that can be made with superglue, epoxy or reef cement are stronger than the rock itself. If a joint fails that is human error and not the fault of the epoxy or reef cement Inside the tank there aren’t sharks swimming around banging into the rock work after all—if there were then stacking wouldn’t work let alone reef cement.
I started with all live rock and sand from TBS. I just moved stuff around underwater and glued some pieces together but mostly just let the puzzle pieces fit together. Attached are pictures of my scape. Hope that’s helpful.
As the time draws very close, I’m getting ready to prepare for my live goods this week, I need to know how long or how resilient my live rock is.
How long can I fiddle with it for scaping? Do I need to scape it in water or can I sit and glue them together outside? If so, how long do I have? If I need to scape live rock in the water, what kind of adhesive should I use???
Totally normal to stress about this right before live goods.
If it’s truly “live” rock (arrived wet/damp and smells like the ocean), you can absolutely scape it outside of water, you just don’t want it drying out. I’d work in short rounds and keep it covered with wet paper towels and/or hit it with a saltwater spray bottle. In a normal room, you’re generally fine doing 30–60 minute sessions as long as it stays damp. The longer it’s exposed, the more die-off you risk, which can mean an ammonia bump later.
Best way to do it with minimal risk is a tote/bin of heated saltwater with a powerhead. Keep most rock in the bin and pull pieces out one at a time to test fit and glue, then back in the bin while you adjust the next piece. That keeps everything wet, warm, and oxygenated.
Adhesive-wise: thick CA gel superglue + reef epoxy putty is the easiest combo. CA gel works great for “tacking” and epoxy fills gaps; together they hold way better than epoxy alone. If you’re building a big structure and want it rock-solid, a reef mortar (Marco/E-Marco style) is strongest, but it’s messier and you’ll want to do that in a bin, not in the display.
One more tip: if you’ll ever keep a pistol shrimp, make sure your base rocks are stable (preferably on the bottom glass, sand around them), because they can undermine sand-supported stacks.
Quick question that changes the answer a lot: did your rock show up dry, damp wrapped, or actually submerged in water?