Somewhat Unique RedSea Reefer 525 G2+ Build

slingfox

Well-Known Member
View Badges
Joined
Mar 22, 2023
Messages
589
Reaction score
447
Location
Northern California
Rating - 0%
0   0   0
After several years of hesitation I have finally decided to join the reef aquarium hobby. I blame Youtube for pulling me into this potential money pit! One night I found myself watching a video about traveling to Japan to buy high end koi fish. The koi pond videos led me to freshwater planted tanks and then to salt water reef videos.

I first started planning for an aquarium four years ago but abandoned the effort multiple times for various reasons. Since then I have thought about and decided against keeping an aquarium since the hobby looked too complicated and costly. A few months ago I finally decided to dive in after walking along the shoreline of the hobby for years.

When I start a hobby, I go deep and hard. This is one reason I was afraid to start but here I am!
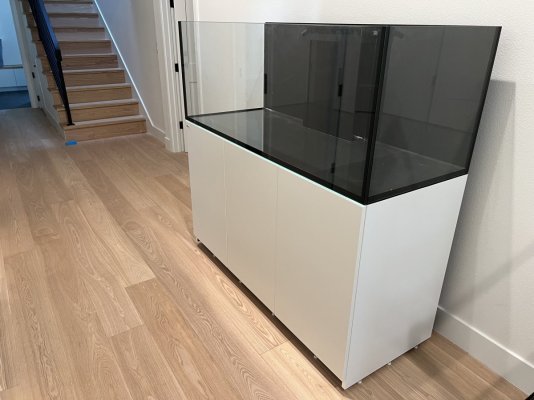
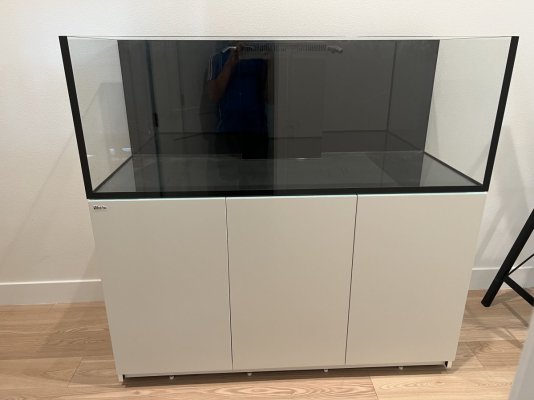
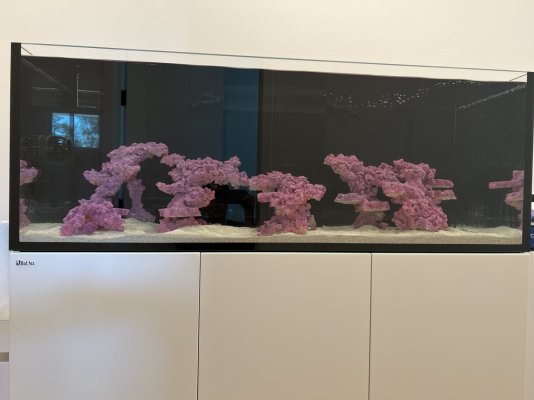
For my first tank build I have decided to build a RedSea Reefer G2 525. This is a 59 inch wide tank with a 112 gallon display and 31 gallon sump. Here is my equipment. If you have any suggestions please let me know!

Theme
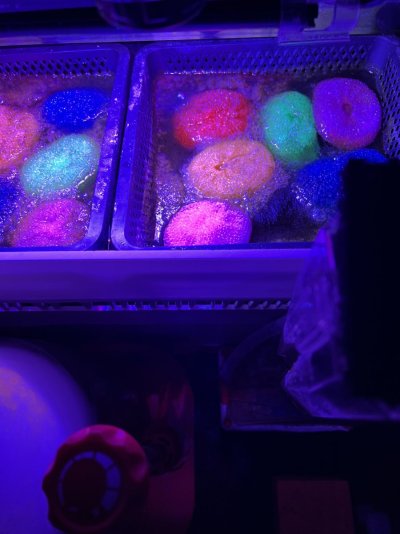
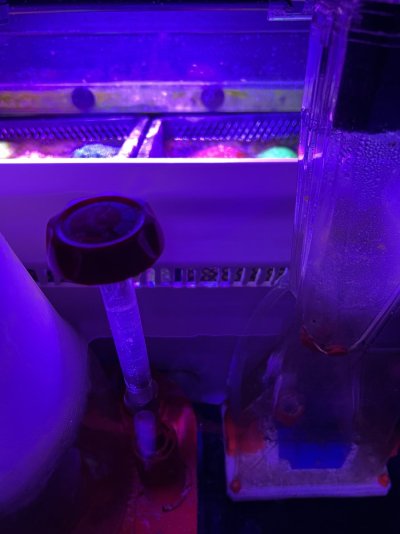
  • Mixed reef with strong emphasis on SPS coral and small to medium sized fish
  • 1" sandbed using CaribSea Special Grade Live Sand
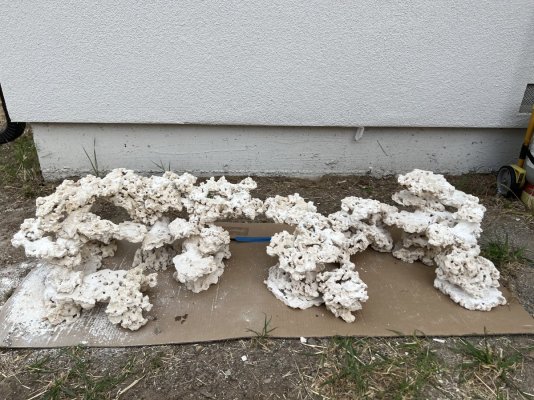
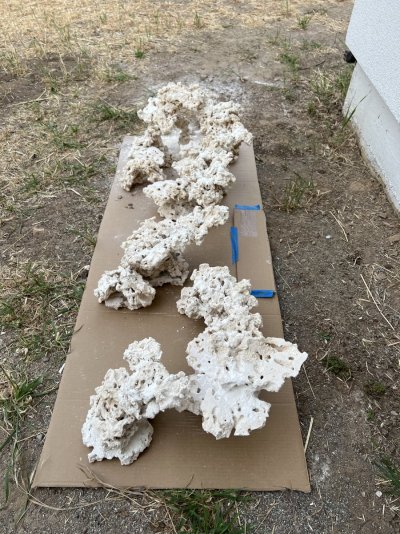
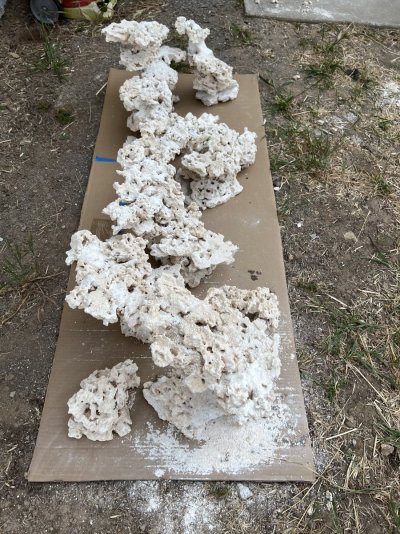
  • Aquascape to be built using Marco rocks, super glue from Gluemasters, and Marco mortar. Aquascape to be colored using pink/mourned/magenta colorant from addictivereefkeeping.com
Stocking Plan
  • Unlike most in the hobby I plan to put in fish last. I will instead stock with the most simple life forms first to build up the bio load processing capability and only add fish once some level of stability has been achieved
  • Basic stocking plan: Cycle tank with bacteria in a bottle (one week), add macro algae + copepods + small clean-up crew (1 month), then add a few soft corals (1 month), slowly add fish while sizing up CUC (2-3 months), add cheap corals including budget SPS, add nicer stuff after 1 year mark hit
  • I will be running with just copepods, CUC, and softies for at least two months before I introduce fish. I will feed lightly to ensure the CUC and copepods have something to eat. I hope to make zero water changes in the first few months other than to test equipment / procedures. If nitrates are high I will turn up the light on the refugium and run the protein skimmer more. I am not concerned about killing copepods since they are tough. If the CUC dies the cost to replenish is not high
  • Any fish added later on will go through medicated quarantine. I have one local LFS (one hour drive) which has been certified by HumbleFish so I will use them or Dr. Reef's
  • Detailed
Lighting
  • 58" AI Blades: Will start with 2 Grows and will add a Glow in 6-12 months once I start adding SPS
  • I went with the AI Blades primarily because I like the look, low mounting height, and light spread. I am concerned about the glowing reviews from YouTube influencers and have no idea how well they will perform in the long run since they are unproven
  • I thought about getting Radions but did not like the light spillage. I also cannot ceiling mount lights since I have very high ceilings and do not like the look of wall mounted hardware
Refugium
  • I will be building a "bucket refugium" using a black rectangular, 6-gallon bucket. I purchased this from one an online shop which sells window cleaning products
  • I have gone with this setup since it will allow me to grow chaeto without flooding the sump with light. I also want to keep the sump as clean as possible
  • Holes will be drilled to allow for water inflow and outflow. The inflow will be fed by a pump running a 4-valve manifold
  • Lighting will be provided by AI Blade Refugium light which will shine through a hole I cut into the bucket lid. I went with this light since I wanted to pair the rectangular bucket with a rectangular light
Key Equipment
  • RODI: 6-Stage system from BRS paired with Smart Buddie RODI Booster Pump
  • Will either use included RedSea ATO or pick up a Tunze 3155. To be paired with a large ATO reservoir of some sort (not identified) stored in a nearby cabinet
  • Powerheads: Vortech MP40 (2)
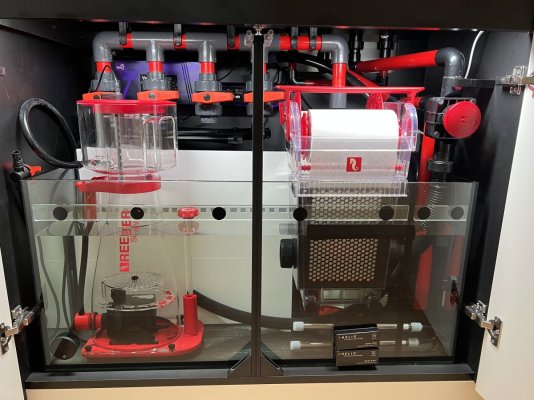
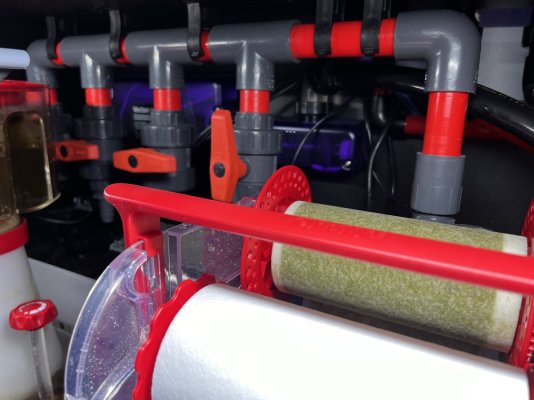
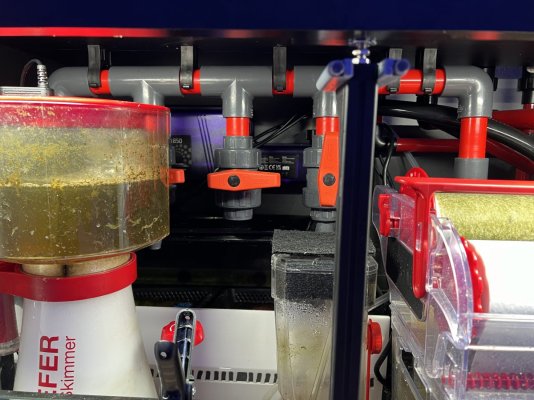
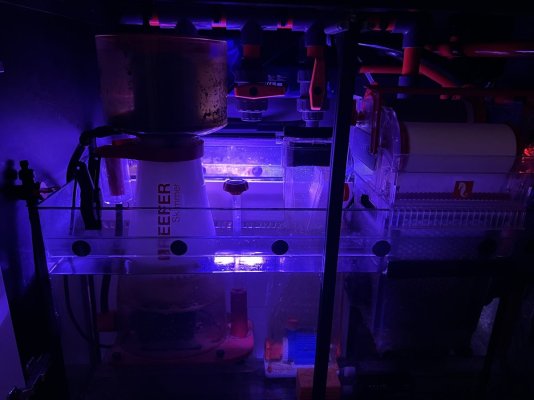
  • Mechanical Filtration: RedSea Reefmat 1200
  • Protein Skimmer: RedSea Reefrun DC 600
  • Return Pump: RedSea ReefRun DC 7000 Pump
  • RedSea ReefRun Dual Controller (needed to control the skimmer and return pump)
  • Pump for 4-valve Manifold: Reef Octopus Varios 6 (will also serve as backup for the return pump)
  • UV Sterilizer: IceCap 27w
  • 4-Valve manifold: To be built with parts from BRS. Will initially be used to provide flow to the bucket refugium and UV sterilizer. 2 unused valves will be there for future equipment
  • Water / Leak Sensor: Included with RedSea G2 system
Controller Ecosystem: CoralVue Hydros
  • I thought about going with Apex but some of the new Hydros products look ultra sexy
  • The Hydros X10 and Kraken not been released so I will need to set up the tank slowly . . .
  • Hydros Control X10: Controller, 4 port doser, salinity and PH probes, 4 sense ports (e.g., temperature, water level, alkalinity, sump doors), 2 drive ports (12V) (ATO and something else)
  • Hydros XP8: 8 Wi-Fi enabled power outlets
  • Hydros Kraken: Power cord management system and battery backup. Looks great for cord management but introduces single point of failure risk
  • Hydros Slim Temperature Sensor
  • Hydros Door Switch (turn on LEDs). Will purchase cabinet LEDs from Amazon
  • Hydros Flow sensor (maybe)
  • Black Aquarium Controller Board Wire Management System
Sorry for the long introduction. I will post updates here as the build progresses!
 
OP
OP
S

slingfox

Well-Known Member
View Badges
Joined
Mar 22, 2023
Messages
589
Reaction score
447
Location
Northern California
Rating - 0%
0   0   0
Build the tank this weekend. I don't think I will ever get a larger tank since I would dread moving anything larger!
 

Attachments

  • IMG_2472.jpeg
    IMG_2472.jpeg
    164.4 KB · Views: 150
  • IMG_2474.jpeg
    IMG_2474.jpeg
    122.8 KB · Views: 121
OP
OP
S

slingfox

Well-Known Member
View Badges
Joined
Mar 22, 2023
Messages
589
Reaction score
447
Location
Northern California
Rating - 0%
0   0   0
I also recently completed the aquascape. I have been doing this off and on for the last month---constantly tweaking. Next steps with the aquascape is to color them up a bit. Will post those pictures when done.
 

srobertb

Well-Known Member
View Badges
Joined
Jun 16, 2021
Messages
986
Reaction score
1,065
Location
SE Texas
Rating - 0%
0   0   0
Congrats! I wanted to say, if it’s not too late, be careful with the e-marco mortar.

I’m 6’7”, 250lbs. I have arms like an albatross and train for strongman (Im a freakishly strong dude). Last tank I made the mistake of marco’ng about 60lbs of rock together. Like 20+ lbs of acropora colony growth later and my tank leaked. Suffice it stay I couldn’t break the rock apart easily and it was difficult to get them out.

This time around I limited it to 30lb chunks and in a 25” deep tank it was still a mistake.

Consider using e-marco to make 20lb chunks and using 1/2” acrylic rods to lock things together than aquaputty where the rod is sticking out or showing thru.

I also don’t want to poo-poo your plans but as someone with a Hydros system and an Apex system, I’d recommend against the Hydros. They used the cheapest Wi-Fi chip they could find. I haven’t looked at their new stuff but I have a few modules + the big boy power strip and it’s buggy and difficult. I gave up and got it it’s very own 2.4ghz router and SSID but it’s still just ok. Also, who thought token Ethernet + no Cat6 was a good idea?!?

I firmly believe that Apex (right now) is the clear and best option. It may not be the fanciest but it is rock solid and trust me, that’s the most important feature.

Can’t wait to see some rockscape!
 
OP
OP
S

slingfox

Well-Known Member
View Badges
Joined
Mar 22, 2023
Messages
589
Reaction score
447
Location
Northern California
Rating - 0%
0   0   0
Congrats! I wanted to say, if it’s not too late, be careful with the e-marco mortar.

I’m 6’7”, 250lbs. I have arms like an albatross and train for strongman (Im a freakishly strong dude). Last tank I made the mistake of marco’ng about 60lbs of rock together. Like 20+ lbs of acropora colony growth later and my tank leaked. Suffice it stay I couldn’t break the rock apart easily and it was difficult to get them out.

This time around I limited it to 30lb chunks and in a 25” deep tank it was still a mistake.

Consider using e-marco to make 20lb chunks and using 1/2” acrylic rods to lock things together than aquaputty where the rod is sticking out or showing thru.

I also don’t want to poo-poo your plans but as someone with a Hydros system and an Apex system, I’d recommend against the Hydros. They used the cheapest Wi-Fi chip they could find. I haven’t looked at their new stuff but I have a few modules + the big boy power strip and it’s buggy and difficult. I gave up and got it it’s very own 2.4ghz router and SSID but it’s still just ok. Also, who thought token Ethernet + no Cat6 was a good idea?!?

I firmly believe that Apex (right now) is the clear and best option. It may not be the fanciest but it is rock solid and trust me, that’s the most important feature.

Can’t wait to see some rockscape!
Thank you SrobertB. I was working on aquascape the last few days and took your advice and made sure to weigh the chunks to make sure nothing would be too large for lifting later. I will also not mortar the pieces together to make things more movable.

The only Hydros component I have current is the 8-plug power strip. I am concerned about the Wi-Fi connectivity. Will see about returning it and just going the Apex route. Maybe will test the strip out first with random stuff around the house.
 
Last edited:
OP
OP
S

slingfox

Well-Known Member
View Badges
Joined
Mar 22, 2023
Messages
589
Reaction score
447
Location
Northern California
Rating - 0%
0   0   0
Below is the current state of the aquascape. I tried to have a lot of spaces higher up for future SPS. I also tried to make sure there are a lot of small caves and hideaway for fish. Aesthetically I am still not completely pleased so may tweak things this week. Particularly I may add a little height on the left side and reduce the height on the right side to make things look a little different. I am afraid doing so may mess things up since I am not great at art type stuff. Any input would be appreciated!
 

Attachments

  • IMG_2478.jpeg
    IMG_2478.jpeg
    382.4 KB · Views: 118
  • IMG_2477.jpeg
    IMG_2477.jpeg
    389.6 KB · Views: 107
  • IMG_2476.jpeg
    IMG_2476.jpeg
    408 KB · Views: 137
OP
OP
S

slingfox

Well-Known Member
View Badges
Joined
Mar 22, 2023
Messages
589
Reaction score
447
Location
Northern California
Rating - 0%
0   0   0
I am done with family vacation and have a reprieve from traveling for work so back to the reef tank setup.

A month ago I started to cycle two gallons of Seachem Matrix divided into 16 small nylon bags. I bought both the Matrix and nylon bags off Amazon since I couldn't find better pricing elsewhere. I put the Matrix into a 5 gallon bucket with saltwater, Microbacter7, and soem ammonia from Algae Barn. It took the Matrix 5 days to cycle and the mix sat into my hot garage with a cheap power head for a month.

I recently completed setting up my RedSea 525 tank, filled it up and started cycling with CaribSea Livesand last week. I placed into the sump the cycled Seachem Matrix. The tank took 8 days to cycle. I had some cleanup crew in a 10 gallon quarantine tank and added them in last night. I will add my first fish later today: a 2" yellow tang from Biota and a small one spot fox fish and long nose hawk fish from an LFS which specializes in fish (best collection here in the Bay Area).

Below are pictures of the tank before I added the clean-up crew. I will post pictures with the lights soon.
 

Attachments

  • IMG_3234.jpeg
    IMG_3234.jpeg
    119 KB · Views: 126
  • IMG_3235.jpeg
    IMG_3235.jpeg
    192.4 KB · Views: 134
OP
OP
S

slingfox

Well-Known Member
View Badges
Joined
Mar 22, 2023
Messages
589
Reaction score
447
Location
Northern California
Rating - 0%
0   0   0
Some notes on the equipment setup 8"in this post and the ones to follow.

How I Colored the White Marco Rock: I am not sure if it was a good idea or not but I bought a few bottles of reef paint from Addictive Reef Keeping to color the white Marco Rock from white to pink/purple/magenta. I think the paint job turned out well but I have no idea how this light affect the cycle, ugly phase, and livestock going forward. The reef paint is pricey but worth it if it keeps the wife happy. The spray bottles the paint came in were useless since they kept on getting clogged by the paint. I had to use a larger, more powerful spray bottle I had laying around to spread the paint. I also diluted the paint by added an equal amount of water. This made the spraying much more smooth. I believe ARC is still tweaking the spray formulation since the first batch I got was more gritty whereas the last more even and smooth.

Reducing Light Spillage from Refugium. As you can see from the sump picture, I replaced the clear glass sump divider with a opaque sign white acrylic plastic sheet. This was done to reduce light spillage from the refugium area in the back. The plastic I bought from TAP Plastics supposedly has light transmission of only 0.1%. The sheet came in two pieces (otherwise it is too large to manuever into the sump). I used a Dremel to cut holes into one of the sheets so that water can move the through the sump.

Manifold Setup: I have added a 4 outlet manifold to the sump. If folks are interested I can take closer pictures of how I put it together. I DIY'd the manifold with the help of YouTube videos. I screwed up several times with the measuring, cutting and glueing but eventually get things to fit!

Head to Head Return Pump Comparisons. I have a RedSea Reefrun 7000 running as the return pump and a Varios6 running the manifold. Unfortunately the RedSea is a lot louder (super annoying hum) whereas the Varios6 is dead silent even when running at 100%. The manifold moves water through the sterilizer and provides flow into the refugium area.
 
Last edited:

nycfishy

Active Member
View Badges
Joined
Apr 9, 2018
Messages
277
Reaction score
124
Rating - 100%
1   0   0
Some notes on the equipment setup 8"in this post and the ones to follow.

How I Colored the White Marco Rock: I am not sure if it was a good idea or not but I bought a few bottles of reef paint from Addictive Reef Keeping to color the white Marco Rock from white to pink/purple/magenta. I think the paint job turned out well but I have no idea how this light affect the cycle, ugly phase, and livestock going forward. The reef paint is pricey but worth it if it keeps the wife happy. The spray bottles the paint came in were useless since they kept on getting clogged by the paint. I had to use a larger, more powerful spray bottle I had laying around to spread the paint. I also diluted the paint by added an equal amount of water. This made the spraying much more smooth. I believe ARC is still tweaking the spray formulation since the first batch I got was more gritty whereas the last more even and smooth.

Reducing Light Spillage from Refugium. As you can see from the sump picture, I replaced the clear glass sump divider with a opaque sign white acrylic plastic sheet. This was done to reduce light spillage from the refugium area in the back. The plastic I bought from TAP Plastics supposedly has light transmission of only 0.1%. The sheet came in two pieces (otherwise it is too large to manuever into the sump). I used a Dremel to cut holes into one of the sheets so that water can move the through the sump.

Manifold Setup: I have added a 4 outlet manifold to the sump. If folks are interested I can take closer pictures of how I put it together. I DIY'd the manifold with the help of YouTube videos. I screwed up several times with the measuring, cutting and glueing but eventually get things to fit!

Head to Head Return Pump Comparisons. I have a RedSea Reefrun 7000 running as the return pump and a Varios6 running the manifold. Unfortunately the RedSea is a lot louder (super annoying hum) whereas the Varios6 is dead silent even when running at 100%. The manifold moves water through the sterilizer and provides flow into the refugium area.
Could you please share pics/details of your manifold setup? would you do the same thing and keep manifold on it's own pump in the future?
 
OP
OP
S

slingfox

Well-Known Member
View Badges
Joined
Mar 22, 2023
Messages
589
Reaction score
447
Location
Northern California
Rating - 0%
0   0   0
Could you please share pics/details of your manifold setup? would you do the same thing and keep manifold on it's own pump in the future?
Attached are two photos of my manifold. It is a pretty standard setup. At the far right is hard plumbing which then transitions to black vinyl tubing which is connected to the pump which runs the manifold. To the left are four different once inch outlets which can be used to provide flow to future equipment. If I had to this again I would only have a 3-manifold setup since I am not sure what I can ever use 4 outlets for! Currently only one is actively used 24/7: outlet which goes into my UV sterilizer. I have used a second one to provide flow into a filter sock when I had to dose lanthanum chloride but now that my tank is somewhat stable I have not had issues with elevated phosphates. I do think having a manifold is useful, but unless you are a complete gear head have 2 or 3 outlets is likely enough for most.

To make the manifold I bought the schedule 80 fittings on BRS and the red PVC tuvinb on Amazon. The manifold is connected into 5 black plastic PVC clamps which are screwed into the top of the sump. Those clamps are sold on BRS.

I recommend using a separate pump for the manifold since that provides more flexibility. More importantly, I consider my manifold pump as the backup in the event the main display return pump fails. My manifold pump has similar flow output to my main pump. If you want to save money you can buy a lower flow manifold pump which should also serve just fine in a backup pump situation.
 

Attachments

  • IMG_4045.jpeg
    IMG_4045.jpeg
    139.2 KB · Views: 56
  • IMG_4044.jpeg
    IMG_4044.jpeg
    198.5 KB · Views: 57
OP
OP
S

slingfox

Well-Known Member
View Badges
Joined
Mar 22, 2023
Messages
589
Reaction score
447
Location
Northern California
Rating - 0%
0   0   0
7 month update. It has been a while since updated this build thread. Overall the first 7 months were rough. From month three through six I was on a close to three month battle with the uglies.

First, I had a massive ulva outbreak. Instead of growing chaeto in the refugium, I grew ulva since it sounded cool to be able to feed excess ulva to my herbivores. Unfortunately, the ulva escaped my refugium and grew all over the rocks in the main display. To get the ulva under control, I tried manual removal for several weeks but it kept coming back. I ended up having to pull out all my rockwork and soaking all my rocks in hydrogen peroxide for over an hour.

The peroxide treatment got rid of the ulva but that left room open for dinos. When I tested my parameters my phosphate was super high levels (eg, 0.5+ ppm phosphate) and nitrates were undetectable. To combat the I did almost everything recommended include manual scrubbing of the rocks every 2-3 days, removal and rinsing of the top layer of sand, UV, silicate dosing, bacteria dosing, bought some live rock from KP aquatics, used manifold to run tank water through 10 micron sock, increase tank temperature to 82 degrees, reduced light intensity, removed half of the biomedia in my sump, stopped lighting the refugium, dosed nitrate, dosed silicate, dosed phyto, put in strips of filter fleece to further export dinos, looked at samples under a microscope, etc. After three labor intensive weeks the dinos steadily declined and then were gone.

After the dinos were under control I had a massive cyano outbreak. That was easy to handle. I scrubbed the rock and removed and rinsed out the top layer of sand (which had mats of cyano) three times over the course of a week. Once cyano was give then GHA grew all over my rocks. I tried manual removal which involved scrubbing all the rocks every 2-3 days but the GHA kept coming back. After three weeks of manual scrubbing I tried once month for low dose fluconozole. At the same time I beefed up the CUC population. After a month the GHA was gone.

For the last month or so my tank has been pretty stable. I am no longer battling the uglies. Now I fear my rocks have too little algae for the CUC and herbivores. I no longer have the scrub my rockwork every week. My phosphate level has declined steadily over time without any further dosing of lanthanum chloride. My nitrates are also consistently in the 5-8 ppm range without any dosing. As my tank has stabilized I have steadily increased my light output and am slowly started to feed more as the fish population grows.

I am now steadily building my coral collection. I started with hammers, then added torches. A few weeks ago I started adding some SPS. Most of my coral are on drag racks, on the sand, or sitting in holes in the rockwork. I have not glued anything down yet since I am am paranoid that I will need to move things around.

Below are some pictures of my tank at month 7!
IMG_4047.jpeg
IMG_4051.jpeg
IMG_4052.jpeg
 

nycfishy

Active Member
View Badges
Joined
Apr 9, 2018
Messages
277
Reaction score
124
Rating - 100%
1   0   0
very helpful thank you.
- what's the white panel looking think in your sump? that the divider or something you put in?
- is your refugium in the back chamber of the sump?
 
OP
OP
S

slingfox

Well-Known Member
View Badges
Joined
Mar 22, 2023
Messages
589
Reaction score
447
Location
Northern California
Rating - 0%
0   0   0
It has been seven months now so I wanted to take the time to write some lessons learned before I forget them.

1) Bucket Refugium as Morphed into Makeshift Algae Turf Scrubber: I originally planned to do a bucket refugium since I thought that would look clean and organized. I was able to get a long 5+ gallon window washer bucket to fit in the back left area of the refugium. The bucket was plumbed and enclosed with a lid and worked well for a few weeks. Ultimately I removed the bucket since I could tell it was going to be a pain to service periodically given how crowded the sump is with the 4 outlet manifold and large size protein skimmer and Reefmat.

I eventually decided to use two mesh baskets sold to pond hobbies to. Inside those baskets I initially put ulva, but the ulva escaped the sump and grew all over my display tank rock. By month two I had ulva growing well in the refugium and all over the display tank. Copepods loved this setup and could be seen in massive quantities crawling all over the back glass as well as the lower areas of the front and side glass.

I ultimately replaced the ulva with chaeto. The chaeto grew well for a month or so but eventually got outcompeted by a mix of turf and green hair algae similar to what you see in algae turf scrubbers. At the six month mark I removed the chaeto from my refugium and instead put in some plastic pot scrubbers in the mesh baskets. Those pot scrubbers serve as homes for copepods and substrate for the turf and hair algae to grow. With the chaeto removed my refugium is essentially acting like a makeshift algae turf scrubber now.

2) White Divider for Refigium: Although I abandoned the bucket refugium concept, I bought three opaque white plastic sheets from TAP plastics which serve as a divider between the front area of the sump from the refugium in the back. The three pieces of plastic when stacked go higher than the glass insert that comes with the tank. The plastic inserts are also made on opaque plastic which supposedly only allows through 2% or so of the light. The white color also reflects the refugium right back into the refugium. Overall this setup helps mitigate like leakage which means I don't have any issues with algae growth in the front area of the tank (eg, the skimmer body for instance). Most importantly, the three inserts are a lot easier to take out than the single larger glass insert. This is important because the manifold placement does not allow much room for moving things around.

3) Dry Rock vs Live Rock: I wished I started with some live rock from the beginning. During the middle of my battle with the uglies, I got a few pieces of live rock from KP Aquatics. Those pieces of rocks were noticeably more resistant to the uglies than the Marko Dry rock. I could have saved myself a lot of money by going with a mix of live plus dry rock from the start. Next time I start a tank I plan to go with a mix of dry and live rock from the ocean, plus sand from the ocean. This is an expensive way to start a tank but that extra money upfront would have saved me money in the long run given the amount of supplements I bought to combat the uglies and coral deaths caused by dinos. Expensive things bought include a small fortune on copepods and bottled bacteria.

3) Ozone for Water Clarity: I bought an ozone generator during the Black Friday sale period in November 2023. Since I do not have a protein skimmer rated for ozone, I looked for the cheapest small skimmer I could find and use that as my ozone reactor. I currently run ozone on the second lowest setting for 30 minutes every night at 2:30am. The water clarity is noticeably clearer!

4) Too much biomedia is not a good thing: I initially stocked my tank with a massive amount of biomedia: 2 gallons of Seachem Matrix. This caused my nitrates to bottom out which set the stage for dinos. I ultimately removed half of the biomedia which has been somewhat offset by the addition of plastic pot scrubbers after I got detectable levels of nitrate for three weeks without dosing.

5) Best purchases for weekly maintenance: The absolute #1 purchase was the Rubbermaid grout brush from Amazon. This is essentially a powerful waterproof electric toothbrush. I used it extensively to scrub the rocks during the various battles with dinos/ulva/GHA. I no longer have to scrub the rocks but use the brush to clean the glass that touches the sand, the grates on the weir box, and the corners of the tank. Overall this is a super handy tool.

Another useful tool that I don't see much about is an electric gravel vac (various models on Amazon). I don't use this to vacuum the gravel (I use a standard python hose for that) but use it to suck detritus out of the sump and to move small amounts of water to and from 5 gallon buckets. For larger movements of water during water I use a Siccer Zero pump. The gravel vac is used for smaller amounts of water movement such as water changes in my 10 gallon bucket quarantine tank.

Things I am thinking about:

1) How to best attach corals to the rock?: So far I have not glued down any corals to the rockscape. I really want to drill the Marko rock but it is insanely dense! I believe it would take me 6+ hours to drill all the rocks.

2) Will my CUC die due to lack of nuisance algae growth on rocks?: For several months my CUC had an all you can eat buffet. Now that the tank has stabilized there is barely any nuisance algae in the main display. I believe some of my snails will die off slowly. I had a Halloween Hermet crab which I caught trying to assassinate a snail a few months ago. I then moved the hermet to the sump for three months. Yesterday I moved the Halloween Hermet back into the display since he could help further balance the situation.

3) Will my copepod population regain its former glory?: At month 2-3, before dinos hit and ulva was growing everywhere I had an insanely high copepod population. Even adding $100 of copepods after getting through the ugly stage (I do not recommend doing this!), the I don't see the huge armies of copepods crawling over my glass during the day. This is likely in part due to the 4 wrasse I have added to the tank. Those wrasse are constantly picking at the surfaces so the copepod population likely won't ever have a chance to return to its former glory.
 

Attachments

  • IMG_4057.jpeg
    IMG_4057.jpeg
    153.2 KB · Views: 45
  • IMG_4056.jpeg
    IMG_4056.jpeg
    106.5 KB · Views: 35
  • IMG_4055.jpeg
    IMG_4055.jpeg
    116.1 KB · Views: 36
OP
OP
S

slingfox

Well-Known Member
View Badges
Joined
Mar 22, 2023
Messages
589
Reaction score
447
Location
Northern California
Rating - 0%
0   0   0
The Tropic Eden Reef Flakes sand did a great job of not moving around but the large flakes resulted in algae growing on many of the large grains. This was a bit of an eye sore. I therefor swapped in Aquaforest Bio Sand which is super white. My kids love the new look since the white sand makes the tank look even brighter. This results in the green algae on the rocks looking a lot less geeen for some reason. The chromis also look a lighter shade blue---I am not sure if that is due to the white sand reflecting more light or if the chromis are still adjusting from the 6 hour deep clean and sand swap.

I have still not glue any frags down. Most of my coral are still in frag racks with a few sitting on the sand for now.

The other major update is I have added in a AI Blade Coral Glow which means I now have two Glows and one Glow. I got the Glow two weeks ago when they went on sale for 10% off.

Updated tank pictures below.
IMG_4271.jpeg
IMG_4272.jpeg
IMG_4297.jpeg
IMG_4273.jpeg
 
OP
OP
S

slingfox

Well-Known Member
View Badges
Joined
Mar 22, 2023
Messages
589
Reaction score
447
Location
Northern California
Rating - 0%
0   0   0
Very early observation on Aquaforest Bio Sand: This sand is very small grain. I was expecting the sand to be blown around like crazy by my MP40s but interestingly the sand has largely stayed put. I hope this continues to hold. I originally started with CaribSea Special Grade sand but swap it out for Tripic Eden Reef Flakes since I got tired of the sand moving around. Only time will tell if the Bio Sand performs better despite being finer grain.
 

Reefing threads: Do you wear gear from reef brands?

  • I wear reef gear everywhere.

    Votes: 20 13.7%
  • I wear reef gear primarily at fish events and my LFS.

    Votes: 10 6.8%
  • I wear reef gear primarily for water changes and tank maintenance.

    Votes: 1 0.7%
  • I wear reef gear primarily to relax where I live.

    Votes: 22 15.1%
  • I don’t wear gear from reef brands.

    Votes: 83 56.8%
  • Other.

    Votes: 10 6.8%
Back
Top