Miracles 160g In-Wall Rebuild

135reef

Community Member
View Badges
Joined
Mar 22, 2017
Messages
67
Reaction score
37
Rating - 0%
0   0   0
Thought I would start a thread for our in-wall rebuild.

Background
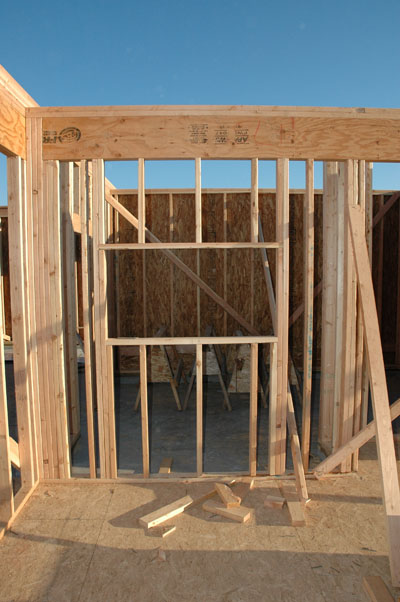
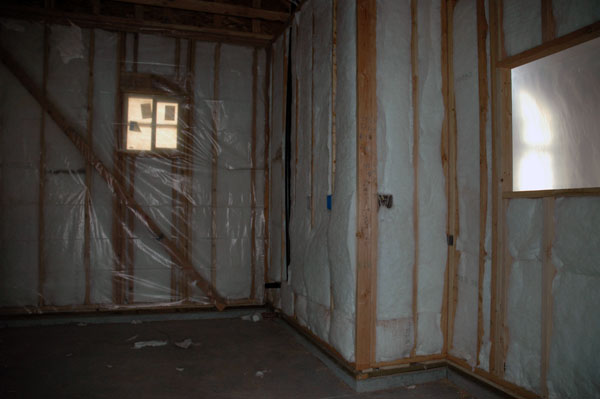
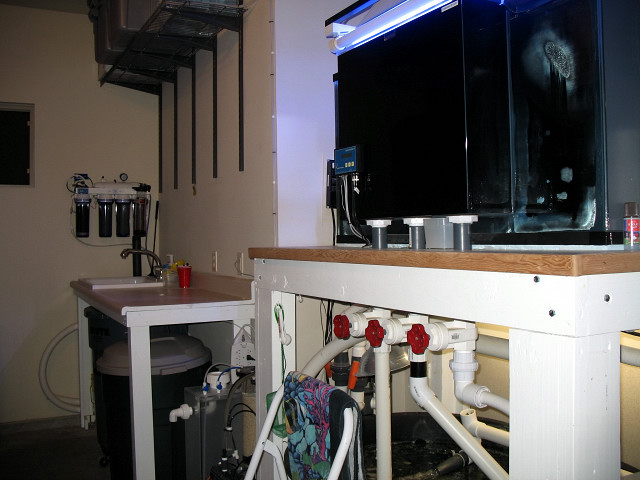
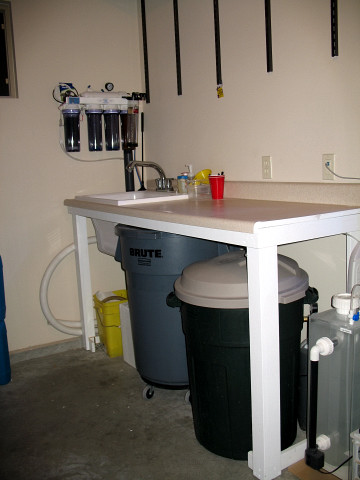
When we built our house ~15 years ago, we found a floor plan that was great for an in-wall. The garage had a double deep bay that backed up to the family room and would become a storage and support room. My wife and I spent an entire afternoon with a tape measure and painters tape mocking up what the wall would look like with a tank framed into it. We had two dedicated breakers wired to opposite sides of the tank to create redundancy and split the life support systems. Miracles built a great tank for us and the tank was wet within a week of moving into the house.

reefroom1.jpg
reefroom2.jpg

130g1of2.jpg
closedloop.jpg

reefroom1.JPG
reefroom2.JPG


Fast forward 15 years; the closed loop is gone, we've gone through multiple generations of lighting from MH/VHO to Kessils/VHO, back to MH w/T5 and to XR30 G4 Pros and T5s. The tank had had it's good years and bad. There were a number of years where I was traveling internationally for work a lot and while I could monitor the tank with our Neptune, it was rough and over time we lost most of the SPS and the tank became host to some simpler corals, RBTAs that have split too many time and clowns.

It was time to drain the tank and start fresh, but if we were going that far, it didn't make sense to keep the tank as-is. Most recommend to strip and re-seal after 10-15yrs and while everyones mileage can vary, I didn't want to rebuild everything just to have problems down the road and wish I had cut the tank apart and rebuilt. Our first thought was, let's try acrylic. It's lighter, easy to get, doesn't have a history of catastrophic seam failures and we could make a few changes from the original design. After some soul searching, I couldn't pull the trigger on acrylic. I think back to all the times of going after the front glass with a razor blade and acrylic wasn't going to support my maintenance habits. Our local fish/coral shop begged me not to do acrylic and knowing my "retentive" habits, threatened to take me out on their maintenance runs in the valley to see what Acrylic scratches looked like and if I could live with it. I know LOTS of people on this board and others are very successful with acrylic and I don't want this to be a flame fest on the virtues of Acrylic versus Glass.

The Future
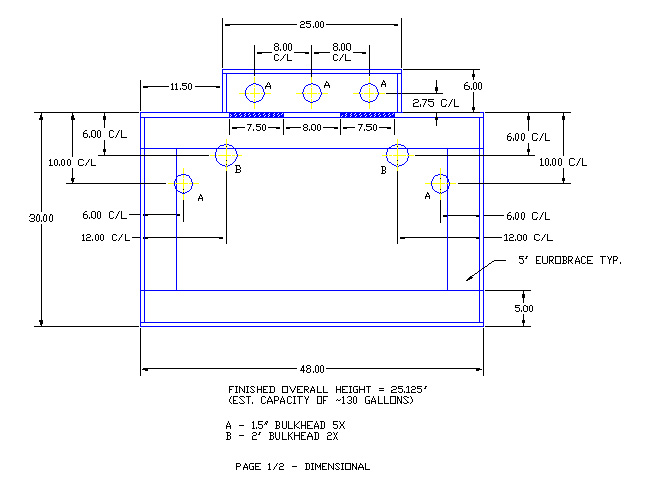
So glass it is. I checked around to see who the glass builders of the day were (insert 15yr gap) and while there are a few new ones out there, most didn't return emails or calls with the exception of Miracles. Derek emailed me back within hours and we started talking about the old tank and what we would do differently this time. Turns out, the guys on the floor remembered the original tank and offered a few suggestions. Drawings were exchanged and we got in the build queue. Tank ordered 4/30 and we are looking at about 9-weeks given their current backlog. We extended the depth and removed all of the closed loop features from the first tank. I seriously looked at making the tank wider and taller, but it would have been a MAJOR hassle and required some extensive work to the wall.

Screen Shot 2020-05-07 at 6.10.23 PM.png


About the only thing I didn't like about the original tank was the way we did the overflow. An acrylic sheet with teeth was added to the back of the tank. Over the years, the acrylic started to buckle and I was concerned it was putting stress on the vertical seams in the back of the tank. A couple of the teeth had broken over time too. For the overflow this time, we are going with a 20" EMS from Taylor.

24in_w_1in_drains_large.jpg


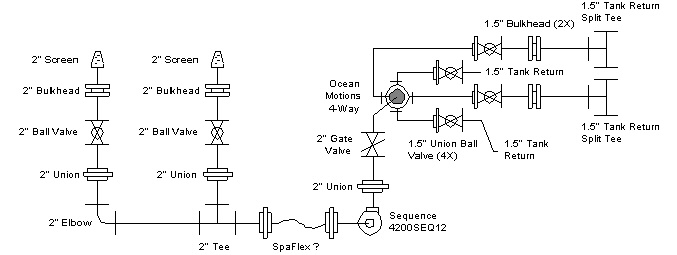
Equipment List (Some new, some reused)
Miracles Aquariums custom in-wall tank
Exotic Marine Systems overflow
Apex Classic
Return #1 | Neptune Core 15 w/Arctica Chiller
Return #2 | Neptune Core-15 w/Pentair 80w UV
MRC Dual Beckett simmer w/Pan World 150PS and automated neck cleaner
Clear Water CW-200
3ea Radion XR30-G4 Pro LED w/diffusers
4ea 54W ATI Blue-Plus T5 (0-10v controlled)
4ea Vortech MP-40s
DIY Auto-Top off
Neptune DOS for automated water changes
GHL Doser2 (Alk/Kalk/Mg)

Sump
Sump is currently a rubbermaid 100g stock tank. It works well for storing extra rock and system volume, but I'd like like it to be a bit smaller under the stand for other equipment and have a way to load filter pad or socks in some way. Thinking about building a custom sump or insert in the stock tank for socks.

Display
Bare bottom with an insert this time. I love the look of sand, but hate the hassle and we want lots of random flow. I have 50# of Marco rock in the box that I'm going to start curing in a can with saltwater, power head and heater. I have another 30# in the sump and 80# I bleached recently due to a rampant aiptasia issue. The plan is to keep the structure no greater than 50% the height of the tank. At 35" deep, we can keep the rock off the back wall and push water around and behind the structure with the MPs.

That's the plan so far. Still researching options on a few things while we wait for the tank. Open to suggestions!

-Doug
 
OP
OP
135reef

135reef

Community Member
View Badges
Joined
Mar 22, 2017
Messages
67
Reaction score
37
Rating - 0%
0   0   0
Quick equipment update...
One of the Core-15 pumps was cancelled due to an inventory count issue. I found one over at Premium and got it ordered. Pulled the trigger on the Clear Water and a Sicce to feed it. Looks like the Pentair UV shipped today.

Still haven't decided on the sump. I'm going to run the pumps external so traditional sumps aren't ideal. I looked a couple of the Bashsea and they look really nice, but not ideal for our setup. A quick trip to the local farm supply places in-town didn't help much unless I want to use the same Rubbermaid style container.

Next challenge has been finding vertical water storage tanks locally. Everyone online wants stupid money to ship them so the search continues...
 
OP
OP
135reef

135reef

Community Member
View Badges
Joined
Mar 22, 2017
Messages
67
Reaction score
37
Rating - 0%
0   0   0
The Exotic Marine Systems overflow arrived today and it looks great. Fit and finish is spot on and I appreciate that they took the trouble to send wrenches and spacers with the kit. First rate! I'd highly recommend the EMS overflow.

A bunch of the equipment arrived over the past week including all the pumps, Clear Water Scrubber, DOS, Ball Valves, 1-Link and new membranes for our RO/DI.

Starting to design an automated water change system and rack solution in the support room. Pictures coming...
 

Mirkus

Active Member
View Badges
Joined
Jan 12, 2012
Messages
305
Reaction score
230
Location
San Leandro
Rating - 0%
0   0   0
The Exotic Marine Systems overflow arrived today and it looks great. Fit and finish is spot on and I appreciate that they took the trouble to send wrenches and spacers with the kit. First rate! I'd highly recommend the EMS overflow.

A bunch of the equipment arrived over the past week including all the pumps, Clear Water Scrubber, DOS, Ball Valves, 1-Link and new membranes for our RO/DI.

Starting to design an automated water change system and rack solution in the support room. Pictures coming...

I have an ems overflow too! I can’t tell you how well it works because my tank is still in the crate.
 
OP
OP
135reef

135reef

Community Member
View Badges
Joined
Mar 22, 2017
Messages
67
Reaction score
37
Rating - 0%
0   0   0
Progress this weekend. I finished the mixing/water change setup. The room is still a mess after a tear-down of the bulk RO/DI chamber to address a bulkhead leak, but I'm loving the setup.

Bulk RO/DI
  • Separate ball valve for large volumes of RO/DI (Mixing 2-part, etc)
  • Sampling port for small volumes of water for testing, rinses, etc.
  • Float switch for over-full alarm

IMG_2488.JPG


Saltwater Mixing Station
  • 1-1/4" ball valve to feed bulk RO/DI into the mixing vessel.
  • Closed loop pump with filter cartridge to minimize crusty build-up in the vessel.
  • Ball valve for large water changes
  • Float switch for low-water to turn-off recirculation pump and automated water change
  • Pump is on a OSC mode to run 30 min every 4hrs
  • Feed timer initiates a 60min mix when I add salt
  • Sampling port for small amounts of mixed salt (coral dip, etc.)
IMG_2491.JPG
IMG_2490.JPG


Control
  • I had an old DC8 with a couple of bad outlets so it was perfect for this application
  • Runs the OSC recirculation and powers the DOS
  • Gives me extra remote outlets for a power head or heater if needed
  • For the float switches, I used some left over CAT5 cable and RJ11 connectors for quick removal/replacement
  • I still have room for two more floats or I/O in the cable if needed
  • New Avast break-out box will be here in a couple of days to tidy-up all the new and old switch inputs to the Apex

IMG_2489.JPG


Automated Water Changes
  • Plan is to use the DOS for automated water changes
  • The new display tank will be ~160g with another 50g in the sump
  • Current thinking is ~15-20g/week or ~3-weeks of capacity on a full reservoir
 
OP
OP
135reef

135reef

Community Member
View Badges
Joined
Mar 22, 2017
Messages
67
Reaction score
37
Rating - 0%
0   0   0
Minor setback last weekend. The bulkhead on the RO/DI tank had a VERY slight drip that I hadn't seen. Big water change, changed to pipe dope, sanded and refinished the top and we are back in business!

Received our Break-Out box kit from Avast Marine and got it installed with the new tanks. Works great!
break-out-box-neptune_grande.jpg


Pulled the trigger on an Apex upgrade. My Classic has been rock solid, but given the full rebuild and desire to try a Triton, I figured it would be better to make the change now and hold the Classic as a backup.
Screen Shot 2020-06-29 at 12.45.19 PM.png
 
OP
OP
135reef

135reef

Community Member
View Badges
Joined
Mar 22, 2017
Messages
67
Reaction score
37
Rating - 0%
0   0   0
New Apex and Trident arrived yesterday. Shocked Fedex was delivering on the 4th. New leak detector sensors arrived, but I ordered the wrong ones. I have the older ALD module which requires an RJ11 connector versus the new FMM module with 3.5mm jacks. The solution was to move the old ALD over to the mixing station stand and use a sensor there. A new FMM module is on the way for the two new sensors I'll place in the sump area.

Strategizing the move. Current thinking is that I'll relocate the tank inhabitants to the sump and move the sump away from the stand area so I can do some drywall repairs around the wall opening. Waiting for an update from Miracles on the delivery schedule. I suspect things are a little delayed.

Still mapping out the plumbing with way too many SCH 80 fittings on my work bench and I still need to order more...
 
OP
OP
135reef

135reef

Community Member
View Badges
Joined
Mar 22, 2017
Messages
67
Reaction score
37
Rating - 0%
0   0   0
And so the rebuild begins. Tank is due to ship in another week or two so this weekend I pulled the 100g Rubbermaid sump and transferred the RBTAs and clowns to a remote location in the tank room. Relocated the Apex Classic running an old Kessel I had, heaters and pump.

Last night and part of today has been tear-down and maintenance. Tore down all the pumps, skimmer, power heads, MP40s and about anything else wet and soaked in Citric Acid for the better part of the day. Everything is rebuilt. labelled and ready to go.

The electronics are all off the walls and while we are down, I've started patching screw holes and damaged drywall. It's a mess, but making progress.
 
OP
OP
135reef

135reef

Community Member
View Badges
Joined
Mar 22, 2017
Messages
67
Reaction score
37
Rating - 0%
0   0   0
The bad and the good. As many have pointed out, if we don't learn from our mistakes, we are destined to live them again. Use my failings as examples and "opportunities" for what not to do.

When I moved the sump and relocated the fish and BTAs, it was getting late. I verified the temp, pH, heater and lighting schedule and called it a day. The next day, everything looked good. The BTAs and fish were out, eating and swimming around. During more of the clean-up, I saw the snails still doing their job on the glass of the old tank. I promptly removed a number of them and threw them into the sump.

Mistakes:
#1: I didn't account for the temperature difference between the old display (no heaters running) and sump.
#2: I assumed the salinity was "close enough". After all, I had just moved the sump and fish a couple days earlier.
#3: I never confirmed the salinity in the sump. Why would I... I just pulled the sump and topped off with tank water.

Fast forward to Sunday morning. I walk into the tank room and immediately notice the sump is super cloudy and there is an ugly white film across the surface. The fish are alive, the BTAs are all fluffed out. What happened...

I immediately check the the heater controller and Apex. Solid at 78F and no spikes recorded. Salinity check. Yep, measures 43. Wait... What? Are the fish and BTAs really alive? How did I do that??? Check the calibration of the meter - nope, it's dead on at 35. In the process of transfers, water changes, etc. I blew it. The good news is everyone still seems alive in spite of it. Ah... all the snails dead.

The good:
One of my recent projects was to create a RO/DI storage and salt mixing station. I have 60g of RO/DI and 60g of mixed salt water at the ready! Over the course of the weekend and this morning, I gradually correct the salinity with water changes. The water looks better but more water changes are going to be needed. Everyone is still alive and surprisingly, the BTAs are all kinds of fluffed out.

Moral of the story. Slow down, double check things as you go and don't assume anything...

On a brighter note, all the equipment is cleaned and rebuilt. I switched from Vinegar to Citric Acid. It works, but perhaps not as well as the vinegar for the same amount of time. Regardless we are clean. The screw holes in the drywall where I mounted hardware have been filled, sanded and ready for another coat of mud and paint. The three holes for the pass thru of water and power to the chiller are taped, filled and sanded. Old mounting screw locations in the stand have been filled and sanded. Should be ready for paint after I get the old tank out and repair some drywall over the top of the tank.

What's next... It's time to drain the old display and get ready to pull it out of the wall. More dry-wall repair and paint before the new tank arrives.

My new concern is the concrete under the sump and where the external skimmer sits. Over the 15yrs, there has been some saltwater on the floor and slow drips around the skimmer that didn't get caught so the concrete has some pitting and minor break-up. Trying to decide how to seal for the future. If you have any thoughts on a VOC free brush/roll-on sealant, let me know...
 
OP
OP
135reef

135reef

Community Member
View Badges
Joined
Mar 22, 2017
Messages
67
Reaction score
37
Rating - 0%
0   0   0
Let the DEMO begin...

It was a productive weekend. The old tank is out and drywall repair is underway. Getting the tank apart was more difficult than I anticipated, but it's done. The back panel is where my biggest concerns were due to the buckling of the acrylic back panel over the years pushing at the vertical seams. They came apart much easier than the rest of the tank so I think we made the right decision.

Speaking of right decisions, credit goes to my wife. We would NOT have been able to cut the old tank apart and re-seal it without added risk. I wasn't super careful, but we chipped over half of the glass edges cutting the silicone away and slipping a putty knife down the seams.

IMG_3567.jpeg
IMG_3565.jpeg
IMG_3570.jpeg
IMG_3571.jpeg
IMG_3572.jpeg
IMG_3573.jpeg


Trash bag was a quick fix, but we are sealed up much better which brought up an interesting phenomenon. When the AC kicks on, their appears to be a negative pressure in the house as the plastic over the hole sucks into the room. Seems counter productive. If there are any HVAC guru's let me know if this is normal or we have an issue.

Talked to Miracles yesterday and the tank is nearly done. Just getting the Starboard fitted and prepped for shipping. I've been calling around to moving and storage companies to figure out how to get the tank received and on the stand. I'm estimating the tank will be ~400lb and we need to lift it to a stand height of 51". Haven't found anyone interested in taking receipt and delivering to the house let along putting it on the stand. Just another challenge...

More to come!
 

revhtree

Owner Administrator
View Badges
Joined
May 8, 2006
Messages
47,603
Reaction score
85,991
Rating - 100%
1   0   0
Thanks for taking us along on this journey! Looks like it's going to be a fun ride!
 
OP
OP
135reef

135reef

Community Member
View Badges
Joined
Mar 22, 2017
Messages
67
Reaction score
37
Rating - 0%
0   0   0
Progress this weekend. The stand is completely rebuilt. Drywall has all been repaired and painted. Minor setback when the Formica touched down in the wrong spot which took two hours to remove the sheet from the top of the tank. Since I was replacing the top, I extended the platform around the tank. Doing maintenance while standing on the platform edge was easier at 35 than it is at 50 :)

Speaking of the tank. I spoke with Derek (Miracles Aquariums) Friday and the tank was crated and ready to ship. Just waiting for the customs documents to clear and pickup today. A local moving and storage company is going to take receipt and deliver to our driveway. Rather than have 5 friends over, I'll have the moving guys pop it up on the stand. Not cheap, but also not too many options to get a ~360lb tank up to the 45" stand height. What could go wrong.

Picture updates...
IMG_9749.jpeg
IMG_4050.jpeg
IMG_3724.jpeg
IMG_1893.jpeg


I use a Rubbermaid Stock tank under the stand. Once the tank is in-place, I'll measure and cut the holes for the two returns (1-Chiller / 1-UV) and three (3) drain lines. There will be a 1/2" foam base between the stand and tank. Tight fit when it's all installed with <1/4" on the three sides.

Meanwhile, the inhabitants in the original sump are doing very well. Frankly, better than when they were in the last display. The RBTAs have split multiple times. I went from 4 large specimens to over 10 now. Both challis look great under a single Kessil I had laying around.

Hope to have a waybill for the tank today and start planning on the move-in.
 
Last edited:
OP
OP
135reef

135reef

Community Member
View Badges
Joined
Mar 22, 2017
Messages
67
Reaction score
37
Rating - 0%
0   0   0
Great news... The tank has been picked up from Miracles. Looks like its still sitting in the shipping hub, but has an estimated dock date of next 8/12. Guess we will see once it makes it on the truck.

It's progress! I'll take it...
 
OP
OP
135reef

135reef

Community Member
View Badges
Joined
Mar 22, 2017
Messages
67
Reaction score
37
Rating - 0%
0   0   0
Progress! The tank rolled into town Monday and was delivered to the house yesterday. The guys from Peasley Storage were outstanding! Five guys showed up, rolled the tank off the truck and put it on the stand. Total time on-site less than 45min.
IMG_8628.JPG

IMG_7279.JPG
IMG_3909.JPG


Now the plumbing begins!
IMG_3153.JPG
IMG_3692.JPG
IMG_3029.JPG
IMG_9030.JPG


More to come this weekend...

IMG_2110.JPG
 
OP
OP
135reef

135reef

Community Member
View Badges
Joined
Mar 22, 2017
Messages
67
Reaction score
37
Rating - 0%
0   0   0
Build update:

Tank has been wet for a few weeks now. Happy with the plumbing and electrical. We have two (2) dedicated 20a breakers so we split life support between breakers (Returns, Heaters, lights). The apex and router are on battery backups and a single MP40 on backup power as well.

Excuse the blue cast. This weekend I worked on aquas cape. Still not happy with it, but its a start. I need more flat space out front. We have a challis that is about 18" diameter and another in the 6" range that need to be fragged or reset the rock to accommodate. More work to be done on rock placement...
IMG_3467.JPG

IMG_6361.JPG

IMG_9902.JPG


Light rack turned out great. Three (3) Radion G4 Pros and four (4) T5s. I used black anodized 20/20 extrusion. It's like erector set for adults... Rack is at the ceiling for aquascaping work in this shot.
IMG_5514.JPG


Power panels turned out well, but I want to create splash covers for them or put divider Lexan or acrylic up just in case.
IMG_9459.JPG

IMG_4559.JPG


Sump turned out good using a combination of hard and soft plumbing. A pair of COR 15s run split returns for the chiller and UV. Both running about 60-70%. The MRC Dual Beckett skimmer is the highest current draw. May look at replacing it with an external recirculating at some point, but I had it so there it is.
IMG_6697.JPG

IMG_6936.JPG

IMG_9064.JPG

IMG_9750.JPG


Controls are all high and tight. Everything is in tracks and tied up. Looks great, but will be a hassle when we need to change probes, but worth it.
IMG_0653.JPG


Still using my GHL 4-head loser for Alk/Ca/Mg. The Trident is mocked up, but I haven't installed it yet. I want to make sure I can get reagents readily enough.

Rock was cooked for about 8 weeks with Dr. Tims. Water tests look good this weekend.

Temp: 77.8F
pH: 8.05
Alk: 8.7
Ca: 450
Mg: 1350
Nitrate: 0
Phosphate: 0.14

Quarantine tank is setup, but fish stock is low locally and what is here is sketchy. Hopefully we see some new stock in the next few weeks for quarantine. Not sure what to do with the three (3) clowns in the offline storage sump. I'm guessing we should bite the bullet and treat them with the new fish to make sure we don't introduce any ick to the display. They are so healthy and happy I hate to stress them, but I also don't want ick in the tank again. IMG_1966.JPG IMG_3268.JPG IMG_5193.JPG IMG_9727.JPG
 
Back
Top