

It's been a while into this build so I have a lot of great pics and information to post about this one. I have this 20 gallon display with a 10 gallon sump that's been up for about 4 years now. I have moved it twice in that time, the latest from an apartment into a rental home. I always stayed small due to apartment life. I ran into all the issues of small tank life such as needing to dose Cal, Mag, and Alk as well as having problems with growing any SPS corals. I never lost a fish over the years but I have lost corals over time that seemed to do well for a few months and then just shriveled away. Over the years I lost pulsing xenia, green star polyp, duncans, and even a favia that was growing like crazy. The only thing I seemed to be able to keep were zoas, mushrooms, and a hammer coral.
.jpg")
Since my final move into a rental house. I decided it was time to upgrade. I had been reading all about the skip cycle method @brandon429 had detailed and I decided that since I was doing this big upgrade I was going to do it this way. I already had a fully established tank with live rocks so when I moved in I put the existing tank right next to where I intended on placing the upgrade. This gave me all the time in the world to proceed with the build of the 75 gallon tank without needing to rush anything and when it was time I could move everything over.
.jpg")
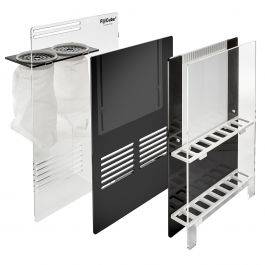
I began by finding the stand I wanted. This was actually given to me by a family member who had a much smaller tank on it. The stand was perfect and built to hold a 75 gallon display. I measured the inside of the stand and discovered that the largest sump I could put inside would be a 29 gallon so that's what I went with. The last time I built my sump I bought a bunch of plexi and cut it myself. This time however I decided to go with a premade baffle kit.
 www.bulkreefsupply.com
This fiji cube baffle kit was great. Sadly the first one I ordered arrived broken so I contacted BRS and they promptly replaced it. This was helpful because out of the broken kit there was 1 good baffle I was able to keep which enabled me to build a special section to force water from my skimmer chamber to go down through a filter pad before hitting the refugium. Now I have a filter pad chamber for a carbon pad. Here's how it looked after I used the aquarium silicone to secure all of the sections which I then leak tested individually.
.jpg")
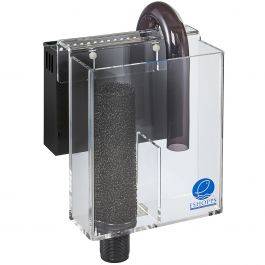
I was ready to build the plumbing from the display tank to the sump. I ended up doing this in a section of Braided flex PVC and some sprinkler right angle attachments with hose clamps. I'm not concerned at this stage with needing to adjust flow rates or turn off drains since I'm using a HOB overflow. I also used silicone to seal all of the connecting points and leak tested it. My only problem was that I needed to move the overflow AND the return pump from the existing tank. I had already upgraded the overflow to handle the flow rates of the upgraded return pump which were driving my existing tank at much lower speeds until this upgrade needed to happen.
Heres that Overflow.
 www.bulkreefsupply.com
.jpg")
I added a right angle breather tube in the sump side of the plumbing since i was placing the drain hose deep into the chamber of the sump and I wanted to reduce salt spray.
This is my return pump and it's just built with flexi PVC attached to it and a u-bend angle diverter over the top of the tank (Placed on the opposite end from the overflow) It's all held in place with some velcro on the back and the top of the tank also.
It was now time to put in the new sand and fill the tank. I got all the saltwater I needed from my local fish store and was intending to use a very large portion of my water from the old tank as well. I rinsed the mixture of coarse and fine sand with RODI water before I put it in the tank and then when pouring the water into the tank I used a sheet of bubble wrap and a strainer to reduce the stirring up of the sand.
.jpg")
.jpg")
Once the water was all in the new tank I let it run and heat up for a couple of days waiting for the cloudiness to settle down.
.jpg")
I ended up adding one more Kessil A160 WE Tuna blue to the tank since I already had one in the existing tank with a controller so I had 2 on it. I thought this would be good enough for this tank but after a while I was wrong about that - Which I will get into later. It was time to move over the existing rock and all the fish.
.jpg")
.jpg")
I kept the rock in the same exact structure to give my fish a comfortable place to call home. Now that I had all this extra room I needed to add more rock.
.jpg")
I ended up going to a local fish store that had established tanks for years and they let me purchase some rocks out of their tanks. I looked for ones that were fully cured and ready to go with lots of good coralline algae on them. I transported them in a bucket from the store in water so they would not have any die off on the way to my home and I put them in the tank. I even picked up some purple mushrooms while I was there.
.jpg")
.jpg")
The tank now looked great. I continued to test nearly every other day and things were wonderful. I never had any issue with ammonia or nitrite. I did have some high nitrate for a bit which was caused by my old tank being cut off from the sump for a little bit. I should not have moved over the water that was sitting in that sump for a couple days but lesson learned there. I did a water change and it dropped. Also though my test kit was near expiration and was reading false high numbers on nitrate.
.jpg")
The new tank is all set up and looking beautiful. I've been adding some things to it little by little and I will share those on this thread later on but I wanted to get this started for everyone and not inundate you all with TMI at the start.
.jpg")
Here's my readings for Ammonia and Nitrite over time. As well as a few others. I use Aquatic Log and its wonderful.


My Phosphate and Nitrate just crashed to zero and that's because I just added a more powerful skimmer than I had before. I'm currently working on that and more to come about it as well as the lighting situation too.
Thank you for taking the time to check out my tank!
Since my final move into a rental house. I decided it was time to upgrade. I had been reading all about the skip cycle method @brandon429 had detailed and I decided that since I was doing this big upgrade I was going to do it this way. I already had a fully established tank with live rocks so when I moved in I put the existing tank right next to where I intended on placing the upgrade. This gave me all the time in the world to proceed with the build of the 75 gallon tank without needing to rush anything and when it was time I could move everything over.
I began by finding the stand I wanted. This was actually given to me by a family member who had a much smaller tank on it. The stand was perfect and built to hold a 75 gallon display. I measured the inside of the stand and discovered that the largest sump I could put inside would be a 29 gallon so that's what I went with. The last time I built my sump I bought a bunch of plexi and cut it myself. This time however I decided to go with a premade baffle kit.
29 Gallon Standard Sump Baffle Kit
The Fiji Cube Sump Baffle Kit is the premier option for creating a custom, economical sump for your reef without the high cost typically associated with having one fabricated for you. These Baffle kits are made to fit a number of common aquarium sizes and include all of the necessary components...
www.bulkreefsupply.com
This fiji cube baffle kit was great. Sadly the first one I ordered arrived broken so I contacted BRS and they promptly replaced it. This was helpful because out of the broken kit there was 1 good baffle I was able to keep which enabled me to build a special section to force water from my skimmer chamber to go down through a filter pad before hitting the refugium. Now I have a filter pad chamber for a carbon pad. Here's how it looked after I used the aquarium silicone to secure all of the sections which I then leak tested individually.
I was ready to build the plumbing from the display tank to the sump. I ended up doing this in a section of Braided flex PVC and some sprinkler right angle attachments with hose clamps. I'm not concerned at this stage with needing to adjust flow rates or turn off drains since I'm using a HOB overflow. I also used silicone to seal all of the connecting points and leak tested it. My only problem was that I needed to move the overflow AND the return pump from the existing tank. I had already upgraded the overflow to handle the flow rates of the upgraded return pump which were driving my existing tank at much lower speeds until this upgrade needed to happen.
Heres that Overflow.
PF-800 HOB Overflow
Add an overflow to any aquarium with Eshopps PF series of hang on back overflows. Adding a sump to a tank will allow you to hide equipment and while adding water volume making your tank more stable. Traditional overflows require you to drill holes in your aquarium where Eshopps PF HOB overflows...
www.bulkreefsupply.com
I added a right angle breather tube in the sump side of the plumbing since i was placing the drain hose deep into the chamber of the sump and I wanted to reduce salt spray.
This is my return pump and it's just built with flexi PVC attached to it and a u-bend angle diverter over the top of the tank (Placed on the opposite end from the overflow) It's all held in place with some velcro on the back and the top of the tank also.
It was now time to put in the new sand and fill the tank. I got all the saltwater I needed from my local fish store and was intending to use a very large portion of my water from the old tank as well. I rinsed the mixture of coarse and fine sand with RODI water before I put it in the tank and then when pouring the water into the tank I used a sheet of bubble wrap and a strainer to reduce the stirring up of the sand.
Once the water was all in the new tank I let it run and heat up for a couple of days waiting for the cloudiness to settle down.
I ended up adding one more Kessil A160 WE Tuna blue to the tank since I already had one in the existing tank with a controller so I had 2 on it. I thought this would be good enough for this tank but after a while I was wrong about that - Which I will get into later. It was time to move over the existing rock and all the fish.
I kept the rock in the same exact structure to give my fish a comfortable place to call home. Now that I had all this extra room I needed to add more rock.
I ended up going to a local fish store that had established tanks for years and they let me purchase some rocks out of their tanks. I looked for ones that were fully cured and ready to go with lots of good coralline algae on them. I transported them in a bucket from the store in water so they would not have any die off on the way to my home and I put them in the tank. I even picked up some purple mushrooms while I was there.
The tank now looked great. I continued to test nearly every other day and things were wonderful. I never had any issue with ammonia or nitrite. I did have some high nitrate for a bit which was caused by my old tank being cut off from the sump for a little bit. I should not have moved over the water that was sitting in that sump for a couple days but lesson learned there. I did a water change and it dropped. Also though my test kit was near expiration and was reading false high numbers on nitrate.
The new tank is all set up and looking beautiful. I've been adding some things to it little by little and I will share those on this thread later on but I wanted to get this started for everyone and not inundate you all with TMI at the start.
Here's my readings for Ammonia and Nitrite over time. As well as a few others. I use Aquatic Log and its wonderful.
My Phosphate and Nitrate just crashed to zero and that's because I just added a more powerful skimmer than I had before. I'm currently working on that and more to come about it as well as the lighting situation too.
Thank you for taking the time to check out my tank!
Last edited:


