Any progress in this project?

Navigation
Install the app
How to install the app on iOS
Follow along with the video below to see how to install our site as a web app on your home screen.
Note: This feature may not be available in some browsers.
More options
You are using an out of date browser. It may not display this or other websites correctly.
You should upgrade or use an alternative browser.
You should upgrade or use an alternative browser.
New 310g Mixed Reef Tank Man Cave Build
- Large Build
- Thread starter CincyReefer07
- Start date
- Tagged users None


OP
OP

It’s been progressing slowly ever since the holidays then ended up getting sick after New Years which also set me back some on the build. Since my last update I’ve bought a second Maxspect mj-dc12k return pump to run (2) returns and have been working on finishing up the doors to my stand which I’ll have put on this weekend and just the other day I pulled (2) new 20amp circuits from my panel down to my sump area for dedicated circuits for everything, along with a 3rd circuit that was existing that I’ll use for stuff that doesn’t draw much since other stuff in my basement is tied to it.Any progress in this project?
I’ve also decided as I was getting ready to plumb the sump into the main DT right before I got sick that I’m going to build a barrier wall between my hvac system and my sump to keep any moisture from causing any issues with the metal hvac stuff right next to it. I’ll be building a wall up to the ceiling and then drywalling everything around the sump with green board drywall and then glueing white frp paneling onto the drywall to protect from moisture. Now that I’m finally getting better I hope to start having more updates again a bit more frequently soon. Hope to have the doors on the stand by this weekend and stand will be 100% finished and have the wall built and be able to start plumbing the tank by the end of this weekend

Last edited:
Good stuff! I’m building slow and got sick as well so I get it. All progress is good progress!

OP
OP
Well I’m finally starting to get back into the build again after having a couple weeks of downtime. Today I finally can say my DIY stand is 100% finished as I finally finished the doors and got them put on. Now onto finishing my sump room and doing the plumbing of the tank.
I’m still deciding on lights, trying to decide between (3) Red Sea 160s or Philips Coral Care Gen 2’s or the new Orphek Atlantik Icon lights. Still need to buy a Pentair 80w UV and a small Sicce pump to feed it and another 275-300lbs of rock as well as sand which I’m leaning towards going with Ocean Direct live sand and having a 2 to 2.5” sand bed.
I’m still deciding on lights, trying to decide between (3) Red Sea 160s or Philips Coral Care Gen 2’s or the new Orphek Atlantik Icon lights. Still need to buy a Pentair 80w UV and a small Sicce pump to feed it and another 275-300lbs of rock as well as sand which I’m leaning towards going with Ocean Direct live sand and having a 2 to 2.5” sand bed.
Attachments
Looking good!
OP
OP
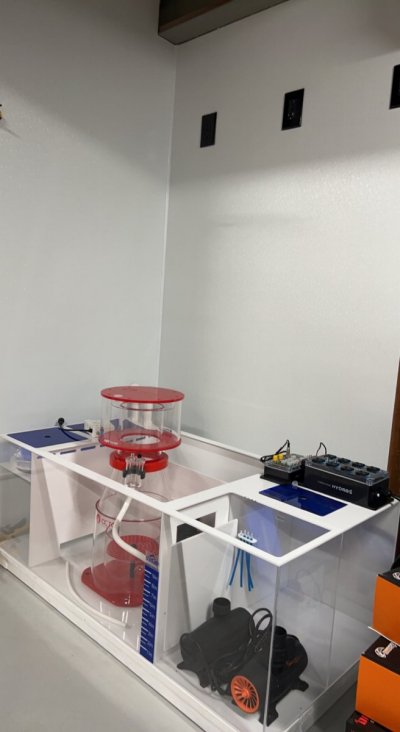
Haven’t had much for updates recently, I’ve had a lot going on recently and haven’t been able to devote much time to the build project. But this weekend I’ve been working on my sump room (aka laundry/storage room that’s quickly being taken over by mixing stations, controllers, filtration equipment and qt tank haha). The room was basically an unfinished room so I decided I’d make the area around the sump look a bit more finished by adding some green board drywall(mold resistant) which will also have FRP paneling(waterproof) glued onto it. And to also function as a barrier wall between my sump and my heating and air unit to help keep any potential rusting/corrosion to a minimum since saltwater and ductwork doesn’t exactly mix I’d say. I also added 2 dedicated 20 amp gfci protected circuits as well that are about 5 feet above the sump on the wall behind the sump. The wall behind my sump will serve as basically my controller board. I have concealed wireways that will be mounted on that wall to make all of the controllers, surge protectors and what not look much cleaner and neater than having cords looking like a mess everywhere.
First pic is how it looked before I added the wall and drywall, second is where it’s at tonight, I’ll be adding the FRP paneling tomorrow and move the sump back into place


First pic is how it looked before I added the wall and drywall, second is where it’s at tonight, I’ll be adding the FRP paneling tomorrow and move the sump back into place

OP
OP
Yeah I figured keep them high, but then I’ll have my surge protector mounted just below them, and then my hydros controller mounted just below the surge protectors, and then the actual pump controllers and what not right below that. So everything will be at least 2 or 3 feet above the sump at the lowest point on that wall and go in a bit of an order from top to bottom of what’s mountedVery nice! I put the outlets in my fish room about 6' off the ground to, gfci also just incase.
OP
OP
Well it’s not much but I got a little farther and closer to finishing up my sump area the last couple days with finishing up the walls. Just gotta plan out where I want the surge protectors and different controllers to mount on the wall, run my black cable raceways so the wiring is mostly hidden, and make sure I leave room for any expansion onto the setup for future just in case. Then onto finishing the plumbing
Attachments

Excellent choice of skimmer, I used that same one on my last system and should have not parted with it. Good idea on the circuit, I did the same with mine to keep it isolated. Following along, looks to be a good build.
OP
OP
Thanks! Yeah I can’t wait to finally have everything up and running to get to really see the stuff at work. Progress has slowed down a bit the last couple months, trying to get the funds saved up to finish off buying the last few things I need/want before I get around to finally putting water into the tank. But making a little bit of progress one way or another every week or so. Just not always much worthy of posting aboutExcellent choice of skimmer, I used that same one on my last system and should have not parted with it. Good idea on the circuit, I did the same with mine to keep it isolated. Following along, looks to be a good build.
Anything good takes time, looking back I wish I would have slowed down a little, better to be sure the first time around and typically less expensive. It has almost been a year for me and finally things are close to where I want them.
Well I’m finally starting to get back into the build again after having a couple weeks of downtime. Today I finally can say my DIY stand is 100% finished as I finally finished the doors and got them put on. Now onto finishing my sump room and doing the plumbing of the tank.
I’m still deciding on lights, trying to decide between (3) Red Sea 160s or Philips Coral Care Gen 2’s or the new Orphek Atlantik Icon lights. Still need to buy a Pentair 80w UV and a small Sicce pump to feed it and another 275-300lbs of rock as well as sand which I’m leaning towards going with Ocean Direct live sand and having a 2 to 2.5” sand bed.
the stand came out amazing!
I have been looking at the 310 for a year + I relly want a FOWLR tank.
anyway do the doors just pop in and out or are they hinged? guess with the fish room you dont need to get under the stand much .
OP
OP
They are hinged using piano style hinges. Although I could have also done it using some type of magnets to just pop them on and off. But this worked for me just as well. I really will have very little need to be getting inside the stand for anything. Mostly just storage for things like pellet foods, glass scraper, spare pumps/heaters, random things like that mostly.the stand came out amazing!
I have been looking at the 310 for a year + I relly want a FOWLR tank.
anyway do the doors just pop in and out or are they hinged? guess with the fish room you dont need to get under the stand much .
OP
OP
Got 160lbs of Marco rock last week, plus a few large shelf pieces, on top of the 60ish pounds of old pukani rock I got from someone’s old system they took down years ago, but have been most excited to get my order of Cornerstone branch rock which finally came today. So another 37lbs of that, it’s just about ready to start building my rockscape for the tank! Finally
I’d like to say the cornerstone branch rock came without incident but unfortunately only 4 of the 14 total pieces arrived unscathed and the rest had random pieces broken off. But luckily it was actually very easy to glue back together just the way it originally was with some good coral frag glue-gel and held back together instantly within 30 seconds strong as can be. Gave me a nice little project to do on the patio for a couple hours tonight.
Finishing up the sump plumbing Saturday and then playing with my rocks most likely lol

man that is a nice garage. what car you got in there?
and of course the scape is gonna look great too.
and of course the scape is gonna look great too.
OP
OP
Thanks dude! That was my project a couple summers ago, redoing my garage into more of a mancave/toy garage. Got my ‘03 50th anniversary vette in there, “little” bit of work done to itman that is a nice garage. what car you got in there?
and of course the scape is gonna look great too.
") , and a rzr xp1000. Definitely excited to get started on building the scape. Probably start playing around with it at some point this upcoming week.
, and a rzr xp1000. Definitely excited to get started on building the scape. Probably start playing around with it at some point this upcoming week.

Last edited:
OP
OP
Well spent the day planning, measuring, cutting, and dry fitting the pvc for the plumbing. Only to get to the final piece and find out I’m a little under 2 feet short on pvc to finish out one of my two return lines. And I thought I ordered plenty lol. But the drains are done and dry fitted, and one of the returns is also, and the second is almost done except for a small section. This is my first time plumbing a reef tank. I’ve always done hob filters, skimmers and what not in the past. And yes I used 2 gate valves on both drains, no reason to have any gate valves honestly as I’m only using Maggie mufflers on both drains for a full drain but I figured I had them, screw it, I’ll throw them in there to have, they look cool anyways haha
More than welcome to make any comments and/or suggestions. It’s not glued yet so things can be changed last minute if need be. I will be adding a pentair uv to the setup before any fish/inverts/corals go into the tank but I figure I don’t necessarily need it yet just to get the tank up and running and cycling first. The wall around the sump will be next project, mounting all the controllers and cable raceways to hide the wiring to make it look clean and only see mostly just controllers and surge protectors.
I do also plan on boxing out the return duct on the right of my sump also to make it look a little more finished off and clean, just wasn’t on the priority list yet. And finishing off the exposed 2x4 on the left wall of my sump.
Last edited:

OP
OP
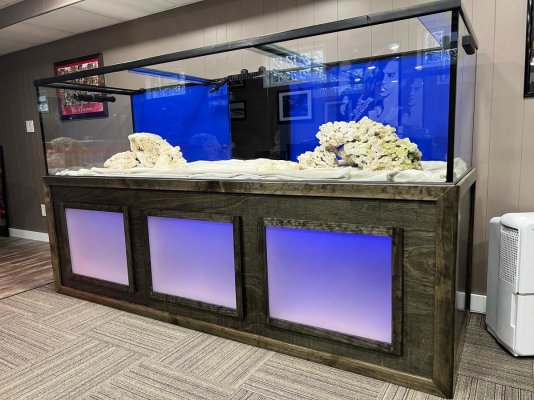
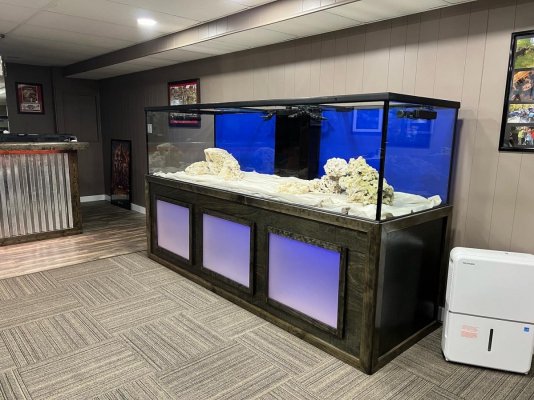
Well got bored last night and decided I’d start playing around with some of the rocks I have for my tank. This here is maybe 200lbs worth of rock. This IS NOT the final look. I was more so just playing around stacking rock to see how it will look, my first attempt. I like a more natural looking reef rather than the artistic looking nsa. But want to make sure I have enough caves and overhangs and hiding places for the tang gang and amount of fish I’ll have.
Feel free to give your thoughts and suggestions on what I should try. Can’t decide if I should try to build it up taller or just taller on one side, add more caves or overhangs, open up more space for some swim throughs, just not sure. Aquascaping is HARD! Lol feel free to comment your thoughts, but like I said, this was just a first attempt of probably many attempts before I settle on what I like. I have another 60lbs of Marco rock and another 15-20lbs of old pukani rock.
Considered buying 20-25lbs of Australian live rock and/or KP Aquarics live rock to put in the tank as well
Similar threads
- Replies
- 22
- Views
- 716
- Replies
- 5
- Views
- 228
- Replies
- 9
- Views
- 307
New Posts
-
-
-
 California Live Goods Stratosphere colonies and SPS 8 pack
- Latest: Tyler Drehobl
-


