Planet 235 Upgrade - The Requiem Reef

OP
OP
skyrne_isk

skyrne_isk

Active Member
View Badges
Joined
Jun 5, 2019
Messages
446
Reaction score
324
Rating - 0%
0   0   0
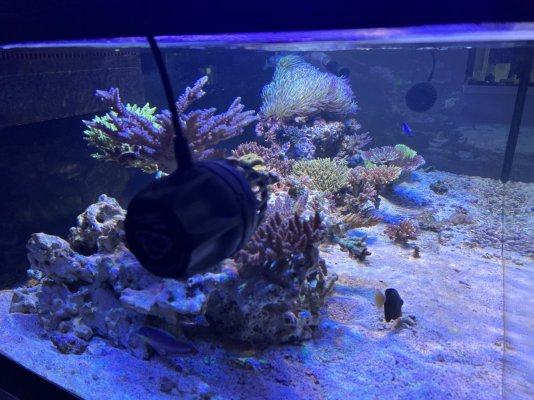
Trying to get some more pics going on here for all of you. My current oldest fish: some wild SI perculas. 7D62F9AB-4C31-46A7-A332-151E6196A393.jpeg

This pair would be 10+ years old. Give me wild caught clowns every time over captive bred. Sure they often have brook, but it’s not too hard to treat these days. Oddly enough, they actually prefer the mag but since the move they haven’t left the gig. They do rotate back and forth though out the day. An interesting note - when they are only in the gig they become much darker - almost all black except for fins. Something to keep an eye on if they stay in the gig for a few weeks.

64BEEBEC-BCF4-4C86-A7A5-64E356B59A5D.jpeg
 
Last edited:
OP
OP
skyrne_isk

skyrne_isk

Active Member
View Badges
Joined
Jun 5, 2019
Messages
446
Reaction score
324
Rating - 0%
0   0   0
And today’s mini project: I need to lower the rock peak in the yellow circle. Both the base structure and the coral base have been drilled (the orange is a fiberglass rod that I will eventually cover with rock and epoxy). But right now the coral is only an inch from the surface - would like to give it a little more vertical room to grow. 98B8ED17-3A6C-42B4-8241-F7C22180800D.jpeg
 
OP
OP
skyrne_isk

skyrne_isk

Active Member
View Badges
Joined
Jun 5, 2019
Messages
446
Reaction score
324
Rating - 0%
0   0   0
And done.

48F9418B-1D29-4F8C-A5CE-F9B1A2C5B463.jpeg

The rod had to be cut down 1/2 or so. To remove the rock I took some channel locks and just crushed the high spot until it lowered and mated nicely to the bottom of the colony rock.

From the reverse side. Was thinking this would need to be mortared with cement, but now am thinking epoxy will do fine.

43EE1023-A1FB-4BE4-B3D4-33DCEA4653D1.jpeg
 
Last edited:
OP
OP
skyrne_isk

skyrne_isk

Active Member
View Badges
Joined
Jun 5, 2019
Messages
446
Reaction score
324
Rating - 0%
0   0   0
I pulled the striped bristletooth tang last night. Was a total PITA but got it done. I ended up putting in an egg crate divider to cut the tank in half and then stuffing rocks with retail shopping plastic bags. It actually worked out pretty well. I made a half dozen unintentional frags but nothing too bad. The bags are great as they cut off access to hiding spots and are really disorienting to the fish since they eliminate so much negative space.

It seems like almost every bristletooth tang I have ends up being a total jerk after a while. Remember when I mentioned the goldflake keeping everyone in line? With him gone, it appears that the striped bristletooth was assuming the top spot in the hierarchy of the tank and it was.... not going so well. The gem tang is probably an inch bigger, but he had several marks on him. Both of the earmuffs have bite marks missing out of their dorsal fins and the largest black leopard had both of his pelvic fins nipped down significantly! I sat down and kept an eye on the tank yesterday afternoon and caught the bristletooth in action nipping at everyone so out he goes.

Does anyone have any insight into decently behaved Ctenochaetus tangs? I had a Chevron a while back who was an angel, but with Hawaii still closed that's not an option. Maybe a marginatus? The bristletooth tangs are great for the utility they provide but their behavior is off putting. Perhaps it's just bad luck on my part....
 
OP
OP
skyrne_isk

skyrne_isk

Active Member
View Badges
Joined
Jun 5, 2019
Messages
446
Reaction score
324
Rating - 0%
0   0   0
Equipment update coming later today. Here is a preview. This package showed up Friday…
 

Attachments

  • IMG_4523.jpeg
    IMG_4523.jpeg
    169.9 KB · Views: 26

Petcrazyson

5000 Club Member
View Badges
Joined
Apr 21, 2022
Messages
5,613
Reaction score
19,458
Location
Clermont, FL
Rating - 0%
0   0   0
I pulled the striped bristletooth tang last night. Was a total PITA but got it done. I ended up putting in an egg crate divider to cut the tank in half and then stuffing rocks with retail shopping plastic bags. It actually worked out pretty well. I made a half dozen unintentional frags but nothing too bad. The bags are great as they cut off access to hiding spots and are really disorienting to the fish since they eliminate so much negative space.

It seems like almost every bristletooth tang I have ends up being a total jerk after a while. Remember when I mentioned the goldflake keeping everyone in line? With him gone, it appears that the striped bristletooth was assuming the top spot in the hierarchy of the tank and it was.... not going so well. The gem tang is probably an inch bigger, but he had several marks on him. Both of the earmuffs have bite marks missing out of their dorsal fins and the largest black leopard had both of his pelvic fins nipped down significantly! I sat down and kept an eye on the tank yesterday afternoon and caught the bristletooth in action nipping at everyone so out he goes.

Does anyone have any insight into decently behaved Ctenochaetus tangs? I had a Chevron a while back who was an angel, but with Hawaii still closed that's not an option. Maybe a marginatus? The bristletooth tangs are great for the utility they provide but their behavior is off putting. Perhaps it's just bad luck on my part....
Many large Bristletooths seem to adopt a very aggressive domineer, and a lot of the reasons why bristletooths come out on top of everyone and highly aggressive is because many people who keep bristletooths have a smaller tank, so with no other tang competition (specifically tang competition and not other fish like angels or wrasse) , the bristletooth’s adopt that overly mean character
 
OP
OP
skyrne_isk

skyrne_isk

Active Member
View Badges
Joined
Jun 5, 2019
Messages
446
Reaction score
324
Rating - 0%
0   0   0
The skimmer update

My last tank before the upgrade ran for just short of three years. That system was 140ish gallons with a 75G sump. The majority of the first couple years I ran a Bubble King Double Cone 180 on that system. Even though officially rated for only 132G, it probably handled my old system fine. As we all know, BK significantly underrates their skimmer capacity. But as I went through the uglies in the early part of that setup you think of things to change (as one does) and I noticed that the RD3 50W was being ran at much under half its rated power on the 180 Double Cone. Which then made me wonder if that pump could be run on a bigger body to good effect.

I had bought a Vertex Omega 200i skimmer when my last tank was built to run on the Tampa Bay live rock QT tank. That skimmer body is decently larger than the 180 Double Cone but shaped almost the same. Here is the Vertex Omega body.

omega 200i.PNG

So the pump is internal on the 200i but I needed a way to mate the external RD3 pump to the new body. A couple trips to the hardware store and some PVC glue and machining gave me this:
nozzle.jpg

Not the best picture, but it's the best closeup that I have. Basically, a threaded 1.5" male adapter to a barbed fitting fits into the Vertex Omega manufacturer's internal pump intake nicely and let's you get to the silicone nozzle on the RD3 pump from the Bubble King.

The other problem to solve is how to convert the internal bubble plate on the Vertex skimmer to the external pump format on the Bubble King.

Here is the bubble plate on the Vertex, where the input to the chamber is on the bottom:
bubble plate.PNG


And here is the bubble plate on the Bubble King - which I needed to replicate for the Vertex body. It's pretty similar in design but has an additional open cylinder on top of the plate and the input to the chamber is from the side.


bubble plate BK.PNG


I started by grabbing a scrap square of acrylic and drilling a hole in the middle of it. The old bubble plate diameter was measured and then the scrap acrylic square was loosely screwed into the table router face at this diameter. The bubble plate also needed a channel to hold the open cylinder; a few test passes on the scrap piece gave me this:

IMG_2471.jpg

The first turn was too small for the channel, but the second was right on the money (which is why the channel is too wide in the attached pic, but it was only scrap anyway). With these tries under my belt, I turned out this piece:

IMG_2457.jpg

On which I just traced the old bubble plate hole pattern layout. I hand drilled pilot holes but had to get use a special tool to get the chamfered edges of the holes done.

After some fun with my father in law's drill press, I ended up with this - which I was pretty happy with. The chamfered edges were done by setting the stop of the press just as the oversized bit made contact with the acrylic plate. Not too bad at all.

IMG_2458.jpg

Both bubble plates included a support post used to hold in with a screw. I had some scrap acrylic rod on hand, so some quick time with the saw and tap gave me this:
post.PNG


Weldon #4 to attach the rod to the base plate acrylic (which was then screwed to the PVC bottom).
IMG_2470.jpg


The last piece to solve for was the actual acrylic tube in the bubble plate. I was able to find some 6" acrylic cylinder on eBay for maybe $20. It just needed cut to length and hole drilled in the side of the lower piece for the nozzle to fit into. One piece was welded to the bubble plate, the other cylinder is free as the screw holds it in place with tension.
IMG_2469.jpg


And here it all is assembled:

IMG_2473.jpg

This frankenstein skimmer of the Vertex Omega 200i and the RD3 pump has been in use for the last two years and I have LOVED it. The RD3 pump had plenty of extra horsepower to turn up and is STILL only at a little over half. Could the Double Cone 180 have ran my last system (and probably this one)? Yeah, I think so. But I really did enjoy the DIY aspect of the project and getting it all to work. One the recurring themes in my thread is going to be fixing old equipment or building something up yourself. Hope you folks enjoyed this update.

Astute readers may have noticed I didn't actually answer what was in the Royal-Exclusiv box.....
 
Last edited:
OP
OP
skyrne_isk

skyrne_isk

Active Member
View Badges
Joined
Jun 5, 2019
Messages
446
Reaction score
324
Rating - 0%
0   0   0
Many large Bristletooths seem to adopt a very aggressive domineer, and a lot of the reasons why bristletooths come out on top of everyone and highly aggressive is because many people who keep bristletooths have a smaller tank, so with no other tang competition (specifically tang competition and not other fish like angels or wrasse) , the bristletooth’s adopt that overly mean character
So what does this mean vis-a-vis stocking? Is this a "add the bristletooth last" or "just don't add one because they all end up aggressive"?
 

Petcrazyson

5000 Club Member
View Badges
Joined
Apr 21, 2022
Messages
5,613
Reaction score
19,458
Location
Clermont, FL
Rating - 0%
0   0   0
So what does this mean vis-a-vis stocking? Is this a "add the bristletooth last" or "just don't add one because they all end up aggressive"?
Bristletooths don’t necessarily need to be added last but it can be beneficial to practice this.

You can totally have or add a bristletooth what I mean is with no other tangs housed with it bristletooths can turn more aggressive then they should be
 
OP
OP
skyrne_isk

skyrne_isk

Active Member
View Badges
Joined
Jun 5, 2019
Messages
446
Reaction score
324
Rating - 0%
0   0   0
The skimmer update - part 2

Since the Bubble King skimmer hadn't been used on my tank in a couple years, I made the decision to sell it along with it's stock pump here on R2R to another member. This left me with the need of a replacement pump to continue to run on the Vertex body.

The RD3 skimmer pump is rated at 1500 lph. On the Royal Exclusiv site it appears they are now offering the Red Dragon X pump as an alternative to the RD3, but with a much lower price when buying the pump alone. What makes no sense is that when buying as part a new skimmer as well, the price points between the RD3 and X are usually within $100 or less. But when buying the pump alone, the price of the RD3 is almost double the X! So I opted for the 50W Red Dragon X pump and Royal Exclusiv had it to me last Friday.

My initial review is extremely positive - the 50W Red Dragon X is also rated at 1500 lph and if anything runs the skimmer at less relative power than the RD3. By this I mean that the RD3 was turned up to about 50% whereas the X is only at 25% or so. Whether this difference is only due to the newness of the pump I'm not sure, but for anyone wondering the X series pumps are great.

It needed a bit of a riser plate, but I had some sheet PVC handy so I cut a piece down to sit the pump on no problem.
skimmer with new pump.jpg

There are definitely fewer "steps" to the power settings on the X series pumps than the RD3 and the pump itself is much lighter and probably of a lesser quality. The X series has maybe 8-10 steps of power whereas the RD3 has 100... but I am not sure the 1% incremental power difference is meaningful. I would typically turn the RD3 up or down 5-10% at a time to notice much of a difference.

Here is a couple of days' worth of production using the X series.
skimmer product.jpg
 
OP
OP
skyrne_isk

skyrne_isk

Active Member
View Badges
Joined
Jun 5, 2019
Messages
446
Reaction score
324
Rating - 0%
0   0   0
Today’s update was about making some modifications to the canopy to get better coverage. The canopy itself is 52” long whereas the tank is 72”. Even though I am not trying to grow SPS at the very ends of the tank there I do need to cover the outermost corals. This section of cross bracing was keeping the LED cradles from being moved to the actual ends of the canopy so they need to be modified. I can’t actually remove them as the canopy is unbraced in the corners and these pieces are all that keep the fixture from racking. 9AD4C5BB-A560-408D-9538-C84A925A4751.jpeg

So the plan is to router out a section of these braces to let me slide the LEDs further toward the ends. But to do a decent routing job I needed to build a jig to guide the router -
I am not much of a free hander (you’ll see proof in a minute).

Here is the jig clamped into place. Build
the jig was really simple - just some basic cuts on a miter saw and a hand saw to finish the corners. 84A54904-15B6-427B-9D8D-7D6D73E6A361.jpeg

After two passes with the router here is what the finished product looks like.
B03C33EE-5001-4154-BB28-F414BFE81999.jpeg

A heck of a mess but cleaned up easily enough after being blown out with the air compressor.

Why I like using a jig is that even when you mess up all you can do is run into the piece of board being removed, so you run the router again and smooth the cut. Note how uneven the cutout piece is - proof that my skill with a router is mid at best. ;)

18B787F6-C639-4F89-84D5-2972760809DC.jpeg 661A0984-B5C9-4440-B0CB-187719D8A0EF.jpeg
 
OP
OP
skyrne_isk

skyrne_isk

Active Member
View Badges
Joined
Jun 5, 2019
Messages
446
Reaction score
324
Rating - 0%
0   0   0
On the tank front, things are settling in nicely. Most of the corals are mounted and the tank is getting close to be ready for a first FTS. Some diatoms have bloomed and covering the new rock but nothing to be concerned with. It’s always interesting how you think you’ll have all this room in your new tank but by the time you get everything in place….

I have had one frag almost RTN completely, but the part that was getting the most light is still alive. Several of the corals on the unplanned Fiji rock bleached out quite a bit due to being out of the water too long while it was being adhered to the epoxied sand. But most have pretty good PE and I don’t think any tissue loss has occurred. Here is the rock in question. - the center coral was a deep purple almost maroon before the move. E939FC6C-A1B2-429D-A824-6243ED08657B.jpeg
 
Last edited:
OP
OP
skyrne_isk

skyrne_isk

Active Member
View Badges
Joined
Jun 5, 2019
Messages
446
Reaction score
324
Rating - 0%
0   0   0
Added a some yellow coris wrasse along with a Maculiceps tang to QT. They are already eating well, which is great. Currently with copper at 1.0ppm. I had the Maculiceps up to 2.0ppm briefly, but his colors darkened and he became very reclusive so I dropped back down to 1.0ppm and his behavior returned to normal. Will get back to 2.0ppm over the weekend.

Yellow coris have to be some of my favorite wrasses. Hardy, pretty, and always get along with tank mates.
 
OP
OP
skyrne_isk

skyrne_isk

Active Member
View Badges
Joined
Jun 5, 2019
Messages
446
Reaction score
324
Rating - 0%
0   0   0
Here’s the milii in the sump. She’s very friendly, but usually gets my fingers!


You can see some of the damage on the mertens from the power head - it’s healing, but missing tentacles still.
 
Last edited:
OP
OP
skyrne_isk

skyrne_isk

Active Member
View Badges
Joined
Jun 5, 2019
Messages
446
Reaction score
324
Rating - 0%
0   0   0
First couple of FTS. There are still some unmounted frags and accidental frags from moving, but it’s getting close to its final form. Enjoy!
 

Attachments

  • IMG_0696.jpeg
    IMG_0696.jpeg
    219 KB · Views: 33
  • IMG_0697.jpeg
    IMG_0697.jpeg
    242.7 KB · Views: 36
  • IMG_0698.jpeg
    IMG_0698.jpeg
    263.6 KB · Views: 33
OP
OP
skyrne_isk

skyrne_isk

Active Member
View Badges
Joined
Jun 5, 2019
Messages
446
Reaction score
324
Rating - 0%
0   0   0
Weekend project has been finishing the doors to the tank. The new tank arrived a week or so earlier than scheduled, so I didn’t have time to finish and mount the doors. The slides for the doors have been mounted to the stand - but I’ll go into more details on that when I cover the stand build properly.

There are 5 doors total, three on the front and two sides. Material is 3/4” AB poplar. I love working with poplar. Technically considered a hardwood It rides the line between hard and soft. It’s light, easy to work with, doesn’t have a lot of grain and takes a finish well.

In the rough, sanded to 120 on the faces. 1F23C830-9638-459F-8E3C-D7A8621FC34E.jpeg

There was some additional prep work needed on the edges - a few voids to fill and the cuts needed sanding. If you look closely you can see the dimple even after filler was applied:

Before:

0FE2E464-7EA5-4C66-9605-CC336671701F.jpeg

After: 84114FBD-C5D8-45A9-9B15-2C53F1EC7502.jpeg


I did take the edges to 220 after filling.

Before:
B880996B-7A63-4DA0-BC5F-1FFC2B5A5296.jpeg

After:
86E1637E-F050-4582-AC4E-7F66F4D44797.jpeg


Two coats of Minwax white base, thinned with water about 25%. I find out of the can it’s a bit thick and doesn’t coat evenly - too easy for brush strokes to remain and didn’t want to rag wipe the finish. Here they are.
80F36EB2-64A2-4EB6-915B-F8CF3D1A694B.jpeg

Four coats of Minwax Polycrylic - thinned with water 4:1. Polycrylic is a water based urethane so not as durable as an oil based product, but it dries crystal clear which I need because it’s going over white.
B968E412-EC4B-419A-A9BF-6C89D6D5B8E5.jpeg

I have something in mind for the edges - am going to use two part epoxy and see how it goes. Am a little worried about the edges of these doors since they are plywood. Hopefully will get to it today.
 
Last edited:
OP
OP
skyrne_isk

skyrne_isk

Active Member
View Badges
Joined
Jun 5, 2019
Messages
446
Reaction score
324
Rating - 0%
0   0   0
So there’s a reason why I’ve never heard of anyone using epoxy to finish the edges of plywood. In short, it was…. disastrous. When attempting to coat all the edges of the door at once, the thinness of the application results in the material drying into a very uneven finish…. like this:
08B53F4E-6C3D-4598-80A3-3FD0E5FF1802.jpeg

If instead you tape the face of the door and paint the epoxy on the one horizontal surface, you get less unevenness by the epoxy still wants to pull away from the edges as it dries.
D1C3BE18-FD7D-48BA-A01E-E02BD03BC016.jpeg

So mind you I have now sanded all edges of the doors at LEAST twice. Now I’ve given up on epoxy altogether and have sanded back down to bare wood. And the best part? The painters tape messed up the finish on the face of the doors so now they require yet another polycrylic finish coat. :expressionless-face:

So it’s been a couple hours of work every day for the last three days and as of now I am actually still further away on finished doors than I was a couple days ago when I started the edge work. smh
 
OP
OP
skyrne_isk

skyrne_isk

Active Member
View Badges
Joined
Jun 5, 2019
Messages
446
Reaction score
324
Rating - 0%
0   0   0
So in short kids, don’t epoxy small lengths of surfaces that you cannot pool epoxy onto. When you don’t get enough material down, it’s doesn’t cure uniformly and looks like this: 4F871741-0AC9-4B90-B2E2-2CC65C2FAEDB.jpeg

I probably have a good 20+ hours getting the epoxy off all 5 door edges, restaining and then a base poly coat applied. All the door faces have just been sanded down to 320 and will receive (what I hope) is a final finish coat.

BCA170EF-C2BB-4FAE-8450-43ADACBCA2E7.jpeg

Once the doors are wrapped up I will get some posts up on the actual build of the stand. I used epoxy on it as well and would consider that effort a rousing success, but on the doors - either pour the faces (and thus the edges) or don’t do them at all!
 

High pressure shells: Do you look for signs of stress in the invertebrates in your reef tank?

  • I regularly look for signs of invertebrate stress in my reef tank.

    Votes: 29 31.9%
  • I occasionally look for signs of invertebrate stress in my reef tank.

    Votes: 23 25.3%
  • I rarely look for signs of invertebrate stress in my reef tank.

    Votes: 17 18.7%
  • I never look for signs of invertebrate stress in my reef tank.

    Votes: 22 24.2%
  • Other.

    Votes: 0 0.0%
Back
Top