Please help!! New to R2R acrylic seam process.

Soup Sandwich

Community Member
View Badges
Joined
Feb 1, 2021
Messages
56
Reaction score
22
Location
Cape Cod
Rating - 0%
0   0   0
Hello there,

I am in desperate need of help. After months of research I have finally purchased enough acrylic to build two tanks. One will be about 20 gallons (as a practice tank) and one will be 150 gallons.

Before I touched any of that material I bought a 1 square foot x 1/2” thick cast acrylic sample which I cut into 4 pieces. I did this to test my seams, as well as edge cleaning. I have bonded two seams, one with a cut and scraped edge, and another with the factory polished edge. I used the pin method on one, with very thin wire.

About 20 seconds after applying Weld-on 4 I pulled the pins and everything looked 100% perfect. No bubbles or missing solvent anywhere. I could not find a single flaw.

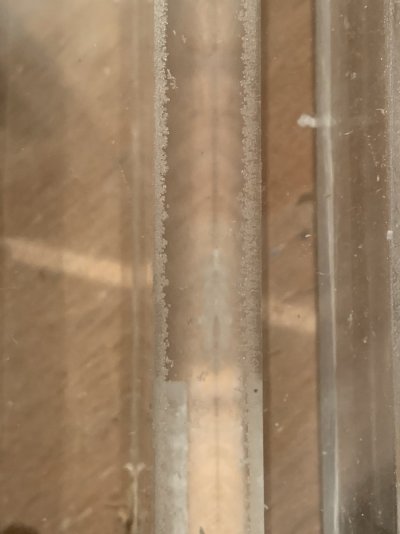
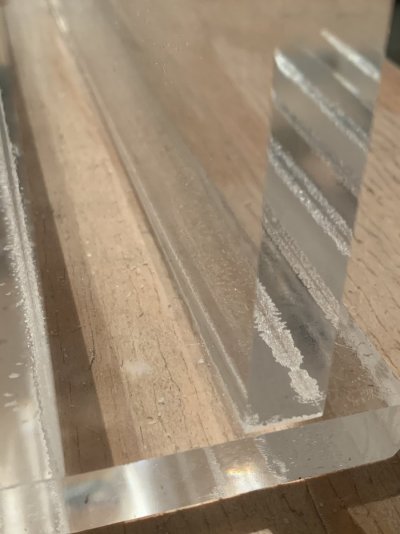
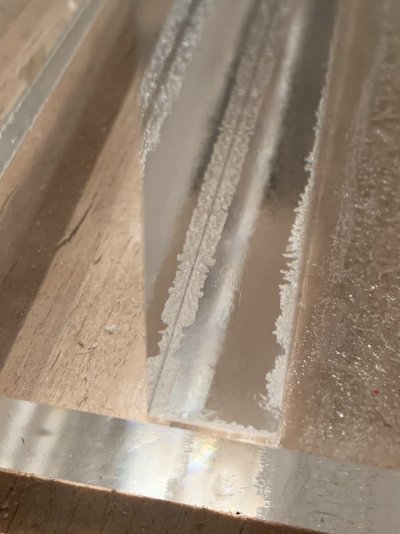
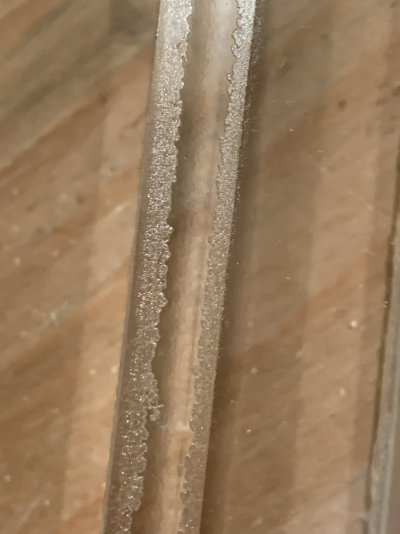
I went upstairs then came back down about an hour later. Nothing had been moved or messed with at all. What I found looks like air has somehow crept in along both sides of the seam. Please see the attached pictures. I can not have seams look like this as it will drive me crazy and I will not be confident with the durability of the tank. I am looking for any and all feedback as to why this may be happening.

Thank you for taking the time to read.

Best,

Chris
C08E0E02-19D6-48C1-AE31-3D763CD8C90A.jpeg 7F055A5B-F0D4-4CD4-97C3-9ADC7C9FFBE0.jpeg E3FED386-E7E2-47B7-ABAF-474E0B52B100.jpeg F7034401-7FE2-4673-9C04-F455996D765E.jpeg
 

fishguy242

Cronies..... INSERT BUILD THREAD BADGE HERE !!
View Badges
Joined
Jan 21, 2020
Messages
43,352
Reaction score
250,067
Location
Illinois
Rating - 100%
1   0   0
hi,tough question to answer,are all edges square,alcohol wiped,clamped? cannot give sound advice on a DT of that size!!!
i can fix it or build it ,but it ain't pretty to say the least :)
 
OP
OP
S

Soup Sandwich

Community Member
View Badges
Joined
Feb 1, 2021
Messages
56
Reaction score
22
Location
Cape Cod
Rating - 0%
0   0   0
hi,tough question to answer,are all edges square,alcohol wiped,clamped? cannot give sound advice on a DT of that size!!!
i can fix it or build it ,but it ain't pretty to say the least :)
Hey there, thanks for the feedback. The edges were square, however I did not alcohol wipe. I had read somewhere along the way that alcohol could potentially cause crazing. What % isopropyl do you recommend?
with that being said, I did thoroughly wipe the edges to the point where I could not see any sort of residue or dust.

As far as clamping, do you mean clamping to help remain square? Or clamping to apply downward pressure on the seam?

Initially I had planned on lightly clamping downward, however I had the concern of forcing solvent out of the joint so I decided against it
 
OP
OP
S

Soup Sandwich

Community Member
View Badges
Joined
Feb 1, 2021
Messages
56
Reaction score
22
Location
Cape Cod
Rating - 0%
0   0   0
I prefer to use weldon 3, it dries much faster and 30 seconds is not long at all for weldon 4. I also clamp acrylic when building tanks because it takes only the slightest movement to make this happen.
I did wonder if I pulled the pins too soon, as the Weldon was still very fluid after 30 seconds. When using Weldon 4 how long do you recommend waiting? Is there a way to tell when the time may be right, aside from elapsed time?

When you say you clamp them, do you mean to apply downward force on the seam? Or simply to hold the pieces from moving?
At the time I did this there was nobody home and it was on a very sturdy work surface on top of a concrete floor. I do not believe there was any movement to speak of.

thank you for your feedback!
 

Joe Glass Cages

Passionate Glass Cages’s Team Member
View Badges
Joined
Dec 13, 2019
Messages
1,180
Reaction score
5,666
Location
Dickson, TN
Rating - 0%
0   0   0
I did wonder if I pulled the pins too soon, as the Weldon was still very fluid after 30 seconds. When using Weldon 4 how long do you recommend waiting? Is there a way to tell when the time may be right, aside from elapsed time?

When you say you clamp them, do you mean to apply downward force on the seam? Or simply to hold the pieces from moving?
At the time I did this there was nobody home and it was on a very sturdy work surface on top of a concrete floor. I do not believe there was any movement to speak of.

thank you for your feedback!
@Ripa89 this is an art. Will take you some time to master. Not bad at all for the first time there. really not bad. The seam needs pressure during welding. I believe you removed pressure too soon. Clamping is the process we us for our acrylic fabrication. I love that you are testing your process as to learn prior to making your tanks. Smart. Try a few more test. Keep the pressure on the seams longer. much longer than 20 minutes. Hope that helps. Feel free to call and ask for Joe and we can walk through the process. Have fun.
 
OP
OP
S

Soup Sandwich

Community Member
View Badges
Joined
Feb 1, 2021
Messages
56
Reaction score
22
Location
Cape Cod
Rating - 0%
0   0   0
@Ripa89 this is an art. Will take you some time to master. Not bad at all for the first time there. really not bad. The seam needs pressure during welding. I believe you removed pressure too soon. Clamping is the process we us for our acrylic fabrication. I love that you are testing your process as to learn prior to making your tanks. Smart. Try a few more test. Keep the pressure on the seams longer. much longer than 20 minutes. Hope that helps. Feel free to call and ask for Joe and we can walk through the process. Have fun.
Thanks a lot for all of your help and encouragement! I will try some more tests using clamps and perfect the results before I start on the real material.
 

KrisReef

10K Club member
View Badges
Joined
May 15, 2018
Messages
11,713
Reaction score
27,581
Location
ADX Florence
Rating - 0%
0   0   0
Thanks a lot for all of your help and encouragement! I will try some more tests using clamps and perfect the results before I start on the real material.
The alcohol for cleaning acrylic is "denatured alcohol." Isopropyl is not the right stuff and I do think it causes crazing.
 

Cabinetman

Well-Known Member
View Badges
Joined
May 3, 2016
Messages
720
Reaction score
712
Location
Nova Scotia Canada
Rating - 0%
0   0   0
I build lots of tanks and get perfect seams. This is my protocol. I cut all my pieces using an 80 tooth blade and then lightly sand the edge with super fine sand paper. Making sure to keep it flat. Next I brace the panel to be welded and use bigger pins. Bigger than twist ties by at least double. I have woodworking clamps all in place with pins all in place then blow the seam out. Then I use either weld 3 or 4 to fill the seam. I then wait at least 2 mins to pull the pins then I tighten the clamps. Sometimes to squeeze out air I tighten quite a bit honestly. Then I leave the clamps in place for about an hour before moving on. The big secret is to lock the acrylic in place with blocks and clamps so it can’t slide on you. And clamp it tight to remove any air and squeeze the melted plastic into any voids. What happened to your seam was because you didn’t let it soak long enough and didn’t clamp it there was a void that only filled with the weld on. It looked great till the weld on evaporated. Remember that stuff has no body to it. It will totally evaporate leaving nothing behind. When you left the seam was basically full of weld on making it look solid but after an hour is when you truly know how well the weld is once it evaporates. Hope that makes sense.
 
OP
OP
S

Soup Sandwich

Community Member
View Badges
Joined
Feb 1, 2021
Messages
56
Reaction score
22
Location
Cape Cod
Rating - 0%
0   0   0
I build lots of tanks and get perfect seams. This is my protocol. I cut all my pieces using an 80 tooth blade and then lightly sand the edge with super fine sand paper. Making sure to keep it flat. Next I brace the panel to be welded and use bigger pins. Bigger than twist ties by at least double. I have woodworking clamps all in place with pins all in place then blow the seam out. Then I use either weld 3 or 4 to fill the seam. I then wait at least 2 mins to pull the pins then I tighten the clamps. Sometimes to squeeze out air I tighten quite a bit honestly. Then I leave the clamps in place for about an hour before moving on. The big secret is to lock the acrylic in place with blocks and clamps so it can’t slide on you. And clamp it tight to remove any air and squeeze the melted plastic into any voids. What happened to your seam was because you didn’t let it soak long enough and didn’t clamp it there was a void that only filled with the weld on. It looked great till the weld on evaporated. Remember that stuff has no body to it. It will totally evaporate leaving nothing behind. When you left the seam was basically full of weld on making it look solid but after an hour is when you truly know how well the weld is once it evaporates. Hope that makes sense.
Hey there,

Thank you very much for your reply. This does make perfect sense to me. At first I had fears of pushing the Weldon out of the seam which is why I initially refrained from using clamps. But after some experimenting, and especially your comment, I know that will not be the case if I let the Weldon sit for a longer period of time before removing the pins and applying pressure.

I have a design for some wood blocks to help with alignment/holding everything steady and I will be getting some new clamps before I try again. The clamps I have are a bit heavy and tend to hinder more than they help.

I really appreciate your feedback, it has been very helpful.
 

Cabinetman

Well-Known Member
View Badges
Joined
May 3, 2016
Messages
720
Reaction score
712
Location
Nova Scotia Canada
Rating - 0%
0   0   0
This is a video that shows corner blocks I designed quite a few years ago that has been copied by a guy who’s pretty well known who lives close to me....this was my first tank built and in my previous reply I made described the changes I made to the procedure. The big secret is soak time. You need to give the plastic time to melt before pulling the pins. If plastic doesn’t ooze out of the seam when you pull the pins and clamp you’re not letting the solvent melt it long enough before pulling the pins. Some harder acrylic I’ve got as long as 3 minute soak before pulling the pins... hope this helps
 
OP
OP
S

Soup Sandwich

Community Member
View Badges
Joined
Feb 1, 2021
Messages
56
Reaction score
22
Location
Cape Cod
Rating - 0%
0   0   0
Did you find a design for the wooden blocks online?
I got an idea from a carpenter’s video I saw a while back. Essentially a 90 degree block that has a 1/2” deep edge removed on the inside half. That gets aligned in the corner with a piece of wood that will be screwed in from the outside of the corner to apply pressure and lock everything together. Somewhat difficult to explain.. if you have a recommendation or a link to a proven clamp I would love to see
 

Cabinetman

Well-Known Member
View Badges
Joined
May 3, 2016
Messages
720
Reaction score
712
Location
Nova Scotia Canada
Rating - 0%
0   0   0
I got an idea from a carpenter’s video I saw a while back. Essentially a 90 degree block that has a 1/2” deep edge removed on the inside half. That gets aligned in the corner with a piece of wood that will be screwed in from the outside of the corner to apply pressure and lock everything together. Somewhat difficult to explain.. if you have a recommendation or a link to a proven clamp I would love to see
Sounds like you seen one of my videos lol
 

Creating a strong bulwark: Did you consider floor support for your reef tank?

  • I put a major focus on floor support.

    Votes: 60 38.5%
  • I put minimal focus on floor support.

    Votes: 35 22.4%
  • I put no focus on floor support.

    Votes: 55 35.3%
  • Other.

    Votes: 6 3.8%
Back
Top