XLOR8T

Active Member
View Badges
Joined
Mar 22, 2018
Messages
212
Reaction score
118
Rating - 0%
0   0   0
Got a picture of your sump please? I'm thinking of the same approach and need ideas on fuge layout in my 525.

3e2f81570a02207e8202ddd4546de6a5.jpg


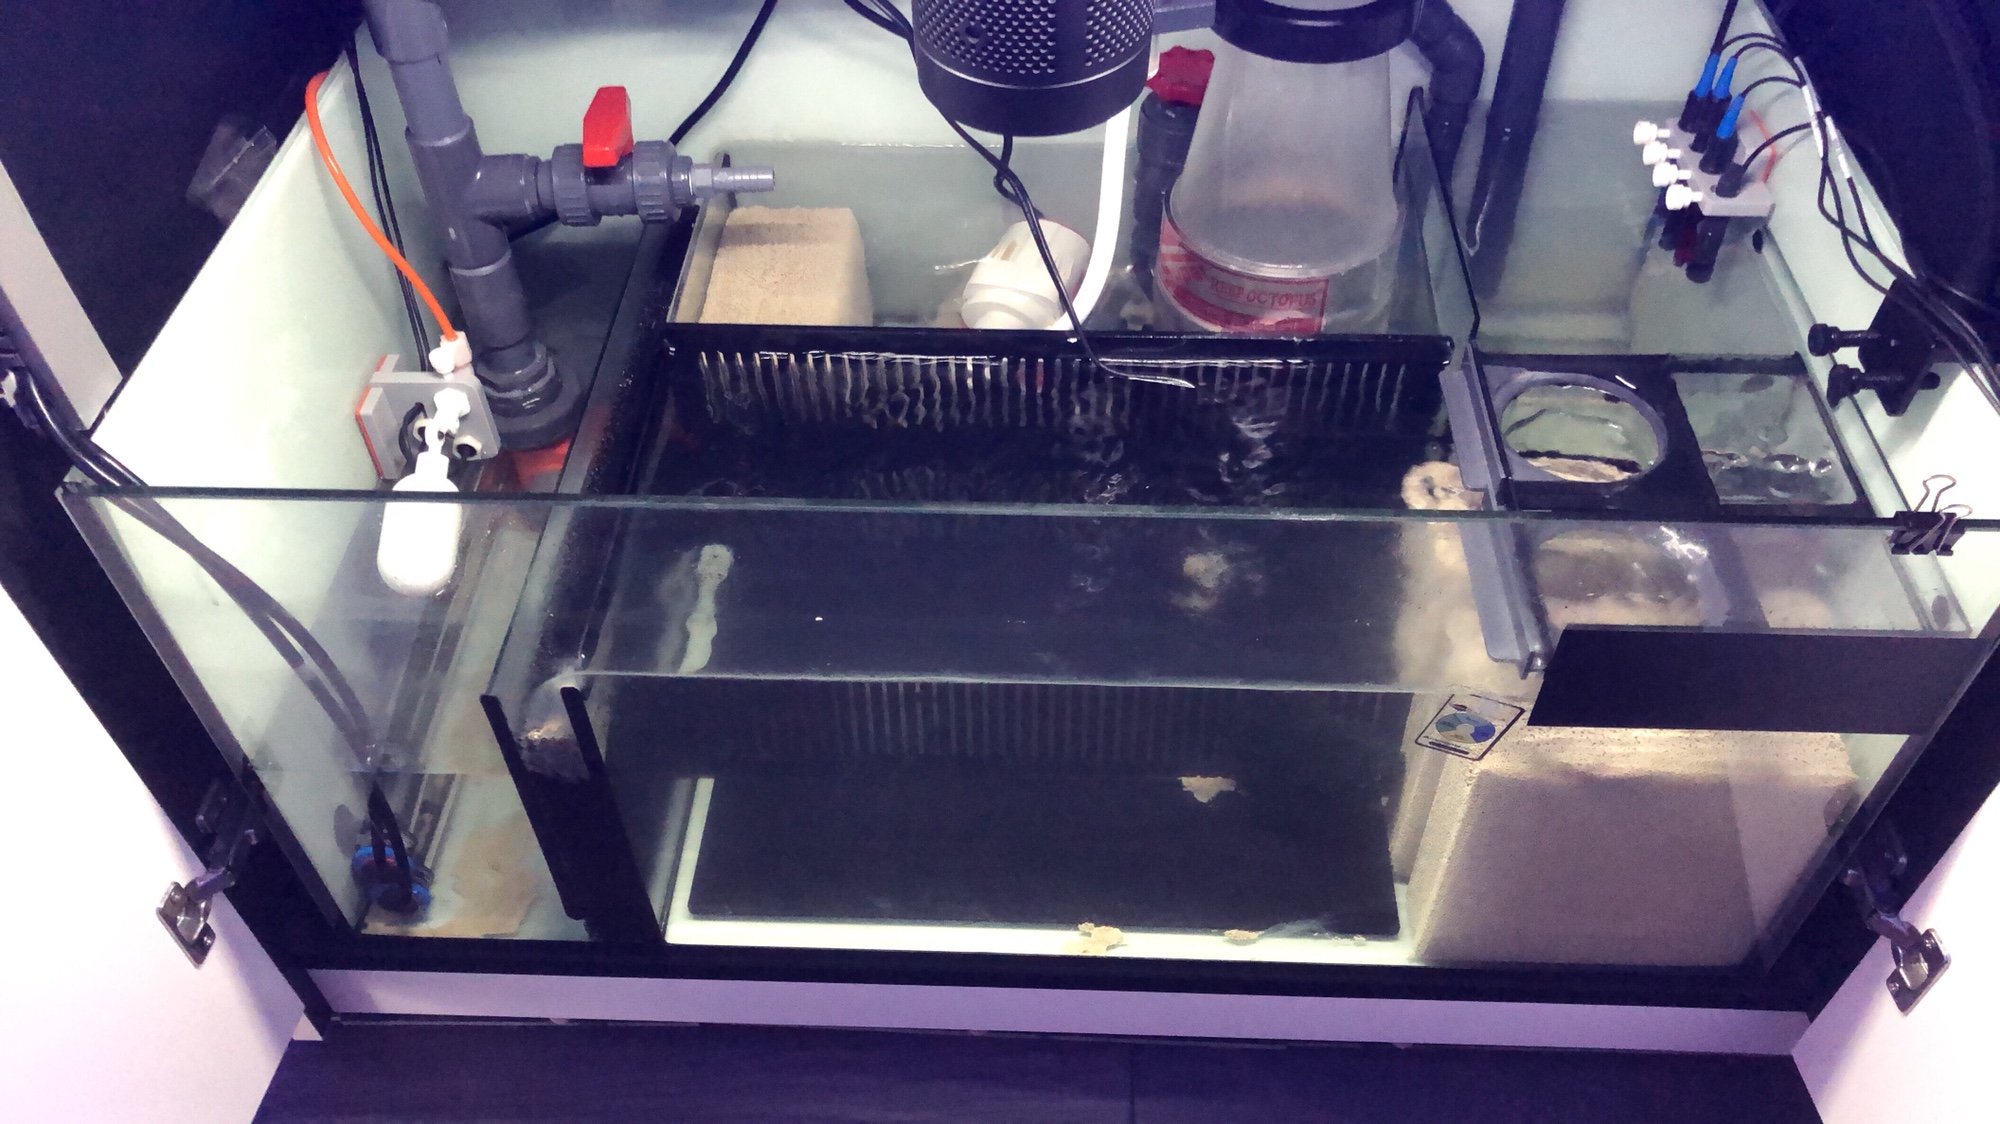
I have now moved one of the marine pure blocks to get more room
 

CDavmd

AstroReefer
View Badges
Joined
Sep 18, 2017
Messages
864
Reaction score
1,329
Location
Massachusetts
Rating - 0%
0   0   0
I got the Reefer 450 from the family of a guy who had made a lot of customizations but became ill and never put the system up. I wasn't able to meet or speak with him and his family packed it up so I've had to go through and try to figure out what everything included is. I'm not familiar with the Reefer series until now so am making the best of it. There's a lot that came with it and this guy was very serious about his build. Although it has never been used, it's daunting to make heads from tails of what his intentions were. I don't have the fittings that you have shown so that could be the reason it has been so difficult. I'm going to cut the pipes that came with the Reefer and slip on a fitting and continue my build with slip PVC valves, unions, and such. I'm sure to be posting more pictures of my progress as it comes to be. As for now posts #6407-6408 and a few previous show some of the equipment I'm trying to decipher. Thanks for your feedback!

Aha, ok I see. Well just consider doing something that will allow you to disconnect from the reefer’s plumbing easily. The reefer pipes are notoriously fragile and might need changing out some day.
 

XLOR8T

Active Member
View Badges
Joined
Mar 22, 2018
Messages
212
Reaction score
118
Rating - 0%
0   0   0
Aha, ok I see. Well just consider doing something that will allow you to disconnect from the reefer’s plumbing easily. The reefer pipes are notoriously fragile and might need changing out some day.

The barb connection is a union with an o ring. Just don’t over tighten. I lubricated my o rings with a tiny bit of silicone lubricant.
 

incloud design

Active Member
View Badges
Joined
Apr 17, 2018
Messages
312
Reaction score
181
Location
Worcester
Rating - 0%
0   0   0
The barb connection is a union with an o ring. Just don’t over tighten. I lubricated my o rings with a tiny bit of silicone lubricant.

I don't have any barb connections and actually would prefer not to. Here's what my 450 came with. There's also a ATS I spoke about in an earlier post but that will come when i start plumbing it in.

Plumbing Parts.jpg
 

XLOR8T

Active Member
View Badges
Joined
Mar 22, 2018
Messages
212
Reaction score
118
Rating - 0%
0   0   0
I don't have any barb connections and actually would prefer not to. Here's what my 450 came with. There's also a ATS I spoke about in an earlier post but that will come when i start plumbing it in.

Plumbing Parts.jpg

So the pipe on the far left is your return. The pipe with the zig zag is your emergency drain (middle pipe) and the one with the valve is your main drain. There should be a piece to connect to it from your return pump. Is there a manifold or other red pipe pieces. Did the person who sold it to you give you a picture of the sump/plumbing when it was put together?
 

CDavmd

AstroReefer
View Badges
Joined
Sep 18, 2017
Messages
864
Reaction score
1,329
Location
Massachusetts
Rating - 0%
0   0   0
I don't have any barb connections and actually would prefer not to. Here's what my 450 came with. There's also a ATS I spoke about in an earlier post but that will come when i start plumbing it in.

Plumbing Parts.jpg

The far left pipe is the top portion of your return which sits in the overflow box. Similarly the 3rd gray tube in your photo is the top portion of your emergency drain and the far right is the top portion of the main drain. The previous owner made a custom sump portion of the emergency drain (red zig zag) and used the original red sea valve with new red pipe for the sump portion of your main drain. I do not see in your photo a sump portion for the return. There should be one of those black union pieces (just before the orange sticker in your photo) with a barb connector screwed in. This is the original design by red sea. The barb connector is used with soft tubing to your return pump.

Most of us have forgone that way of doing it in favor of hard plumbing with a manifold. We remove the barb portion as I mentioned, then use the threaded to slip 3/4 inch fixture I posted earlier using teflon tape to connect to that red sea union. Then from there we glue our pipes or manifold as per your choice. You need to find that part ( if its missing you will need to order from red sea) in order to connect your pump with or without a manifold to the return pipe going back to the tank.

I would suggest dumping the main drain he made and re-make it with a gate valve. You will find it much easier to fine tune the drain and avoid the gurgling noises which can be a problem with the original red sea diaphragm valve.
 

CDavmd

AstroReefer
View Badges
Joined
Sep 18, 2017
Messages
864
Reaction score
1,329
Location
Massachusetts
Rating - 0%
0   0   0
The far left pipe is the top portion of your return which sits in the overflow box. Similarly the 3rd gray tube in your photo is the top portion of your emergency drain and the far right is the top portion of the main drain. The previous owner made a custom sump portion of the emergency drain (red zig zag) and used the original red sea valve with new red pipe for the sump portion of your main drain. I do not see in your photo a sump portion for the return. There should be one of those black union pieces (just before the orange sticker in your photo) with a barb connector screwed in. This is the original design by red sea. The barb connector is used with soft tubing to your return pump.

Most of us have forgone that way of doing it in favor of hard plumbing with a manifold. We remove the barb portion as I mentioned, then use the threaded to slip 3/4 inch fixture I posted earlier using teflon tape to connect to that red sea union. Then from there we glue our pipes or manifold as per your choice. You need to find that part ( if its missing you will need to order from red sea) in order to connect your pump with or without a manifold to the return pipe going back to the tank.

I would suggest dumping the main drain he made and re-make it with a gate valve. You will find it much easier to fine tune the drain and avoid the gurgling noises which can be a problem with the original red sea diaphragm valve.

sorry looked at your photo again- the first pipe with the right angle is your return overflow box portion. the bottom black union IS THE sump portion to connect to your pump. It will screw on in the other direction to the underside of your tank in the sump. He must have already taken off the barb if its not there. You'll still need the 3/4 inch threaded to slip fixture I am talking about to connect your plumbing to it.

Here are some photos to help you understand the parts-

images.jpeg Screen Shot 2018-06-16 at 12.00.26 PM.png Screen Shot 2018-06-16 at 12.00.11 PM.png
 

incloud design

Active Member
View Badges
Joined
Apr 17, 2018
Messages
312
Reaction score
181
Location
Worcester
Rating - 0%
0   0   0
The far left pipe is the top portion of your return which sits in the overflow box. Similarly the 3rd gray tube in your photo is the top portion of your emergency drain and the far right is the top portion of the main drain. The previous owner made a custom sump portion of the emergency drain (red zig zag) and used the original red sea valve with new red pipe for the sump portion of your main drain. I do not see in your photo a sump portion for the return. There should be one of those black union pieces (just before the orange sticker in your photo) with a barb connector screwed in. This is the original design by red sea. The barb connector is used with soft tubing to your return pump.

Most of us have forgone that way of doing it in favor of hard plumbing with a manifold. We remove the barb portion as I mentioned, then use the threaded to slip 3/4 inch fixture I posted earlier using teflon tape to connect to that red sea union. Then from there we glue our pipes or manifold as per your choice. You need to find that part ( if its missing you will need to order from red sea) in order to connect your pump with or without a manifold to the return pipe going back to the tank.

I would suggest dumping the main drain he made and re-make it with a gate valve. You will find it much easier to fine tune the drain and avoid the gurgling noises which can be a problem with the original red sea diaphragm valve.

Thank you so much for the detailed response. I've gotten the plumbing pretty well figured out other than the ATS portion. I've dug through everything and don't have the piece you're referring to. I'm hoping the fittings I ordered from BRS will settle the return. I also ordered valves for a manifold and gate valves for the drain. My biggest issue is integrating my basement sump that is running my 65 gallon display. I need to come out of the back of the stand with a WYE fitting, down through the floor and run the drain split to both the 450 sump and my 150 gallon sump in the basement. Just a few months ago I put together a nice sump system in the basement with all my equipment and set it up for essentially automated water changes. I didn't intend on an additional tank but rather to upgrade my existing tank. I could not pass on the Reefer. I'd of been foolish to do so. But now I don't want to waste all the time, effort, and money put into my original plan. So I'm trying to get the most out of what I have. I have a video showing my sump system and when I get back to my office I'll post it for reference. This will be well worth the work in the end if all goes as planned. I'm in no rush and nothing is being harmed while it is being designed. I'd have to say that the construction and development process although costly and stressful at times is almost as rewarding as the beauty the display provides. The pic is to give an idea of my layout.

20180612_110403.jpg
 

incloud design

Active Member
View Badges
Joined
Apr 17, 2018
Messages
312
Reaction score
181
Location
Worcester
Rating - 0%
0   0   0
sorry looked at your photo again- the first pipe with the right angle is your return overflow box portion. the bottom black union IS THE sump portion to connect to your pump. It will screw on in the other direction to the underside of your tank in the sump. He must have already taken off the barb if its not there. You'll still need the 3/4 inch threaded to slip fixture I am talking about to connect your plumbing to it.

Here are some photos to help you understand the parts-

images.jpeg Screen Shot 2018-06-16 at 12.00.26 PM.png Screen Shot 2018-06-16 at 12.00.11 PM.png

Not even close I'm sure but right now the sump is wet from painting and I'm short a bunch of plumbing. But mainly my plan for the return is to somehow run the UV Sterilizer above or behind the manifold with an outlet also available to feed the ATS. It's hard to show an example this early in the game but below should give an idea. The adapter from BRS should solve the connection from the schedule 80 union to the bottom of the tank. In a perfect world, lol!

UV Sterilizer ideas.jpg
 

incloud design

Active Member
View Badges
Joined
Apr 17, 2018
Messages
312
Reaction score
181
Location
Worcester
Rating - 0%
0   0   0
Can anyone confirm what this is? I believe it's a Kalk Stirrer but am not sure and it has no model number to look up. It's Bubble Magus...
Red Sea Reefer Build Part 1 (3).jpg

Thanks!
 

tenurepro

Well-Known Member
View Badges
Joined
Mar 17, 2017
Messages
844
Reaction score
1,309
Rating - 0%
0   0   0
Ok, guys... my Reefer 250 is officially 2 years old....yay!
Many thanks to all members of this forum and others that have helped me numerous times along the way!

to celebrate,
here is a comprehensive video on the system:


And here is an update of my SPS time-lapse video showing growth pictures for all my Acropora over the past 2 years


Cheers!
 

jwt1603

Active Member
View Badges
Joined
Oct 1, 2017
Messages
381
Reaction score
235
Location
St Johns, Florida
Rating - 0%
0   0   0
I changed out the RS drain valve for a gate valve last night. I'd been wanting to do this for a while but I was very nervous about it. Turns out it was a quick job and now it's easy to set, and maintain the level in the overflow.

Thanks to the people on here that supplied the part numbers and advice / guidance on how to do it.
 

incloud design

Active Member
View Badges
Joined
Apr 17, 2018
Messages
312
Reaction score
181
Location
Worcester
Rating - 0%
0   0   0
I changed out the RS drain valve for a gate valve last night. I'd been wanting to do this for a while but I was very nervous about it. Turns out it was a quick job and now it's easy to set, and maintain the level in the overflow.

Thanks to the people on here that supplied the part numbers and advice / guidance on how to do it.

Could you please help me get the drain right? I've tried a few ways on here but can't get the drain connected. I have a house full of brand new equipment and can't do anything with it due to a pipe. I ordered adapters, didn't work, sanded pipes and didn't work. I don't have a Barb fitting. I don't know what to do.
 

jwt1603

Active Member
View Badges
Joined
Oct 1, 2017
Messages
381
Reaction score
235
Location
St Johns, Florida
Rating - 0%
0   0   0
Full disclosure, the steps below are my version of what others have said on here. I take no credit for developing this. I just know it worked for me doing it the way they said. Somewhere back in this thread there is a video that shows how to do it.

I still have the stock drain pipe in the overflow. Do you? I was reading your posts and didn't know if that was changed out. If it's still stock I used Red Sea part 42222 and unscrewed the barbed fitting off of it. I then used a 3/4 inch slip to NPT threaded PVC adapter to replace the barbed fitting. I reused the RS O-ring that was on the fitting and used a couple of wraps of the heavy Teflon tape (some stores have it in pink others have it in gray) to get the male NPT threads to fit snugly in the female metric threads of the Red Sea fitting. If you use standard Teflon tape you'll need multiple wraps to get it to fill the gaps in the metric vs standard thread pitch. Then it's just 3/4 inch PVC from there to what ever you want to connect next. I don't have a manifold or anything so I just have a straight piece of PVC going down into the sump in the same place the stock drain pipe fed.

Here's one link that might help you visualize it. https://www.reef2reef.com/threads/red-sea-reefer-250.361627/#post-4477459

Broadfield did another one but I can't find it right now.
 

incloud design

Active Member
View Badges
Joined
Apr 17, 2018
Messages
312
Reaction score
181
Location
Worcester
Rating - 0%
0   0   0
Full disclosure, the steps below are my version of what others have said on here. I take no credit for developing this. I just know it worked for me doing it the way they said. Somewhere back in this thread there is a video that shows how to do it.

I still have the stock drain pipe in the overflow. Do you? I was reading your posts and didn't know if that was changed out. If it's still stock I used Red Sea part 42222 and unscrewed the barbed fitting off of it. I then used a 3/4 inch slip to NPT threaded PVC adapter to replace the barbed fitting. I reused the RS O-ring that was on the fitting and used a couple of wraps of the heavy Teflon tape (some stores have it in pink others have it in gray) to get the male NPT threads to fit snugly in the female metric threads of the Red Sea fitting. If you use standard Teflon tape you'll need multiple wraps to get it to fill the gaps in the metric vs standard thread pitch. Then it's just 3/4 inch PVC from there to what ever you want to connect next. I don't have a manifold or anything so I just have a straight piece of PVC going down into the sump in the same place the stock drain pipe fed.

Here's one link that might help you visualize it. https://www.reef2reef.com/threads/red-sea-reefer-250.361627/#post-4477459

Broadfield did another one but I can't find it right now.

Thank you so much! I've been all over the place trying to get this sorted. The link above I hadn't found in the countless searches but heard so much about Broadfield. It seems every attempt that was made to connect this plumbing just ended in a happy reefer but no details on how they got it working. I'm going to have to order a new down pipe as I cut mine following another thread on here that didn't work. So I'll order the piece above along with the down pipe, get the MPT fittings and see how it goes. Guess my house is going to be a wreck for another week but as long as it gets done is all I care. Thank you very much for your efforts and I'm happy to hear things have worked out for you! I'll post back when I get things sorted. (hopefully, lol).
 

CDavmd

AstroReefer
View Badges
Joined
Sep 18, 2017
Messages
864
Reaction score
1,329
Location
Massachusetts
Rating - 0%
0   0   0
Could you please help me get the drain right? I've tried a few ways on here but can't get the drain connected. I have a house full of brand new equipment and can't do anything with it due to a pipe. I ordered adapters, didn't work, sanded pipes and didn't work. I don't have a Barb fitting. I don't know what to do.

I don't understand, several of us have given you precise instructions. I even posted the Red Sea instructions for you and described exactly what JW just posted to you. The stock drain pipe screws into the overflow box from above. The union that goes under the cabinet screws on just below it as in the diagram. You need to remove the barb fitting that is on it ( it may have already been removed for you by the previous owner). Then purchase a slip to NPT threaded adapter. It can be 3/4 inch or 1 inch depending on your choice of pipe size for your manifold or plans. Wrap 15 turns of teflon around the threads and screw it in tightly into the Red Sea Union fixture that goes under the cabinet. You can use the O-ring if you like as described. Thats it.....from this slip fixture you glue your pvc pipe/return/manifold and you are good to go.
 

incloud design

Active Member
View Badges
Joined
Apr 17, 2018
Messages
312
Reaction score
181
Location
Worcester
Rating - 0%
0   0   0
I don't understand, several of us have given you precise instructions. I even posted the Red Sea instructions for you and described exactly what JW just posted to you. The stock drain pipe screws into the overflow box from above. The union that goes under the cabinet screws on just below it as in the diagram. You need to remove the barb fitting that is on it ( it may have already been removed for you by the previous owner). Then purchase a slip to NPT threaded adapter. It can be 3/4 inch or 1 inch depending on your choice of pipe size for your manifold or plans. Wrap 15 turns of teflon around the threads and screw it in tightly into the Red Sea Union fixture that goes under the cabinet. You can use the O-ring if you like as described. Thats it.....from this slip fixture you glue your pvc pipe/return/manifold and you are good to go.

I understand and realize several have tried to help. I was jumping around too much and following different techniques. I was caught up on the reduction that would take place with the drain using an MPT adapter. Due to getting a second hand setup with various custom works it was difficult to follow diagrams as they didn't show what I have. I will order the parts necessary and want to Thank you all for your efforts while I got through the confusion. I was stressed out and apologize for any misunderstanding.
 

Reefing threads: Do you wear gear from reef brands?

  • I wear reef gear everywhere.

    Votes: 17 17.0%
  • I wear reef gear primarily at fish events and my LFS.

    Votes: 5 5.0%
  • I wear reef gear primarily for water changes and tank maintenance.

    Votes: 0 0.0%
  • I wear reef gear primarily to relax where I live.

    Votes: 17 17.0%
  • I don’t wear gear from reef brands.

    Votes: 53 53.0%
  • Other.

    Votes: 8 8.0%
Back
Top