Taller is better: Kev's 80g column

Kevin Jaako

Community Member
View Badges
Joined
Apr 12, 2018
Messages
86
Reaction score
226
Rating - 0%
0   0   0
A few months ago I loaded my two cranky, over-tired (but mostly lovely) toddlers into the car, hoping they'd fall asleep on a drive around town... Somehow I ended up at a guy's house who was selling an aquarium (sorry sweetheart!)

A few hours later, I showed up at home with a new aquarium and no one napping.
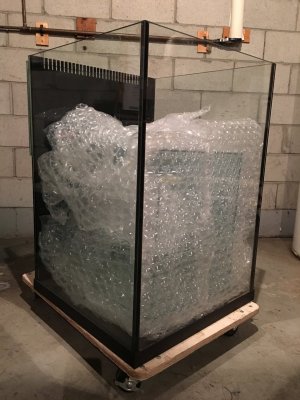
IMG_1156.jpg IMG_1154.jpg

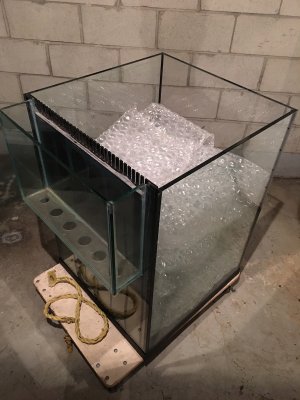
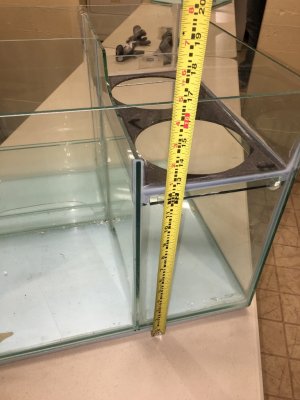
It was a custom built 80 gallon, 24" x 24"x 32" tank... I'd always had a thing for column tanks and I fell in love with this one instantly. Bevelled rimless starfire glass, black silicone, external overflow box with four 1" drains & two 3/4" returns plus a custom-made all-glass sump. The thing'd never even seen water.

It's been a few months since, and I've been snatching up second-hand equipment, painting stands, doing research and exploring the plumbing department at Home Depot. I wanted somewhere where I could document & track my progress and after being personally inspired by countless R2R Build Threads, I thought I may as well do so publicly... at the very least, you guys might keep me accountable and help me avoid cutting corners.

Here we gooooooooooo.....
KJ
 
OP
OP
Kevin Jaako

Kevin Jaako

Community Member
View Badges
Joined
Apr 12, 2018
Messages
86
Reaction score
226
Rating - 0%
0   0   0
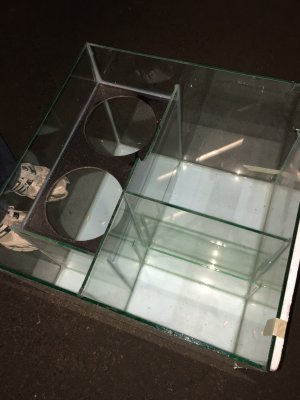
Here's the junk in my sump. Two 7" filter socks + skimmer & return pump compartments. It's 20" x 20" x 17" – designed to fit into a Marineland Ventura stand. Which it does... like a glove. I'm not sure how much else I'll be able to fit into the stand re: dosing/reactors/electronics/... I guess that's one issue with a column. Small stand!!
KJ

sump1.jpg sump2.jpg
 

NY_Caveman

likes words, fish and arbitrary statistics
View Badges
Joined
Sep 8, 2017
Messages
17,008
Reaction score
108,390
Location
New York
Rating - 0%
0   0   0
Here's the junk in my sump. Two 7" filter socks + skimmer & return pump compartments. It's 20" x 20" x 17" – designed to fit into a Marineland Ventura stand. Which it does... like a glove. I'm not sure how much else I'll be able to fit into the stand re: dosing/reactors/electronics/... I guess that's one issue with a column. Small stand!!
KJ

sump1.jpg sump2.jpg

Very nice. I think columns are a real challenge (and never thought about the stand being one as well). It will be very interesting to see what you do with it. Nice score. And funny story.
 
OP
OP
Kevin Jaako

Kevin Jaako

Community Member
View Badges
Joined
Apr 12, 2018
Messages
86
Reaction score
226
Rating - 0%
0   0   0
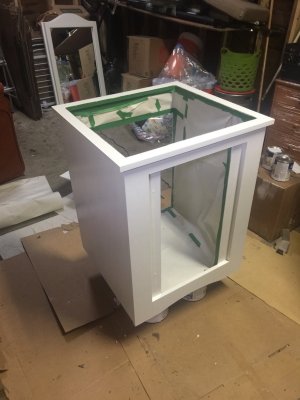
Marineland only makes their Ventura stands in black & oak. Here's the stand after about 8 coats of Dulux bathroom paint, tinted to match a chunk of IKEA shelving I brought into the store. Since the drain lines will come in through the open back, I'm thinking I might install some bungee netting across the top to keep power adapters and electronics tucked away?

I'm tired of painting...
IMG_0246.jpg

KJ
 
OP
OP
Kevin Jaako

Kevin Jaako

Community Member
View Badges
Joined
Apr 12, 2018
Messages
86
Reaction score
226
Rating - 0%
0   0   0
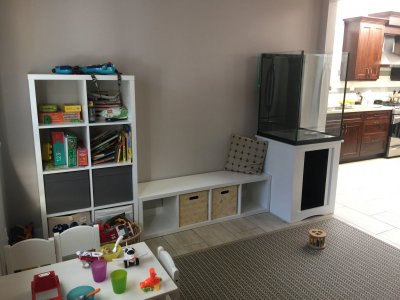
I still need to finish painting the door, but I tricked some dinner guests into helping me lift the tank onto the stand last week... The paint store did a pretty good job colour-matching to the IKEA cabinets.

The rear overflow box means the stand needs to stick out from the wall by about 4". I'm thinking I might cut a 2x4" to size and place it behind the stand to extend the base back to the wall. That would allow the sump to hang out the back of the stand, which will give me enough room in the front of the cabinet for a few small ATO/dosing reservoirs and also let me plumb the overflows straight down from the overflow box. I'll eventually make some covers for behind the tank to hide the sump & plumbing, but I'm pretty keen to get this thing cycling first. I bought a Vertex Omega 180i and a Neptune COR-20 this week.

The Marineland Ventura stand was designed for their 60g cube and my tank is 80g... I'm hoping they've overbuilt it enough.
KJ

IMG_0296.jpg
 
OP
OP
Kevin Jaako

Kevin Jaako

Community Member
View Badges
Joined
Apr 12, 2018
Messages
86
Reaction score
226
Rating - 0%
0   0   0
Thanks @Hazenight @Genomecop @NY_Caveman - yea, fitting equipment into the stand is a bit like Tetris. I had a small moment of panic when I manoeuvered my Omega 180i into the sump for the first time (thanks, @heifinator ). There's plenty of of room once it's in there, but the sump is quite tall, so getting it in & out is a bit tricky. Good thing you only need to clean these things every few years, right??? ;)

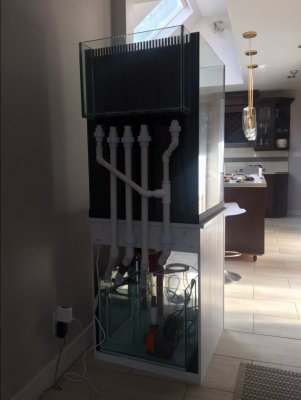
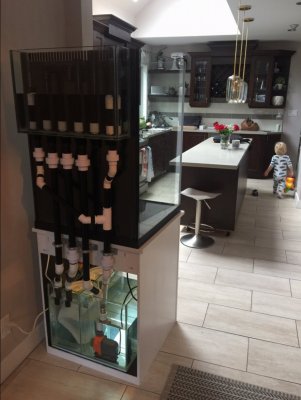
I spent the last few nights plumbing the overflow. I'd never done solvent welding before, so it was a bit of a learning experience. Getting black PVC shipped to Canada is slow & expensive, so I mocked it up first with white sch40 from my local hardware store before commiting with my nice Formufit pipe. It also let me practice a bit first. I learned pretty quickly that the pipe will seat much deeper into fittings with primer/cement than when dry-fitting, so when I re-cut everything in black pipe, I added an extra 1/4" to accomodate. I also learned not to plumb when you're tired.... I cemented the wrong fitting more than once.

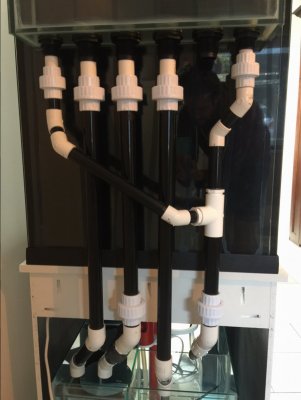
I've got a 1" Beananimal overflow with dual returns. The returns are hard-plumbed, with a short soft-tubing gap to dampen vibration. The return is 1" up to the tee, then splits into two 3/4" lines the rest of the way up to the tank. There was just enough clearance between the 3 drain pipes and the wall behind the tank to run the return across and over to the other side, hence my funky return manifold :). I also needed to get creative so I could fit an MP40 driver in the bottom corner of the tank.

I don't currently have plans to support the weight of the pipes, so they'll hang straight down off the bulkheads. There's lots of guidance out there suggesting NOT to do that, but my overflow glass is pretty thick, and the weight will be pulling straight down, so I'm hoping there won't be much stress on the bulkheads? I'd welcome any thoughts on that, though. I'd obviously rather not chance it.

KJ

IMG_0373.JPG IMG_0379.JPG IMG_0376.JPG
 
OP
OP
Kevin Jaako

Kevin Jaako

Community Member
View Badges
Joined
Apr 12, 2018
Messages
86
Reaction score
226
Rating - 0%
0   0   0
32" tall? Get yourself a mask and snorkel, you're gonna need it :)
Hah, you bet! :)

Well, it wouldnt' be a build thread without a bump in the road...

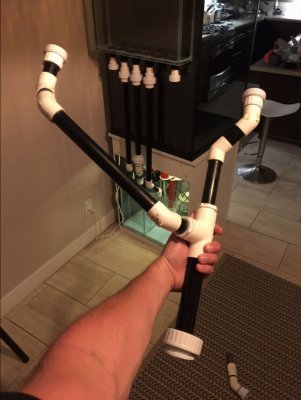
I've been finding pockets of time here & there to work on the tank, which given family & work obligations, tends to be pretty late at night. I finally got my plumbing done last night at about 1:00am and figured I'd better check for leaks before pushing the tank back against the wall. Given that I'd never welded PVC before, and that my DIY skills generally tend to be of the 3rd-times-the-charm variety, I had a towel ready. I held-off installing the Loc-line that carries the returns into the DT, so I essentially had a closed loop between the sump and the overflow box. I dialled my COR-20 onto its lowest setting and after a minute or two of "IT'S ALIIIIIIIIVEEEEEEEE" , I noticed drips coming out of the full-siphon line, just above the gate valve.

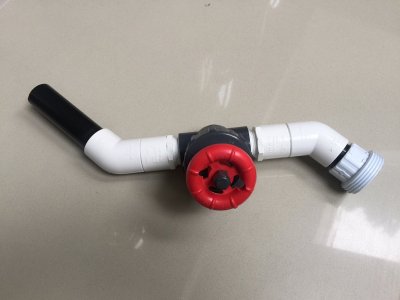
My 1:00am-self decided to cut open a tube of silicone and throw a thick, sloppy bead around the faulty joint before calling it a night. My slept-on-it-self realized this was a stupid risk and that I should just replace the faulty section and spare myself the dread of a potential time-bomb in a hard-to reach place. I'd installed a union just above the gate valve for periodic cleaning, and the valve itself had a threaded fitting, so I could easily re-do the section with half a union and 2 fittings. Unions everywhere, people.

I'll try to swap out the faulty joint tonight and run a leak-test for 24h before I push the tank against the wall. Fingers crossed...

KJ

IMG_0386.JPG
 
Last edited:

Greybeard

2500 Club Member
View Badges
Joined
Feb 10, 2017
Messages
3,233
Reaction score
8,669
Location
Buffalo, MO
Rating - 0%
0   0   0
Plumbing leaks, I've learned the hard way, are best fixed _right_. Cut it out, and do it over. PVC is cheap, in contrast to the rest of a typical reef system.

If you clean both the pipe and the joint after cutting, prep with a PVC primer, and use decent glue (I don't like the thin, clear stuff)... chances of a leak are slim.
 
OP
OP
Kevin Jaako

Kevin Jaako

Community Member
View Badges
Joined
Apr 12, 2018
Messages
86
Reaction score
226
Rating - 0%
0   0   0
Plumbing leaks, I've learned the hard way, are best fixed _right_. Cut it out, and do it over. PVC is cheap, in contrast to the rest of a typical reef system. If you clean both the pipe and the joint after cutting, prep with a PVC primer, and use decent glue (I don't like the thin, clear stuff)... chances of a leak are slim.

True that. It took me sleeping on it to see that :) I read all the "does PVC plumbing reeeaaally need primer?" threads and decided not to chance it. I was applying liberally, doing a quarter-turn and holding the joints in place, so I'm not entirely sure how I ended up with a faulty joint. In the pic above, it's the joint between the threaded male adapter and the 45º elbow to the right of the valve. As you can see, the two fittings are touching, so I'm guessing I may just have cut the joining pipe too short and ended up with a poor seal. The main thing going through my mind now is... "there's one leak I know about... what are the odds I have another?"

Any tips for identifying really slow leaks other than just periodically feeling around the joints for signs of moisture?

KJ
 

Greybeard

2500 Club Member
View Badges
Joined
Feb 10, 2017
Messages
3,233
Reaction score
8,669
Location
Buffalo, MO
Rating - 0%
0   0   0
Any tips for identifying really slow leaks other than just periodically feeling around the joints for signs of moisture?

Salt creep.

Any joint that is leaking, regardless of how slow it's leaking, is going to be encrusted with salt in a month or so, guaranteed :)
 
OP
OP
Kevin Jaako

Kevin Jaako

Community Member
View Badges
Joined
Apr 12, 2018
Messages
86
Reaction score
226
Rating - 0%
0   0   0
Another day, another trip to the hardware store!

It took me about 30 mins to cut 2 lengths of pipe, glue ‘em up and get it all pieced back together. Not too painful, as far as leak-repairs go and… it holds!! I setup a closed loop again between the sump and the overflow box and let it run overnight. I woke up to a dry floor :)

Tonight I’ll replace the power outlet with a GFI, drain the tap water out of the sump and push the tank back against the wall.

My boys were so excited to finally see water trickling through the sump. My eldest is CONVINCED that we’re gonna get a whale, a shark and a turtle in our tank. I managed to persuade him into considering fish instead, to which he agreed – but only if we get a blue fish. Any suggestions?

IMG_0390.JPG
IMG_0404.JPG

KJ
 

Greybeard

2500 Club Member
View Badges
Joined
Feb 10, 2017
Messages
3,233
Reaction score
8,669
Location
Buffalo, MO
Rating - 0%
0   0   0
Looking good!

When I was leak testing my latest build, I ran tap water for a week. Plenty of time to see if it was going to hold, but mainly, I was trying to judge noise levels, make sure I wasn't going to be unhappy with it on that front. Kept an eye on flow patterns, flow rates through the sump, noise from sump wall spill-over, etc.

Take your time. No rush. It's all much easier to change NOW than it will be once it's full of salt, sand, and rock!
 
OP
OP
Kevin Jaako

Kevin Jaako

Community Member
View Badges
Joined
Apr 12, 2018
Messages
86
Reaction score
226
Rating - 0%
0   0   0
This had been bugging me...

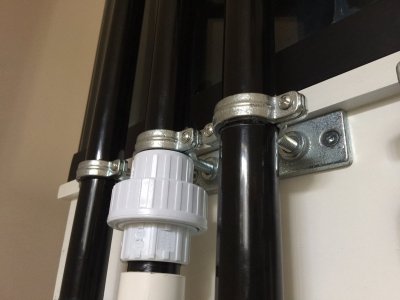
I don't currently have plans to support the weight of the pipes, so they'll hang straight down off the bulkheads. There's lots of guidance out there suggesting NOT to do that, but my overflow glass is pretty thick, and the weight will be pulling straight down, so I'm hoping there won't be much stress on the bulkheads? I'd welcome any thoughts on that, though. I'd obviously rather not chance it.

...so I picked up a couple split-ring pipe hangers from Lowes. I used some Gorilla mounting tape inside the rings to create a tight fit and clamped them down tight. Rock solid!

KJ

IMG_0408.JPG
 
Back
Top