With Headaches and Lessons Learned a New Tank Build

OP
OP
Ditto

Ditto

Valuable Member
View Badges
Joined
Apr 25, 2017
Messages
2,229
Reaction score
2,973
Location
Albany, NY
Rating - 0%
0   0   0
@Tristren - nothing special, the skimmer turns off, and the return pump and the two lights under the cabinet turn on.

They pull the cup off and clean it for me. and put a filter pad in for me.

They do not not need to remember to turn it back off it will do it for them automatically in 30 minutes.

They have two feed modes also on the touch.

One is for the fish the other for the fish/coral.

Difference is the fish/coral I leave the skimmer off another 15 minutes and the 1-10v pumps turn up higher, return pump slows down so that it can be moved around the tank more.
 
OP
OP
Ditto

Ditto

Valuable Member
View Badges
Joined
Apr 25, 2017
Messages
2,229
Reaction score
2,973
Location
Albany, NY
Rating - 0%
0   0   0
Below is the Par Readings, did this a few times and took the average, this is before I raise the lights.
Par_tank_before raising.jpg


My lights are running only at 75% power, with a max brightness of 80%, this is the peak interval when I took the readings.

I took 4 readings and then took the average of the 4. All readinf were taking with a apogee 510.
 
Last edited:

Tristren

Well-Known Member
View Badges
Joined
May 16, 2017
Messages
786
Reaction score
808
Location
Ottawa
Rating - 0%
0   0   0
@Tristren - nothing special, the skimmer turns off, and the return pump and the two lights under the cabinet turn on.

They pull the cup off and clean it for me. and put a filter pad in for me.

They do not not need to remember to turn it back off it will do it for them automatically in 30 minutes.

They have two feed modes also on the touch.

One is for the fish the other for the fish/coral.

Difference is the fish/coral I leave the skimmer off another 15 minutes and the 1-10v pumps turn up higher, return pump slows down so that it can be moved around the tank more.

Oh! I was thinking it was some special setup with a skimmate locker or something :)
 
OP
OP
Ditto

Ditto

Valuable Member
View Badges
Joined
Apr 25, 2017
Messages
2,229
Reaction score
2,973
Location
Albany, NY
Rating - 0%
0   0   0
@Tristren - I have one of those on the other tank, connected to a 5 gallon bucket. ;) works great!!

This one I am working on tieing the output to a drain line in the house will put a relay in the line and a float switch on the lid. When it fills or maintenance will turn on empty it and delay xxx to turn back on.
 
OP
OP
Ditto

Ditto

Valuable Member
View Badges
Joined
Apr 25, 2017
Messages
2,229
Reaction score
2,973
Location
Albany, NY
Rating - 0%
0   0   0
Busy day :) The Mitras Lx7206 Are now installed underneath the hood. I took the time cleaning the top of the tank while having the hood off, and doing some additional cable management under the hood so everything would be nice and neat.

First Took off the Canopy and Attached the Mounting Brackets for the Mitras Lx7206 to the top of the canopy and took two of the Deep Actinic Lights and reversed the bracket on them and mounted them also to the Top of the Canopy.
Mounting Brackets Installed.JPG


With the Hood back on I installed the Mitras LX 7206 Lights in the mounting brackets in between the Deep Actinic with the Mitras Simulation Sticks Underneath them.
Lights Hung 2.JPG


Lights Hung 1.JPG


I thought the Mitras simulation sticks may be blocked to much having the Mitras LX 7206 Lights over them but as you can see in the picture below no issues.
night 2.JPG


The Mitras-Simulation Sticks providing moonlight for the tank.
night 3.JPG


Tomorrow I will take Par Readings and post the results :)
 
OP
OP
Ditto

Ditto

Valuable Member
View Badges
Joined
Apr 25, 2017
Messages
2,229
Reaction score
2,973
Location
Albany, NY
Rating - 0%
0   0   0
First I took the Par Readings at peak light time, no adjustments of the existing Deep Actinic Lights, to see what the difference was now that they are attached to the Canopy. The numbers below represent the 2 Deep Actinic Lightbars now 8 1/2" off the water, and the Actinic light being removed. The Red Numbers were the Original Readings, Yellow numbers are the new readings.

It was not a surprise that I would loose Par, and noticed some of my Zoa's were extending reaching for the light.

Par_tank_Rasing raising no changes to % 2242019.jpg


Second I increased the % of the 2 Deep Actinic Lightbars from 85% to 100%, and the numbers did go up as expected. The Red Numbers were the Original Readings, Orange numbers are the new readings.

Par_tank_After raising lights at 100%.jpg


With the Par Reading now completed on the Mitras Light Bar V2 being raised, and the removal of the 1 Actinic Light the Mitras Lx7206 will be turned on and Par Readings taken.

Some take away:

1- Having a PAR Meter when installing lights is 100% a must, rent one if you need to but knowing what your readings are before and after helps assist on determining what adjustments need to be done with your lights.
2- The light from the Mitras Light bars 2 was more then enough when ontop of the tank, the change I did was more of a convenience factor, to make it easier for me to access things within the tank. :)
3- I was expecting Par Loss :) I knew removing the Actinic was going to impact the Par readings along with raising them, I was just unsure on how much.

Next Post will be with the Lx7206 Turned on :)
 
OP
OP
Ditto

Ditto

Valuable Member
View Badges
Joined
Apr 25, 2017
Messages
2,229
Reaction score
2,973
Location
Albany, NY
Rating - 0%
0   0   0
@najer - Thank you!!

First I have to say OMG these lights throw out some power, have them in acclimation mode over the tank, and even with the lights at 75% right now for acclimation I am not sure if i want to raise them any higher. I increased the acclimation period for 30 days to 90 days because of the excellent light output.

The blending of the lights across the entire tank is gorgeous, no disco ball effects. Below are the updated Par Results, like I said I was blown away at the lights output. I pulled down the window shades in the room also to make sure no outside sun was hitting the tank, needless to say it made no difference. You can tell even on the picture how much brighter the tank is now.

LX7206 PAr now instyalled.jpg


With running them now a week, I have also seen a increase in alkalinity and calcium in the tank. I am slapping myself for not doing this sooner thoroughly impressed so much my other tanks are now going to be upgraded with the LX7206 lights also.
 
Last edited:
OP
OP
Ditto

Ditto

Valuable Member
View Badges
Joined
Apr 25, 2017
Messages
2,229
Reaction score
2,973
Location
Albany, NY
Rating - 0%
0   0   0
Below are my #GHL LX7206 Light Schedule Settings with my Energy Options

Overall Light Schedule:
Vinny - Light Schedule.png


20K Spectrum Settings:
20K spectrum.png


18K Spectrum Settings:
18K spectrum.png


17K Spectrum Settings:
17K Spectrum.png


15K Spectrum Settings: (only used for 3 hours in total but 1 hour on each end is ramp up time)
15K spectrum.png


Energy Options Settings on the Lights:

Energy Options.PNG


Power Balancing Settings on the Light:
Power Balnce 1.PNG
Power Blance 2.PNG
 
Last edited:
OP
OP
Ditto

Ditto

Valuable Member
View Badges
Joined
Apr 25, 2017
Messages
2,229
Reaction score
2,973
Location
Albany, NY
Rating - 0%
0   0   0
Some Updated Coral shots inside the tank with the new lights on: (March 2019 Pictures)

All of these started as small frags, and small samples, and have been growing exceptionally well inside the tank.

My clown fish home :) Behind it is a slew of clown eggs.
March 2019 #1.JPG


This just keeps growing!!
March 2019 #2.JPG


These zoas both started as small frag plugs with 1-2 on each and both are exploding all over the rocks.

march 2019 #4.JPG


Started with one Ricordia and now have two and a third one is starting to appear.
March2019 #3.JPG
 
OP
OP
Ditto

Ditto

Valuable Member
View Badges
Joined
Apr 25, 2017
Messages
2,229
Reaction score
2,973
Location
Albany, NY
Rating - 0%
0   0   0
I finally Did it, I placed the new sump in today :)

Headache for sure and the lesson learned is do it when the tank is new and and before it is built not after :(

Bad news is the Klir 4 will not work(Placing them up for sale today), I could have probable rerouted my piping to make them work, but because it took me 6 hours to get the new one in I decided not to. I am still glad I did it for the reason is now I can now use filter socks, as the sump that originally came with the tank had a filter pad but it really never worked well.

First always good to try fit..
IMG_0554.JPG


The Nyos Torq will be replacing the two Avast Spyglass (easier Maintenance on the Torq)
Sumday Day 1.JPG


Whooohoo Back up and running

Skimmer Section.JPG


Nyos Torq running all Dosing Tubes all Reconnected (Your also seeing here my AWC, and ATO Refill is here)

Some are asking why not in the return chamber, which is the next chamber over, I want the ability to see that it is running, and it will allow me to also adjust the two float switch switchs are in this chamber also more easily for the AWC). I also have a Low Sensor in the Return chamber if it gets two low it will alarm.


Nyos Torq.JPG


I used different bulk heads at the end as the owns I orginally wanted to use I did not like, but I have a slow leak under one of them, I am not sure if I have a loose bulk head or the threads themselves, will work on this today. It maybe 2-3 drips every 4 hours.

Slow Leak.JPG


Since I was also cleaning up and re-running lines, I installed the #GHL Inline water filter on the KHD Director This is just to keep the chamber even cleaner when taking water samples.

KHD Doser Filter.JPG


Overall even with the small leak which I will get figured out today, I am happy I did it, this should eliminate bulk of the detritus that was getting to the skimmer and also to the return pump. I figure for now I can go with Filter socks and later try Filter cups :) I wanted to really place the Klir 4, but when I do my next tank I will make sure to design them with them in mind the first time and not try to put them in after the fact. The overall new sump is a work of art, and worked out exactly as expected, was able to slid it through the front without any issues.
 
OP
OP
Ditto

Ditto

Valuable Member
View Badges
Joined
Apr 25, 2017
Messages
2,229
Reaction score
2,973
Location
Albany, NY
Rating - 0%
0   0   0
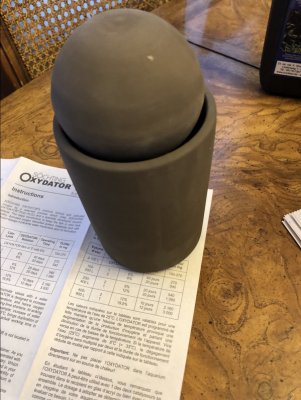
@Lasse - use of a Oxydator was interesting, and seem to yield good results so I thought it would be a good time to try one on this tank. Took about 10 days to come across from Germany, but it has arrived.
IMG_0613.JPG


I figure we will start at 6%

IMG_0614.JPG


The unit is about 7 inches high will go into my sump after my skimmer and before my return pump.

I am going to go with either 1 or 2 catalyst.

I took a water sample and shipped it off to be tested, and plan to do one after we have this running to compare the results.

IMG_0615.JPG
 

najer

Valuable Member
View Badges
Joined
Jul 9, 2016
Messages
20,453
Reaction score
144,449
Location
Humble, England
Rating - 0%
0   0   0
@Lasse - use of a Oxydator was interesting, and seem to yield good results so I thought it would be a good time to try one on this tank. Took about 10 days to come across from Germany, but it has arrived.
IMG_0613.JPG


I figure we will start at 6%

IMG_0614.JPG


The unit is about 7 inches high will go into my sump after my skimmer and before my return pump.

I am going to go with either 1 or 2 catalyst.

I took a water sample and shipped it off to be tested, and plan to do one after we have this running to compare the results.

IMG_0615.JPG

It will be interesting to see what happens, I run mine with 6% and two catalysts, I would never run a tank without one now! ;)
 
OP
OP
Ditto

Ditto

Valuable Member
View Badges
Joined
Apr 25, 2017
Messages
2,229
Reaction score
2,973
Location
Albany, NY
Rating - 0%
0   0   0
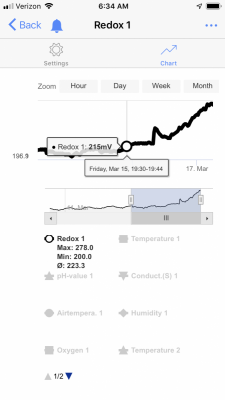
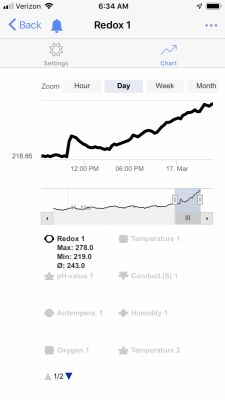
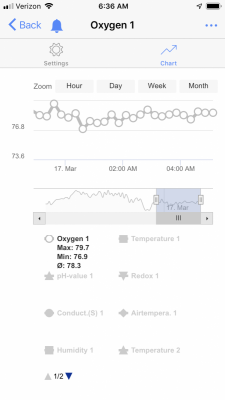
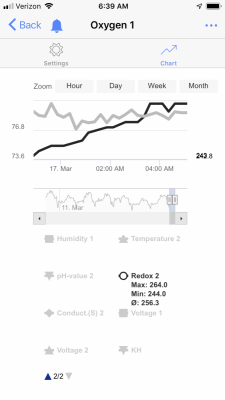
The oxydator does what has been posted and raise overall ORP but my O2 levels remain the same.


55468868-2196-488D-9AEE-61F703D7A221.png A21FF54C-F365-4350-9F65-E761250D92BC.png

O2 levels
E2D5A3C8-8F5A-43C9-B69D-6B48B0358D32.png


With redox and O2 on the same chart :)

8C4570CD-BA28-4771-956F-51A6F8439F5C.png

The coral and fish seem uneffected by it and will continue to monitor and report on it.
 
OP
OP
Ditto

Ditto

Valuable Member
View Badges
Joined
Apr 25, 2017
Messages
2,229
Reaction score
2,973
Location
Albany, NY
Rating - 0%
0   0   0
Quick Update:

The Oxydator seems to have increased my ORP in total by about 65. I re-calibrated my ORP probes to make sure but even after the calibration it seems to be now in the low 300's, when before I was in the mid 250's. No issues with the unit, I figure based on the instructions I will need to fill it once every two weeks at 6%. My Oxygen sensor has remain steady at 80% and has not changed at all with the introduction of the Oxydator seems steady and content at 80.

At the same time, I took my old BRS Carbon, and PO4 Reactor, and converted it into a CO2 Scrubber from my Skimmer. I noticed at night my PH was dipping below 8.0 and wanted to prevent this from happening. I took a piece of Silicone tubing and placed it over the air inlet of the Skimmer and connected it to the BRS Carbon and PO4 Reactor, and filled them both with CO2 Absorbent media. I ran it out a hole in the back of the cabinet.


IMG_0677.JPG


My plan is to install the unit in the basement tomorrow right below the tank.
IMG_0678.JPG


At the same time someone asked on another thread about the salt creep of the NTYOS Torq. There is none :) The unit is very easy to operate and fill. Mine is in about 8" of water, and running on medium flow through the unit, I plan to purchase another for my other reef tank to replace the Avast Spyglass.


FernandesReef

Community Member
View Badges
Joined
May 12, 2017
Messages
48
Reaction score
108
Rating - 0%
0   0   0
Great build and equipment.
I am setting up another tank in October and I have decided to go the GHL route ( lights and controller)
Thanks for your detailed build looking forward to some updates.
How do you find the slimmer neck cleaner worth the money?
 
OP
OP
Ditto

Ditto

Valuable Member
View Badges
Joined
Apr 25, 2017
Messages
2,229
Reaction score
2,973
Location
Albany, NY
Rating - 0%
0   0   0
@FernandesReef - I like the neck cleaner a lot. It works great easy to use. Usually I pull it off one every other month and clean it.

And welcome to the GHL family :)
 

When to mix up fish meal: When was the last time you tried a different brand of food for your reef?

  • I regularly change the food that I feed to the tank.

    Votes: 45 21.5%
  • I occasionally change the food that I feed to the tank.

    Votes: 72 34.4%
  • I rarely change the food that I feed to the tank.

    Votes: 69 33.0%
  • I never change the food that I feed to the tank.

    Votes: 19 9.1%
  • Other.

    Votes: 4 1.9%
Back
Top