alexjoha

Active Member
View Badges
Joined
Jul 29, 2015
Messages
131
Reaction score
120
Location
Norway
Rating - 0%
0   0   0
IMG_1670.jpeg


Hi, I have a system that`s 210 gallons, the main tank is a pensula style custom made tank.

It has Opti white glass on all sides and is viewable from 3 sides.

The tank is placed between my Livingroom and the hallway.


Aquarium

Custom ordered pensula 610Liters

With full Opti white glass at 15mm

Produced by Akwarium Szczecin in Poland.

Circulation

1x Ecotech Vectra L1
3x Neptune systems WAV
1x boyu 3000L (Flow in Sump area and to manifold)

Filtration

Bubbleking Supermarine 250 + rd3 pump + avast neck cleaner.
LS: Real Reef 60-70kg dry
Deltec FR 509 - Using Rowaphos and seachem matrix carbon

Lighting

3x Ecotech Radion XR30w PRO G4
1x Ecotech Radion XR30w PRO G3
1x Kessil h380 (Sump area)

Other equipment
1 x Aqua Light Doser single head for Acropower
Computer

1 x Neptune Systems Apex 2016
2 x Apex Power bar
1 x WXM ecotech modul
1 x AFS Automatic feeder
2 x ATK Automatic Top off
1 x Apex Display Module
1 x Apex Solenoid Valve
2 x Wav Start Kit

Fish

2 x Amphiprion Ocellaris - "Nemo" clown
1 x Cryptocentrus cinctus - Yellow Prawn Goby
1 x Labroides dimidatus - Cleaner Wrasse
1 x Ctenochaetus tominiensis - Tomini Tang

Cleaning crew

Coming...

Corals

Coming...
 
OP
OP
alexjoha

alexjoha

Active Member
View Badges
Joined
Jul 29, 2015
Messages
131
Reaction score
120
Location
Norway
Rating - 0%
0   0   0
IMG_0663.jpeg

Old tank before tear down

I have had a tank in the same spot before this tank, so I knew what I wanted the new tank to look like.
It needed to be wider than the old tank, but I couldn’t make the water volume any larger since I had some weight restraints sins my tank is place at the second floor.
The old tank was 60cm (23inc) wide and I needed it to be 80cm (31,5inc) wide this time. The aquascape in the old tank bothered me a lot since the corals always grew out and would hit the glass.

So, I had the design ready in my head, just needed to get it down on paper, so I started the design in Sketchup.
I also needed an aquarium manufacturer, since my local shops couldn’t deliver the tank the way I wanted it to be.

It took me a while to get a hold of a tank manufacturer, I fund a firm that had a good reputation in Europe on a Swedish Facebook reef site.
And decided to contact them after I had read a few build treads and reviews from this manufacturer.

I sent them my sketches and got a pricing back, and they told me what was possible and what would be a bit difficult, the design got better and better and after some iterations I decided it was time to get it built.

The final design ended up like this:

IMG_0145.JPG


The air slits didn’t end up in the final product since the manufacturer meant there were no need, and they were correct.

IMG_0143.JPG

IMG_0153.JPG
 
OP
OP
alexjoha

alexjoha

Active Member
View Badges
Joined
Jul 29, 2015
Messages
131
Reaction score
120
Location
Norway
Rating - 0%
0   0   0
Preparation for the move

After the tank got ordered I needed to clear the space where the new tank would sit,
That meant that I needed to sell my old tank and move all the livestock. I got my hands on a used Akvastabil move 360 aquarium used for freshwater.

The space I had left over for this tank was down stairs in my laundry room. My fish and corals needed to stay in this tank for some weeks while I made the new tank ready.
That meant that I needed it to be a reef tank not a freshwater tank so I got some glass cut to size and made an overflow.

IMG_0165.jpeg


The tank in place down stairs, Now the transformation can begin. :)
IMG_0166.jpeg


The piping i needed finally came in the post so finally i can start the transformation! :)

IMG_0508.jpeg


Durso ready. :)

IMG_0160.jpeg


I got a used sump and skimmer from a fellow reefer for cheap, not the best design but it would work for a short period. :)

IMG_0555.jpeg


Got all the plumbing done so now for the new rock and filling of the tank :);)

IMG_0666.jpeg


Finally got the tank filled, i had to borrow a light from the tank up stairs while the tank was cycling, I wanted to go over all the corals from the main tank before they got moved.
Look for any bristelworms, and remove them. Same thing with bubble algae. I also had a few emerald crabs i didn't want anymore. So the old rock wouldn't move inn to the new tank.
 
OP
OP
alexjoha

alexjoha

Active Member
View Badges
Joined
Jul 29, 2015
Messages
131
Reaction score
120
Location
Norway
Rating - 0%
0   0   0
Tearing down the old tank

The old tank got sold to a friend that wanted to start in the saltwater hobby.
He wasn’t going to use it as a peninsula but as a normal tank against the wall.

IMG_0687.jpeg


I started by removing a lot of the corals and rock work that i easily could get to, but over the years it had all grown together. It was painful to break everything apart :(
My fellow reef buddy's asked me several times if i still wanted to do this. It was such a shame to see me break down the reef, and just for some more width to the tank. :(

IMG_0689.jpeg


The skimmer hadn't been cleaned in 6 months ;Vomit

IMG_0692.jpeg


Guess i should have done it more often, but i hadn't had the time :confused:

IMG_0695.jpeg


A few snails in the pump :)

IMG_0696.jpeg


Inn to the vinegar bath you go! ;):)

IMG_0698.jpeg


Now it`s the sumps turn to get emptied out and cleaned ;Vomit

IMG_0701.jpeg


Sumps out, just need to clear everything else out of the tank now, the new owner of the tank was going to take some of the stone and coral with him :)

IMG_0707.jpeg


Almost nothing left in the tank now :(

IMG_0710.jpeg


And it`s gone! ;Nailbiting just the equipment cabinet left :(

IMG_0719.jpeg


He didn't have the space for everything in the care so some of it had to go on the roof ;Facepalm
 
OP
OP
alexjoha

alexjoha

Active Member
View Badges
Joined
Jul 29, 2015
Messages
131
Reaction score
120
Location
Norway
Rating - 0%
0   0   0
Tank down stairs

The tank down stairs got a bit to full so I had to give some corals to a friend so that he could keep them for me, I didn’t realize when I started the tear down that the corals would take so much space.

IMG_1474.JPG


It`s just for a short while don’t judge me ;Nailbiting;Facepalm;)

IMG_1236.jpeg


Well i needed to have some type of dosing so i moved all my apex gear, it doesn’t look good but it works ;Facepalm:)
 

Tbabcock

Well-Known Member
View Badges
Joined
Mar 29, 2016
Messages
612
Reaction score
396
Location
Indiana
Rating - 0%
0   0   0
What is the dimension of the new tank? Im looking to build a new 200+ and was looking at a stock 48"× 36" or even bigger at 48"×48".
 

SPR1968

No, it wasn’t expensive dear....
View Badges
Joined
Feb 21, 2017
Messages
20,047
Reaction score
124,735
Location
Nottinghamshire England
Rating - 0%
0   0   0
That’s an excellent write up and pictures Alex and thanks for taking the time to do this for us.

There was some serious what looks like Coraline build up in the NYOS skimmer after just 6 months!
 
OP
OP
alexjoha

alexjoha

Active Member
View Badges
Joined
Jul 29, 2015
Messages
131
Reaction score
120
Location
Norway
Rating - 0%
0   0   0
What is the dimension of the new tank? Im looking to build a new 200+ and was looking at a stock 48"× 36" or even bigger at 48"×48".
Hi,

I normally use metric numbers but i did put my measurements in to a converter for you, my tank is 31.5 inch wide and 60 inch long,

If your able to have a tank that’s 48x48 then why not, only thing is that you will have to have double the lighting, since the width is more then what a normal light can handle. My tank is a bit wider then what the radions are designed for so I am going with a hybrid system to get full coverage, and I have 4 radions on my tank atm so that I get an even PAR reading on my rock structure.

If you go with the 48inch wide tank , then you would need 2 radions in the width of the tank to get a good coverage so it would be a bit more expensive though
 
OP
OP
alexjoha

alexjoha

Active Member
View Badges
Joined
Jul 29, 2015
Messages
131
Reaction score
120
Location
Norway
Rating - 0%
0   0   0
That’s an excellent write up and pictures Alex and thanks for taking the time to do this for us.

There was some serious what looks like Coraline build up in the NYOS skimmer after just 6 months!

Yeah the old tank used 46ml of triton core 7 everyday and had some good growth to it :)
 
OP
OP
alexjoha

alexjoha

Active Member
View Badges
Joined
Jul 29, 2015
Messages
131
Reaction score
120
Location
Norway
Rating - 0%
0   0   0
The waiting period

Now we just had to wait for the tank to get finished, at least we could plan a bit more around the plumbing and setup, and my local shop could order in the parts I needed.
The problem with not having a tank to use all my energy on is that I have to much time to spare on the internet. ;Wacky
That means ordering more than what I need! And gadgets! ;);)

IMG_1472.jpeg

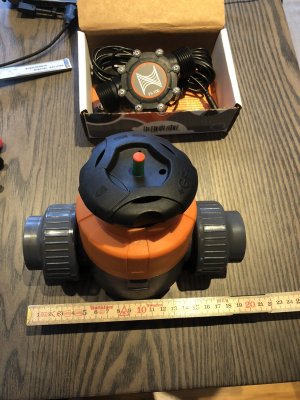
The first thing i needed to source was a good membrane valve, that`s not easy in a small country like Norway, and i needed it in metric.
I did find a store in Sweden that had them so i ordered it from them. ;)

IMG_1471.jpeg


Also ordered a turbine flow meter ;Wideyed

IMG_1737.jpeg


The local shops didn`t have plastic clips to clamp down the hoses so i had to order from china ;Facepalm
 
OP
OP
alexjoha

alexjoha

Active Member
View Badges
Joined
Jul 29, 2015
Messages
131
Reaction score
120
Location
Norway
Rating - 0%
0   0   0
When ecofriendly fails

I ordered a lot of triton core 7 and supplements, the more I ordered the better the pricing I got from the local shop.
I often buy in bulk since I know I will use it all eventually.

IMG_0209.jpeg


The first time i orderd a larger batch of triton core 7 it looked like this ;);) I Really miss that packaging! :(

IMG_0352.jpeg


the first batch of triton was a success and I could reduce the dosing from 450ml with balling down to around 46ml with triton core 7.
I loved the bottles and the ease of use, I could just tell my girlfriend to open a new bottle and poring it in to the dosing container if it was needed.
Since I could turn down the dosing amount to 46ml instead of 450ml a day that meant that my GF didn’t need to fill my reservoir while I was away at work.

Since my experience with triton was so good I obviously ordered more when the first batch was all gone, and in came the milk cartons instead of the plastic containers.
What I didn’t plan on was that the new packaging that triton had decided to go for would leak over time. ;Facepalm;Facepalm;Facepalm:(:(:(

IMG_1498.jpeg


Unfortunately, I didn’t have my triton core 7 in a plastic container, they were all in my cabinet and that did get destroyed.
I decided that I am not taking the chance on these cartons now that they have leaked out large amounts. So I decided to empty them out and recycle the cartons… :(:(:(

IMG_1499.jpeg


I couldn't save the part 1 and 2 since i kept them all together ;Facepalm

IMG_1500.jpeg


I have no words.. ;Facepalm

IMG_1504.jpeg


IMG_1505.jpeg


IMG_1611.jpeg


The only way i would buy triton core 7 now a days is in 10L jugs like thees.
I am never buying cartons again, i had to transfer all the trace elements that came in cartons too the old plastic bottles too :(

IMG_1486.jpeg


Here is an unopened Strontium carton leaking after 2 weeks. ;Facepalm
 
Last edited:
OP
OP
alexjoha

alexjoha

Active Member
View Badges
Joined
Jul 29, 2015
Messages
131
Reaction score
120
Location
Norway
Rating - 0%
0   0   0
Killing Aptasia with a laser?

I did find a few aptasia in the small tank down stairs and had heard about people using lasers to fry them, so I went on to ebay and ordered one.

IMG_0492.jpeg


It looks like the shipping was a bit on the ruff side! :)

IMG_0495.jpeg


Everything inside did survive tho! :)


First test! not easy trying to film with one hand and focus the laser with one hand :) but it did work :)
 
OP
OP
alexjoha

alexjoha

Active Member
View Badges
Joined
Jul 29, 2015
Messages
131
Reaction score
120
Location
Norway
Rating - 0%
0   0   0
Pukani or Real Reef rock?

I had ordered in about 50kg of dry pukani rock and plats for my new build, but I still wanted some larger plates to use in my aquascape.
I looked all over the place for some good plates to add but I had no luck.
After my local shop contacted there distributer and ask them if they could get ahold of some larger plates for a costumer they said that they did have some real reef rock plates that they had used in a show earlier that yare.

They sent some pictures to my local shop of the ruff dimensions and the weight of each plate they had. And they looked great!
Soooo what to do now then?? They wouldn’t fit in with the pukani I already had ordered.
Should I take a gamble and buy all new Real Reef Rock and try to sell my Pukani rock?
Or should I just keep the rock I had and forget about the large plates that I could get?

37516389_526540421114247_2232056111018541056_n.jpg


So this is what they sent me and they look so nice! :eek:

39149929_450423505451954_8909925065894658048_n.jpg

39186525_226338608064172_8985205938398953472_n.jpg


So after estimating the cost of changing out all my rock i decided that YES! ill go for all new Real Reef Rock! :)

41229880_322552838322545_886435319514136576_n.jpg


After a week i got this photo from my local shop!! :) my rock had arrived ;)

41280724_1843642399076859_3817139295123144704_n.jpg


Some more teasers from the local shop since he knew i couldn't come and get them the same day ;)

41166752_1843642412410191_8406517055846612992_n.jpg


Nice shape and size ;)
 
OP
OP
alexjoha

alexjoha

Active Member
View Badges
Joined
Jul 29, 2015
Messages
131
Reaction score
120
Location
Norway
Rating - 0%
0   0   0
The Tank Is Here!

The tank finally arrived from Poland, it went inside with a clearance of 1inch (2-3cm) through the door and inn to the living room!
Next time I’ll get some glass mover suction cups! Lesson learned!

IMG_1409.jpeg


I had to store it a bit away from where it`s going to sit until i had painted the back and finished the piping so we decided to put the tank on it`s stand so that i could measure out everything :)

IMG_1414.jpeg


The sump and ATO tank looks flawless! :)

IMG_1412.jpeg


They even countersunk the holes in the metal! :)

IMG_1416.jpeg


Screw in place sitting flush :)

IMG_1420.jpeg


Adjustable feet was also included :)

IMG_1421.jpeg


The holes for the drain pipes through the top plate was coated with silicon to prevent swelling :)

IMG_1422.jpeg


Here is a closer look :)

IMG_1425.jpeg


Tested all the pieces to see how the tank would look finished :)

IMG_1430.jpeg


I can`t wait to get started on the plumbing for this tank! ;Joyful

IMG_1428.jpeg


An other nice detail on the tank, they have put a fillet on the edges of the holes for the return pipes :cool:

IMG_1457.jpeg


The logo is in place! :) I think ill actually keep it on :)

IMG_1458.jpeg


This is how they rest the top on the edge :)

IMG_1459.jpeg


Look at that craftsman ship! :) there are NO internal silicone for me to hit with my scraper! o_O

IMG_1461.jpeg


I have never seen a silicone job like this one! its amazing :)

IMG_1454.jpeg


First fish in the tank! :p;)

IMG_1462.jpeg


That back wall needs to get painted black or something so i don't see the piping and cables :)
 
Last edited:
OP
OP
alexjoha

alexjoha

Active Member
View Badges
Joined
Jul 29, 2015
Messages
131
Reaction score
120
Location
Norway
Rating - 0%
0   0   0
Painting the overflow

The back wall of the tank needed some paint so I couldn’t see the pips and cables going down to the sump. I used Benga lack and painted it black

IMG_1476.jpeg


Here we go! ;) let's hide those pipes! :)

IMG_1494.jpeg


Looks alot better now ;) now i need some type of comb so that fish don't fall over the overflow... but what to use?? o_O

IMG_1496.jpeg


Side view of the overflow where the comb needs to sit. :)

39109116_1820560394705342_5392088581202247680_n.png

Maybe i should get the D-D UltraFlow Weir comb?
The solution will come further down ;)
 
Last edited:
OP
OP
alexjoha

alexjoha

Active Member
View Badges
Joined
Jul 29, 2015
Messages
131
Reaction score
120
Location
Norway
Rating - 0%
0   0   0
Plumbing the tank

Next step would be the plumbing, I had ordered more or less everything for this, but I was still missing the threaded parts for the flow sensor.

IMG_1508.jpeg


First thing i mounted was the return lines, i wanted them to come out in the opposit end of where the overflow is :)

IMG_1509.jpeg


good to have some unions on the plumbing for later disassembly ;)

IMG_1512.jpeg


After I had mounted the return line and looked at how to route it down through the cabinet, it became clear that this would be a problem later on when the tank would be sitting against the wall too, so I decided to make the hole larger so that I had ample room to work under the overflow if needed. (adding pump magnets and so on.) :)

IMG_1516.jpeg


I liked the idea of using silicone to seal off the wood so i did the same thing with the new hole i made :)

IMG_1479.JPG


Got my self one of these for the plumbing but it was to week for 40mm piping so i broke it, back to the good old table saw ;)
 
OP
OP
alexjoha

alexjoha

Active Member
View Badges
Joined
Jul 29, 2015
Messages
131
Reaction score
120
Location
Norway
Rating - 0%
0   0   0
Putting the tank where it belongs

I now felt ready to move the tank in to the space where it was supposed to be,
After painting and checking everything 10 times. So, I called my reefing buddy’s again and asked for some moving help! :)

Yeah I forgot about the suction cups for the glass again! So, it got really heavy and tricky, now that the yoga math was placed on top of the stand. Trying to keep that from wrinkling under the tank and getting the tank in the correct place at the same time was a real pain in the butt! :mad:;Facepalm;Facepalm

IMG_1519.jpeg


I leveled out the height differences between the 2 floors with some hard waterproof finer so that the feet would sit at the correct height and not damage the floors. :)

IMG_1522.jpeg


Then we got the stand in place and leveled it and got all the feet where they needed to be :) Oh almost forgot but that guy is Mats! a buddy that always joins when i move a tank! :)
I think this is the second or third move he has joined me on til now ;)

IMG_1526.jpeg


So now we just need to move the tanks ;Wideyed

IMG_1527.jpeg


Had to use some of the kitchen to store stuff under the move :confused: OH and the Prusa isn't normally placed in the kitchen! :p
But i was testing out the new Prusa Master Chef Upgrade! :p


IMG_1528.jpeg


Finally the tank is on its stand! :):cool:

IMG_1530.jpeg


Will be nice to have those large doors when i need to do things in the sump area :) Next is more plumbing! ;)

IMG_1531.jpeg


This will be the view from my living room :) oh and i finally can get the baby door thingy in place again! :) she is becoming fast!
 

Creating a strong bulwark: Did you consider floor support for your reef tank?

  • I put a major focus on floor support.

    Votes: 53 41.7%
  • I put minimal focus on floor support.

    Votes: 25 19.7%
  • I put no focus on floor support.

    Votes: 45 35.4%
  • Other.

    Votes: 4 3.1%
Back
Top