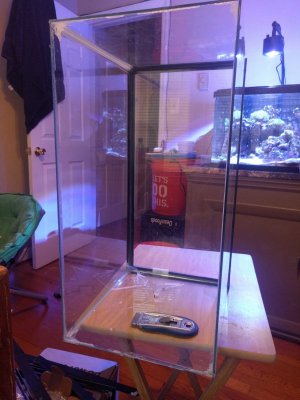
60g cube dream tank build

xHavok

New Member
View Badges
Joined
Jul 27, 2017
Messages
10
Reaction score
6
Rating - 0%
0   0   0
Ever since I first started with my biocube 29 I have loves the idea of a cube tank. I love the depth that I can play with for the aquascape. I've never been a fan of the "rubble wall at the back" scape most standard tanks have so I knew I would need a cube. I looked for a long time and a 60g cube has always seemed perfect for me.

I've had my Biocube for the last year and a half and although I've have a few setbacks, I've been able to avoid any major disasters. A couple weeks ago I saw an ad for a super cheap 60g cube and stand on my local reef club's facebook page and decided that it was time for me to start my dream tank.

Now I have a lot of work to do before I even put water in this thing, so I decided to make a build thread to keep track of everything and I can check things off my list as I go. Since this is my dream tank I am going to do my dream build, which may or may not be expensive. I plan to try and keep the tank indo-pacific themed since most of the livestock I enjoy seem to be from that region of the ocean. I also want to try and reef as sustainable as possible so I am hoping to stick to purely aquarium bred and aquacultured corals when at all possible.

So the things I need, in the order I need to do them in is:
- re-paint the stand, exterior and interior
- re-seal the cube
- replace several pieces of the plumbing system
- leak test the system
- Acquire Apex system for reef monitoring
- Acquire rock and sand for scape
- Cycle tank
- Enjoy perfect tank that will have no problems ever for all of time /sarcasm

I have tons of questions but I'll make a new comment asking them. I am fully open to advice, comments, and suggestions. That's the whole point of making a forum post and not just doing a blog lol. I hope you all enjoy this thread as much as I'm going to enjoy building the tank.

Photo spam at the end

The new tank and stand featuring my current tank
IMG_20170727_204352.jpg

New stand and tank are level =D
IMG_20170727_204406.jpg

So you can see the damage to the existing silicone, there are places where its a little worse, but not much
IMG_20170806_142449.jpg

More silicone damage
IMG_20170806_142510.jpg


Under the stand. I'm going to repaint the interior with a water proof paint to make cleaning easy and so I don't have to worry about the humidity damaging the wood and making the stand weak
IMG_20170806_142531.jpg


The sump that I got with the tank along with skimmer, return pump, and a few other odds and ends. I'm not sure if I will use this for sure yet. I may get a 40b and turn it into a large sump and refugium, the under side of the stand is certainly big enough.
IMG_20170806_142540.jpg


shot of my current 29g biocube, included for the sake of posterity. featuring my clowns, Gomez and Morticia, and the cleaner shrimp Luigi
IMG_20170806_142559.jpg
 
OP
OP
xHavok

xHavok

New Member
View Badges
Joined
Jul 27, 2017
Messages
10
Reaction score
6
Rating - 0%
0   0   0
Since my first 2 things to finish are repainting the stand and re sealing the tank I decided to work on both of these together.

First I am going to practice before resealing the tank by resealing an old 10g I had laying around. I'd rather mess up a 10 first than the 60g. I also have to special order the black silicone I since no stores within 50 miles carry it so while I wait on it I'll work on this 10g. I've watched a bunch of youtube videos and think I'm ready to go.
IMG_20170806_140050.jpg

The second endeavor I am going to work on is painting the stand. I am thinking about going with an enamel paint, like what goes on boats, inside so it will be fully water proof and easy to scrub if necessary. Are enamel paints alright for this sort of thing? I want to paint the inside white so any discolorations will be easy to see. The outside I was planning to use regular indoor house paint. My girlfriend would like the outside to be a dark navy with a black trim. In order to get her go ahead she had to part of the project somehow so she gets to help decorate.

I'm definitely new to this whole aspect of reefing. My biocube 29g was on a homemade table that I just sealed and stained. but the sides were open so it was never enclosed and didn't have a full on sump to accommodate. The humidity is what I am most worried about.
 

samnaz

Earthling
View Badges
Joined
Dec 30, 2016
Messages
3,564
Reaction score
6,879
Location
Humble.fish
Rating - 0%
0   0   0
What kind/brand of paint will you be using to repaint the inside? Will you be sanding it first or no? Just curious cause I'm considering doing the same thing with my stand.
 
OP
OP
xHavok

xHavok

New Member
View Badges
Joined
Jul 27, 2017
Messages
10
Reaction score
6
Rating - 0%
0   0   0
What kind/brand of paint will you be using to repaint the inside? Will you be sanding it first or no? Just curious cause I'm considering doing the same thing with my stand.

I am planning to sand it first, mostly to make sure there's no dust or grime before I start applying paint. As for the brand name I'm not sure, I know Home Depot carries it though. I'm hoping someone with more experience will chime in with some advice on it haha. Then we can both be pointed in the right direction
 
OP
OP
xHavok

xHavok

New Member
View Badges
Joined
Jul 27, 2017
Messages
10
Reaction score
6
Rating - 0%
0   0   0
WHAT are u doing for lighting? What about filtration?

My plan currently is to continue using the Kessil A360WE I have over my biocube 29. according to all the info I can find it should be sufficient. I may add additional LED's later on if necessary.

As for filtration, I'll obviously have live rock/sand, and in the sump I'll have filter socks and a skimmer. I got the skimmer with the tank and I'm not sure what brand it is, but it looks like a typical in sump skimmer. I would like to have a refugium, but I think I'll need the middle chamber for the skimmer so I don't know if I'll be able to with the current sump setup.
 
OP
OP
xHavok

xHavok

New Member
View Badges
Joined
Jul 27, 2017
Messages
10
Reaction score
6
Rating - 0%
0   0   0
Longer update with lots of pictures ahead:

While I was on another errand in a city about 2 hours from me I stopped by a LFS and picked up a new bulkhead and a few new gaskets. They look identical to the old ones but I figure better safe than sorry when it comes to a leak right? So all that's left plumbing wise is a new hose for the drain gasket. I'm not super sure where to find one though. The hose it came with looked like a shop-vac hose but I'd rather have something with a smooth inside rather than bumpy. Any suggestions on that front?

I finally got the 10 gallon practice tank resealed and I learned quite a bit. I'm glad I didn't start with the 60g cube, that's for sure. I made a couple of minor mistakes, but nothing serious or really noticeable unless its pointed out.


IMG_20170806_140050.jpg

The first thing I did was I used my razor blade to scrape all the silicone off the inside of the tank. This process took the longest. I has to be careful not to accidentally scrape between the panes of glass at the corners, and not to scratch the glass. The corners on the bottom were the most difficult, I had to use a razor blade without the scraper to get in there cause the corners were so tight. I then went over each spot 2 more times and a few spot after that to get all the silicone up. I used 91% alcohol to get the little bits of dust and fine particles off the glass before taping my lines


IMG_20170808_202713.jpg

The tape lines were pretty easy once I figured out how to do it efficiently. I went out 3/8" from each side more or less. I figure it won't be noticeable if its off by 1/16". and as far as I can tell it all looks the same to me now. Interestingly enough, this part took longer than actually applying silicone.


IMG_20170808_203832.jpg

After getting my tape straight it was time for the important part. this part took surprisingly little time, and next time I think I can do it with a lot less silicone. After using the caulking gun to put the silicone in all the creases, I put on a clean nitrile glove and smoothed the silicone out to get a nice even shape on all the corners. I did the bottom first, wiping the excess off on a paper towel as I went. I had a few extra bits of silicone fall on the bottom and a little on the sides of the tank, but nothing a razor blade can't get off after it finishes curing in a couple days.


IMG_20170808_204550.jpg

Here you can see one of my mistakes close up. I pulled the first piece of tape off, only to realize the silicone wasn't smooth at the bottom. I had to wipe it up a bit to get the silicone even and nice, but since I had already pulled the tape off this one line had gotten messed up. Luckily I hadn't pulled the tape off the rest of it yet so I could check the other corners before removing the tape.


IMG_20170808_204626.jpg

This is how all the other corners turned out. the lines are nice and smooth and even all the way down. lesson learned, double check the seams before removing the tape.


IMG_20170808_204633.jpg

Lastly, the bottom. I came a bit farther out from the seam for the bottom, and I wasn't as worried about appearances. The bottom is not as super smooth as the sides are, but if it gets used it will be covered with substrate anyway so I wasn't worried about that. I still took care to have smooth edges though.

All in all I think I am ready to take on the 60g as soon as my black silicone arrives. In 2 days I'll be water testing the 10g over night and provided there are no problems, I'll move on to the 60g. I'm considering making a video of the 60g resealing but I'm not sure yet. Let me know what you think or if you guys have any advice for me! the build is moving along slowly now, but it'll pick up speed as I get these smaller things out of the way.
 
OP
OP
xHavok

xHavok

New Member
View Badges
Joined
Jul 27, 2017
Messages
10
Reaction score
6
Rating - 0%
0   0   0
Its been awhile since my last update but I've been making steady but slow progress. I'm in college as well as working full time and I haven't has as much free time since the semester started up. The practice resealing went perfectly and the tank held water just fine for more than a week, so I am ready to move on and reseal the 60g! I'm excited to be getting to this stage. It means I am closer to being ready to get the tank started! =D

I went to a reef expo that was close by the other week and also picked up some pretty useful stuff. a few hanna checkers to make testing easier (and they do make testing easier). I also got a few new corals because I have a problem. I got a really cool looking lobophilia and a stunning gorgonian. as well as a duncan and a new acan. All in all a really productive trip. The only thing I wish I could have grabbed was a brand new Apex system with the energy bar and all the probes and such for $550. Unfortunately I just didn't have the money to buy it on that day.

I'm mostly finished repainting the stand. I only have a spot or two to touch up. and I'm loving to color scheme. Let me know what you guys think.


IMG_20170831_190527.jpg


IMG_20170831_190509.jpg


IMG_20170831_201826.jpg


And the final product.
IMG_20170911_175709.jpg


One other bit of business is I'm trying to decide if I still want to get an Apex. They have a lot of advantages, but the cost is super prohibitive. If I bought one new it would cost more than the entire tank setup has cost me since starting the upgrade. Not including the Kessil lights I had before I started the upgrade. Hopefully someone sees this and can give me a bit of insight.

The only other bit is I still haven't decided whether or not I'm going to use the sump that it came with. I could easily use a 29g tall I have lying around that's never been used, or I could fit a 40g breeder in the stand as well. The current sump is only 15g up to the rim so functionally its a lot less, probably 10g. Either way I will have a sump and I know more water volume is better, but would it be worth the hassle to make another sump? I don't realistically think it will be very hard to make a new sump, but is it worth the added cost? again I would love some input
 

woodguy

Active Member
View Badges
Joined
Jul 22, 2017
Messages
102
Reaction score
147
Rating - 0%
0   0   0
looking great, nice job on the silicone! going to be a nice set up. if your running an ato, i dont know the extra water will be worth it, now your heating and skimming more water, bigger equipment, etc. looking forward to see this progress, getting equipment together for a cube upgrade ob my 28 jbj
 
OP
OP
xHavok

xHavok

New Member
View Badges
Joined
Jul 27, 2017
Messages
10
Reaction score
6
Rating - 0%
0   0   0
short update for today:

I had my first major setback. While applying the new silicone to the 60g, I must have taken too long before removing the tape. When I went to remove the tape the new silicone had already started drying to the tape and it destroyed the corner. I'm going to have to redo the entire silicone job again.

This is incredibly frustrating because this is the only thing I need to do before moving on to the next step, which is my first water and plumbing test. I'm probably going to be set back by 2 or 3 weeks at least. I'm going to need to order more silicone, which takes time to arrive. I also need to figure out how to go a bit faster. I think some sort of smoothing tool would greatly help here, but I'll probably need to make it myself. Over-all this is an obstacle that will be overcome. I won't be able to do much more work on the tank this week because of work and a bunch of tests for school. Hopefully I can get back to it next week.


looking great, nice job on the silicone! going to be a nice set up. if your running an ato, i dont know the extra water will be worth it, now your heating and skimming more water, bigger equipment, etc. looking forward to see this progress, getting equipment together for a cube upgrade ob my 28 jbj
Thank you for the encouragement!! Those are some of the issues I'm looking at as well. I know my skimmer is rated for 100g, but the heater and such are definitely concerns. I think I've decided to keep my smaller sump for now and possibly upgrade later.
Also, as the rest of this post says, the practice silicone for the 10g went very well, but the 60g is another story. I'll have to step my game up for the next attempt.
 

Fence13

Over Thinker Extraordinaire
View Badges
Joined
Feb 5, 2017
Messages
245
Reaction score
234
Location
Iowa
Rating - 0%
0   0   0
This is such a unique and interesting stand, where did you get it or how did you build it?
 

ectoaesthetics

Active Member
View Badges
Joined
Feb 1, 2018
Messages
378
Reaction score
432
Rating - 0%
0   0   0
Love it. Currently building out a 60 gallon cube project right now... I'll be watching this one :)
 

Caring for your picky eaters: What do you feed your finicky fish?

  • Live foods

    Votes: 17 28.3%
  • Frozen meaty foods

    Votes: 50 83.3%
  • Soft pellets

    Votes: 9 15.0%
  • Masstick (or comparable)

    Votes: 6 10.0%
  • Other

    Votes: 3 5.0%
Back
Top