





- Joined
- Sep 21, 2025
- Messages
- 2,513
- Reaction score
- 4,537
- Location
- Germany
- What state or country do you live in
- Other International
 Another Phytoplankton Culture Tutorial
 (Left: Backup starter cultures, Right: Phytoplankton cultures)
Preamble / Introduction
Even though I'm writing this thread like an article, I'd appreciate input from anyone who successfully grows phytoplankton on what to improve or add, so I can update text and images over time and make it as easy as possible for people to grow plankton successfully. All images were taken and created by me, no use of AI. I only used some computer-assisted help with grammar, spelling, and phrasing, since English isn't my native language.
I've been asked a few times about my approach to growing phytoplankton, so I decided to put together this thread. It covers how to build proper culture vessels in different sizes, the sterilization process, and a few side notes you might find helpful. I know this topic has been covered many times before, but everyone has their own method, and mine has worked well for me, even through times when I got lazy and neglected the cultures for weeks at a time.I don't use a very specific salinity, inoculation ratio (how much starter culture to use when starting a new batch), or keep a very stable temperature. I also found out that filtering the air is useful when starting from scratch, but once you have dense and healthy cultures it doesn't matter too much anymore for "easy to keep" phytoplankton.
Equipment
You will need the following equipment to start your own phytoplankton cultures:
- Culture vessels. See options 1 and 2 in this thread, build your own, or buy some online.
- Air pumps + tubing. You will need one tube for each culture vessel. If you have a strong air pump you can buy "air distributor check valves", which will split one air line into multiple lines.
- Rubbing alcohol in a spray bottle to keep surfaces and equipment as clean and "sterile" as possible.
- Acetic acid, or better yet, muriatic acid, to clean culture vessels (use gloves and eye protection when handling these acids. You don't want pressure to build up in the vessel while you're swirling it around to dissolve residues, only to have a drop of acid suddenly land in your eye.)
- Optional: A compound microscope to examine the cultures from time to time.
Building Culture Vessels (Option 1)
(Culture vessel)
The only things you will need are:
- Autoclavable lab bottles
- Borosilicate glass tubes/straws
- Drill
- Round metal file
The only thing you need to do is drill a hole in the bottle cap. Use a drill bit slightly smaller than the tube, then widen the hole with a round metal file until the tube fits (it doesn't have to be perfectly airtight). You can either drill a second, smaller hole so air pushed through the media can escape, or leave the caps on loosely so air can escape around the sides. I prefer the second approach, since it keeps dust from falling in.
(Heat-resistant GL45 bottle cap with hole)
I'd recommend preparing bottles in a few different sizes: 100mL, 250mL, 500mL, and 1000mL. When starting new batches from an impure culture starter, it can make sense to begin with several smaller bottles first until you reach a decent plankton density.
Building Culture Vessels (Option 2)
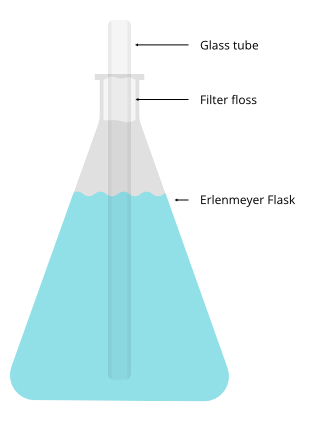
The second option for culture vessels is even simpler but comes with a few drawbacks. All you need is:
- Erlenmeyer flasks (borosilicate glass)
- Filter floss
- Borosilicate glass tubes (if you won't use a pressure cooker, plastic or fiberglass tubes will do just as well)
Growth Media Preparation
- Fresh RO/DI (fresher = less contamination)
- Artificial sea salt without organics (no added amino acids) - The optimal salinity depends on the phytoplankton species, but something close to natural ocean levels works well.
- Fertilizer that matches the phytoplankton species you want to grow
I'd recommend starting with a robust species like Nannochloropsis salina, which works very well with Guillard's F/2 fertilizer. In a best-case scenario, you'll find F/2 split into three separate bottles: Nutrients, Trace Elements, and Vitamins. This lets you add the nutrients and trace elements before sterilization, so even if you skip sterile filtering when adding the fertilizer, the contamination risk is limited to the vitamin solution, which shouldn't support much growth on its own. You can't add the vitamins yet, though, since they would be destroyed during sterilization, whether by the heat of the pressure cooker or the chemical action of bleach if you use that instead. In most cases you'll need to add 1mL of fertilizer per 1L of culture, but check your product's instructions to be sure. If you're starting from a very weak culture, using twice the recommended amount can also give good results.
Sterilization Process


(Sterilization setup options)
The sterilization process is fairly straightforward. Put the culture vessels into a pressure cooker that can safely reach 15psi. To reduce evaporation from the culture vessels, which would increase salinity, wrap some tin foil around the caps. The water level in the culture vessel should match the water level in the pressure cooker. If you can't keep evaporation down this way, you can instead seal the vessels completely with intact caps, and place the drilled caps with glass tubes directly in the water so they're sterilized separately. Once everything you want to sterilize is in the pressure cooker, close it and turn up the heat. Once it reaches 15psi, start a timer for 15 minutes. After the 15 minutes, turn off the heat, release the pressure, and let everything cool down.(Sterilization setup options)
Starting the Culture
Once room temperature is reached, add the vitamin portion of the fertilizer (or the whole fertilizer, if you didn't add it earlier), preferably through a sterile filter (I use PES 0.22µm filters) attached to a syringe, then add some phytoplankton from your starter culture until the culture media has a slightly greenish color. You could start by filling about a quarter of the culture vessel with starter, but sooner or later you will find the right amount that works for you. To safely transfer the starter into the culture vessel without too much risk of contamination you can use a lightweight version of this procedure [YouTube Link].
I personally eyeball it and use very small amounts. It takes a while for the culture to grow this way, but it works nicely in my experience, and I don't need too much plankton. Afterward, connect the glass tubes to an air pump, using tape to make the connection between the air hoses and glass tubes airtight. If you're cultivating sensitive plankton species, you might also want to add sterile air filters to the air hoses. This wears down the air pumps fairly quickly, but it keeps the air free of contaminants that could otherwise ruin the culture. You need to bubble enough air through the tubes that the plankton stays in suspension and doesn't start collecting on the bottom of the vessel. Depending on the vessel, this will probably be somewhere between 3 and 9 bubbles a second.
Harvesting
Once the culture looks dark green you can start new culture vessels and use it to grow your culture. For your first culture I would just wait 1 or 2 weeks to see how dark it will go. Once you know how it looks at peak density, you'll know when to harvest. For very delicate cultures, temperature might be a factor, and you might have to use small heater mats, the kind often used for terrariums, along with a controller like an Inkbird. I haven't had to deal with this myself, as room temperature has worked just fine. Since I'm growing plankton in the same room where my tank stands, I currently use a lighting schedule that matches my tank's, so my fish won't have to deal with the light all night long. However, an 18h light / 6h dark schedule has worked really well for Nannochloropsis salina. I'm currently using the Tunze Eco Chic Refugium light but you can just use cheap LED strips as well.
Instead of increasing the culture size over time, I like to keep the batches small and rather have multiple separate smaller vessels to ensure there is always a healthy culture from which I can grow more. You can however opt to increase the vessel size over time.
Cleaning the Culture Vessels
I'm really lazy, so I just take some muriatic acid, pour a little bit into the old culture vessel, and swirl it around until all residues are dissolved (this takes only a few seconds). Then I give the culture vessel a rinse with tap water followed by a quick rinse with RO/DI, and it's good to go for the next iteration. Work in a well-ventilated area with eye protection and gloves. If you fully close the culture vessel with a cap, make sure to loosen it every few seconds, or pressure will build up. If a drop of acid previously landed on the neck of the bottle, loosening the cap can cause that drop to fly off unexpectedly, which can be dangerous. If you don't want to deal with acids, you can also add some bleach for a few hours, which should also remove unwanted residues, just much more slowly.
Dealing with Culture Crashes
Fortunately I never had all my batches crash at once, so I simply was able to start a new batch from the healthiest culture that was currently running or at least some "leftovers" from the last batch. If your culture crashes you will see it losing color and maybe bits and pieces floating around in the current. If you are growing different plankton species I recommend examining the cultures that crashed to see if it is a cross-contamination issue, or if something else if wrong.
Examining the Culture
(Microscopy of a freshly received "starter culture")
(First batch started with the received starter culture. No nematodes or ciliates in Nannochloropsis clusters)
(Cyanobacteria next to a few Nannochloropsis cells)
The second batch isn't ready yet, but it's already looking much better:
(Current state of the second batch)
Last edited:



 I hope I will find the time to improve the text a bit further, but currently I have too many projects to take care of at once

















