Prepare yourself for a rather long first post. This thread is going to document all of the tanks I have in my fish room. Which should be a relatively simple task, but I recently broke my own 2 tank limit. So now there is four of them. I have no idea how this happened.
40 Breeder Display


Equipment:
20 Long QT
.jpg")
This photo was taken 1 day after receiving an order of macro algae. The algae immediately cause a nuisance algae bloom. I ran out of time before leaving to really clean everything up, but I did get everything under water and that was the best I could do. The reason I ran out of time will be the next section. I didn't have time to properly document which types of macro algae I recieved, for now they will be "Samplers". I'm looking into QT'ing inverts but it looks like this lot will be in for 76 days, or until 11/27.
Equipment:
Lighting: Mars Aqua LED Black Box
Return: Sicce Silent (?) - It's a smaller model
Skimmer: Tunze 9004
Wavemakers: None
Heater: Enhiem Jager
ATO: Me
Controller: Apex jr.
Overflow: DIY Ghost Overflow
Stand: DIY Based on Rocket Engineer's Template
Livestock:
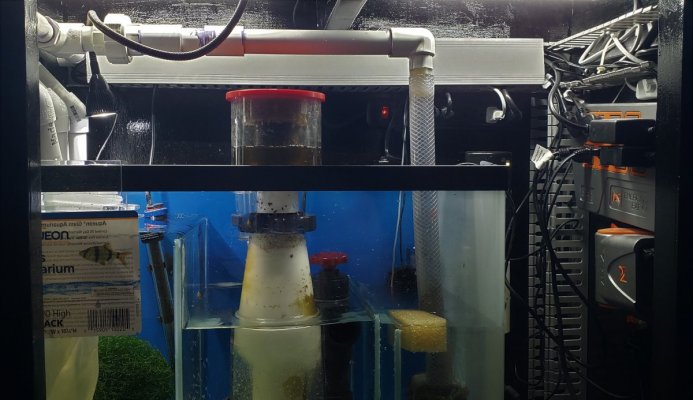
This 20L system is what I would call Rev 1 ( or 0, if you're a python ) of my design. As such, it has the first DIY Ghost Overflow I built. Other than being much cheaper than finished products it allows me to seamlessly replace the teeth on the overflow with anything I can build. In the picutres you can see the intermediate tank is bulky and the water level in the tank is higher than I'm comfortable with. What you can't see is the two bulkheads to the tank create a bit noise with high flow. Moving on with this knowledge, I made a few changes for the version on the 40B: I shrank the intermediate outside tank, added a third bulkhead from the main overflow to the intermediate tank, I moved the main syphon line to the middle on the int. tank, and I made the overflow sit lower in the tank to allow more flow. The main changes I made between the 20L and the 40B were with the overflow. The other changes I made were mounting lights into the stand and adding wire duct to the inside of the stand. Highly recommend it if you're worried about wire management. If it fits in the duct, consider it managed. The duct is 3"x3" so there's plenty of room to fit wiring and I fit a few power supplies into the duct.
20L Ghost Overflow
.jpg")
.jpg")
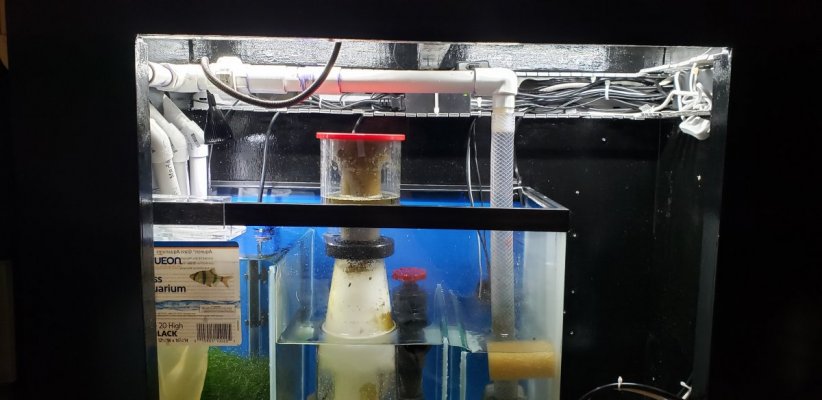
40B Ghost Overflow

"I see two return line and only one return in the tank."
The Fun Begins
Like you do when you're bored, I found an add on craigslist for 2 Fluval EVO 13.5 tanks on craigslist for what I think was a deal. I agreed to buy them on a friday, picked them up on a Saturday, and had to leave the following Sunday morning. It's friday night and I have now agreed to caring for 2 new aquariums. I don't have anywhere to put them, off to home depot. The efforts well into the night on the kitchen counter result in the following stand. For roughly 5 hours of effort, I'm satistified with the results. The stand is made from 1x4s and is 36"x22". I made it a little longer than needed to potentailly fit a 40g breeder on top if I ever felt adventurous. I'm not a ME and don't know if it would hold 600lbs, but I'll pretend it will for now.
.jpg")
.jpg")
You can see how I reinforced the top sheet of plywood with shorter beams. They are ~6" apart. The spacing garantees there will always be two of them underneath a Fluval EVO 13.5 at any one time. I had an internal debate between the two methods below. I still don't know which one would have been stronger. If anyone knows, can you let me know?
.jpg")
Evo #1 - The Endler Tank?

Yup, you read correctly. The entire reason I was looking for a nano tank was endlers. You can see one of the young males in the picture. After reading it was possible years ago, I attempted it recently and had 5 endler's that needed a home. Even after turning off both vortecs in the 40B and cutting back on the flow from the return pump, it became apparent they couldn't handle the flow. Interestingly they will rest on top of flat surfaces now, even in a tank will much lower flow. I have seen them laying on top of the floating plastic plants, even with a reletively gentle 9x turn over rate.
Equipment:
Livestock:
Evo #2 - Upgrades
.jpg")

The individual I purchased the aquariums from intended to set up both of the EVOs, they only set up one of them and added a few upgrades. I'm not sure about all of them, but I know about the following: upgraded the return to a sicce silent 1.0, lost the stock hood, added an AI Prime, and Intouch media basket. It came with a bunch of various equipment, but I didn't have time to process all of it. Before I left, I setup this EVO with the livestock they had and the AI Prime. The clowns are huge and I really like the patterns. I've only seen "designer" clowns in pictures or as 1" fish at the LFS. In person looking at a 2-3" fancy clown. They are incredible. The original owner purchased them in 2017 and claimed they would spawn. Maybe I'll get to try my hand at raising clowns?
Equipment:
Livestock:
We shall see if I keep up with this thread.
I can't delete this picture. Please enjoy it again->
Edit: I deleted the duplicate picture
40 Breeder Display
Here it is! This is my display system. It's a 40g breeder with a 20H sump. I created a "L" shaped rock wall. It wraps around 2 sides of the tank allowing a full length view. I did my best to keep most of the rock work up against the wall of the tank. I was able to accomplish this by using a diamond-coated chopsaw blade on dry rock. Overall the process worked but it was more difficult than expected. Due to the cost of a diamond-coated blade I used a smaller one 6 or 7". Using such a small blade didn't allow me to cut the rocks the way I wanted to, but I am happy with the results. The "L" shaped piece is foamed to the tank wall. The piece on the right side is only set into the aquarium. While I did this so I could remove it the event I needed to move the tank, it has a gap behind it and fish may be able to get behind it. I did my best to leave the main body of the tank open for swimming. One downside is there is a limited amount of hiding spaces for cryptic fish. I did create a large cave in the corner of the tank. Several of the rocks protrude from the wall creating ledges. I am hoping to use coral and macros to create the actual cover in the tank.Equipment:
Lighting: 2 Mars Aqua LED Black Boxes
Return: Sicce Silent (?) - It's a larger model
Skimmer: Reef Octopus 110-INT
Wavemakers: MP10 and MP40
Heater: Enhiem Jager
ATO: Tunze ATO
Controller: Apex
Overflow: DIY Ghost Overflow
Stand: DIY Based on Rocket Engineer's Template
Livestock:Fish:
None
Inverts:
Too many - Hawaiian Brittle Stars
Too many - Small Strombus Snails
Coral:
2x Types of Zoas
1x Head of Hammer
Macros:
Cheato - In the Sump
Side note there is something very strange growing in my skimmer. I'll snag a picture for the next post.
20 Long QT
This photo was taken 1 day after receiving an order of macro algae. The algae immediately cause a nuisance algae bloom. I ran out of time before leaving to really clean everything up, but I did get everything under water and that was the best I could do. The reason I ran out of time will be the next section. I didn't have time to properly document which types of macro algae I recieved, for now they will be "Samplers". I'm looking into QT'ing inverts but it looks like this lot will be in for 76 days, or until 11/27.
Equipment:
Lighting: Mars Aqua LED Black Box
Return: Sicce Silent (?) - It's a smaller model
Skimmer: Tunze 9004
Wavemakers: None
Heater: Enhiem Jager
ATO: Me
Controller: Apex jr.
Overflow: DIY Ghost Overflow
Stand: DIY Based on Rocket Engineer's Template
Livestock:
Fish:
None
Inverts:
None
Coral:
1x Types of Zoas
Spiny Gorgonian
Purple Plume Gorgonian
Macros:
Caulerpa Sampler (3+ Types of Caulerpa)
Red Algae Sampler (3+ Types of Red Macros)
Hypnea Pannosa (It's Blue!)
This 20L system is what I would call Rev 1 ( or 0, if you're a python ) of my design. As such, it has the first DIY Ghost Overflow I built. Other than being much cheaper than finished products it allows me to seamlessly replace the teeth on the overflow with anything I can build. In the picutres you can see the intermediate tank is bulky and the water level in the tank is higher than I'm comfortable with. What you can't see is the two bulkheads to the tank create a bit noise with high flow. Moving on with this knowledge, I made a few changes for the version on the 40B: I shrank the intermediate outside tank, added a third bulkhead from the main overflow to the intermediate tank, I moved the main syphon line to the middle on the int. tank, and I made the overflow sit lower in the tank to allow more flow. The main changes I made between the 20L and the 40B were with the overflow. The other changes I made were mounting lights into the stand and adding wire duct to the inside of the stand. Highly recommend it if you're worried about wire management. If it fits in the duct, consider it managed. The duct is 3"x3" so there's plenty of room to fit wiring and I fit a few power supplies into the duct.
20L Ghost Overflow
40B Ghost Overflow
"I see two return line and only one return in the tank."
-We don't talk about the rock wall not allowing the second return line to be installed.
The Fun Begins
Like you do when you're bored, I found an add on craigslist for 2 Fluval EVO 13.5 tanks on craigslist for what I think was a deal. I agreed to buy them on a friday, picked them up on a Saturday, and had to leave the following Sunday morning. It's friday night and I have now agreed to caring for 2 new aquariums. I don't have anywhere to put them, off to home depot. The efforts well into the night on the kitchen counter result in the following stand. For roughly 5 hours of effort, I'm satistified with the results. The stand is made from 1x4s and is 36"x22". I made it a little longer than needed to potentailly fit a 40g breeder on top if I ever felt adventurous. I'm not a ME and don't know if it would hold 600lbs, but I'll pretend it will for now.
You can see how I reinforced the top sheet of plywood with shorter beams. They are ~6" apart. The spacing garantees there will always be two of them underneath a Fluval EVO 13.5 at any one time. I had an internal debate between the two methods below. I still don't know which one would have been stronger. If anyone knows, can you let me know?
Evo #1 - The Endler Tank?
Yup, you read correctly. The entire reason I was looking for a nano tank was endlers. You can see one of the young males in the picture. After reading it was possible years ago, I attempted it recently and had 5 endler's that needed a home. Even after turning off both vortecs in the 40B and cutting back on the flow from the return pump, it became apparent they couldn't handle the flow. Interestingly they will rest on top of flat surfaces now, even in a tank will much lower flow. I have seen them laying on top of the floating plastic plants, even with a reletively gentle 9x turn over rate.
Equipment:
Lighting: Stock EVO 13.5
Return: Stock
Skimmer: None
Wavemakers: None
Heater: None
ATO: Me
Controller: None
Overflow: AIO
Stand: DIY Based on Rocket Engineer's Template
Livestock:
Fish:
4 or 5 - Endler's Livebearers
Inverts:
2 - Small Strombus Snails
Coral:
None
Macros:
Cheato
Evo #2 - Upgrades
The individual I purchased the aquariums from intended to set up both of the EVOs, they only set up one of them and added a few upgrades. I'm not sure about all of them, but I know about the following: upgraded the return to a sicce silent 1.0, lost the stock hood, added an AI Prime, and Intouch media basket. It came with a bunch of various equipment, but I didn't have time to process all of it. Before I left, I setup this EVO with the livestock they had and the AI Prime. The clowns are huge and I really like the patterns. I've only seen "designer" clowns in pictures or as 1" fish at the LFS. In person looking at a 2-3" fancy clown. They are incredible. The original owner purchased them in 2017 and claimed they would spawn. Maybe I'll get to try my hand at raising clowns?
Equipment:
Lighting: AI Prime LED
Return: Sicce Silent 1.0
Skimmer: None
Wavemakers: None
Heater: None
ATO: Me
Controller: None
Overflow: AIO
Stand: DIY Based on Rocket Engineer's Template
Livestock:
Fish:
2 - Ocellaris Clownfish
Inverts:
2 - Nassarius Snails
Coral:
Neon Green Toadstool
Kenya Tree
3-5 Heads of Candy Cane - This coral hasn't fully open yet
Macros:
None
It has taken serveral hours to create this post. I hope you enjoy!We shall see if I keep up with this thread.
I can't delete this picture. Please enjoy it again->
Edit: I deleted the duplicate picture
Last edited: