IM NUVO 200 EXT Peninsula Dream

ReefBrownie

Active Member
View Badges
Joined
Aug 22, 2016
Messages
117
Reaction score
153
Location
Coushatta, Louisiana
Rating - 0%
0   0   0
Hey Everyone! Been out of the game for a little over a year after a move from Arkansas to Louisiana. I decided that even though there isn't much here in the way of a LFS (closest is around 3 hour drive), I couldn't see myself without a reef tank. I have previously owned a 180, 125, and 75 gallon mixed reefs. I have been in the hobby a little over 8 years.
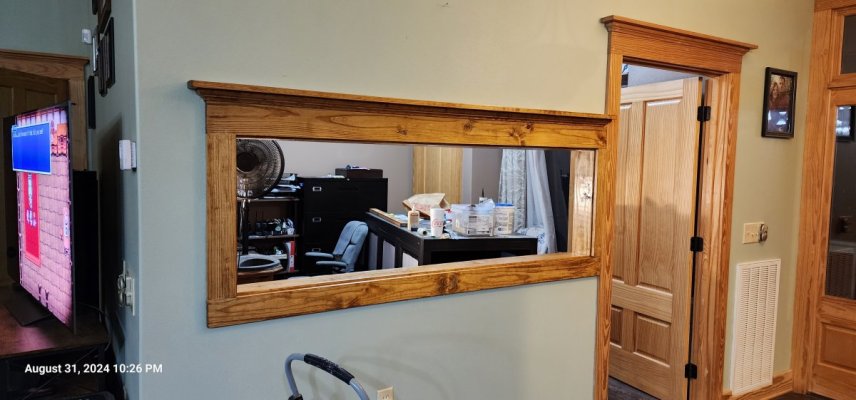
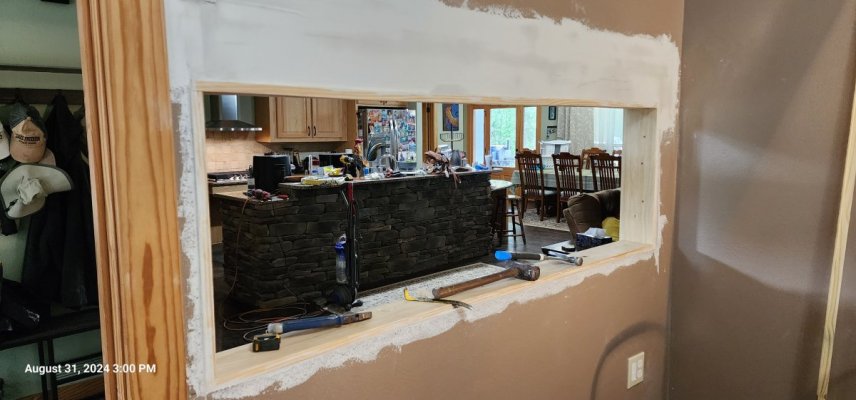
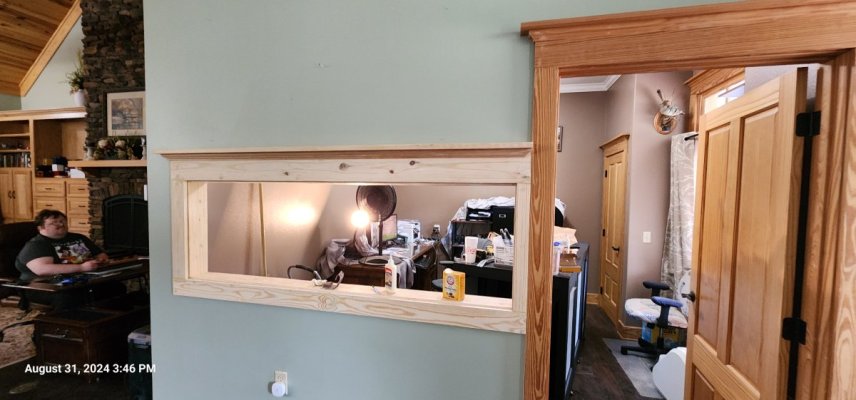
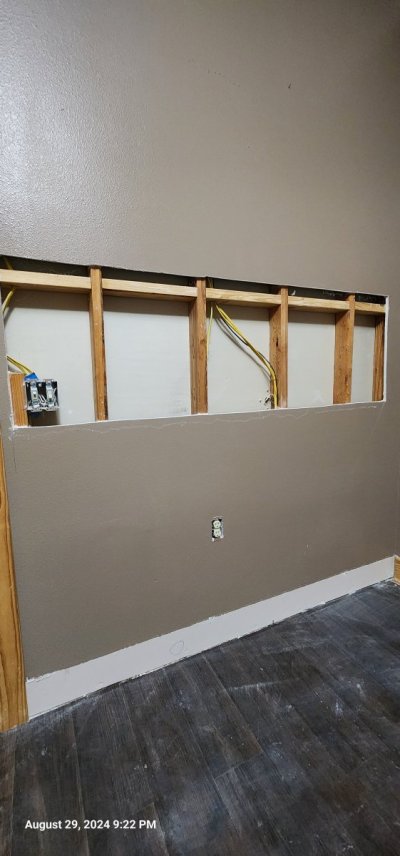
We moved into a new house, and I have an awesome husband that's handy, and allows me to get away with crazy ideas :grinning-face-with-sweat:. We have the perfect wall in our entryway that adjoins our office that I plan on cutting out so that you can see the tank from both rooms. So I decided to go bigger than I have ever done before. I started getting quotes on tanks and finally decided on a 200 IM EXT Peninsula complete kit, can't beat the reviews and price for the package. I placed an order on June 17, and it arrived today (Aug 20th). I am super excited to start this journey!
20240820_100515.jpg
20240820_102154.jpg
20240820_102452.jpg
20240820_102545.jpg
20240820_104927.jpg
20240820_105057.jpg
20240820_105021.jpg
20240820_105528.jpg
 

Devaji

7500 Club Member
View Badges
Joined
Aug 27, 2016
Messages
7,865
Reaction score
6,793
Location
Jackson Hole, WY
Rating - 0%
0   0   0
you are going to LOVE it. I have the same tank.
the stand is easy to put together and I like it more the the wood RS/WB stands.

just wish they made a 8'x30"x22 "size

PS: get more help than you think to move it in.
 
OP
OP
ReefBrownie

ReefBrownie

Active Member
View Badges
Joined
Aug 22, 2016
Messages
117
Reaction score
153
Location
Coushatta, Louisiana
Rating - 0%
0   0   0
Ok things have been crazy lately. I finally have time to sit down and update this thread. A lot has happened since my tank arrived back in August, so I will break this up into a couple of posts.

So here a some pics of my wall that I had cut out to accommodate the tank. The light green side is looking from my entryway/livingroom/kitchen area, and the brown side is the view from the office.

You can see from the opening that I had some electrical to deal with. I was able to move the plug on the office side to the far right side along the corner. I actually had two breakers installed that will be dedicated to the fish tank. The plug I moved I put in a GFCI on and then I also added a plug above the tank for the lights. I had a bit of trouble with the ceiling fan/light switch since there was no good place to put it without having to walk all the way into the office to flip the switch, so I moved it to above where the tank is going. It is on a remote control so that makes it a bit more convenient.

We built the framing around the tank hole to match the rest of the window and door trim in the house. On the tank side however, I only put small/thin wood trim so that the tank could sit flush against the wall.

*On a side note, matching wood stain to a previous 12 year old colored trim is a pain! I think we did a decent job :)
 

Attachments

  • 20240831_222656[1].jpg
    20240831_222656[1].jpg
    113.3 KB · Views: 81
  • 20240831_222622.jpg
    20240831_222622.jpg
    122.6 KB · Views: 89
  • 20240831_150059.jpg
    20240831_150059.jpg
    117 KB · Views: 83
  • 20240831_154654.jpg
    20240831_154654.jpg
    116.3 KB · Views: 83
  • 20240829_212238.jpg
    20240829_212238.jpg
    107.6 KB · Views: 85
OP
OP
ReefBrownie

ReefBrownie

Active Member
View Badges
Joined
Aug 22, 2016
Messages
117
Reaction score
153
Location
Coushatta, Louisiana
Rating - 0%
0   0   0
Ok this post will be about putting the tank in place and setting up the sump.

First up, got the stand put together, and was very pleasantly surprised to discover that the stand came with a leveling feet kit. I was not expecting this, due to it not being listed on any of the documentation with the purchase. But it is amazing, especially with my floating vinyl flooring.
20240829_212203[2].jpg
20240829_212212[1].jpg


This tank is a well made beast! Took every bit of 4 strong guys to get it in place. (I didn't get any pics of them actually moving it though. Probably a good idea since I was a nervous wreck) We used 2 furniture dollies and a rhino cart to wheel it from the carport to the office. Thankfully all the exterior doors to my home are 36 in or more wide, so we did not have to removed any doors to get it in. I ordered 4 of the 9 inch suction cups, the ones from amazon that could accommodate up to 800 lbs. This made lifting the tank from the dollies on to the stand possible.
20240901_121438[1].jpg
20240901_121449[2].jpg
20240901_123000[1].jpg
20240901_122934[2].jpg


I sealed the bottom board to the inside of the stand with a bead of silicone all the way around. The sump fits perfectly in the stand, and even has enough room for me to put in a 29 gallon aquarium that I am going to use as a ATO reservoir. Only caveat that I had with this build is I had to cut and redo a bit of the included kit plumbing. The kit that IM designed was for access to the other side of the tank with the sump siting directly under where the overflow side is. If I were to put it together like it came I could not see into the sump because I am accessing in from the "back". I did mine backwards so that the overflow would be in the corner and I could see the front of the sump. So, all I had to do was cut the pipe and add extensions with couplings.

20240901_123020[2].jpg
20240901_123149[1].jpg
20240909_201705[2].jpg
20240909_201758[1].jpg

20240909_201742[1].jpg
 

Sean Clark

🐟 OnlyFins 🐠
View Badges
Joined
May 16, 2019
Messages
9,057
Reaction score
33,256
Location
Michigan
Rating - 0%
0   0   0
Ok this post will be about putting the tank in place and setting up the sump.

First up, got the stand put together, and was very pleasantly surprised to discover that the stand came with a leveling feet kit. I was not expecting this, due to it not being listed on any of the documentation with the purchase. But it is amazing, especially with my floating vinyl flooring.
20240829_212203[2].jpg
20240829_212212[1].jpg


This tank is a well made beast! Took every bit of 4 strong guys to get it in place. (I didn't get any pics of them actually moving it though. Probably a good idea since I was a nervous wreck) We used 2 furniture dollies and a rhino cart to wheel it from the carport to the office. Thankfully all the exterior doors to my home are 36 in or more wide, so we did not have to removed any doors to get it in. I ordered 4 of the 9 inch suction cups, the ones from amazon that could accommodate up to 800 lbs. This made lifting the tank from the dollies on to the stand possible.
20240901_121438[1].jpg
20240901_121449[2].jpg
20240901_123000[1].jpg
20240901_122934[2].jpg


I sealed the bottom board to the inside of the stand with a bead of silicone all the way around. The sump fits perfectly in the stand, and even has enough room for me to put in a 29 gallon aquarium that I am going to use as a ATO reservoir. Only caveat that I had with this build is I had to cut and redo a bit of the included kit plumbing. The kit that IM designed was for access to the other side of the tank with the sump siting directly under where the overflow side is. If I were to put it together like it came I could not see into the sump because I am accessing in from the "back". I did mine backwards so that the overflow would be in the corner and I could see the front of the sump. So, all I had to do was cut the pipe and add extensions with couplings.

20240901_123020[2].jpg
20240901_123149[1].jpg
20240909_201705[2].jpg
20240909_201758[1].jpg

20240909_201742[1].jpg
You are going to want all of those valves lower, below the tank, in the open stand area for nice easy access. Just my thoughts.
 
OP
OP
ReefBrownie

ReefBrownie

Active Member
View Badges
Joined
Aug 22, 2016
Messages
117
Reaction score
153
Location
Coushatta, Louisiana
Rating - 0%
0   0   0
Next up: Getting the tank aquascape setup and filled.

I got lucky and found someone semi-local (3 hour drive) that had some dry rock exactly like marco rock for sale in bulk. I got about 300 lbs for a very good price, all I needed to do was wash it. So I went a step further and took a chisel and sledgehammer to it and rebuild my own customized rock scape. I decided to try the super glue and sand method. It was an experience to say the least to get enough for a 200 gallon tank, but looking at it now I think it was well worth the effort. In previous tank builds i used Caribsea Life Rock, and I was never happy with how much room the rock took up without providing the hiding spaces that I felt like it could have. This way "when/if" the coral grow out the fish should have plenty of hiding spots.

20240902_173434[1].jpg
20240902_173441[1].jpg
20240902_173608[1].jpg

On to filling the tank. I opted for a sand bed because I prefer the look vs barebottom. I went with 200 lbs of the Two Little Fishes Course Aragonite dry sand. This took a good amount of time to rinse out (it had alot of silt), and even here you can see it is still cloudy. But I love the color and the grain size of this sand.
20240909_201902[1].jpg
20240918_154638[1].jpg

20240918_154606[1].jpg
When filling this tank, I went for the easy way. As you can see in the photo above the white hose on the right side of the photo leads to my 300 gallon saltwater mixing station I have set up in the carport Storage room/ Fish supply room and is plumbed into the return section of my sump. Also with that hose is a RO/DI hose for filling up my ATO reservoir that travels from that same carport room's RO/DI system to the 29 gallon tank with a float valve. I am paranoid about floods even still so I do not leave either of these lines open. I close them off with valves in the storage room.
 

Attachments

  • 20240918_154638[1].jpg
    20240918_154638[1].jpg
    141.6 KB · Views: 74
  • 20240902_173416[1].jpg
    20240902_173416[1].jpg
    170.8 KB · Views: 71
OP
OP
ReefBrownie

ReefBrownie

Active Member
View Badges
Joined
Aug 22, 2016
Messages
117
Reaction score
153
Location
Coushatta, Louisiana
Rating - 0%
0   0   0
You are going to want all of those valves lower, below the tank, in the open stand area for nice easy access. Just my thoughts.
I thought about that when I was putting it together, but It's actually not as bad to reach them as it looks. I don't usually have to use them at all once I get the overflow dialed in.
 

fishybizzness

2500 Club Member
View Badges
Joined
Apr 3, 2017
Messages
2,598
Reaction score
3,284
Rating - 100%
2   0   0
Ok this post will be about putting the tank in place and setting up the sump.

First up, got the stand put together, and was very pleasantly surprised to discover that the stand came with a leveling feet kit. I was not expecting this, due to it not being listed on any of the documentation with the purchase. But it is amazing, especially with my floating vinyl flooring.
20240829_212203[2].jpg
20240829_212212[1].jpg


This tank is a well made beast! Took every bit of 4 strong guys to get it in place. (I didn't get any pics of them actually moving it though. Probably a good idea since I was a nervous wreck) We used 2 furniture dollies and a rhino cart to wheel it from the carport to the office. Thankfully all the exterior doors to my home are 36 in or more wide, so we did not have to removed any doors to get it in. I ordered 4 of the 9 inch suction cups, the ones from amazon that could accommodate up to 800 lbs. This made lifting the tank from the dollies on to the stand possible.
20240901_121438[1].jpg
20240901_121449[2].jpg
20240901_123000[1].jpg
20240901_122934[2].jpg


I sealed the bottom board to the inside of the stand with a bead of silicone all the way around. The sump fits perfectly in the stand, and even has enough room for me to put in a 29 gallon aquarium that I am going to use as a ATO reservoir. Only caveat that I had with this build is I had to cut and redo a bit of the included kit plumbing. The kit that IM designed was for access to the other side of the tank with the sump siting directly under where the overflow side is. If I were to put it together like it came I could not see into the sump because I am accessing in from the "back". I did mine backwards so that the overflow would be in the corner and I could see the front of the sump. So, all I had to do was cut the pipe and add extensions with couplings.

20240901_123020[2].jpg
20240901_123149[1].jpg
20240909_201705[2].jpg
20240909_201758[1].jpg

20240909_201742[1].jpg
Holy cow! A leveling kit? Mine didn't come with that! That's a game changer. I will be contacting them to see if it's something I can purchase.
 
OP
OP
ReefBrownie

ReefBrownie

Active Member
View Badges
Joined
Aug 22, 2016
Messages
117
Reaction score
153
Location
Coushatta, Louisiana
Rating - 0%
0   0   0
Lighting installed and first fish added. Previous tanks I was mostly a T5 user, and now since I don't have a LFS that I can get the bulbs from I decided to go with LEDs. (I have had horrible history with T5 bulbs being shipped). I decided to try out the Reefi Uno 2.0's on this tank. Recommended to use 3 for this size tank and wanting mostly mixed LPS tank. Decided to hang them on 80/20 extruded aluminum rail hanging from the ceiling.
20241007_222804[1].jpg
20241004_194024[1].jpg

I did a fishless cycle using Brightwell's QuikCycle and then added a Gladiator and a Fancy clownfish from saltwateraquarium. Meet Sugar and Spice.
20240921_100356[1].jpg

And after about 3 weeks I saw a beautiful Orange Shoulder when I was at a LFS in New Orleans that I had to have. Meet Cayenne.
20241016_124726[1].jpg
 

Gumbies R Us

God, Bouldering, and Reefing
View Badges
Joined
Nov 10, 2022
Messages
28,944
Reaction score
51,298
Location
North Georgia
Rating - 0%
0   0   0
Following along! Tank is looking great so far!
 
OP
OP
ReefBrownie

ReefBrownie

Active Member
View Badges
Joined
Aug 22, 2016
Messages
117
Reaction score
153
Location
Coushatta, Louisiana
Rating - 0%
0   0   0
First Corals: So I'm hoping to go with LPS dominated mixed reef for this build. May not work, but I will adapt as I go. Most of these corals I got from the Aquashella that came to Dallas back in September. I knew the tank wasn't ready yet so I put together a temp frag tank with a 13 gallon AIO that I had in storage. I know...I know...impulse buy and rushing things..:confused:. I was really trying to not buy anything that I knew would be too sensitive, so starting it off with a green leather, ricordia, and some Zoanthids.
20241009_170021[1].jpg
20241009_170045[1].jpg
20241009_170038[1].jpg

20241016_124716[1].jpg

Also a few frags of euphyllia and a favites. I know the green hammer is not great (ended up losing it) but my ATO got stuck on the AIO tank, but one loss is not terrible for me rushing things..:downcast-face-with-sweat:
 

TOP 10 Trending Threads

WHAT AMOUNT OF LIVE ROCK AND SAND SHOULD BE PRIORITIZED FOR OPTIMAL BIODIVERSITY/FILTRATION?

  • 100% live rock + bagged sand

    Votes: 34 28.1%
  • 100% dry rock + 100% live sand

    Votes: 41 33.9%
  • 50/50 live/dry rock, 50/50 live/bagged sand

    Votes: 27 22.3%
  • 75% live rock, 25% live sand

    Votes: 11 9.1%
  • 25% live rock, 75% live sand

    Votes: 8 6.6%
Back
Top