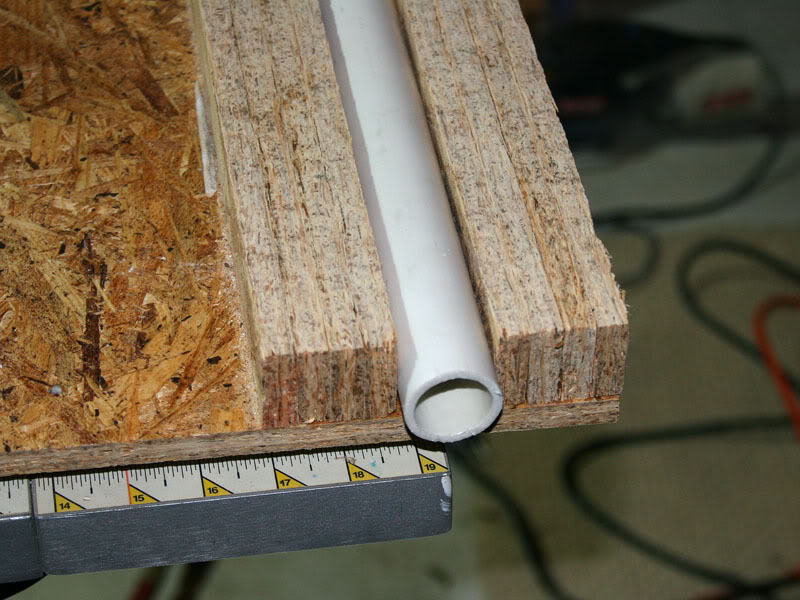
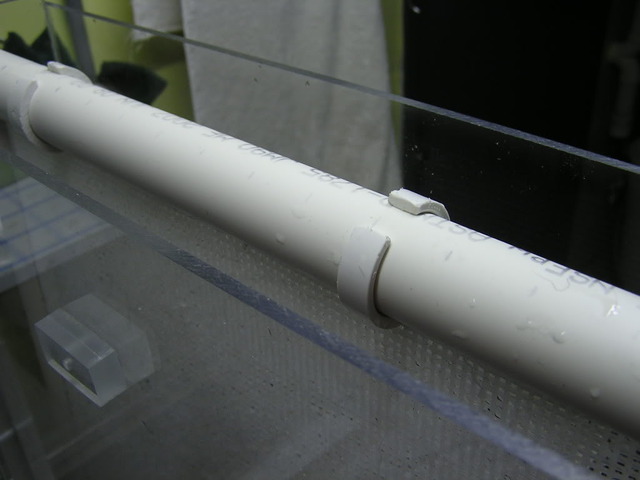
Algae Scrubber Basics

Reef Breeders

ReefBreeders.com
View Badges
Joined
Dec 21, 2010
Messages
4,521
Reaction score
758
Location
North Kingstown, RI
Rating - 0%
0   0   0
Wow, excellent write up! You can buy red bulbs a walmart, basically just painted incandescent, not sure how bright they are. I think this should be stickied!
 
OP
OP
Turbo's Aquatics

Turbo's Aquatics

Super Duper Member
View Badges
Joined
Jun 7, 2011
Messages
2,804
Reaction score
4,029
Location
West Des Moines, IA
Rating - 0%
0   0   0
Thanks, it took a while to put it all together, and this is the second version! Thanks for the sticky suggestion too. Mods? Rev?

Are you talking about the CFLs that are painted the funky colors? :bigsmile: I don't think those have ever been tried, but that's not the kind of red bulb that I referred to. Color temp (K) heavy in red. A painted bulb like you're talking about is really a novelty item :nerd:

I just read a post on the Algae Scrubber site that I will have to re-post over here regarding algae growth and color temperature, it pretty much shuts the door on using Royal Blue LEDs to grow algae
 

Jerad

Community Member
View Badges
Joined
Dec 27, 2010
Messages
44
Reaction score
0
Location
Winona, MN
Rating - 0%
0   0   0
Nice tank! I found this video of a corporate use of ATS. What do you think of this design?
‪Inland Aquatics Part 1‬‏ - YouTube
At 3:15ish it starts talking about their ATS
I want to make one but I am kinda poor. How much would a cheap one cost? How much did yours cost? Yours looks very professional.
 
OP
OP
Turbo's Aquatics

Turbo's Aquatics

Super Duper Member
View Badges
Joined
Jun 7, 2011
Messages
2,804
Reaction score
4,029
Location
West Des Moines, IA
Rating - 0%
0   0   0
It's hard to put a price tag on mine, because I built it myself. The lighting parts probably ran about $200 (all stock items). You can do the dirt cheap route with CFLs, the clip-on dome reflectors, a good slot tube, and the screen material for under $50 probably. You might even find a scrap piece of acrylic or polycarbonate to hang on each side of the screen. Then it's all about time and making it fit into your existing setup. That's usually the tricky part.
 
OP
OP
Turbo's Aquatics

Turbo's Aquatics

Super Duper Member
View Badges
Joined
Jun 7, 2011
Messages
2,804
Reaction score
4,029
Location
West Des Moines, IA
Rating - 0%
0   0   0
Here's today's harvest - 3rd week in a row of stellar growth!

DSC02387.jpg


DSC02388.jpg


DSC02389.jpg


DSC02390.jpg
 

ToXIc

2500 Club Member
View Badges
Joined
Feb 27, 2011
Messages
4,001
Reaction score
67
Location
TN
Rating - 0%
0   0   0
Don't know if I missed it in a earlier post. But how long of a light cycle do you run with the scrubber? 24/7 12/7 daytime or 12/7 night time to help with ph like with cheato.


____________________________
Sent from my iThingy using Tapatalk
 

bct15

2500 Club Member
View Badges
Joined
Nov 20, 2010
Messages
2,845
Reaction score
171
Location
Mississippi
Rating - 0%
0   0   0
Don't know if I missed it in a earlier post. But how long of a light cycle do you run with the scrubber? 24/7 12/7 daytime or 12/7 night time to help with ph like with cheato.


____________________________
Sent from my iThingy using Tapatalk

I think it says to do 18 hrs on, 6 hrs off.

Brandon
 
OP
OP
Turbo's Aquatics

Turbo's Aquatics

Super Duper Member
View Badges
Joined
Jun 7, 2011
Messages
2,804
Reaction score
4,029
Location
West Des Moines, IA
Rating - 0%
0   0   0
For the algae scrubber, it's 18 on 6 off. You can shorten and lengthen a bit depending on certain conditions, but generally you want to stick to that. Algae needs a dark period.
 

Modernreefkeeper

New Member
View Badges
Joined
Aug 5, 2011
Messages
18
Reaction score
0
Location
Downtown San Jose Ca
Rating - 0%
0   0   0
Where do you get the "algae" from? it comes from live rock, or just in the system?
they use to run Turf algae in these scrubbers back in the day, but once that gets in to the tank its all over if you remove the scrubber
 
OP
OP
Turbo's Aquatics

Turbo's Aquatics

Super Duper Member
View Badges
Joined
Jun 7, 2011
Messages
2,804
Reaction score
4,029
Location
West Des Moines, IA
Rating - 0%
0   0   0
Old school scrubbers had issues because they didn't remove the screen fully from the system to clean it. That is not done with the modern scrubber. I need to get part 2 done because Part 1 only covers building it right, not maintaining it. Lots of old problems solved by maintaining it right.

Algae occurs naturally in your system, even in a bare system started with dry base rock and freshly mixed SW will grow algae.

"Turf" algae refers generally to Red Turf, sometimes green turf, but this is not what is desired with the modern vertical scrubber. You can Green Hair Algae because it grows very fast and because of that it has a high filtering capacity.
 
OP
OP
Turbo's Aquatics

Turbo's Aquatics

Super Duper Member
View Badges
Joined
Jun 7, 2011
Messages
2,804
Reaction score
4,029
Location
West Des Moines, IA
Rating - 0%
0   0   0
New Scrubber Sizing Guideline (Sept 2011)

Scrubbers will now be sized according to feeding. Nutrients "in" (feeding) must equal nutrients "out" (scrubber growth), no matter how many gallons you have. So...

An example VERTICAL waterfall screen size is 3 X 4 inches = 12 square inches of screen (7.5 X 10 cm = 75 sq cm) with a total of 12 real watts (not equivalent) of fluorescent light for 18 hours a day. If all 12 watts are on one side, it is a 1-sided screen. If 6 watts are on each side, it is a 2-sided screen, but the total is still 12 watts for 18 hours a day. This screen size and wattage should be able to handle the following amounts of daily feeding:

1 frozen cube per day (2-sided screen)
1/2 frozen cube per day (1-sided screen)
10 pinches of flake food per day (2-sided screen)
5 pinches of flake food per day (1-sided screen)
10 square inches (50 sq cm) of nori per day (2-sided screen)
5 square inches (50 sq cm) of nori per day (1-sided screen)
0.1 dry ounce (2.8 grams) of pellet food per day (2-sided screen)
0.05 dry ounce (1.4 grams) of pellet food per day (1-sided screen)

High-wattage technique: Double the wattage, and cut the hours in half (to 9 per day). This will get brown screens to grow green much faster. Thus the example above would be 12 watts on each side, for a total of 24 watts, but for only 9 hours per day. If growth starts to turn YELLOW, then increase the flow, or add iron, or reduce the number of hours. And since the bulbs are operating for 9 hours instead of 18, they will last 6 months instead of 3 months.

HORIZONTAL screens: Multiply the screen size by 4, and the wattage by 1.5

Flow is 24 hours, and is at least 35 gph per inch of width of screen [60 lph per cm], EVEN IF one sided or horizontal.

Very rough screen made of roughed-up-like-a-cactus plastic canvas.

Clean algae off of screen every 7 to 14 days, so that you can see the white screen material.
 

olsinc

Community Member
View Badges
Joined
Nov 15, 2011
Messages
92
Reaction score
3
Location
Arkansas
Rating - 0%
0   0   0
I built Mine this past weekend. We have a 75 gallon system which includes the sump capacity. We have noticed we have a outbreak of that Red Slime stuff. Will the Scrubber take care of this problem by Exporting the Bad Nutrients?
 
OP
OP
Turbo's Aquatics

Turbo's Aquatics

Super Duper Member
View Badges
Joined
Jun 7, 2011
Messages
2,804
Reaction score
4,029
Location
West Des Moines, IA
Rating - 0%
0   0   0
Cyano can be overcome, but it is tough. So you need to have a well-built scrubber. Make sure you're not lacking in screen roughness, wattage, flow, etc. Also you may find that it helps greatly to build using the new feeding based sizing guidelines in combination with the double-light method. The point is that you want thick green growth as this does the best filtering. Give it time, and the cyano will lose the battle.
 
OP
OP
Turbo's Aquatics

Turbo's Aquatics

Super Duper Member
View Badges
Joined
Jun 7, 2011
Messages
2,804
Reaction score
4,029
Location
West Des Moines, IA
Rating - 0%
0   0   0
Foreword

In the past 6 months, there have been several basic changes to the core concept of the Algae Scrubber, and these changes resulted in many people experiencing better growth and more effective filtration.

By far the biggest change is that the size of the screen needed for a given system is no longer dictated by the volume of the tank or the bio-load, but is instead based on the amount of food you add to the system. This has resulted in much smaller screen requirements; in some cases, ridiculously small screens when compared to the previously guidelines.

The second is the optional lighting scenario using twice the light intensity and half the photoperiod, which can power through the initial dark algae growth stages some experience, and can also be helpful in battling tough tank algae.

Third covers the advent of LED Algae Scrubbers.

I went through and edited the previously posted “Basics”, mainly for the purpose of addressing the 3 above items. Many other sections were also affected, and I have incorporated as many hints, tips, and tricks as I could. Even if you have read through the previous “Basics” summary before, read this one again. And again.

Some of the pictures in this are based on the old sizing requirements, but are still good for examples of specific principles. For this reason, and the lack of pictures of smaller builds using the new requirements, I have kept many of the pictures the same.

Part 2? Yeah yeah…I incorporated a little more into this one, and I have a start on Part 2, but it needs revamping too!

This will likely be the last summary revision for this version of the Algae Scrubber. There is a new version being developed (not by me) and it is currently being kept under wraps as it is in the middle of the patent process (again, not by me) so I know very little about it, except that it will supposedly have vast improvements in many areas, and will not resemble any Algae Scrubber that anyone has ever seen (this frustratingly includes me). The principles are all the same, so this summary has value still. But just be aware that a lot of this information (that I’ve but so much time into assembling…grrr!) might just get thrown out the window. Tidbits of info? On the new version, you won’t have to cut a slot in a pipe, can remove and clean the screen without shutting off flow,

Anyways….the re-revamped Basics:

Algae Scrubber Basics Summary: February 2012

There are many options when it comes to building your own Algae Scrubber. Hopefully this series of posts will wrap up all the basic concepts as clearly and concisely as possible. It seems that many people look at this concept and think they can make some kind of major improvement, and post their idea. Then, a newbie can look at that and think that it makes great sense and mimic it, without understanding the pitfalls. I feel that it is important to understand the concept and purpose behind the basics, and why you should rarely deviate from them without fully understanding the basic concepts first.

Most of the issues people encounter with their DIY builds can be directly attributed to missing one or two of the basic principles. So consider this a "best practice" summary. That is, there are several ways to build an Algae Scrubber, but there is always a cheap and easy way, as well as the most effective and efficient way.

The Vertical Waterfall Algae Scrubber

99% of this summary is dedicated to the basic of designing and constructing a modern, vertical screen, waterfall-style Algae Scrubber, illuminated from both sides. This is simply because this design is currently by far the most efficient and effective type of Algae Scrubber design, and the only one that I recommend building. The occasional mention is made regarding considerations to make for building a single-sided Algae Scrubber, or for a horizontal/slanted Algae Scrubber. From here forward in this series of posts, horizontal or slanted Algae Scrubbers will be referred to as “non-vertical”.

The vertical waterfall style Algae Scrubber is very efficient for a couple of reasons. The design allows you to illuminate the algae from both sides and place the lights very close, which reduces the distance that light has to travel through water in order to reach the algae. The water flow over the screen is relatively thin and moves fast; this is important, because algae requires turbulent flow in order for nutrients to reach the cells on a microscopic level (Google “boundary layer”). Because of both of these factors, vertical Algae Scrubbers require less light and material than the older style non-vertical Algae Scrubbers for equivalent filtration capacity.

The Slot Pipe, Screen, and Fasteners

The principal component of the modern vertical waterfall Algae Scrubber is the slot pipe and plastic canvas screen. The screen is inserted into a section of horizontal PVC pipe which has a slot cut into it. The screen is typically held in place with a fastener through a cut-out section of the screen, like this:

IMG_8700.jpg


Slot Pipe

The slot pipe itself should be Schedule 40 PVC at a minimum. Don't use vent pipe, flexible hose, or thin-walled PVC. The reason is that cutting a slot in the tube weakens it enough that it can bow over time and cause the slot to change width, and cinching zip ties tightly around it can make that worse. This is especially true for a wide, tall Algae Scrubber. Anything over 24" should probably have 2 slots, with a small section in the center left uncut (maybe 1/4") with some kind of means of support at the center. It may look fine at first, but with heavy growth, you start to see this:

AS_yesman.jpg


I'm not saying that it won't work, and I'm not critiquing the design pictured above. It just got me thinking that it can't be good to have that pipe flexing that much. So this is a recommendation I am making for Algae Scrubbers with screens over 24" wide. But check out that growth!!! That's 6.5 pounds of algae (drained).

NOTE: I left that above section in here because I just love that picture. But the reality is that unless you are feeding about a 1/4 cup of food per day, you’ll never, ever need an Algae Scrubber this big. Read on…

Pipe Diameter

When running an Algae Scrubber fed directly from the overflow, there is usually no need to deviate from the size of the drain pipe that you currently use. But, that all depends on your total resultant flow to the pipe, length of screen, etc. In the majority of cases, this doesn’t change anything. However, if you had a large tank, and were combining four 1” drain lines together to feed one large Algae Scrubber, you have different considerations.

If you're doing a pump fed Algae Scrubber, either top of tank or sump, try to match the size of the slot pipe and other PVC components to the recommendations from the pump manufacturer, and if in doubt, err on the side of larger pipe. Larger pipe puts less head pressure on the pump, which will increase the flow rate.
 
OP
OP
Turbo's Aquatics

Turbo's Aquatics

Super Duper Member
View Badges
Joined
Jun 7, 2011
Messages
2,804
Reaction score
4,029
Location
West Des Moines, IA
Rating - 0%
0   0   0
Cutting the Slot

The width of the slot should be approximately 1/8" wide, the same length as the screen which you are using (as exact as possible), and as straight as possible. Cutting a straight, even width slot is arguably the most difficult and critical part of building an Algae Scrubber. If the slot is crooked or uneven, the screen may not hang properly, and there may be areas where the flow is lighter and heavier. This can result in sections of weak growth.

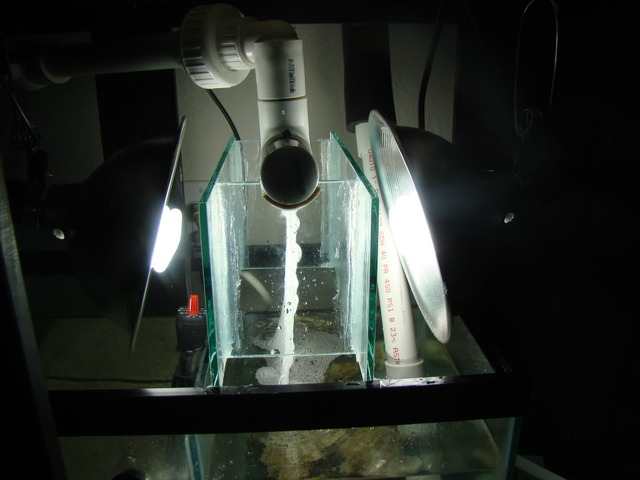
The width of 1/8” is what works best for a screen that has about 35 GPH of flow per inch of slot length. This flow rate is the minimum ‘target’ flow rate you want to have. At this rate, the water will ‘pile up’ in the pipe and purge the air out, and the water drain out fairly evenly across the entire screen.

Cutting the slot too narrow will result in low and uneven flow across the screen, resulting in areas of low growth. If you feed the scrubber via the overflow, this can cause big problems. Water can only flow so fast through a certain opening, and while this flow will increase with pressure, there is still a limit.

Cutting the slot too wide can also result in problems. If the slot is too wide for the total flow, then the air does not purge from the pipe as easily, resulting in the water ‘shooting’ through the pipe and dumping out on the far end. The only reason to widen a pipe is when you want a greater flow rate per linear inch of slot. It doesn’t take much of an increase in width to allow a significant increase in flow. If you think about it, the 35 GPH/in slot is 1/8”, and half of that is take up by the screen, which means 35GPH/in flows through a slot that is essentially 1/16”, maybe 3/32” if you don’t count the screen as completely blocking half the flow (since it is mesh after all). So increasing the slot width by 1/16” can likely allow double the flow. For your Algae Scrubber to be successful with a wider slot, the screen really needs to be rough enough, so just pay attention to that when roughing up your screen for a high-flow setup.

However you go about this, you might need a few tries to get good at it. PVC is cheap, so practice on a small section so you get used to how this is done. It’s going to take a little time and patience – don’t rush it. Mark the slot, and cut carefully. If you mess up, do it again. Once you solvent weld an end cap and a union to it, it is not as cheap to replace (but still relatively cheap).

Doing it right means using a power tool.

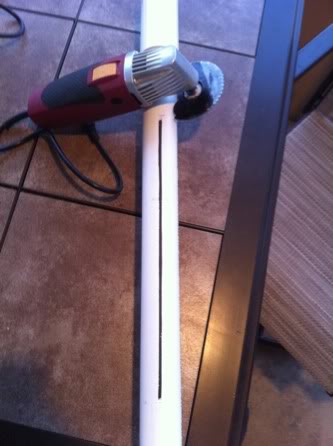
You could use a Dremel with a cutoff wheel

SlotCutter.jpg


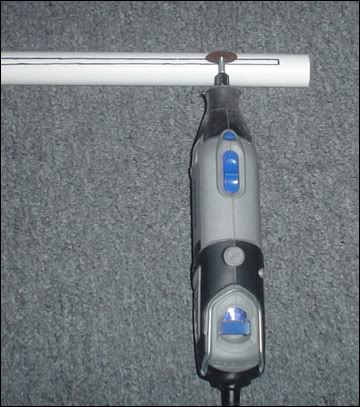
An Oscillating tool:

RC_flyhigh123.jpg


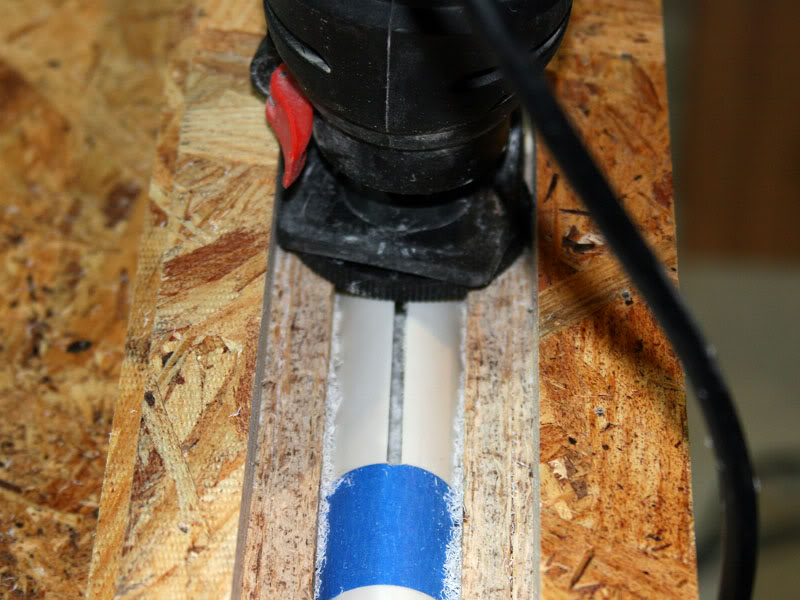
A roto-zip (and a guide jig) or a router

RC_perpetual98-1.jpg


RC_perpetual98-2.jpg


Plastics like PVC are ‘grabby’, and using a roto-zip or router takes extra precautions - so this is not for the inexperienced, but it makes very straight slots. With the right jig setup, you could also use a handheld circular saw, but then you are lowering a spinning blade onto the PVC (if you’re cutting the slot in the middle and leaving the ends uncut).

One of the best ways to cut a perfectly slot straight is by using a table saw. However, there really is no way to cut a slot in the middle of a section of pipe (or across the whole length of one side of a pipe) without removing the anti-kickback device and lowering the pipe on to the spinning blade. I have successfully done this, and it is definitely not for the person who is not fully respectful of power equipment and comfortable with the above mentioned method (or any of the other methods, for that matter)

However you decide to cut the slot in the pipe, remember to observe all necessary safety precautions. Either that, or have someone else do it for you.

I read a post from one person who reported that they had their table saw grab the piece of PVC pipe while cutting the slot and shoot it across the room. Turns out he had the blade too high and the pipe rotated on him as he wasn’t using a fence of any kind to guide the pipe. Be smart and careful.

Screening Material

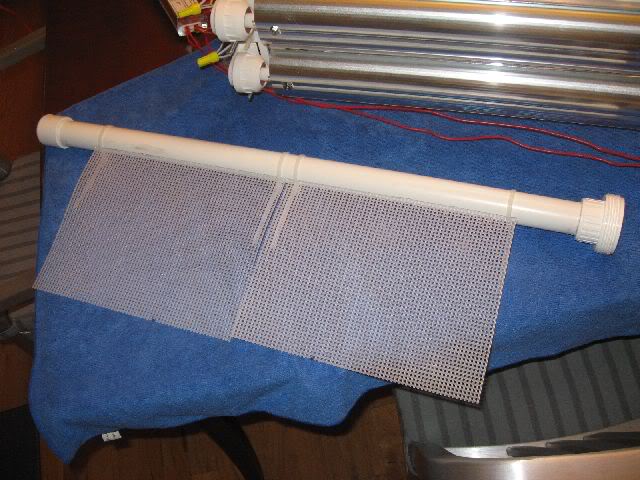
The search for the "perfect material" for growing algae in the vertical waterfall configuration has always come back to the same material, the Clear #7 Mesh Plastic Canvas. This can be found at almost any fabric (Jo-Ann Fabric) or craft-type hobby store (Michaels), usually in the knitting materials section. I have seen it at Wal-Mart, next to all the yarn. If you google “plastic canvas” you’ll find hundreds of links. You can feel free to experiment, but this material has been proven to work over and over again.

The reason that it works so well is because it is cheap, flexible, light, and easy to rough up. It is also translucent, which is critical. As algae grow thicker on a screen, the outer layer starts to block light to the lower layers. This causes weakening of the algae at the point of adhesion to the screen material. Allowing light to penetrate to the base of the screen from both sides helps to prevent the lower layers from weakening and detaching from the screen. Any material that blocks light is fundamentally inferior, all other things being equal. This also means don’t use any of the colored screening materials that you will see.

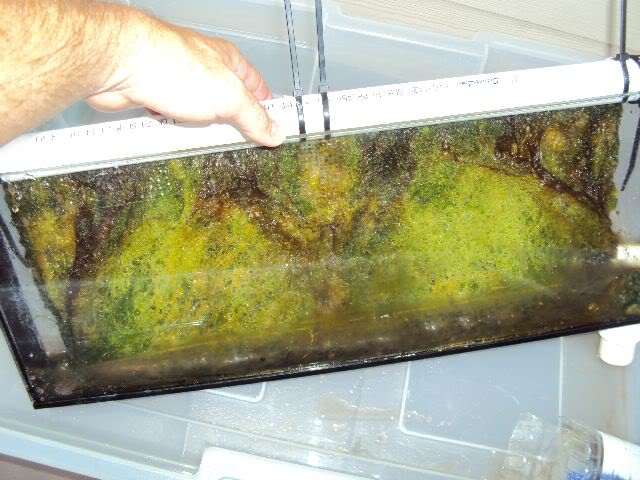
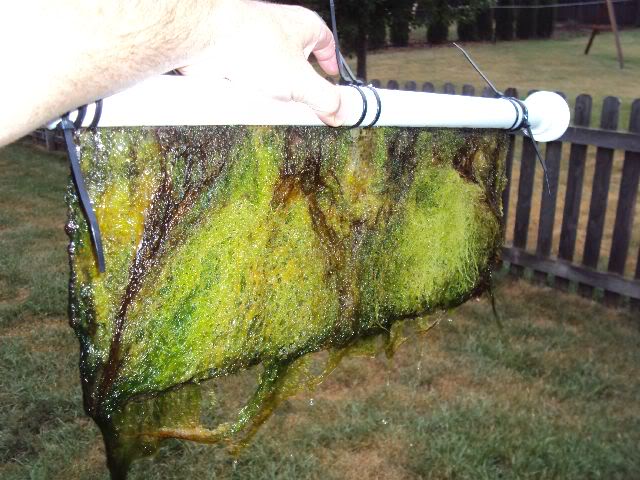
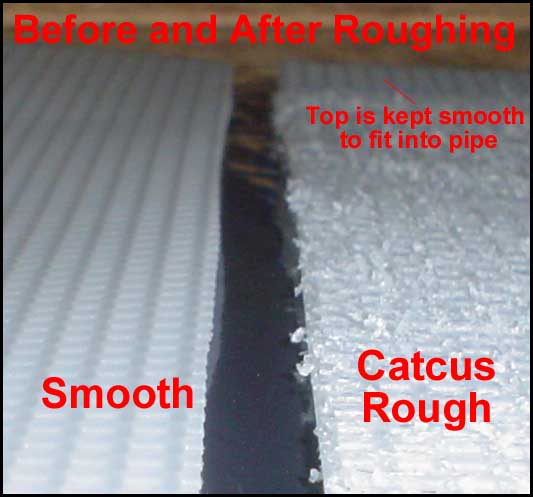
A brand new screen is slick and smooth. Except for the top edge of the screen, it needs to be roughed up so that the algae has anchoring points. This is a critical step and it absolutely must be done properly. Once the screen is established, algae can grow very thick, it can hold a significant amount of water, and it will get heavy. I have seen pictures of screens that weigh several pounds. This weight is distributed across the screen, and with a rough base, it will hold very well.

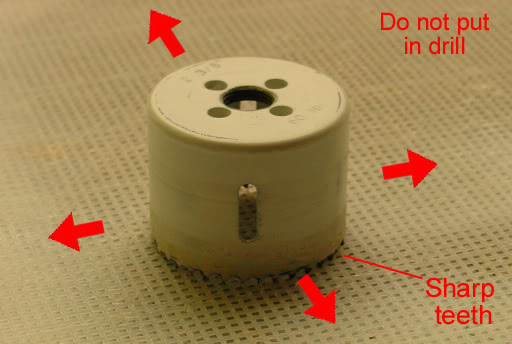
To rough the screen up, the best thing to use is a bi-metal hole saw. These saws have teeth that protrude out to a sharp point, and are great for tearing up the screen

HoleSaw.jpg


As the above picture shows, you need to drag is back and forth across the screen. I suggest you sit in the garage or outside with a cutting board on your lap and lay the canvas on that. When you start roughing the screen, do a lot of random movements. Don’t concentrate on one spot for very long or you’ll wear through the screen and tear it. Rotate the screen often. You can also tilt the saw bit as you drag it so that the teeth won’t snag the screen. You should get a good heaping tablespoon of plastic from each side of a 10x10 screen.

UPDATE:

I now recommend a 2 step process with a suggested Mortar coating 3rd step.

Plan out your roughing so that you leave the section of the screen that is inserted into the slot pipe smooth - untouched - plus a few rows beneath it. This will reduce algae attachment there and make that part easy to keep clean

Step 1: clamp screen to a table and use a center-crimp wire brush drill bit at low speed and medium pressure to scuff up the screen. Do several passes in different directions (left-right, top-bottom, diagonal both way). This takes the "shine" off the material but does not remove much, and does not rough it up much.

Step 2: Use a straight, sharp-tooth saw blade instead of the hole saw. Use overlapping circular motion. I do one pass clockwise, one pass counterclockwise.

kinda like this


But more like this


Step 3: apply mortar, let it cure for a few days, and soak for 5-7 days to leech anything out.

https://www.reef2reef.com/threads/algae-scrubber-basics.63113/page-6#post-2522930

https://www.reef2reef.com/threads/algae-scrubber-basics.63113/page-7#post-2602031

https://www.reef2reef.com/threads/algae-scrubber-basics.63113/page-7#post-2602031

https://www.reef2reef.com/threads/algae-scrubber-basics.63113/page-8#post-2756965

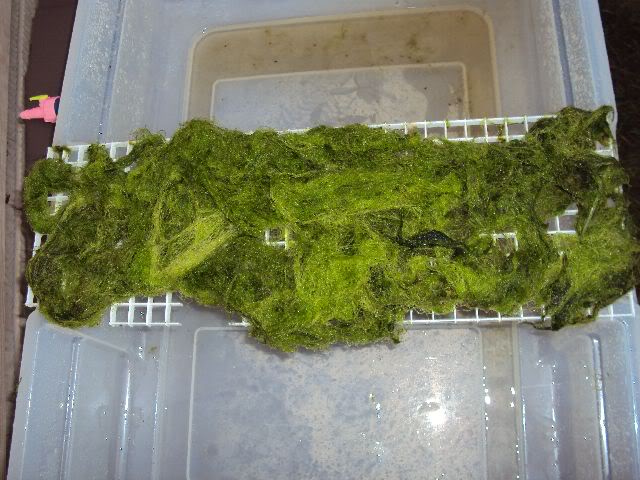
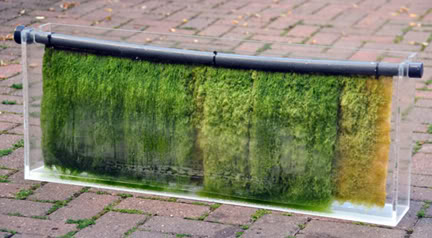
After it’s all done, your screen should look like this:

Canvas.jpg


Give the screen a good rinse and a light scrub with an old toothbrush to clear off all the pieces that are ‘hanging by a string’. These pieces are inert plastic, but still, you don’t really want these floating around in your aquarium.

Though I haven’t used one myself, I have heard that a rasp (available at any hardware store) is also great for roughing up this material. There are handheld rasps (similar to a Ped-Egg for your feet, except much sharper), and there are bit-mounted rasps (for power drills). It looks like it could be a little easier to tear the screen with this tool, but there is much less elbow grease involved. The drill bit rasps I have seen don’t appear to have protrusions large enough to “dig” into the screen and result in a cactus-rough surface.

Some have tried other methods of roughing up the screen. 80 grit sandpaper will definitely rough up the screen, but it doesn’t leave it ‘prickly’, so it’s not very effective. Recently, someone put a screen in the oven for a few minutes, then sprinkled it with aragonite sand and pressed it on. It was a neat idea, but it blocked the light from penetrating to the base from both sides, so it didn’t do very well.

The bottom line here is that there really is no shortcut. You only have to rough up the screen once, so stick to the tried and true method, unless you feel like experimenting on your aquarium.

As previously mentioned, the top edge of the screen (where it is inserted into the slot pipe) should not be roughed up at all, or else algae can easily grow into the slot and restrict the flow. The amount of material you leave smooth depends on your design, mainly, how far you plan on inserting the screen into the slot pipe. Regardless of this measurement, the smooth section should extend at least 1/8” down below the slot.
 
Last edited:
OP
OP
Turbo's Aquatics

Turbo's Aquatics

Super Duper Member
View Badges
Joined
Jun 7, 2011
Messages
2,804
Reaction score
4,029
Location
West Des Moines, IA
Rating - 0%
0   0   0
Fasteners

Most people have uses standard zip-ties to secure the screen to the slot pipe, since they are cheap and easy to use. Generally you have to use new ones each time you clean the screen (because you have to cut them), or you can re-use them if you’re handy with the tip of a razor blade and can get them to release.

You can also use releasable zip ties (I found them in the electrical section of Home Depot), but they’re not as easy to release as you would think they would be, unfortunately. I have used them, and I still need a mini-screwdriver to take them off.

Velcro straps can also be used, however they need to be free of adhesives, and I have never been able to get an answer from manufacturers about the stuff that has hooks on one side and loops on the other (such as OneWrap) regarding their safeness in aquaria. “Medical Grade” would be the safe way to go, but I haven’t looked much into those.

Another method of holding the screen in place is to use plastic shower curtain rings. It works very well, however you should have extras on hand in case one breaks when you’re removing it.

Yet another is to use sections of PVC pipe, one size larger that the slot tube, to make rotatable rings. This works very well, just make them narrow so that they don’t block too much flow.

AS_waucedah_joe.jpg


The best one that I have found to date is the nylon beaded cable tie, which, like the zip-tie, is inert, but super-easy to release, so it’s good for months and possibly years. I haven’t seen these in any store, I had to order them online.

Beadedzipties.jpg


The ones I bought are perfectly sized to fit around a 1” PVC Schedule 40 pipe. These are my personal favorite choice. If you hang the screen only from the center (with the screen touching the top inside of the pipe) then these might not work very well. Instead, use them at the corners of the screen. Another nice this is that the beads are just a little bigger than the #7 mesh screen holes, so you can just push them through very easily.

TIP: This is an important point – if you have a screen or screens that are held in place in the center of the pipe (or anywhere away from the ends) you do not want to cinch cable ties down hard! Since there is a slot cut in the pipe, cinching down the ties will cause the pipe to pinch closed and you will get reduced flow in the center. The zip-ties should just be snug enough to hold the screen in place.

I’ve seen a few designs that don’t use fasteners, but there are considerations to make with these designs.

Preventing water creep along the pipe

This is an important part of the slot pipe design. The issue here is that when you are running water though a horizontal pipe with a slot in the bottom of it, the water has a tendency to creep along the bottom edge of the pipe, not matter how perfectly horizontal you install it. If your Algae Scrubber is positioned completely over your sump, this may not be a big issue, as any errant flow will just drip into the sump. If your pipe ends extend close to the edge of the sump however, a steady trickle of water can result in gallons of water on the floor. I can attest to this.

The solution is very simple. Right at the point where the slot ends, place a large plumbing gasket, such as an o-ring (use several, they’re cheap), or even a bulkhead gasket. The point is that it needs to prevent water from getting past it. I can tell you from experience that a standard zip-tie will not work – the profile is too low.

In many cases, you need to put this piece on the pipe before you weld the cap on the end of the pipe, or else it will be very difficult to install. This one is a ballcock washer, and definitely needs to be installed before the cap is installed:

ballcockwasher.jpg


Here’s what I used on the latest mod to the Algae Scrubber I run

DSC03630.jpg


I found these at Ace hardware in the plumbing gasket section. I forgot to put them on before solvent bonding the ends on, but luckily they were flexible enough to get over the end cap. They work fantastic!

Update:

I use a rotatable ring, it's very simple. Take a 3/4" couple and cut off a ring about 1/4" wide (just small enough to fit through a square created by cutting out one of the crosses of the screen). Clip about 1/4 of the ring out with a wire cutters and round off the cut edges with sandpaper and snap over the pipe. Done
 
Last edited:
OP
OP
Turbo's Aquatics

Turbo's Aquatics

Super Duper Member
View Badges
Joined
Jun 7, 2011
Messages
2,804
Reaction score
4,029
Location
West Des Moines, IA
Rating - 0%
0   0   0
As far as spray and salt creep is concerned, you want to avoid buildup on the lamp itself. No matter what you do, there will still likely be some buildup due to evaporation, so you will want to wipe off the lamp or fixture periodically (as needed). Make sure the lamp has cooled down, remove the lamp if possible, and wipe it down with a soft cloth and warm water. This is rather easy to do in place with T5HO lamps, and more difficult for spiral and multi-tube CFLs; just be gentle so you don’t crack the tube.

The water will cascade down the screen smoothly, and then drop off the bottom edge. If you don’t let the bottom of the screen sit in the water, it’s going to pour off and crash down, and splash everywhere. That’s not the problem I’m discussing here, I’m talking about spray from the slot pipe or screen.

The ideal solution is to block the source of salt creep or spray – the slot pipe itself. While 99.99% of the water that cascades down the screen will stay on the screen, occasionally there will be droplets of water that pop and fly around, and over time these can cause salt creep.

The most recent and effective solution to the spray issue is also one of the cheapest and simplest. Saran Wrap!! I don’t have a picture of this, so just use your imagination: take a piece that is a little longer than the slot and wide enough to wrap around the pipe plus about an inch or so, drape it over the pipe, and touch it to either side of the screen. Water tension does the rest, and the Saran Wrap suctions onto the screen. Presto. No spray (from the slot). You still might get some droplets randomly flying off the algae mat, so other protection might be necessary, but the slot spray is definitely the biggest culprit, and Saran Wrap is a great weapon.

Aside from Saran Wrap, the best spray blocker is a box that totally encloses the screen on all 4 sides and bottom, and has a removable lid. Such a box would have a drain hole in the bottom, and would typically be made out of acrylic, but could be made from glass also. This is beneficial for other reasons too, but we’re just talking spray blocking right now.

Closing the top with a lid, or at least extending the blocker up to the top of the slot pipe, will minimize the random drops that occasionally fly upward, as well as evaporation. A lid should not lip over the outside of the box, rather the inside so that any condensation will tend to stay inside the box.

The next best would be an enclosure with an open bottom. The advantage to an open-bottom enclosure is that it's easy to build. If you extend the screen to the water level inside the sump, you can nearly eliminate noise and microbubbles. Pictures illustrate this best:

RC_Travis1787.jpg


RC_rysher.jpg


The most basic full-screen spray blocker would just be a couple of plastic panels draped over the tube. Here are a few examples:

RC_srusso3.jpg


RC_srusso4.jpg


RC_Dave1NC2.jpg


RC_Dave1NC3.jpg


I don’t recommend enclosing CFLs in glass or plastic jars. IMO, it is difficult to allow for adequate air convection with such an arrangement. CFLs get hot even with air convection, and if a hot lamp gets in contact with the plastic, it could melt and might start a fire.
 
Back
Top