Hello,
I thought I would share my automatic water changing setup - to get feedback and then also provide an example for anyone who is attempting to do something similar.
First, a little background. I have a DOS system, which I had purchased to do automated water changes. But, after some consideration, I decided to implement a PMUP system instead. Some reasons:
- I originally planned to have my Kalk reactor with a drip feed but decided I wanted to use the DOS to more closely monitor/control the KW additions.
- I was concerned about the continuous run time of the DOS for the volume of water changes I planned (this may be unfounded - I know a lot of people use the DOS this way now).
- Speed - I want to use my waste water from the tank as new water for my quarantine tank as I use the TTM for new arrivals. Yes, I understand the DT must be disease free (it is, new setup) - but I also figure that after 2 weeks of TTM and then 2 weeks of QT time, the fish go to the DT anyway. The PMUPs can do this much quicker than the DOS system.
Ok, so on to my PMUP setup for automated water changes. Here is a list of equipment involved
- Neptune FMM Module (I already had this for my ATO setup).
- Neptune ATK Kit (which has 2 optical sensors, one called ATOHI and one called ATOLO).
- An additional optical sensor, mounted about 4 inches above the ATOHi optical sensor, called FILLHI.
- 2 PMUPs - one in the Sump, called SW_DRAINPUMP and one in my saltwater mix reservoir in the garage, called SW_FILLPUMP.
- 1 Neptune Solenoid. This was a late addition to the plan because when the saltwater reservoir is more than about 60% full, a siphon is created from the fill line. So I had to add this solenoid, which is energized at the same time as the SW_FILLPUMP.
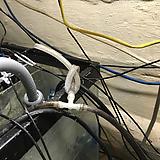
Here are the optical sensors in the return section of my sump:
The manifold of shut-off valves for the lines out to my garage. These lines run about 40 feet up through the attic and then down the wall to a cabinet in the garage, where there is another set of 6 manifolds on that end:
In addition to the PMUPs and sensors listed above, I created 5 virtual outlets to act as controls and variables to manage the water change. They are:
- H2O_CHANGE - used to initiate the water change cycle and control some behaviors during the fill.
- FILL_DONE - used to signal that the fill is completed. I fill first and then drain.
- DRAIN_DONE - used to signal that the drain is completed.
- SW_FILLING - used to indicate that we are filling. The FILLPUMP will activate based on this variable.
- SW_DRAINING - used to indicate that we are draining. The FILLPUMP will activate based on this variable.
Now for the programming:
H2O_CHANGE:
Fallback OFF // Changing is initiated by toggling this ON
Set OFF // and then back to AUTO
If Output SW_Filling = ON Then ON // <-- this code will then keep H2O_CHANGE ON
Defer 020:00 Then OFF // for 20 minutes (a 5 gallon change takes ~10-15m
FILL_DONE:
Set OFF
If FillHi CLOSED Then ON // A fill is complete when the FILLHI sensor is closed
If SWResL CLOSED Then ON // If the saltwater reservoir goes empty, we are done filling
If Output H2O_Change = OFF Then OFF. // When the H2O change timesout, we reset to OFF
Defer 020:00 Then OFF // Make this variable sticky during the change
DRAIN_DONE:
If ATOHi OPEN Then ON // When the water drops to the ATOHI sensor, stop draining
If ATOHi CLOSED Then OFF // Else we are not done draining
If Output SW_Filling = ON Then OFF // If we are filling, we can't be draining...this is for the initial
If Output H2O_Change = OFF Then OFF // cycle start when ATOHi may be open.
Defer 020:00 Then OFF
SW_FILLING:
Fallback OFF
If Output H2O_Change = ON Then ON
If Output H2O_Change = OFF Then OFF
If Output Fill_Done = ON Then OFF // Once we are DONE, we turn off the fill pump/change states
SW_DRAINING:
Fallback OFF
If Output H2O_Change = ON Then ON
If Output H2O_Change = OFF Then OFF
If Output SW_Filling = ON Then OFF
If Output Drain_Done = ON Then OFF // DONE Draining
SW_FILLPUMP:
Fallback OFF
If Output SW_Filling = ON Then ON
If Output Fill_Done = ON Then OFF
If SumpHi CLOSED Then OFF // There is a high Sump float switch safety net
SW_DRAINPUMP:
Fallback OFF
If Output SW_Draining = ON Then ON
If Output Drain_Done = ON Then OFF
If SumpLo CLOSED Then OFF // Low sump float switch safety net (this also turns off return pumps)
Note - in addition to the above programming, the Skimmer also has a program to turn off during water changes because the water level in the sump changes.
So, how does it all work? Well, to start the cycle you simply toggle H2O_CHANGE from AUTO to ON and then about 1 second later back to AUTO. This tracker variable will stay ON because the SW_FILLING variable will set to ON and then the Defer statement will keep it there.
While filling, the controls look like this:
And then after the fill is complete (sorry - FillHi was CLOSED, I swear :) - the controller switches from fill to drain immediately and I didn't screenshot fast enough to show the FillHi optical switch closed!:
And then after the drain is complete:
With the current placement of the FillHi optical sensor, one cycle changes about 5.3gal. I estimate my total system is about 170g (150g + 20g in the sump), giving a % volume change of 3% so I may try and raise the sensor up another couple of inches and get to 5%. And then I can choose whether to cycle twice in a row to give a 10% water change each week or whether I just want to run it at a higher frequency. Technically, I
could trigger a 5% change 2x/week by adding an "ON" state on the H2O_CHANGE at specified time/day of week. I am not 100% there yet, but is something I may add later as I am confident in my failsafes.
One very minor potential gap is that if I trigger the water change when the ATO is at its very lowest point before trigger a freshwater fill, over time my system will get a little bit saltier after evaporation. I have other things I need to do first but I am thinking I will setup another virtual outlet to trigger a forced ATO of freshwater or even better yet, add the FW top-off logic to the existing saltwater change program...hmmmm...that might be even better :).
Happy reefing!
Rick


 What is the TDS of your tap water? How often do you replace DI?


