Overkill? SPS light build

Stoneyed

Community Member
View Badges
Joined
Jun 2, 2022
Messages
70
Reaction score
138
Location
Vero Beach
Rating - 0%
0   0   0
Hi all!

This is the layout for my 180g (72"x24"x24") sps lights.

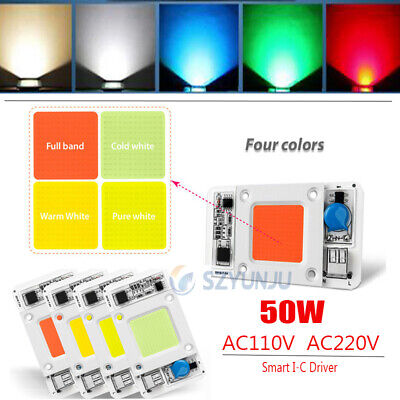
I currently am running these types of chips (12 total) with decent success (acros growing slowly), but feel like i can do better. Current PAR readings are about 150 mid-tank at 80%, so this should bump me up substantially... especially with the addition of the full-spectrum chips.

Chips are laid out to avoid the center braces and overflows. Each chip is a dimmable 50w, with 110v driver onboard. The price point on these is low enough to buy a few spares... which given their sourcing, is probably a good idea.

6 Channels: Blue1, Blue2, Full Spectrum, 30k, 20k, UV.

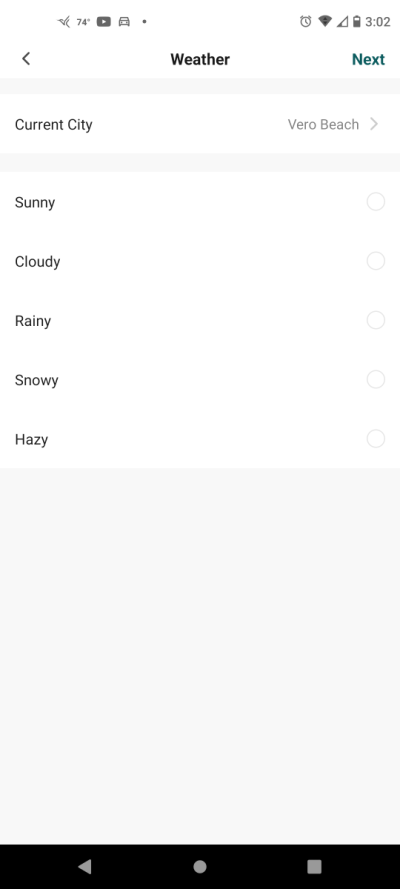
These will be run from a wifi dimmer that will handle dimming channels on/off, as well as geolocated weather events (e.g. if it's storming in Fiji, reduce Full Spectrum + 20k by 30%).

Light layout.drawio (4).png


Heat sink (12" x 60") is on it's way, and I already have all the chips and dimmers. Will post updates as the build progresses.
 

dansyr

Active Member
View Badges
Joined
Nov 28, 2022
Messages
281
Reaction score
333
Location
Los Angeles
Rating - 0%
0   0   0
This is cool! You're doing this with live geo data? where are you getting that from (i've only found easily-parsable historic data), and what scale of weather events are you doing?
 

theatrus

Valuable Member
View Badges
Joined
Mar 26, 2016
Messages
1,950
Reaction score
3,351
Location
Sacramento, CA area
Rating - 0%
0   0   0
Overkill? Not really, you have dim control. I'm curious how well those chips respond to dimming, and whether they will just end up chopping at 60Hz like most dimmable LED bulbs.
 
OP
OP
Stoneyed

Stoneyed

Community Member
View Badges
Joined
Jun 2, 2022
Messages
70
Reaction score
138
Location
Vero Beach
Rating - 0%
0   0   0
This is cool! You're doing this with live geo data? where are you getting that from (i've only found easily-parsable historic data), and what scale of weather events are you doing?
The smart dimmer handles all of it. IDK what weather data it uses, but i'd guess it's either weatherunderground, or something similar. Screenshots below for the app setup. For now, i have it set to reduce the white lights by 20% when it rains in Cairns, Australia.

Screenshot_20230206-150218.png

Screenshot_20230206-150226.png


Screenshot_20230206-150444.png

Screenshot_20230206-150502.png

Screenshot_20230206-150708.png

Screenshot_20230206-150719.png
 

Attachments

  • Screenshot_20230206-150232.png
    Screenshot_20230206-150232.png
    27.8 KB · Views: 45
OP
OP
Stoneyed

Stoneyed

Community Member
View Badges
Joined
Jun 2, 2022
Messages
70
Reaction score
138
Location
Vero Beach
Rating - 0%
0   0   0
Overkill? Not really, you have dim control. I'm curious how well those chips respond to dimming, and whether they will just end up chopping at 60Hz like most dimmable LED bulbs.
The dimmer has a couple built-in modes. I got lucky on my first try, and don't see any chopping. It dims down to either 10 or 20% (IIRC). I did try a triarc dimmer a while ago, and it looked like a strobe!
 

dansyr

Active Member
View Badges
Joined
Nov 28, 2022
Messages
281
Reaction score
333
Location
Los Angeles
Rating - 0%
0   0   0
The smart dimmer handles all of it. IDK what weather data it uses, but i'd guess it's either weatherunderground, or something similar. Screenshots below for the app setup. For now, i have it set to reduce the white lights by 20% when it rains in Cairns, Australia.

Screenshot_20230206-150218.png

Screenshot_20230206-150226.png


Screenshot_20230206-150444.png

Screenshot_20230206-150502.png

Screenshot_20230206-150708.png

Screenshot_20230206-150719.png
Ah cool, thanks!
 

oreo54

5000 Club Member
View Badges
Joined
Sep 18, 2017
Messages
5,576
Reaction score
3,436
Rating - 0%
0   0   0
A1:MOV for surge protection>4000V passed
A2:1000V Bridge rectifier
A3:Constant current and constant power control
A4:NTC sensor for pcb overheat protection
A5:Voltage-regulator for ic vdd protectio
A6:Driver IC, over voltage and over current control
A7:It can use led dimmer or SCR dimmer to dimming it


Are you using this kind?
 
OP
OP
Stoneyed

Stoneyed

Community Member
View Badges
Joined
Jun 2, 2022
Messages
70
Reaction score
138
Location
Vero Beach
Rating - 0%
0   0   0
A1:MOV for surge protection>4000V passed
A2:1000V Bridge rectifier
A3:Constant current and constant power control
A4:NTC sensor for pcb overheat protection
A5:Voltage-regulator for ic vdd protectio
A6:Driver IC, over voltage and over current control
A7:It can use led dimmer or SCR dimmer to dimming it


Are you using this kind?
Yep! I think i got the blues, 20k, and 30ks from that vendor.
 
OP
OP
Stoneyed

Stoneyed

Community Member
View Badges
Joined
Jun 2, 2022
Messages
70
Reaction score
138
Location
Vero Beach
Rating - 0%
0   0   0
Received the heatsinks! First step is to attach them together with 2-part metal epoxy. A 60" heatsink was prohibitively costly, so I used 2x 30"
IMG_20230208_160958573.jpg
Next step is measuring everything out, and marking the screw holes
IMG_20230208_181723528.jpg

IMG_20230208_190935589.jpg

Drill baby drill!
IMG_20230209_181202734.jpg

3mm tap in all the holes
IMG_20230209_195752297.jpg

After tapping, I washed the heatsink, then degreased it with isopropyl alcohol. Next step: thermal grease. Definitely wear gloves, because this stuff gets everywhere!
IMG_20230209_213652653.jpg

Temp assembly so I can begin wiring everything up. Final assembly will happen after I receive the lenses.
IMG_20230209_223424999.jpg
 

theatrus

Valuable Member
View Badges
Joined
Mar 26, 2016
Messages
1,950
Reaction score
3,351
Location
Sacramento, CA area
Rating - 0%
0   0   0
Looks good.

Gluing that center joint would make me uncomfortable, especially in shear. Get some small scrap aluminum or buy a hobby bar at the Home Despot and at least join them with a plate fastener as a backup.
 

oreo54

5000 Club Member
View Badges
Joined
Sep 18, 2017
Messages
5,576
Reaction score
3,436
Rating - 0%
0   0   0
Looks good.

Gluing that center joint would make me uncomfortable, especially in shear. Get some small scrap aluminum or buy a hobby bar at the Home Despot and at least join them with a plate fastener as a backup.
I agree esp. since they have the drill and tap availability..
 
OP
OP
Stoneyed

Stoneyed

Community Member
View Badges
Joined
Jun 2, 2022
Messages
70
Reaction score
138
Location
Vero Beach
Rating - 0%
0   0   0
Looks good.

Gluing that center joint would make me uncomfortable, especially in shear. Get some small scrap aluminum or buy a hobby bar at the Home Despot and at least join them with a plate fastener as a backup.
That's... A really good idea! In theory the epoxy has plenty of strength... But better safe than sorry.
 

theatrus

Valuable Member
View Badges
Joined
Mar 26, 2016
Messages
1,950
Reaction score
3,351
Location
Sacramento, CA area
Rating - 0%
0   0   0
The last thing I'd hate to see is the heatsink split down the middle, laying into the tank, with live 120V electrolysis bubbling away. The epoxy adds a great amount of stiffness to the whole thing, but I've learned with glue to never trust it fully.
 
Last edited:

theatrus

Valuable Member
View Badges
Joined
Mar 26, 2016
Messages
1,950
Reaction score
3,351
Location
Sacramento, CA area
Rating - 0%
0   0   0
All my homies hate shear forces
IMG_20230211_170105597_HDR.jpg


Cutting wire channels
IMG_20230210_184920315.jpg


Progress!
IMG_20230212_213731882_HDR.jpg


Top. Terminal strip will be protected with a plastic "cap"
IMG_20230212_213651462.jpg

Shear force awareness squad.

Looks good. I've had lots of luck just tacking wires with silicone adhesives to channels in heatsinks.

Do you have a bottom clear cover planned?
 
OP
OP
Stoneyed

Stoneyed

Community Member
View Badges
Joined
Jun 2, 2022
Messages
70
Reaction score
138
Location
Vero Beach
Rating - 0%
0   0   0
Shear force awareness squad.

Looks good. I've had lots of luck just tacking wires with silicone adhesives to channels in heatsinks.

Do you have a bottom clear cover planned?
Silicone is the plan for when everything is done. Tape is just to keep it organized while I work on it.

I ended up ordering ~70 degree lenses for each of the chips, so that should protect them from splashes. The driver portions on the chips are epoxy-coated, so humidity shouldn't be an issue
 

theatrus

Valuable Member
View Badges
Joined
Mar 26, 2016
Messages
1,950
Reaction score
3,351
Location
Sacramento, CA area
Rating - 0%
0   0   0
The only area of concern maybe is the connectors. I've lost fixtures due to salt creep, where sudden condensation totally bridged a bunch of connections with high voltage. Once everything is built up, maybe check how exposed the connections get and weigh whether just covering them in silicone too is worth the hassle. Its probably readily removable enough if you do need to swap a module.
 

More than just hot air: Is there a Pufferfish in your aquarium?

  • There is currently a pufferfish in my aquarium.

    Votes: 32 17.3%
  • There is not currently a pufferfish in my aquarium, but I have kept one in the past.

    Votes: 32 17.3%
  • There has never been a pufferfish in my aquarium, but I plan to keep one in the future.

    Votes: 34 18.4%
  • I have no plans to keep a pufferfish in my aquarium.

    Votes: 79 42.7%
  • Other.

    Votes: 8 4.3%
Back
Top