I figured. That was the first time I showed them. They’ve been copied in other how to vids since. I also added side pieces to the bottom of the jig to be able to screw them down to the table to essentially lock the panel in place to keep it from sliding from side to side.Oh disregard my previous reply! I am just now seeing the video you posted and that is exactly what I was trying to describe.

Navigation
Install the app
How to install the app on iOS
Follow along with the video below to see how to install our site as a web app on your home screen.
Note: This feature may not be available in some browsers.
More options
You are using an out of date browser. It may not display this or other websites correctly.
You should upgrade or use an alternative browser.
You should upgrade or use an alternative browser.
Please help!! New to R2R acrylic seam process.
- Thread starter Soup Sandwich
- Start date
-
- Tags
- diy acrylic help new please help
- Tagged users None


Thanks a lot for that. I made up some small ones quick for my test seams and ran a second set today. The seam came out a lot better than the first, however there is still some or that same air creep on one side.I figured. That was the first time I showed them. They’ve been copied in other how to vids since. I also added side pieces to the bottom of the jig to be able to screw them down to the table to essentially lock the panel in place to keep it from sliding from side to side.
What type of clamps do you use to apply downward pressure on the seam?
I use bar clamps.

Alright thank you. I was using some older, and pretty beat up Quick Clamps. I will try to acquire some bar clamps and experiment with how much pressure to apply.I use bar clamps.
If I have an air pocket sometimes I squeeze quite hard using the bar clamps to get it out. If I have to I crank on it to be honest and it’s never caused an issue
Have you ever tried or considered going along the outside edges with a thicker solvent, such as Weldon-16, to reduce any air coming in on the edges? Almost a similar method as silicone for a glass tank.If I have an air pocket sometimes I squeeze quite hard using the bar clamps to get it out. If I have to I crank on it to be honest and it’s never caused an issue

No I don’t have any need to. If done right you won’t get any of that I never do
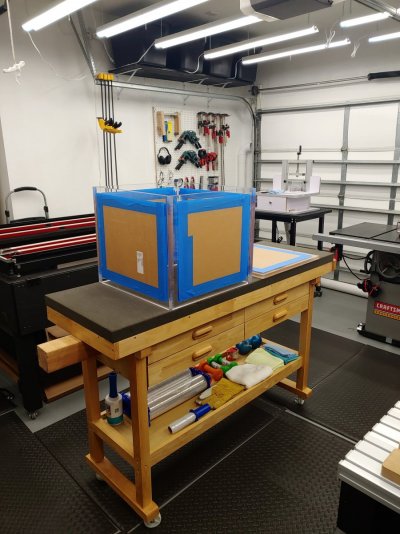
Update for all of those who are curious. I just got side 2 of the smaller practice tank up. The first side came out absolutely perfect. Not a bubble or any air creep to be seen. I appreciate all of your help throughout this learning process.
Attachments
Looks great!Update for all of those who are curious. I just got side 2 of the smaller practice tank up. The first side came out absolutely perfect. Not a bubble or any air creep to be seen. I appreciate all of your help throughout this learning process.

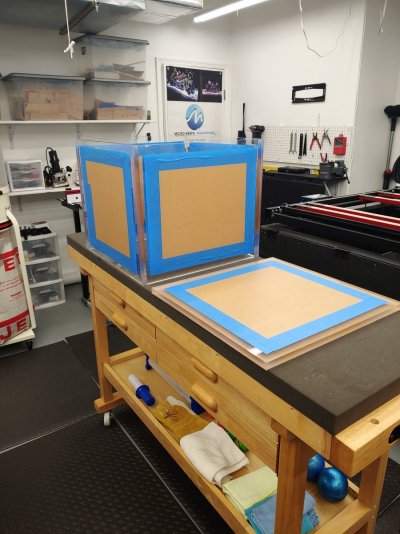
All is going well so far, both sides have come out flawless and I am currently prepped to add the front pane this morning.
However, my curiosity got the best of me while I was working and I decided to look up the brand of acrylic that was delivered...
I am full of regret for not thinking of this sooner. The brand is MargaCipta, and my search results have left me with a pit in my stomach.
I am seeing a lot of poor reviews on this brand acrylic. Most of the complaints that I read are that the product does not seam well. From what I can tell, these seams are very good. Fully transparent with no air bubbles/air creeping in from the sides. When I set the two pieces together, after about 70 seconds of soak time, a bead of softened acrylic oozed out of both sides. Most of the negative reviews that I have read talked about long soak times, no oozing, and poor looking seams. Is that the only concern about this brand? Is there more to it than just good looking seams?
I plan to have both tanks setup in my basement for at least a month (probably longer now). Does anybody have any input on this topic aside from 'it's a bad brand' ?
I don't know anything about that brand (never heard of them before), but I do know your seams look extremely good. I typically take reviews with a skeptical eye. Do the reviews of bad seams come from people that have no idea what they are doing? My opinion, keep moving forward and when done, leak test it outside.
update!
the majority of the big tank is complete. I have a few areas that I am having some concern about. I have 2 areas where some air got in the seam, and another area on the bottom where the tank slid off about 1/16th of an inch creating another small air gap/overhang.
My concern is about structural integrity, and of course potential for water leak. Based on the attached pictures, do any of you think this is cause for concern?
if so I have been considering getting some quarter round or triangular acrylic doweling to go around the entire perimeter of the bottom, and one small section for the seam on the side that has the air bubbles.
the tank is 60” x 24” x 24” and the acrylic is 1/2” thick.
As always, any and all input is greatly appreciated.
Attachments

My last few tanks have been built using the marga cipta brand..in fact I picked up a few sheets of 3/4 yesterday to build one for a client. It’s all about soak time with it. It’s a harder acrylic for sure. But the few tanks I’ve build are holding strong a year in. The biggest is a 375 8x3x2.All is going well so far, both sides have come out flawless and I am currently prepped to add the front pane this morning.
However, my curiosity got the best of me while I was working and I decided to look up the brand of acrylic that was delivered...
I am full of regret for not thinking of this sooner. The brand is MargaCipta, and my search results have left me with a pit in my stomach.
I am seeing a lot of poor reviews on this brand acrylic. Most of the complaints that I read are that the product does not seam well. From what I can tell, these seams are very good. Fully transparent with no air bubbles/air creeping in from the sides. When I set the two pieces together, after about 70 seconds of soak time, a bead of softened acrylic oozed out of both sides. Most of the negative reviews that I have read talked about long soak times, no oozing, and poor looking seams. Is that the only concern about this brand? Is there more to it than just good looking seams?
I plan to have both tanks setup in my basement for at least a month (probably longer now). Does anybody have any input on this topic aside from 'it's a bad brand' ?
Not sure if I’d trust it only being made of 1/2” material. I always use 3/4” on tanks that high.update!
the majority of the big tank is complete. I have a few areas that I am having some concern about. I have 2 areas where some air got in the seam, and another area on the bottom where the tank slid off about 1/16th of an inch creating another small air gap/overhang.
My concern is about structural integrity, and of course potential for water leak. Based on the attached pictures, do any of you think this is cause for concern?
if so I have been considering getting some quarter round or triangular acrylic doweling to go around the entire perimeter of the bottom, and one small section for the seam on the side that has the air bubbles.
the tank is 60” x 24” x 24” and the acrylic is 1/2” thick.
As always, any and all input is greatly appreciated.
I was initially going to use 3/4” but after seeing multiple commercial tanks at 24” high being sold made out of only 3/8” I figured it would be adequately safeNot sure if I’d trust it only being made of 1/2” material. I always use 3/4” on tanks that high.

The nice thing about using 3/4 is there’s room for error when it comes to getting the seams perfect. There’s only one way to find out if it’s going to hold! Lol. Good luck with it.I was initially going to use 3/4” but after seeing multiple commercial tanks at 24” high being sold made out of only 3/8” I figured it would be adequately safe
Working with 3/4 inch acrylic is when you have no choice but to use pins. Working with the 1/2 inch is either pin or wicking.
3/4 inch in my opinion is much easier with pin method simply due to how it stands vertically with some assistance from wooden braces on both sides.
Here is a 30 gallon cold water tank I built for temperate reef.
3/4 inch in my opinion is much easier with pin method simply due to how it stands vertically with some assistance from wooden braces on both sides.
Here is a 30 gallon cold water tank I built for temperate reef.
Attachments

Part of the problem is your scraping the edge to be bonded. I machine the edge with a router. It leaves a perfect 90 and with a spiral flute carbide cutter, leaves a fine edge. Get you some router goodness and make some shavings. Last let it soak a bit more befor you pull pins. Also watch the date on your solvent. It needs to be less than 6 months old. I mix my own every 2 weeks.

Did you use pin method? Did you use Weldon 4? Remember about 90 seconds when you pull the pins. Then adjust the piece as it will slide. Once in proper place, gently tighten your clamps.Hello there,
I am in desperate need of help. After months of research I have finally purchased enough acrylic to build two tanks. One will be about 20 gallons (as a practice tank) and one will be 150 gallons.
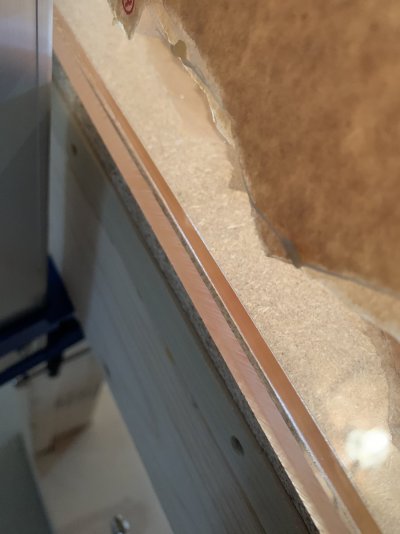
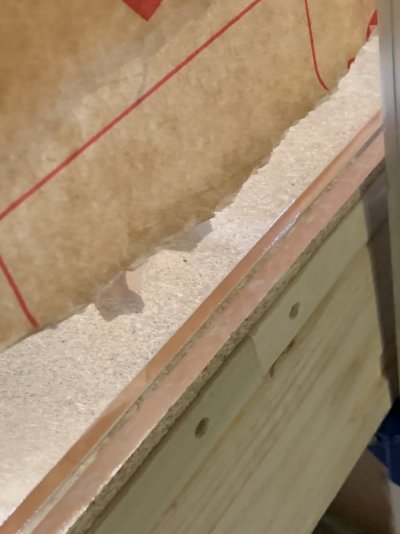
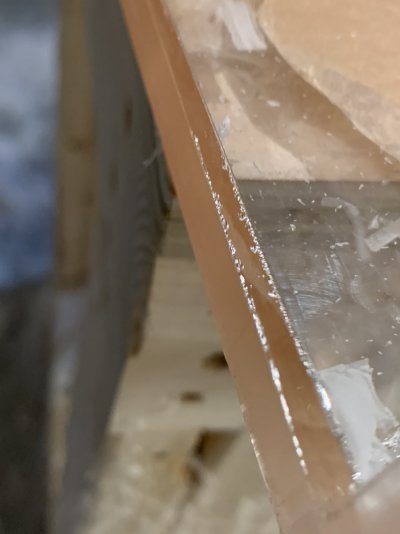
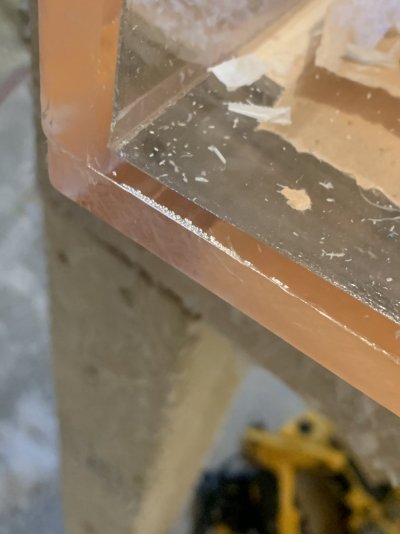
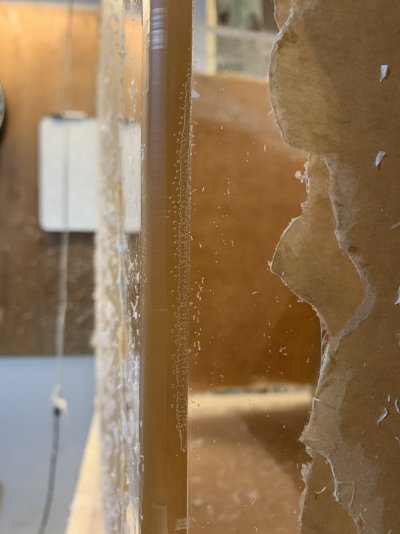
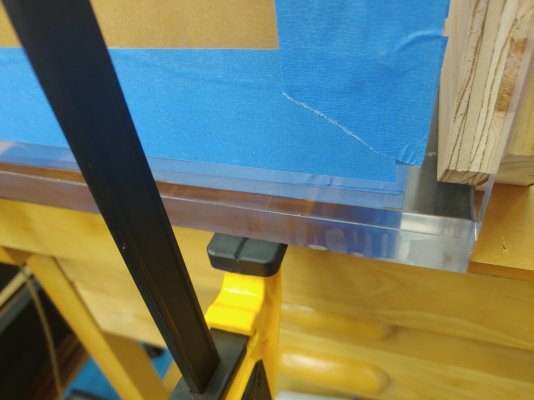
Before I touched any of that material I bought a 1 square foot x 1/2” thick cast acrylic sample which I cut into 4 pieces. I did this to test my seams, as well as edge cleaning. I have bonded two seams, one with a cut and scraped edge, and another with the factory polished edge. I used the pin method on one, with very thin wire.
About 20 seconds after applying Weld-on 4 I pulled the pins and everything looked 100% perfect. No bubbles or missing solvent anywhere. I could not find a single flaw.
I went upstairs then came back down about an hour later. Nothing had been moved or messed with at all. What I found looks like air has somehow crept in along both sides of the seam. Please see the attached pictures. I can not have seams look like this as it will drive me crazy and I will not be confident with the durability of the tank. I am looking for any and all feedback as to why this may be happening.
Thank you for taking the time to read.
Best,
Chris


That will remove any bubbles that formed in there. Don't worry if you see a couple bubbles in the middle apply the clamp a little more as it dries the melted acrylic will absorb any micro bubbles and you will come out with perfect bubble free seams.
Similar threads
- Replies
- 48
- Views
- 1,548

- Replies
- 1
- Views
- 246


