Been following your JBJ videos and they were great. Pretty excited how this one will turn out. Great job so far!
Navigation
Install the app
How to install the app on iOS
Follow along with the video below to see how to install our site as a web app on your home screen.
Note: This feature may not be available in some browsers.
More options
You are using an out of date browser. It may not display this or other websites correctly.
You should upgrade or use an alternative browser.
You should upgrade or use an alternative browser.
SCA 120 Gallon PNP Build
- Build Thread
- Thread starter CJs Aquariums
- Start date
- Tagged users None


OP
OP
for those that would rather watch this build.. Ive uploaded the Build video on my YouTube channel..
OP
OP
much appreciated!Another subscriber here. Definitely following along. You've got some great ideas going already. Can't wait to see where the rest of the build goes!

- Joined
- Apr 9, 2015
- Messages
- 470
- Reaction score
- 510
Hey CJ! You'll be happy to know your Duncan, frogspawn, and everything else I got from you are happy and healthy.

for those that would rather watch this build.. Ive uploaded the Build video on my YouTube channel..
Well done man, well done! by far my favorite canopy. Love the adjustability with the light spread. Cant wait to see the tank get filled up.
- Joined
- Jul 8, 2015
- Messages
- 7,547
- Reaction score
- 11,873
This is my very first forum post... so Ill try to make this short and sweet. I have a fully documented build on my YouTube channel:
CJ's Aquariums :
https://www.youtube.com/channel/UCJk-fASKh33tB4O7kVjcmxA
The goal is to add another way to share and document my journey.. So lets get started
This SCA 120 Gallon tank is an upgrade to me previous Marineland 37 gallon cube & JBJ 45 Rimless AIO tanks.. these covered my first 3 years in the hobby.. I can share these builds in another thread or you can find them on my youtube channel ...
That should give you all an idea of what kind of tanks Ive kept in the past....
Now lets move on to the SCA 120 gallon PNP system... the goal was to upgrade to a tank that was at least 3 times bigger than my previous two and also had a minimum width of at least 24''. My options where a 150 gallon 3 x 3 x 3 cube tank or this 120 gallon 4 x 2 x 2 aquariums from sca...
Considering the SCA tank included stand,canopy,sump,skimmer,return pump and plumbing.. i could NOT pass it up.
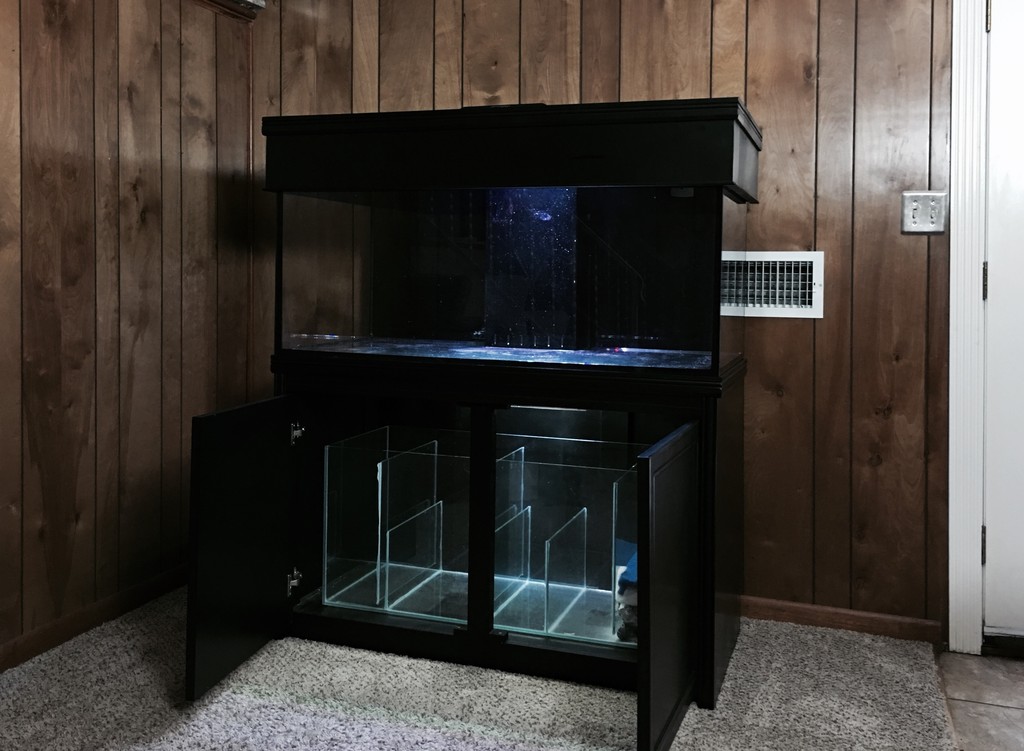
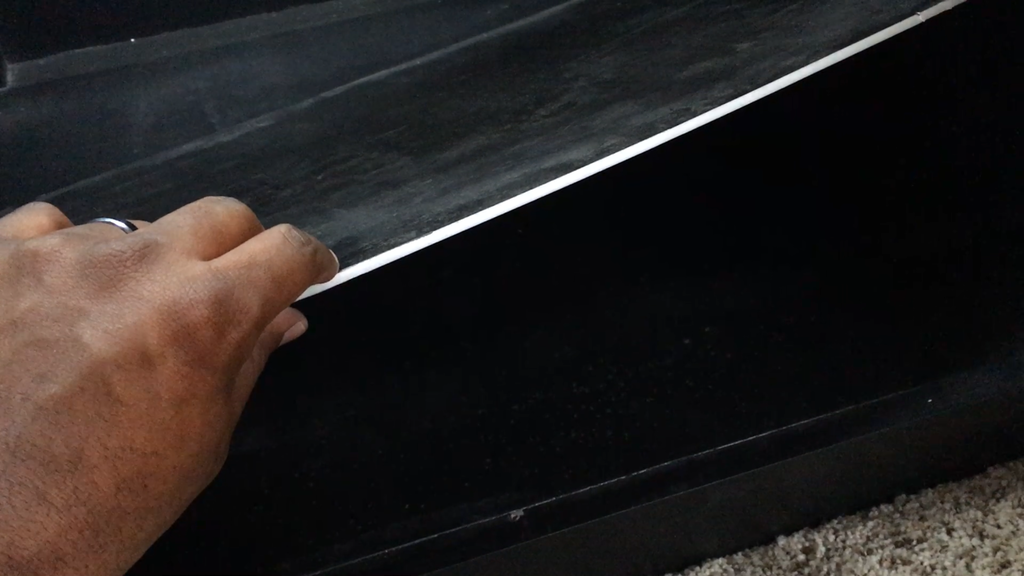
This tank was def everything i expected and more... Before everyone gets on me about the vent.. the tank has been moved since this photo...
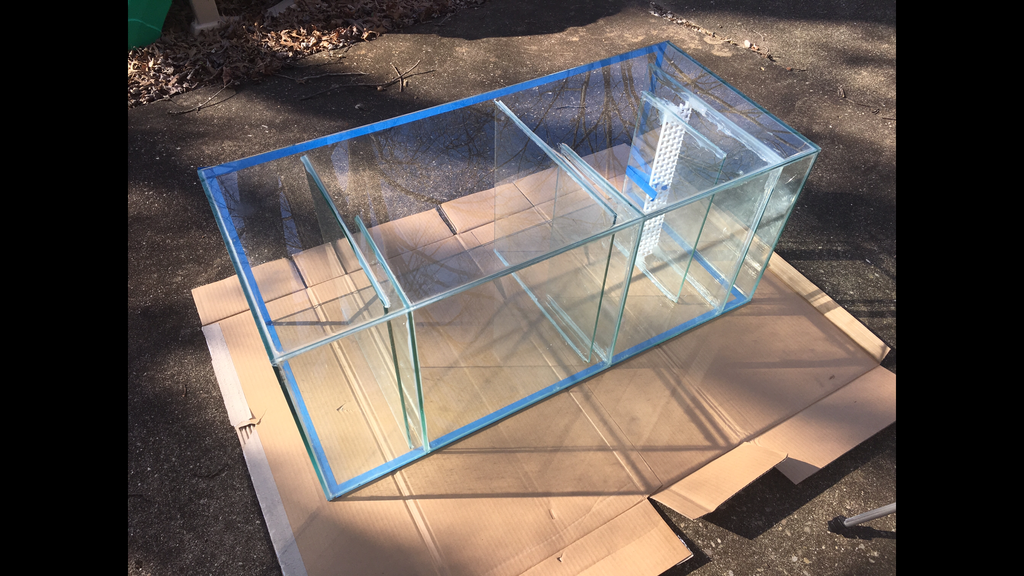
Now that i had the tank... First thing was to address the sump... I wanted to change the arrangement of the baffles.. and toss the soft hosing that was provided... in its current arrangement I def wouldn't get the most out of it mechanical filter wise or refugium wise...
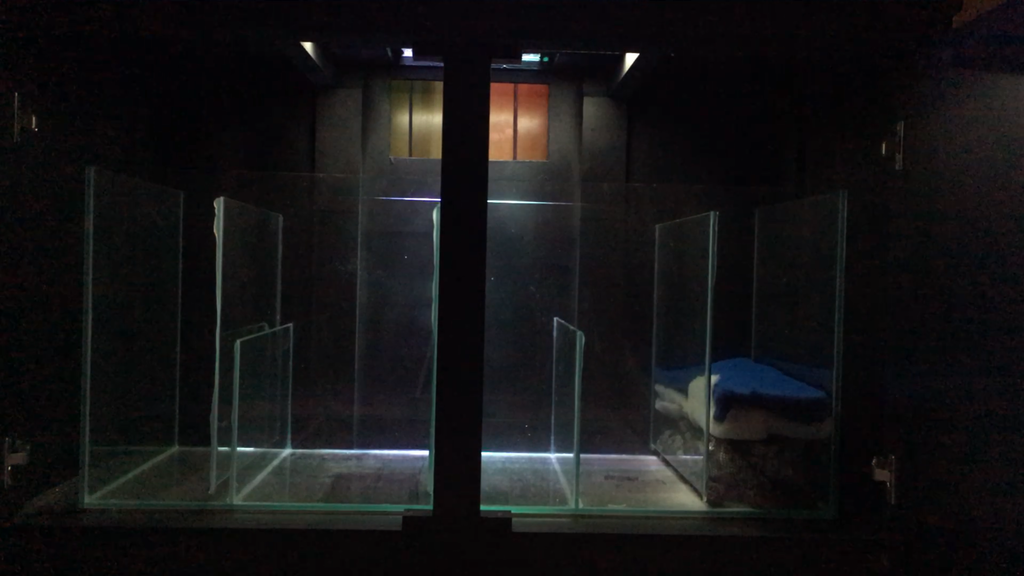
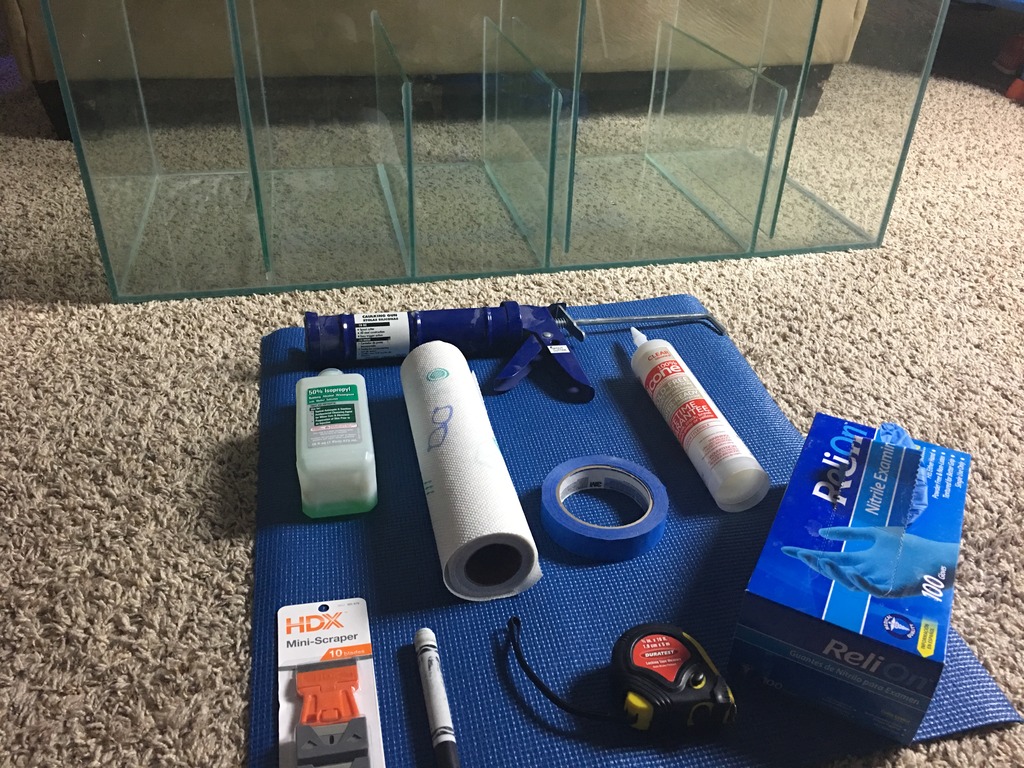
So the mission began... this is basically how i modified this sump for around $20 bucks...
first... i decided to replace the foam sheet under the stand... and clean out all the dust and dirt
replaced it with a 1/8'' thick blue yoga mat.. trimmed to fit inside the stand

this wasn't my first choice.. I originally looked for black mats... funny how seeing a diff color changes your whole plan.. now a blue PVC / black color scheme is in the works...
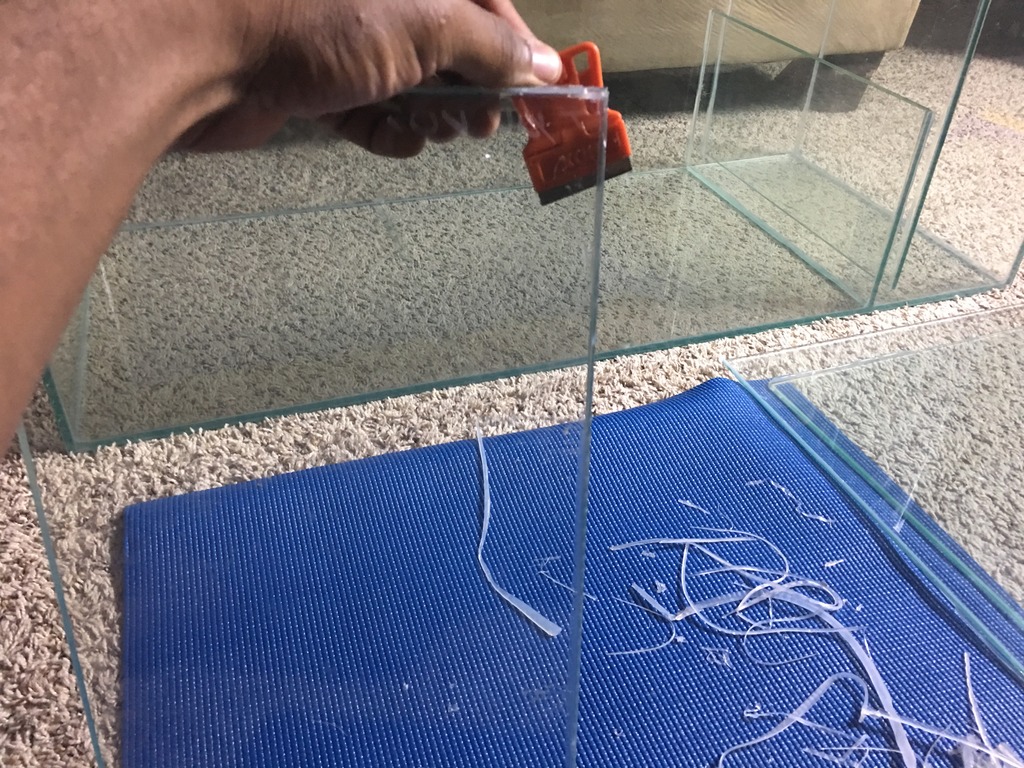
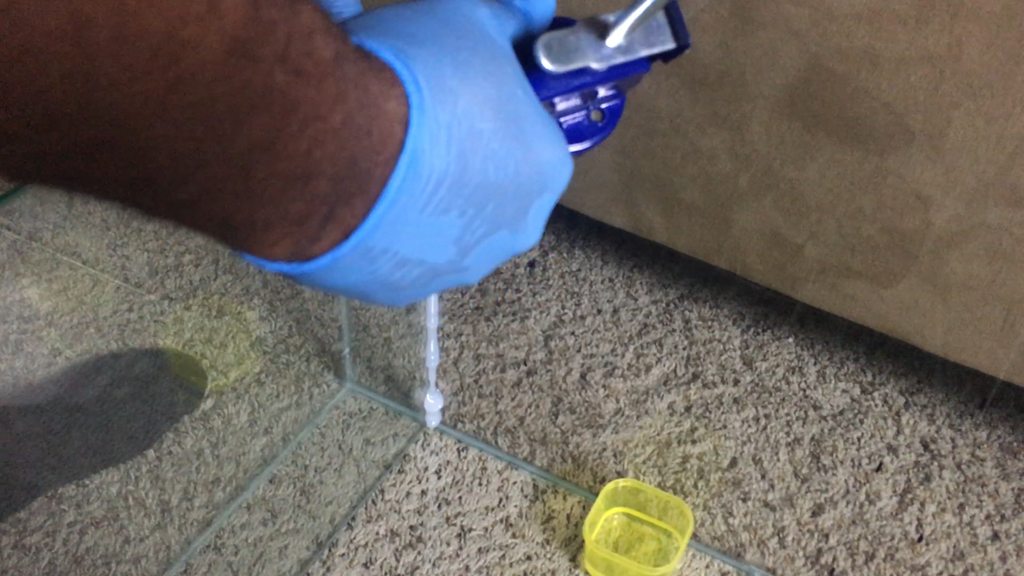
Now lets get to the sump... the glass baffles were just as thick as the tank itself.. estimated 1/4''... so i decided to keep them. Cutting them out was not fun... but i used razor blade and random tools around the house to get the job done..
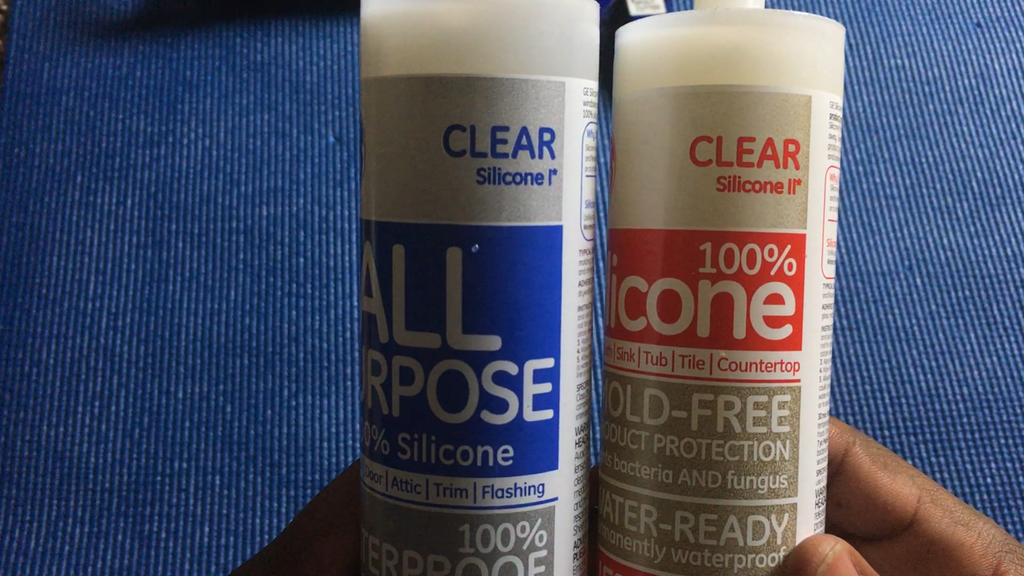
everything was going fine... built the entire sump again.. only to find out I used the wrong GE II silicone ( Biggest Goof of the year) ....needless to say I wasted 2 days of my life... so I tore down the whole sump AGAIN.. and picked up the right silicone
GE I ( the blue stuff)
Glued the baffles into place according to my measurements for the skimmer water requirements, access for maintenance... and allow enough water in case of power outage...
the sump was pretty much completed... but i had the idea of painting the entire sump for added effect... making my plumbing pop.. so time to whip out the painters tape and spray paint ( Rust-oleum) was the brand I used...
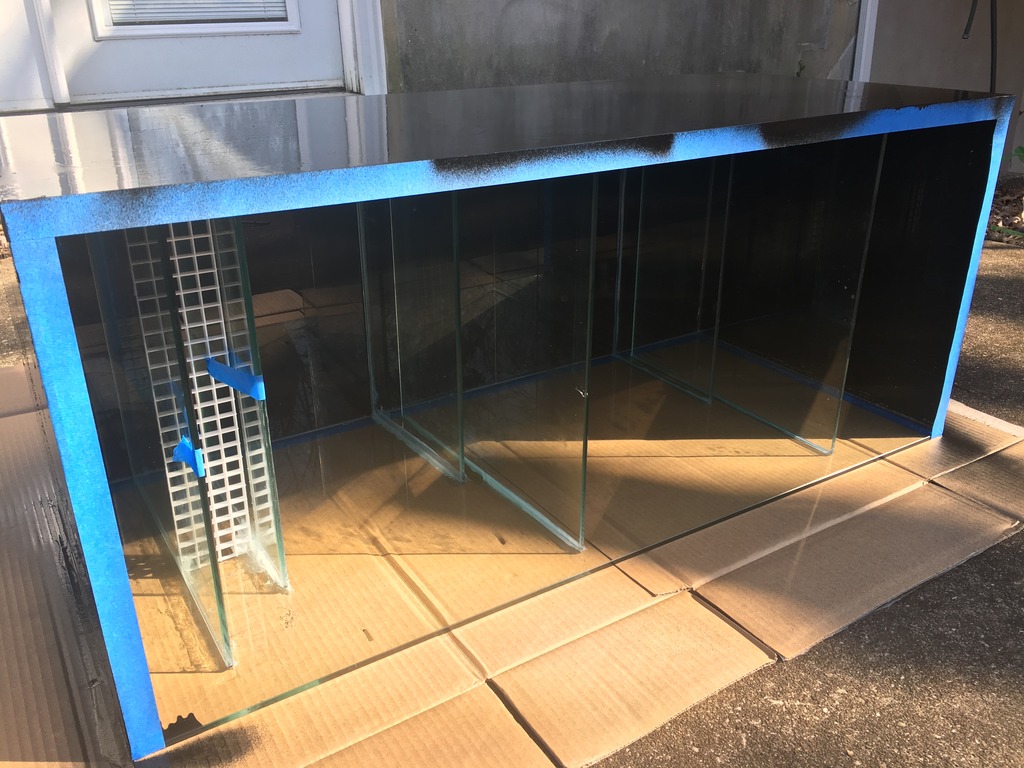
After letting this dry... time to put the finished product in place to make sure it all fits right..
There are 3 main reason i decided to do this change..
1. First baffle now flows over into a filter tray.. I can place floss here and throw away easier
2. Skimmer is no long right before the return area.. this will prevent micro bubble and stop the skimmer from sucking up pods..
3. the refugium area is now double in size.. flowing from bottom to top.
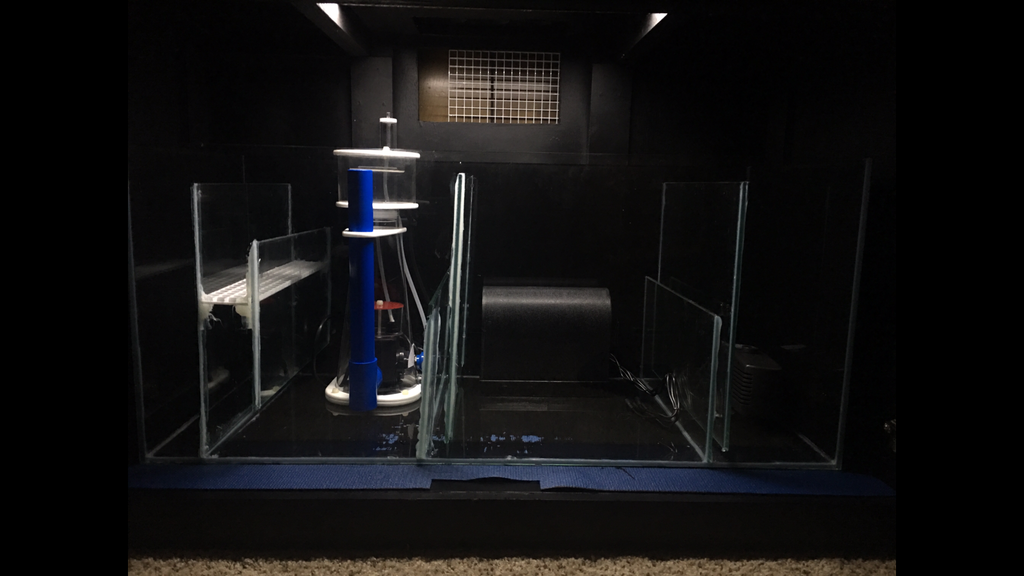
The refugium area will house my Santa Monica Rain2 Algae Scrubber, Pond matrix media and soon to be purchased reactor for carbon
I still have a ton of work to do on this build... hopefully this thread post correctly and i can update it as i make more progress... thanks for reading!
For a full video on this build feel free to watch it on my youtube channel:
Thanks for joining man. This is a great place to be. Cant wait to see this bad boy up and running.

- Joined
- Oct 15, 2016
- Messages
- 683
- Reaction score
- 346
Yo CJ awesome upgrade. Will be following this project. I'm in the process of setting up a 180, if you have time check my build out . Big up on the canopy. I've been trying to figure out how to float my canopy. I might have to use your idea.
What's up CJ good to see u here to man
Following here and on YouTube.

OP
OP
Hey CJ! You'll be happy to know your Duncan, frogspawn, and everything else I got from you are happy and healthy.
That's fantastic man! I always wondered what happened to all the corals I sold... even funnier you found my thread and recognized my tank haha
Good deal I'm looking forward to setting up this new tank. Thanks for helping me buy it
OP
OP
Yo CJ awesome upgrade. Will be following this project. I'm in the process of setting up a 180, if you have time check my build out . Big up on the canopy. I've been trying to figure out how to float my canopy. I might have to use your idea.
Appreciate it man... just getting things in order for this tank... makes me almost miss the easy AIO setup I used to have .... ALMOST but not quite haha

OP
OP
Thanks for joining man. This is a great place to be. Cant wait to see this bad boy up and running.
Thanks man... just getting my feet wet. Videos are so much easier than importing pictures. For me at least haha
OP
OP
You did a great job documenting this here Big Cee. You know I'm watching.. Got to send you a Tank warming gift
Dee From Brooklyn
Yessir still a lot more to come working on the plumbing now
OP
OP
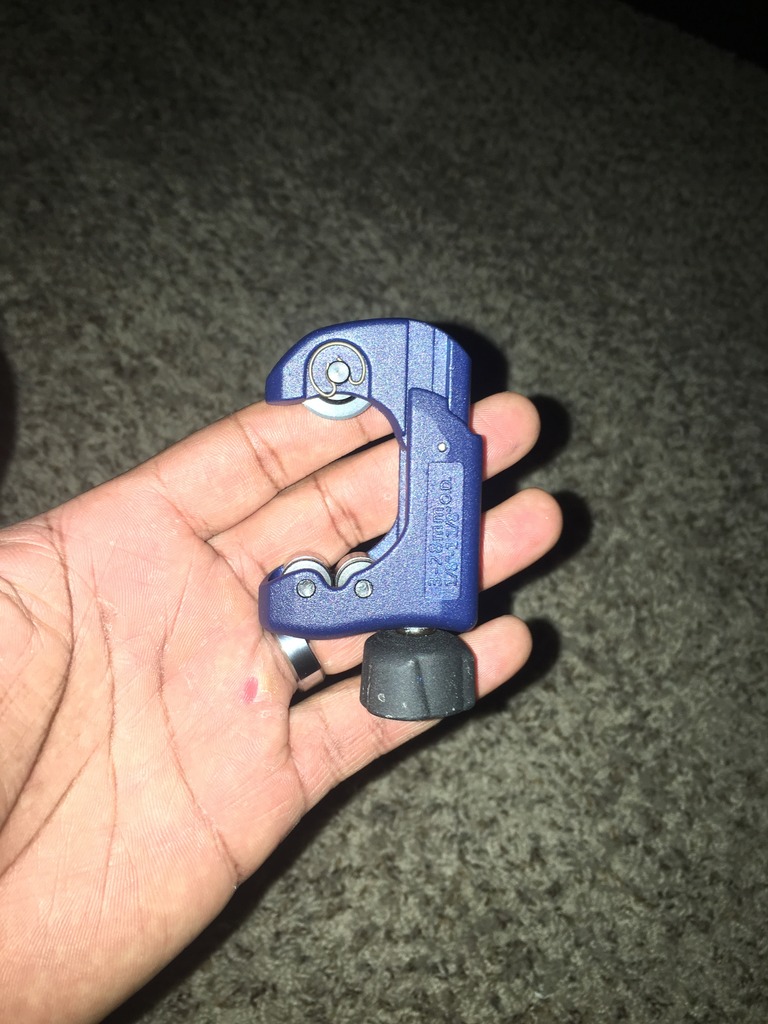
Finally time to get started on this plumbing.... my first mistake was purchasing the wrong pipe cuttter. After making 3 cuts with this my forearms felt like they were gonna explode not to mention my skin tearing hahha...
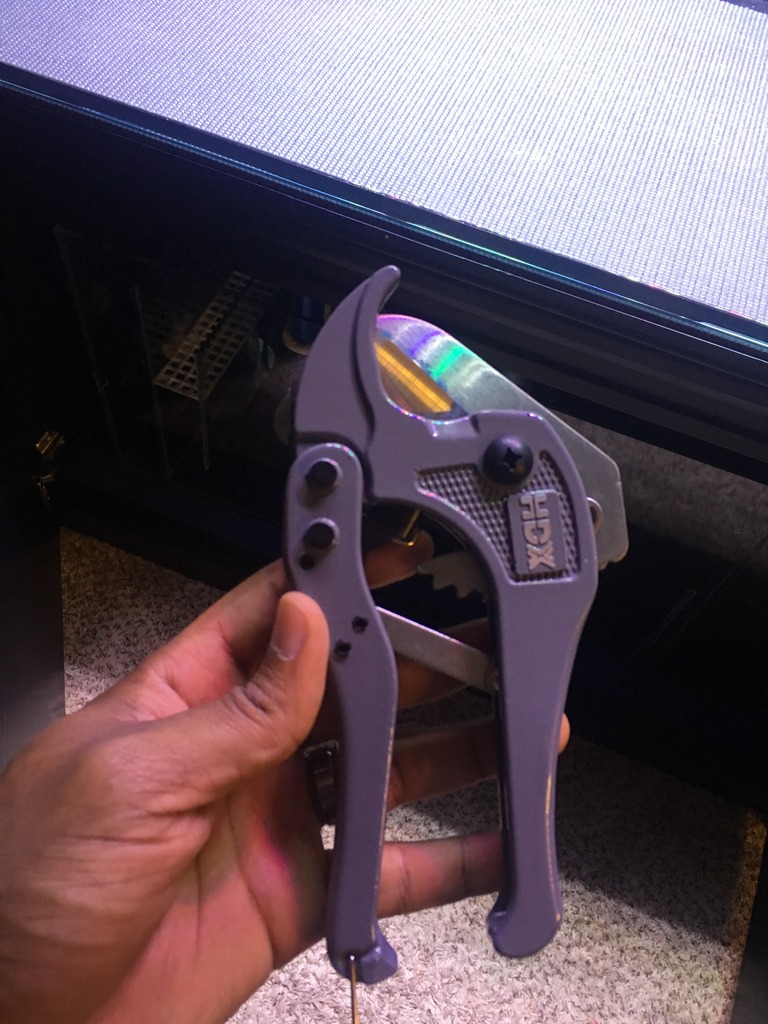
Switched to a ratcheting pvc cutter and made a world or diff...
I preorder a huge box of pvc supplies including unions , elbows, Tees, True union ball and gate valves.. and no matter how much I tried to prepare I STILL have to go to lowes for a few things I need... these are the leftovers
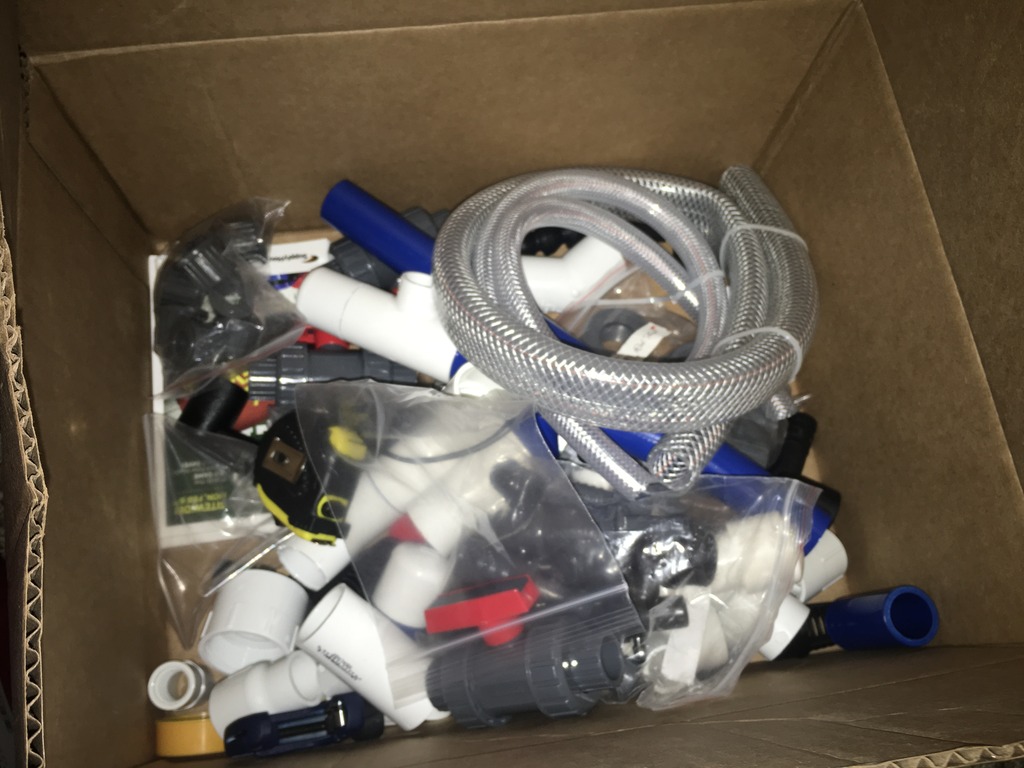
I decided to use blue pvc I purchased from bulk reef supply... I ordered three 5ft pieces and ended up using almost all of it for the plumbing .. drain lines and DIY algae Scrubber mounting (ill cover the Scrubber later)
Let the dry fitting begin...
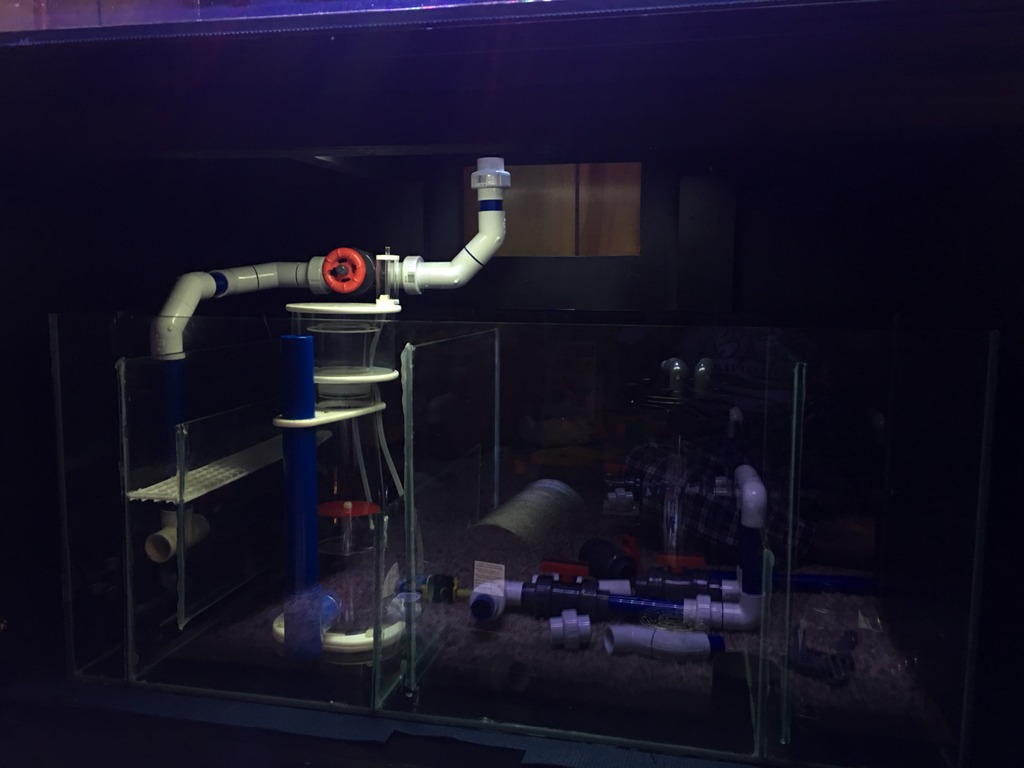
Herbie drain is primarily 45 degree elbow and a gate valve... the plan is to reduce any back pressure that would make the siphon harder to start...
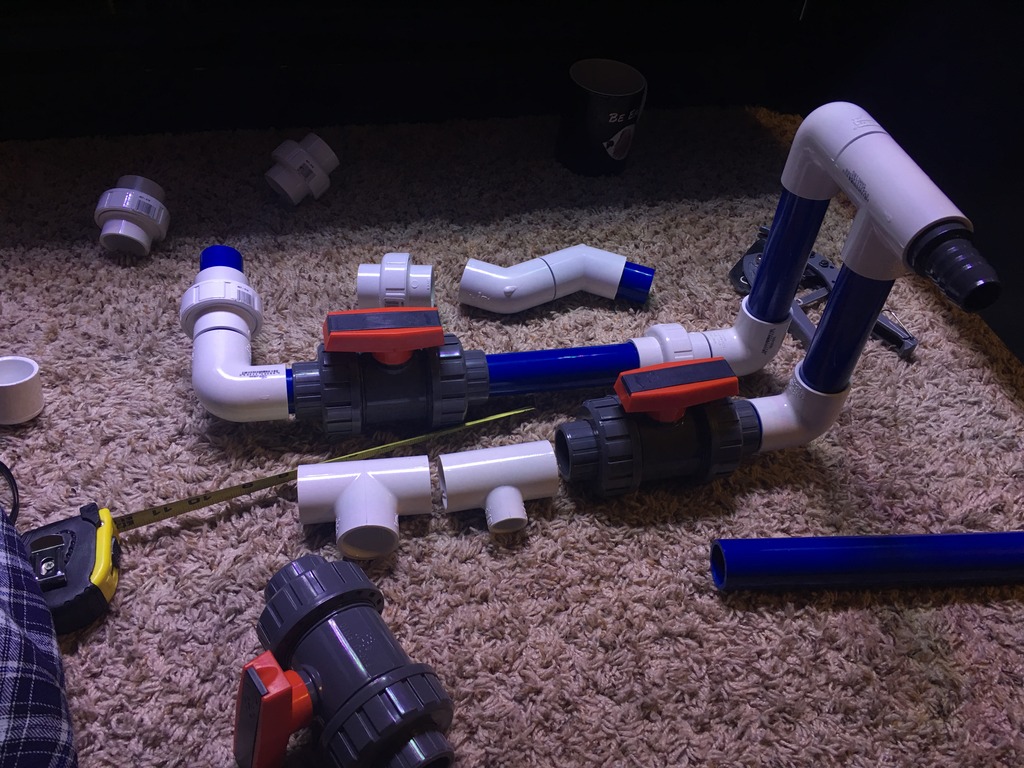
The manifold was the biggest project by far... I wanted it functional but also out of the way to all for full sump access.. this is the beginning of the idea forming on the fly ..
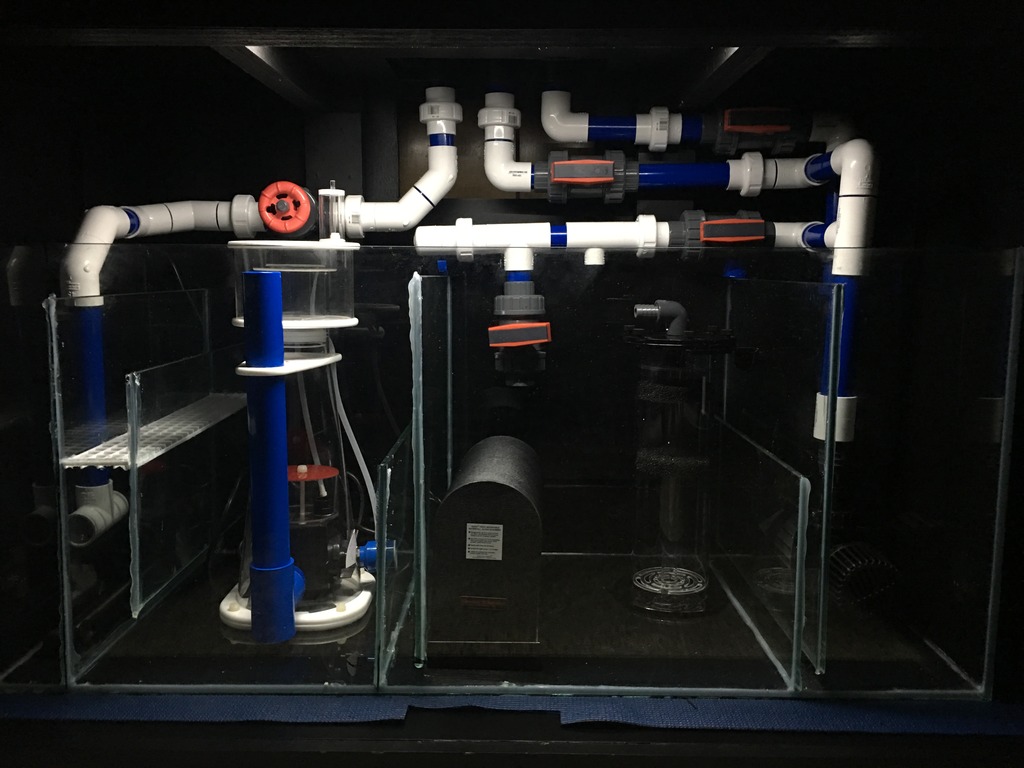
So this is most of the plumbing done.. dry fitted at least. I really like the look of the black painted sump and the LED lighting. Makes it all look as if it's floating in nothing. The plumbing pe deftly matched the SCA skimmer and really worked out even more than I thought it would...
I still have to finish the manifold and connect the Santa Monica rain2 Scrubber and my deep water reactor...
Too be continued after my trip to lowes tom... def off to a good start
Switched to a ratcheting pvc cutter and made a world or diff...
I preorder a huge box of pvc supplies including unions , elbows, Tees, True union ball and gate valves.. and no matter how much I tried to prepare I STILL have to go to lowes for a few things I need... these are the leftovers
I decided to use blue pvc I purchased from bulk reef supply... I ordered three 5ft pieces and ended up using almost all of it for the plumbing .. drain lines and DIY algae Scrubber mounting (ill cover the Scrubber later)
Let the dry fitting begin...
Herbie drain is primarily 45 degree elbow and a gate valve... the plan is to reduce any back pressure that would make the siphon harder to start...
The manifold was the biggest project by far... I wanted it functional but also out of the way to all for full sump access.. this is the beginning of the idea forming on the fly ..
So this is most of the plumbing done.. dry fitted at least. I really like the look of the black painted sump and the LED lighting. Makes it all look as if it's floating in nothing. The plumbing pe deftly matched the SCA skimmer and really worked out even more than I thought it would...
I still have to finish the manifold and connect the Santa Monica rain2 Scrubber and my deep water reactor...
Too be continued after my trip to lowes tom... def off to a good start

- Joined
- Oct 15, 2016
- Messages
- 683
- Reaction score
- 346
I feel you on having some thing that's a plug and opposed to having to build everything. I'm a bit overwhelmed myself. I have to set a goal each day and focus on those tasks to accomplish that goal. If I don't I would have 10 different projects going and nothing gets accomplished. Keep grinding homie.Appreciate it man... just getting things in order for this tank... makes me almost miss the easy AIO setup I used to have .... ALMOST but not quite haha
Cj what's up big dog. This thread will be like a harry potter book. Should I read it or just watch the videos [emoji23] haha I'm just playing, good to see you on that thread life. Very informational, good job dude. See ya on the next shack. -ariefeht
Similar threads

- Replies
- 15
- Views
- 490
- Replies
- 1
- Views
- 96

New Posts
-

-

-
-
 *** TUNZE PREMIUM GLASS CARE GIVEAWAY!!! *** Two Prizes for Two Winners!!!
- Latest: Reefing_addiction


