TrueTricia's Beachside Build

OP
OP
truetricia

truetricia

Active Member
View Badges
Joined
Jul 23, 2014
Messages
402
Reaction score
424
Rating - 0%
0   0   0
Well dont go shopping before your tenant has a chance to give you the real numbers :)

hahaha! I already found one! But man...$$$. Rimless and low lead front and side panels...

Another option is to block that area and simply cut an access point in the wall under the stairs. I just need to be able to service the Robot and the empty the receptacle. I can make a mock stand and see how it all fits. Then open up a small "window" to allow me to do what I need. I also have an upstairs closet I could move the litter box to possibly.... I'm not sure I'm ready to drop $1K on a new tank when I'm planning on buying a lot of new fancy gadget equipment.
 

madweazl

2500 Club Member
View Badges
Joined
Sep 19, 2016
Messages
4,110
Reaction score
5,092
Location
Virginia
Rating - 0%
0   0   0
hahaha! I already found one! But man...$$$. Rimless and low lead front and side panels...

Another option is to block that area and simply cut an access point in the wall under the stairs. I just need to be able to service the Robot and the empty the receptacle. I can make a mock stand and see how it all fits. Then open up a small "window" to allow me to do what I need. I also have an upstairs closet I could move the litter box to possibly.... I'm not sure I'm ready to drop $1K on a new tank when I'm planning on buying a lot of new fancy gadget equipment.

Dont let me be the voice of reason LOL.

28182355497_12da9dcb9e_b.jpg
 
OP
OP
truetricia

truetricia

Active Member
View Badges
Joined
Jul 23, 2014
Messages
402
Reaction score
424
Rating - 0%
0   0   0
It's been a frustrating week at work, which means I've spent a lot of time watching MACNA 18 videos. Can't wait for MACNA 19 in Orlando, since my family lives down that way.

Back to my tank build:

SUMP:

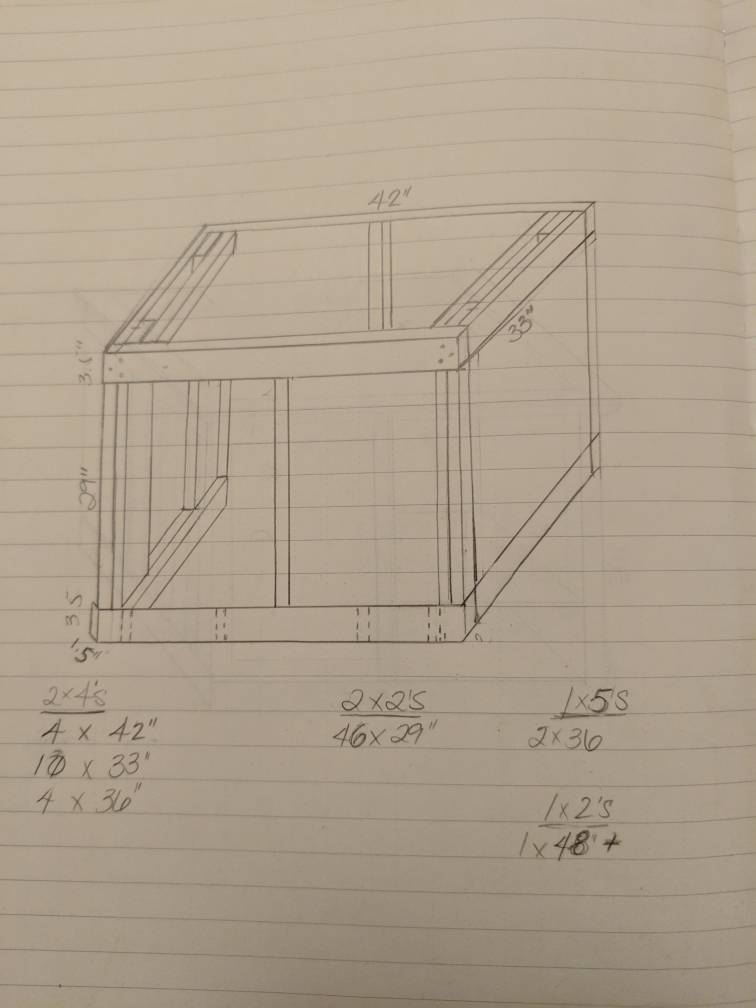
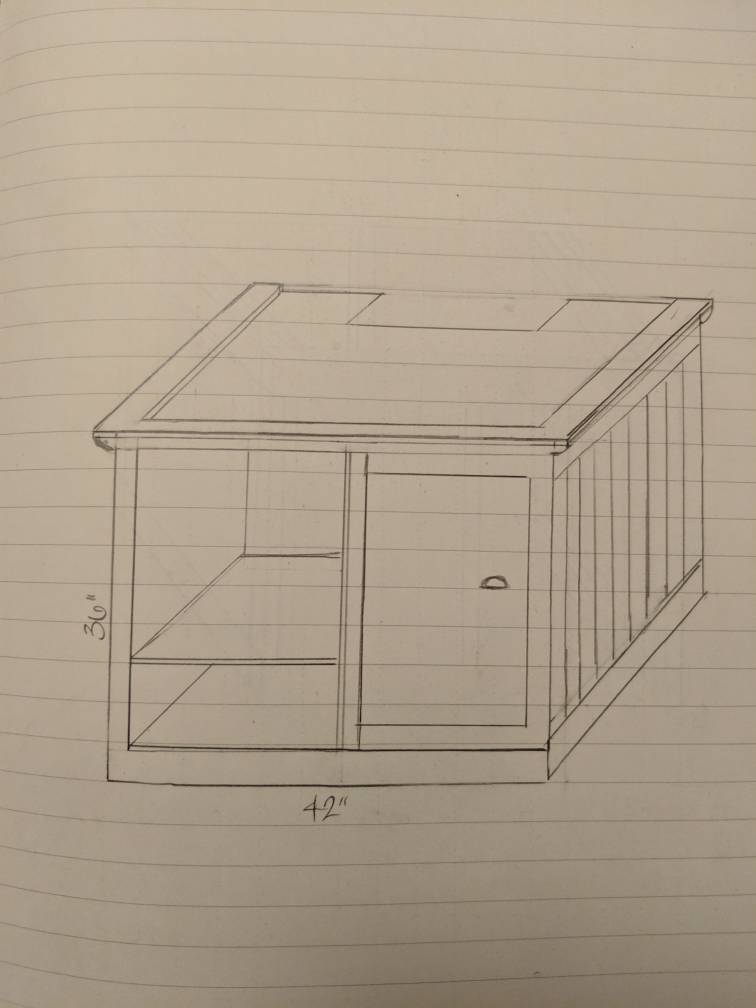
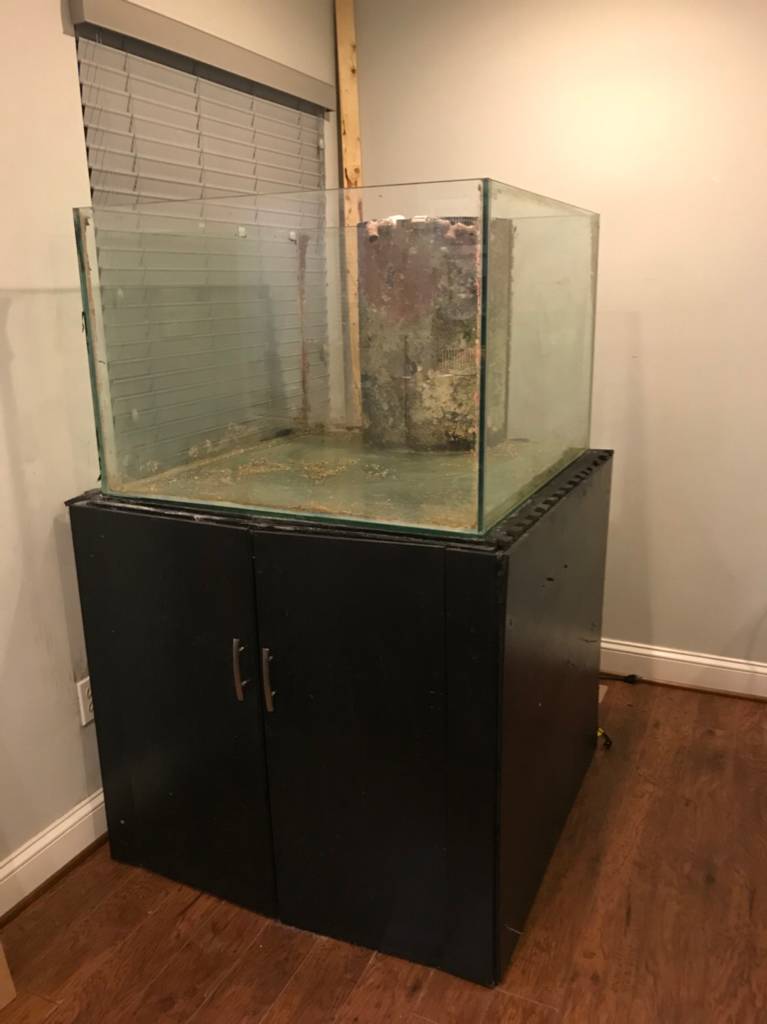
My sump is a 40g Breeder (I'm 99% sure on this). Assuming that the internal dimensions of my fish room can accomodate the 40B, I'll place it on the back wall that will be directly adjacent to the tank. I've decided to build a stand for my sump to raise it off the ground, and this will allow me to place ATO and Waste containers directly below it. It'll also have a 4-6" lip for test equipment, etc.

Let's go through this one step at a time.

Intial filtration: Incoming water from the DT overflow will come into a small holding area with one or two 4" filter socks. I'll be trying to build this myself out of acrylic, or I'll eventually cave and order some custom piece. I want to maintain a small footprint here. If this turns out to not be feasible, I'll settle for a filter sock holder and a single 4" sock. A small amount of noise shouldn't be problematic here since the sump will be in the fish room rather than under a stand.

Fuge: After initial filtration, the water will enter the Fuge area. Currently, there's no separate area in my sump for the fuge, rather just a large intial area before the baffles for the return. I'm going to place my skimmer in the sump, mark off the necessarily footprint, and add baffles that can accomodate a marine pure block insert. In the fuge itself, I have a large marine pure block already, so that will go in the bottom. I have an PAR light that I can use, or I'll eventually look into upgrading that. I want to make the baffles black and rather high up on the sump walls to block light going into the other sections.

Skimmer & Heater: In the middle section, I plan to have the skimmer and two small heaters for redundancy. My skimmer (Brand unknown) is rated for up to 250g if I remember correctly, so it should be plenty able to handle my tank. I'll have a line plumbed into the skimmer return cup for overflow that empties into the 20g waste container that's under the Sump stand.

Return: I plan on plumbing dual return pumps. I have an Jebao DC return pump, but eventually, I want to add a COR 15 or COR 20 with the Jebao acting as the backup. The return pump will feed a manifold as well as the return to the DT. If I can't fit both pumps in the return chamber, then I may plumb one as an external pump. The dual return pumps will act as a redundancy factor in case one fails. I think I'll have my Apex programmed to only run one, but if that one fails, then to turn the other on and send an alert.

Manifold: While not pictured in the drawing below, I'll have a manifold that will be fed from the return pumps. The manifold will feed a dual carbon/GFO reactor and a UV filter. The manifold will have ball valves and unions so that it can be completely disconnected from the main return line and overflow lines without having to shut down the entire system.

ATO: The ATO will be a 20g tank sitting below the Sump. I plan on connecting an Apex ATO system to it.
Waste Tank: This will also be a 20g tank sitting below the Sump. This will be fed by both the skimmer cup and the DOS-operated AWC.

Both tanks will have acrylic tops I'll be making. Both of these systems will be plumbed with inline check valves to ensure there's no backflow or back siphon issues. Both tanks will also be connected through the wall to my DT stand in my living room. Inside the stand, I'll have the ability to connect to longer lines. With the ATO, there will be a line to pump freshwater into the ATO reservoir to refill it from my living room (I would have a trash can on a roller to roll water into the living room), or directly from a pump in the RO/DI reservoir that will be in another room (I need to measure the distance and see if this is feasible). For the Waste Tank, I'll have a pump in the tank connected to a long tube line in the DT stand that I can unroll and place directly in my sink. Then I turn on the pump and the waste tank automatically empties. Both tanks will have optical and float sensors for redundancy. This helps to minimize the number of buckets I have to carry, helps with the AWC system, and keeps work to a minimum.

Saltwater Reservoir: While not pictured below, I plan to have a 30g saltwater reservoir in a Rubbermaind bucket to the side of the Sump. This will be connected via the DOS for AWC. As a backup to the optical and float sensors in the waste tank, the DOS pump will be programed to only do 15g of water changes during a time span so as to ensure that the waste container doesn't overflow. I highly doubt I'll get 5g of skimmate in there, so I should be good. The SW reservoir will also be plumbed to connect to the DT Stand in my living room to allow me to pump in fresh RO/DI water to mix with salt. It'll also have an optical sensors to measure high and low water alerts.

Sump.jpg
 
OP
OP
truetricia

truetricia

Active Member
View Badges
Joined
Jul 23, 2014
Messages
402
Reaction score
424
Rating - 0%
0   0   0
So I've been doing good about buying up some used equipment for my new build. Mind you, I still don't know if my current 120g (48x24x24) tank will fit in the space, or if I'll end up buying a new/used one. Regardless, the equipment plan remains the same. I have decided to go BB on this build as I want to keep it as ULM as possible and maximize my chances for succcess.

AI HD52 LED light in white
Neptune Cor-20 Return Pump
WAV Kit (2 x WAVs and 1Link)
PM2 Module w/ salinity probe
Neptune ATK Kit (FMM module, sensor kit, and PMUP)
Neptune DOS & DDR combo
3 x PMUP for various uses
Solenoid valve
Neptune Breakout Box
UV Sterilizer
2 x PhosBan 150s
2 x Neptune optical sensors

I'm almost through my entire shopping list for the big tank. I still need:
New Apex or ApexEL (I have an Apex Classic, but I want some of the features and compatibility of the new models)
Various probes (once new Apex model is bought)
Refugium light or chaeto reactor
Flow monitor (once I decide on plumbing size)
Neptune Leak Detection Kit or sensors (I'm not sure if I'll need the additonal FMM module that comes in the kit based on system set up)
Klir filter or fiter sock holder (may start with socks and upgrade to Klir later)
ATO, Waste Water, and Saltwater containers (will depend on overall fish room plan)
Plumbing Supplies
Starboard
 
OP
OP
truetricia

truetricia

Active Member
View Badges
Joined
Jul 23, 2014
Messages
402
Reaction score
424
Rating - 0%
0   0   0
So I've bought a new tank! It's a cube! 35x35x24. Here's some sketches of my stand build and beginning lumber requirements.

The stand is going to be split in half so that one part is cabinet and the other a bookshelf. There will be plywood on the top, a 1xX frame around the tank, with crown moulding between that and the remainder of the stand. The whole thing will be white washed.

I've indicated a cut out for my plumbing on the one photo. I've got a couple supporting slats on the bottom, plus supporting ones on the inside of the uppers. I'll be using a kreig tool to attach the wood together in most places. The sides of the tanks will use 2x2s that will both add support and be the outer "wainscoting" look.

29fb66be9d0774fdac12c1dc78b1d036.jpg
80bc8c772a8e3859c0dca97bd2068632.jpg
 
Last edited:
OP
OP
truetricia

truetricia

Active Member
View Badges
Joined
Jul 23, 2014
Messages
402
Reaction score
424
Rating - 0%
0   0   0
The 120g Beachside build is underway!


A little background: When I previously lived in DC, I had a 120g mixed reef tank. This tank wasn't my first SW tank, but it was the biggest and certainly the most challenging. I learned the most from this tank compared to my previous tanks (when I lived in FL, I literally pulled SW and fish from the ocean with my collector's license and assisted in seahorse rehab from oil spills). But the tank was full of second-hand equipment with no real plan to the tank. I then moved to Norfolk for work, and never set up the tank after moving. I quickly deployed for a year to the Middle East, where I dreamed of having my big tank back. So fast forward to now...

After some health issues and other set-backs, I've finally found the time to really work on the tank. I considered buying a new tank, but in the end, I've decided to set up my old tank rather than go through the hassle of a new one. This past week, I built the stand.

The 120g stand has a 51" x 26" footprint built with 2x4s with a 3/4" plywood top and skinned in 1/4" plywood. I knew that I wanted the stand to be able to house a sump in the bottom when I wanted, but it wouldn't need to atm (there's a fish room). Therefore, it avoids mid-support beams to allow for easy integration of a sump if needed, and a conversion from the current divided design. The stand is built based on the commonly circulated design, with multiple support beams across the bottom, and strategically placed support beams across the top. The beams were situated to support a middle barrier (made from 1/4" plywood backed by 3/4" plywood for shelf support and a 2x2 beam at the front) going down the inside of the stand to create two separate compartments. The beams were also placed to ensure that they did not interfere with plumbing the tank. Of note, I used deck screws with weather proof coating. The frame is supported by two separate 2x4s on each corner, and an additional support 2x4 to stabilize the stand but are not meant to support weight. Next, the top 3/4" plywood had two sections cut out to provide space to attach bulkheads, while still providing structural integrity to the top. The floor of the stand used 1/4" plywood supported by the many beams. This provided the basic frame of the stand.

The interior of the stand is divided into two parts. The left side of the stand is a bookshelf, with removable shelves. The removable shelves were created by buying shelf pegs, and then creating a template for the holes in a spare piece of wood. The template was used to create four sets of holes for the shelf pegs (and will be saved for future use). It's very important to use the template to ensure continuity among the peg holes. Also, ensure the drill is level as you drill the holes to ensure the pegs sit flat. I then used prefab shelves from HD cut fit the interior measurements.

The right side of the stand is a storage area for the tank, and will eventually have a cabinet door put on to hide the interior. I'm thinking a barn door style to be honest. There's a shelf tucked into the nook created by the stand frame for food and other supplies. Otherwise the interior is open to accommodate an ATO reservoir and/or electronics display.

The entire stand was skinned in 1/4" plywood, and the entire thing painted with a basecoat of Kilz. Afterwards, additional coats of white paint that match my walls were added. Next, an Innovative Marine self-leveling mat was added to the top, and the entire stand leveled. My flooring is tile, which I did myself, and therefore isn't perfectly even. A few shims were necessary to make the tank perfectly level. The tank, which was cleaned out from storage, was placed on top. I painted the tank trim to match my walls, so that it fits into the house decor perfectly.

Simple trim still needs to be added to hide some of the seams, and then pieces of acrylic will cover the overlap of the stand and siliconed against the sides of the tank to provide a more waterproof work area. And then I need to add a door to the cabinet side.

My plan is to move my small AIO 5g pico tank to the bottom of the bookshelf side to act as my coral/invert QT tank. I'll have a separate fish QT tank that will be in a different section of the house. I've got rocks curing upstairs in Rubbermaid tubs. I'm not going to do the final plumbing on the tank right away. I'm going to put unions and check valves (closed) on the pipes and connect them to each other while I wait for a few other life things to develop. The rocks will get moved in to aquascape and then finish cycling in the big tank. Before that's finished, I'll have the fish room set up and the plumbing able to be fully set up.

Part of why I'm delaying is that I'm having surgery in a couple months, and there's a chance I'll be moving back to DC within six months... I don't want to get everything set up and not be able to access the fish room directly after surgery, or have to tear everything down immediately after setting it up. I can give the rocks time to cure and tank to initially cycle while I get a better idea of probability of relocation.
 
OP
OP
truetricia

truetricia

Active Member
View Badges
Joined
Jul 23, 2014
Messages
402
Reaction score
424
Rating - 0%
0   0   0
I'm now set to have surgery in September, whereas I was originally supposed to have it two weeks ago. I'm finishing some plumbing this week and water testing the tank. Then the rocks will get moved in (aquascaped later), I'll add some circulation with a WAV pump, and let it sit for a couple more weeks. I'll also add in some additional bacteria and some coraline algae to start that process. The rocks have been cycling in a rubbermaid container for the last six weeks or so, and are already well on their way.

I also have two juvenile captive bred Black Ice Snowflake clowns from ORA. These fish are beautiful, healthy, and very interactive. They started eating pellets by day three after shipping, and are now little pigs! Before they get added to the tank, they'll go through a 50 day QT with API General Cure and TTM. Since they came from ORA, I don't expect them to have any parasites, but they did go through LA facilities, which can be iffy now. Every fish added to my tank will go through TTM and API General Cure treatments, even if they look perfect. If they don't look perfect, then they'll get some additional treatments and time. These guys are only staying in QT for so long (well beyond the TTM) because of my own time limitations and the tank's initial set up.

I've decided that rather than doing all captive-bred, I'm going to try to only do sustainably sourced fish. This means a wider range of fish are available, while ensuring that I do my part to help with the long-term health of the ocean. This should also decrease the likelihood of introducing disease into the tank and its inhabitants.
 
OP
OP
truetricia

truetricia

Active Member
View Badges
Joined
Jul 23, 2014
Messages
402
Reaction score
424
Rating - 0%
0   0   0
I'm behind on my write-up for this build! A lot has happened, and now as I'm recovering from surgery, I've got time to actually write an update.

With the stand finished, I began water testing the tank, and slowly adding RODI water while checking for leaks. My water mixing station is in an exterior porch storage closet, so I ran the RODI tubing from there inside and into the tank, routing it through a spare PVC pipe to keep it in the tank.
IMG_20190820_183059.jpg

IMG_20190821_063833.jpg


The cats were quite interested in what was going on. Obviously, I'm going to need a screen lid. The tank sits just high enough that things shouldn't fall into the tank from the stairs, but the stair landing provides an easy access point to the back of the tank as well.
IMG_20190822_062702.jpg


I used a sticky note to mark my progress, and to mark the waterline in case of any micro leaks that I wasn't seeing. After coming home from work, I'd check the waterline and see if there was any water loss throughout the day.

Finally, after a few days, the tank was filled to just below the weirs on the overflows. At this point, the plumbing wasn't finished. I had plugs in the bulkheads, and had plumbed true union ball valves just below each bulkhead. These were turned off, and before filling the tank, I'd tested them to ensure there were no leaks.
IMG_20190820_183036.jpg


The reason for all of this was an upcoming surgery. I wanted the tank to be just barely functioning because the water volume meant minimal maintenance needed for the 4 CB ORA clowns that would go in here. I stuck a HOB skimmer on the side, added a heater, and began setting up my Apex. All things that would allow the tank to function while I was recovering from surgery.
 

Attachments

  • Photos (2).zip
    63.1 MB · Views: 55
OP
OP
truetricia

truetricia

Active Member
View Badges
Joined
Jul 23, 2014
Messages
402
Reaction score
424
Rating - 0%
0   0   0
Once Hurricane Dorian became a real threat, I had to reconsider going to MACNA. Florida was supposed to be a pre-surgery fun trip, but the Hurricane and its unpredictability meant I couldn't chance getting stuck down there and missing my surgery. So I stayed home and worked on the plumbing of course!

I personally prefer monochromatic color schemes, but in designing the sump and plumbing, I also wanted to create something that would be easy for a caretaker to understand. Thus I decided to go with multicolored plumbing, each line associated with a particular color. Black is the water flowing from the DT to the sump. Blue is for the return line back to the tank. Green is for the secondary drain on the Bean Animal overflow and my manifold, and red is the emergency drain. This makes it very easy to quickly describe if any leaks are occurring and from where.

Unfortunately, I didn't take any pictures of the finished product, but I did take some of the various stages. The return pipe is connected to my pump by braided hose to minimize vibrations, and the black pipe will eventually connect, also via braided hose, to the Clarisea Klir Filter Bracket. Once I put in all the equipment into the sump, the green and red end points will be finalized. For now, they just dump into the sump at a random point with an unglued connection (no water should be running through, and certainly won't be under pressure).

Important features are the one-way valves on the green manifold line to prevent water going up the drain pipe. I've also used a true union ball valve at the manifold T so turn this on and off. While nothing is connected now, I'll be adding three outputs on the manifold to run a couple of reactors. There's a one-way valve on the return line as well to prevent water flowing back from the aquarium into the sump. I also used furniture cord covers in the wall for the pipes, to help distribute any weight and pressure of the pipes on the drywall. Not to mention it just looks good! I also laid down a PVC shower liner beneath the sump to help with any minor water spills as I work in the fish room.

IMG_20190831_010328.jpg
IMG_20190831_010402.jpg
IMG_20190831_010810.jpg
IMG_20190831_154506.jpg


While I did make some minor mistakes with the plumbing with not quite the right angles, everything fits together and is leak free! I've used a bunch of unions, so various pieces can be taken apart and modified if necessary.
 

Being sticky and staying connected: Have you used any reef-safe glue?

  • I have used reef safe glue.

    Votes: 32 84.2%
  • I haven’t used reef safe glue, but plan to in the future.

    Votes: 1 2.6%
  • I have no interest in using reef safe glue.

    Votes: 2 5.3%
  • Other.

    Votes: 3 7.9%
Back
Top